这篇文章将为大家详细讲解有关pytorch如何实现线性拟合方式,小编觉得挺实用的,因此分享给大家做个参考,希望大家阅读完这篇文章后可以有所收获。
一维线性拟合
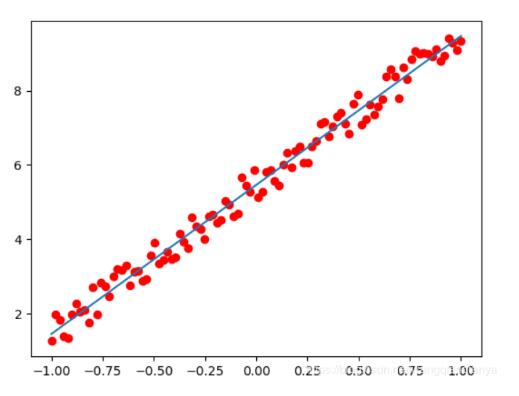
数据为y=4x+5加上噪音
结果:
import numpy as np
from mpl_toolkits.mplot3d import Axes3D
from matplotlib import pyplot as plt
from torch.autograd import Variable
import torch
from torch import nn

X = torch.unsqueeze(torch.linspace(-1, 1, 100), dim=1)
Y = 4*X + 5 + torch.rand(X.size())

class LinearRegression(nn.Module):
 def __init__(self):
  super(LinearRegression, self).__init__()
  self.linear = nn.Linear(1, 1) # 输入和输出的维度都是1
 def forward(self, X):
  out = self.linear(X)
  return out

model = LinearRegression()
criterion = nn.MSELoss()
optimizer = torch.optim.SGD(model.parameters(), lr=1e-2)

num_epochs = 1000
for epoch in range(num_epochs):
 inputs = Variable(X)
 target = Variable(Y)
 # 向前传播
 out = model(inputs)
 loss = criterion(out, target)

 # 向后传播
 optimizer.zero_grad() # 注意每次迭代都需要清零
 loss.backward()
 optimizer.step()

 if (epoch + 1) % 20 == 0:
  print('Epoch[{}/{}], loss:{:.6f}'.format(epoch + 1, num_epochs, loss.item()))
model.eval()
predict = model(Variable(X))
predict = predict.data.numpy()
plt.plot(X.numpy(), Y.numpy(), 'ro', label='Original Data')
plt.plot(X.numpy(), predict, label='Fitting Line')
plt.show()
多维:
from itertools import count
import torch
import torch.autograd
import torch.nn.functional as F

POLY_DEGREE = 3
def make_features(x):
 """Builds features i.e. a matrix with columns [x, x^2, x^3]."""
 x = x.unsqueeze(1)
 return torch.cat([x ** i for i in range(1, POLY_DEGREE+1)], 1)


W_target = torch.randn(POLY_DEGREE, 1)
b_target = torch.randn(1)


def f(x):
 return x.mm(W_target) + b_target.item()
def get_batch(batch_size=32):
 random = torch.randn(batch_size)
 x = make_features(random)
 y = f(x)
 return x, y
# Define model
fc = torch.nn.Linear(W_target.size(0), 1)
batch_x, batch_y = get_batch()
print(batch_x,batch_y)
for batch_idx in count(1):
 # Get data


 # Reset gradients
 fc.zero_grad()

 # Forward pass
 output = F.smooth_l1_loss(fc(batch_x), batch_y)
 loss = output.item()

 # Backward pass
 output.backward()

 # Apply gradients
 for param in fc.parameters():
  param.data.add_(-0.1 * param.grad.data)

 # Stop criterion
 if loss < 1e-3:
  break


def poly_desc(W, b):
 """Creates a string description of a polynomial."""
 result = 'y = '
 for i, w in enumerate(W):
  result += '{:+.2f} x^{} '.format(w, len(W) - i)
 result += '{:+.2f}'.format(b[0])
 return result


print('Loss: {:.6f} after {} batches'.format(loss, batch_idx))
print('==> Learned function:\t' + poly_desc(fc.weight.view(-1), fc.bias))
print('==> Actual function:\t' + poly_desc(W_target.view(-1), b_target))
关于“pytorch如何实现线性拟合方式”这篇文章就分享到这里了,希望以上内容可以对大家有一定的帮助,使各位可以学到更多知识,如果觉得文章不错,请把它分享出去让更多的人看到。
免责声明:本站发布的内容(图片、视频和文字)以原创、转载和分享为主,文章观点不代表本网站立场,如果涉及侵权请联系站长邮箱:is@yisu.com进行举报,并提供相关证据,一经查实,将立刻删除涉嫌侵权内容。


