这篇文章给大家分享的是有关nginx如何实现代理多个服务器的内容。小编觉得挺实用的,因此分享给大家做个参考,一起跟随小编过来看看吧。
首先修改配置文件:
#user nobody;
worker_processes 1;

#error_log logs/error.log;
#error_log logs/error.log notice;
#error_log logs/error.log info;

#pid  logs/nginx.pid;


events {
 worker_connections 1024;
}


http {
 include  mime.types;
 default_type application/octet-stream;

 #log_format main '$remote_addr - $remote_user [$time_local] "$request" '
 #     '$status $body_bytes_sent "$http_referer" '
 #     '"$http_user_agent" "$http_x_forwarded_for"';

 #access_log logs/access.log main;

 sendfile  on;
 #tcp_nopush  on;

 #keepalive_timeout 0;
 keepalive_timeout 65;

 #gzip on;

 server {
  listen  9922;
  server_name firstProxyServer;

  #charset koi8-r;

  #access_log logs/host.access.log main;

  #location / {
   #root html;
   #index index.html index.htm;
  #}
  location / {
   proxy_pass http://localhost:8989;
  }

  #error_page 404    /404.html;

  # redirect server error pages to the static page /50x.html
  #
  error_page 500 502 503 504 /50x.html;
  location = /50x.html {
   root html;
  }

  # proxy the PHP scripts to Apache listening on 127.0.0.1:80
  #
  #location ~ \.php$ {
  # proxy_pass http://127.0.0.1;
  #}

  # pass the PHP scripts to FastCGI server listening on 127.0.0.1:9000
  #
  #location ~ \.php$ {
  # root   html;
  # fastcgi_pass 127.0.0.1:9000;
  # fastcgi_index index.php;
  # fastcgi_param SCRIPT_FILENAME /scripts$fastcgi_script_name;
  # include  fastcgi_params;
  #}

  # deny access to .htaccess files, if Apache's document root
  # concurs with nginx's one
  #
  #location ~ /\.ht {
  # deny all;
  #}
 }

  server {
  listen  9977;
  server_name secondProxyServer;

  #charset koi8-r;

  #access_log logs/host.access.log main;

  #location / {
   #root html;
   #index index.html index.htm;
  #}
  location / {
   proxy_pass http://localhost:8080;
  }

  #error_page 404    /404.html;

  # redirect server error pages to the static page /50x.html
  #
  error_page 500 502 503 504 /50x.html;
  location = /50x.html {
   root html;
  }

  # proxy the PHP scripts to Apache listening on 127.0.0.1:80
  #
  #location ~ \.php$ {
  # proxy_pass http://127.0.0.1;
  #}

  # pass the PHP scripts to FastCGI server listening on 127.0.0.1:9000
  #
  #location ~ \.php$ {
  # root   html;
  # fastcgi_pass 127.0.0.1:9000;
  # fastcgi_index index.php;
  # fastcgi_param SCRIPT_FILENAME /scripts$fastcgi_script_name;
  # include  fastcgi_params;
  #}

  # deny access to .htaccess files, if Apache's document root
  # concurs with nginx's one
  #
  #location ~ /\.ht {
  # deny all;
  #}
 }

 # another virtual host using mix of IP-, name-, and port-based configuration
 #
 #server {
 # listen  8000;
 # listen  somename:8080;
 # server_name somename alias another.alias;

 # location / {
 #  root html;
 #  index index.html index.htm;
 # }
 #}


 # HTTPS server
 #
 #server {
 # listen  443 ssl;
 # server_name localhost;

 # ssl_certificate  cert.pem;
 # ssl_certificate_key cert.key;

 # ssl_session_cache shared:SSL:1m;
 # ssl_session_timeout 5m;

 # ssl_ciphers HIGH:!aNULL:!MD5;
 # ssl_prefer_server_ciphers on;

 # location / {
 #  root html;
 #  index index.html index.htm;
 # }
 #}

}
其中主要的是有两个server,每个server对应的被代理的服务器的不同。从而实现了nginx代理多个服务器的目的。
下面是两个服务server的配置:
server {
  listen  9922;
  server_name firstProxyServer;

  #charset koi8-r;

  #access_log logs/host.access.log main;

  #location / {
   #root html;
   #index index.html index.htm;
  #}
  location / {
   proxy_pass http://localhost:8989;
  }

  #error_page 404    /404.html;

  # redirect server error pages to the static page /50x.html
  #
  error_page 500 502 503 504 /50x.html;
  location = /50x.html {
   root html;
  }

  # proxy the PHP scripts to Apache listening on 127.0.0.1:80
  #
  #location ~ \.php$ {
  # proxy_pass http://127.0.0.1;
  #}

  # pass the PHP scripts to FastCGI server listening on 127.0.0.1:9000
  #
  #location ~ \.php$ {
  # root   html;
  # fastcgi_pass 127.0.0.1:9000;
  # fastcgi_index index.php;
  # fastcgi_param SCRIPT_FILENAME /scripts$fastcgi_script_name;
  # include  fastcgi_params;
  #}

  # deny access to .htaccess files, if Apache's document root
  # concurs with nginx's one
  #
  #location ~ /\.ht {
  # deny all;
  #}
 }

  server {
  listen  9977;
  server_name secondProxyServer;

  #charset koi8-r;

  #access_log logs/host.access.log main;

  #location / {
   #root html;
   #index index.html index.htm;
  #}
  location / {
   proxy_pass http://localhost:8080;
  }

  #error_page 404    /404.html;

  # redirect server error pages to the static page /50x.html
  #
  error_page 500 502 503 504 /50x.html;
  location = /50x.html {
   root html;
  }

  # proxy the PHP scripts to Apache listening on 127.0.0.1:80
  #
  #location ~ \.php$ {
  # proxy_pass http://127.0.0.1;
  #}

  # pass the PHP scripts to FastCGI server listening on 127.0.0.1:9000
  #
  #location ~ \.php$ {
  # root   html;
  # fastcgi_pass 127.0.0.1:9000;
  # fastcgi_index index.php;
  # fastcgi_param SCRIPT_FILENAME /scripts$fastcgi_script_name;
  # include  fastcgi_params;
  #}

  # deny access to .htaccess files, if Apache's document root
  # concurs with nginx's one
  #
  #location ~ /\.ht {
  # deny all;
  #}
 }
下面是测试的结果:
首先两个tomcat中部署两个服务器:

然后启动nginx。
cmd下:start nginx
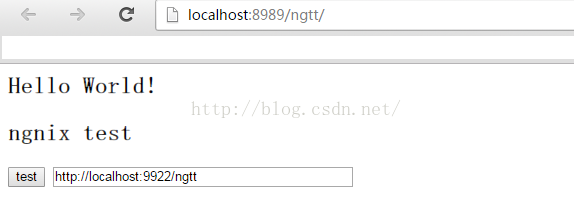
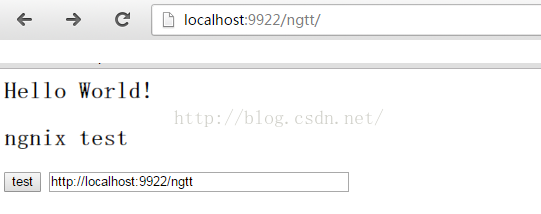
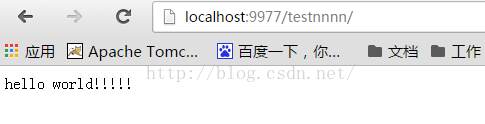
分别访问这两个server:
http://localhost:9922/ngtt/
http://localhost:9977/testnnnn/
感谢各位的阅读!关于“nginx如何实现代理多个服务器”这篇文章就分享到这里了,希望以上内容可以对大家有一定的帮助,让大家可以学到更多知识,如果觉得文章不错,可以把它分享出去让更多的人看到吧!
免责声明:本站发布的内容(图片、视频和文字)以原创、转载和分享为主,文章观点不代表本网站立场,如果涉及侵权请联系站长邮箱:is@yisu.com进行举报,并提供相关证据,一经查实,将立刻删除涉嫌侵权内容。


