这期内容当中小编将会给大家带来有关vue组件从开发到发布的实现,文章内容丰富且以专业的角度为大家分析和叙述,阅读完这篇文章希望大家可以有所收获。
项目结构
|-- node_modules
|-- src
| |-- index.js
| |-- vue-clock.vue
|-- docs
| |-- index.html
| |-- index.css
|-- dist
src: 组件相关代码。
node_modules: 组件依赖包。
docs: 说明文档,组件简单的可以单个页面,也可以使用vuepress。
dist: 打包后组件内容,一般 package.json 的 main 入口指向这个文件夹里的文件。
组件开发
vue组件开发相对来讲还是比较容易的,创建一个 vue-clock.vue 文件,组件的相关逻辑实现。
该组件主要实现一个基于 time 属性输入,显示对应时间的钟表样式。
  <div class="clock">
    <div class="clock-circle"></div>
    <div class="clock-hour" :></div>
    <div class="clock-minute" :></div>
    <b class="hour" v-for="h in timeList" :key="h">
      <span>{{h}}</span>
    </b>
  </div>
通过元素画出钟表的样式,基于 css3的transform 属性旋转出每个时间点。
因为钟表的时针并不是直接跳到下一个点的,所以需要计算出不同分钟时,时钟指针的旋转角度。
后续增加了不指定时间的情况,显示当前时间并每分钟自动更新。
export default {
  data() {
    return {
      timeList: [12, 1, 2, 3, 4, 5, 6, 7, 8, 9, 10, 11],
      hourRotate: "rotatez(0deg)",
      minuteRotate: "rotatez(0deg)"
    };
  },
  props: ["time"],
  watch: {
    time() {
      this.show();
    }
  },
  methods: {
    show() {
      this.showTime();
      if (this._timer) clearInterval(this._timer);
      if (!this.time) {
        this._timer = setInterval(() => {
          this.showTime();
        }, 60 * 1000);
      }
    },
    showTime() {
      let times;
      if (this.time) {
        times = this.time.split(":");
      } else {
        const now = new Date();
        times = [now.getHours(), now.getMinutes()];
      }

      let hour = +times[0];
      hour = hour > 11 ? hour - 12 : hour;
      let minute = +times[1];
      let hourAngle = hour * 30 + minute * 6 / 360 * 30;
      let minuteAngle = minute * 6;
      this.hourRotate = `rotatez(${hourAngle}deg)`;
      this.minuteRotate = `rotatez(${minuteAngle}deg)`;
    }
  },
  mounted() {
    this.show();
  },
  destroyed() {
    if (this._timer) clearInterval(this._timer);
  }
};
还有一些钟表的布局样式,可以直接在项目里查看。vue-clock.vue
接着我们需要抛出组件,以便在项目中引入使用。
  // src/index.js
  import Clock from './vue-clock.vue';
  export default Clock;
  if (typeof window !== 'undefined' && window.Vue) {
    window.Vue.component('clock', Clock);
  }
这里,组件开发的部分已经完成了,喝杯咖啡,check一下代码,我们要把它打包发布到npm上。
打包发布
打包前确认一下 webpack 的配置文件输出。
 output: {
  path: path.resolve(__dirname, './dist'),
  publicPath: '/dist/',
  filename: 'vue-clock.min.js',
  library: 'Clock',
  libraryTarget: 'umd',
  umdNamedDefine: true
 }
打包组件文件到 dist 文件夹中。
npm run build
npm发布
配置package.json
{
 "name": "vue-clock2",
 "description": "Vue component with clock",
 "version": "1.1.2",
 "author": "bestvist",
 "keywords": [
  "vue",
  "component",
  "clock",
  "time"
 ],
 "main": "dist/vue-clock.min.js",
 "license": "MIT",
 "homepage": "https://bestvist.github.io/vue-clock2/"
}
登录npm
如果使用淘宝镜像的,需要先修正一下镜像源。
npm config set registry https://registry.npmjs.org/
// 查看登录人
npm whoami
// 登录
npm login

// 发布
npm publish
如果看到类似信息,说明发布成功。
npm notice
+ vue-clock2@1.1.2
Github主页
把项目上传到github托管,配置一份基本 README.md 说明文档。
因为组件已经发布到npm上,所以可以配置几个徽章在README中。
// npm 版本
[npm version](https://img.shields.io/npm/v/vue-clock2.svg)

// npm 下载量
[npm download](https://img.shields.io/npm/dt/vue-clock2.svg)
更多的徽章配置可以查看shields
接着描述一下组件的引入和使用方法:
安装:
npm install vue-clock2
使用:
<template>
 <clock :time="time"></clock>
</template>

<script>
 import Clock from 'vue-clock2';
 export default {
  components: { Clock },
  data () {
   return {
     time: '10:40'
   }
  }
 }
</script>
更详细的交互或是属性说明就交给文档来解决了。
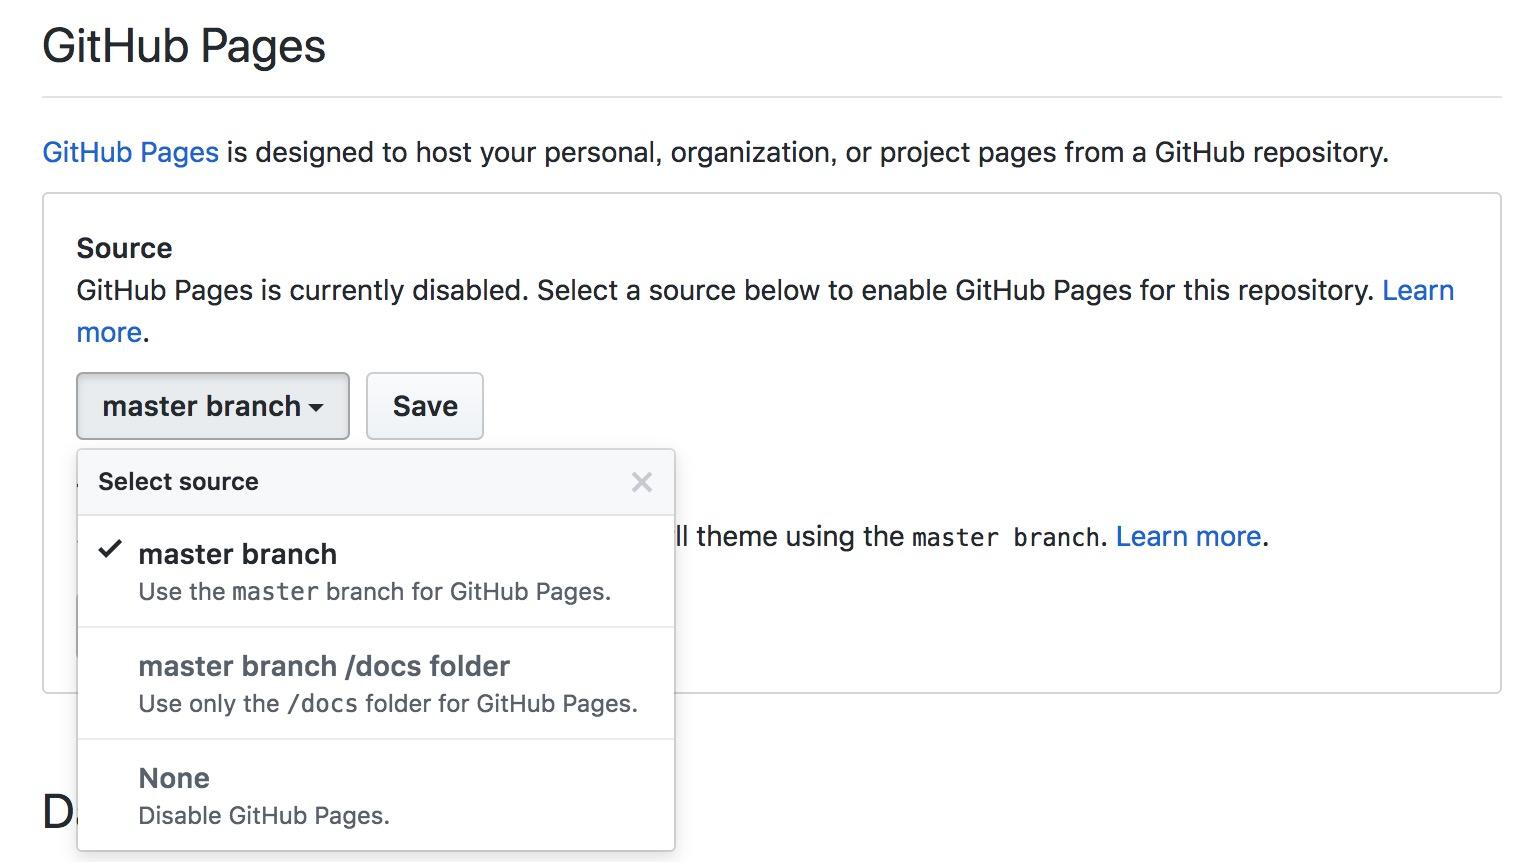
在 github 项目上通过 settings 指定 GitHub Pages
上述就是小编为大家分享的vue组件从开发到发布的实现了,如果刚好有类似的疑惑,不妨参照上述分析进行理解。如果想知道更多相关知识,欢迎关注亿速云行业资讯频道。
免责声明:本站发布的内容(图片、视频和文字)以原创、转载和分享为主,文章观点不代表本网站立场,如果涉及侵权请联系站长邮箱:is@yisu.com进行举报,并提供相关证据,一经查实,将立刻删除涉嫌侵权内容。


