本篇文章为大家展示了使用SpringSession怎么实现请求与响应重写,内容简明扼要并且容易理解,绝对能使你眼前一亮,通过这篇文章的详细介绍希望你能有所收获。
1、请求重写
SpringSession 中对于请求重写,在能力上主要体现在存储方面,也就是 getSession 方法上。在 SessionRepositoryFilter 这个类中,是通过内部类的方式实现了对 HttpServletRequset 和 HttpServletResponse 的扩展。
1.1 HttpServletRequset 扩展实现
private final class SessionRepositoryRequestWrapper
			extends HttpServletRequestWrapper {
	// HttpServletResponse 实例
	private final HttpServletResponse response;
	// ServletContext 实例
	private final ServletContext servletContext;
 // requestedSession session对象
 private S requestedSession;
 // 是否缓存 session
 private boolean requestedSessionCached;
	// sessionId
	private String requestedSessionId;
	// sessionId 是否有效
	private Boolean requestedSessionIdValid;
	// sessionId 是否失效
	private boolean requestedSessionInvalidated;

	// 省略方法
}
1.2 构造方法
private SessionRepositoryRequestWrapper(HttpServletRequest request,
		HttpServletResponse response, ServletContext servletContext) {
	super(request);
	this.response = response;
	this.servletContext = servletContext;
}
构造方法里面将 HttpServletRequest 、 HttpServletResponse 以及 ServletContext 实例传递进来,以便于后续扩展使用。
1.3 getSession 方法
@Override
public HttpSessionWrapper getSession(boolean create) {
 // 从当前请求线程中获取 session
	HttpSessionWrapper currentSession = getCurrentSession();
	// 如果有直接返回
	if (currentSession != null) {
		return currentSession;
	}
	// 从请求中获取 session,这里面会涉及到从缓存中拿session的过程
	S requestedSession = getRequestedSession();
	if (requestedSession != null) {
	 // 无效的会话id(不支持的会话存储库)请求属性名称。
	 // 这里看下当前的sessionId是否有效
		if (getAttribute(INVALID_SESSION_ID_ATTR) == null) {
		 // 设置当前session的最后访问时间,用于延迟session的有效期
			requestedSession.setLastAccessedTime(Instant.now());
			// 将requestedSessionIdValid置为true
			this.requestedSessionIdValid = true;
			// 包装session
			currentSession = new HttpSessionWrapper(requestedSession, getServletContext());
			// 不是新的session,如果是新的session则需要改变sessionId
			currentSession.setNew(false);
			// 将session设置到当前请求上下文
			setCurrentSession(currentSession);
			// 返回session
			return currentSession;
		}
	}
	else {
		// 这里处理的是无效的sessionId的情况,但是当前请求线程 session有效
		if (SESSION_LOGGER.isDebugEnabled()) {
			SESSION_LOGGER.debug(
					"No session found by id: Caching result for getSession(false) for this HttpServletRequest.");
		}
		// 将invalidSessionId置为true
		setAttribute(INVALID_SESSION_ID_ATTR, "true");
	}
	// 是否需要创建新的session
	if (!create) {
		return null;
	}
	if (SESSION_LOGGER.isDebugEnabled()) {
		SESSION_LOGGER.debug(
				"A new session was created. To help you troubleshoot where the session was created we provided a StackTrace (this is not an error). You can prevent this from appearing by disabling DEBUG logging for "
						+ SESSION_LOGGER_NAME,
				new RuntimeException(
						"For debugging purposes only (not an error)"));
	}
	// 创建新的session
	S session = SessionRepositoryFilter.this.sessionRepository.createSession();
	// 设置最后访问时间,也就是指定了当前session的有效期限
	session.setLastAccessedTime(Instant.now());
	// 包装下当前session
	currentSession = new HttpSessionWrapper(session, getServletContext());
	//设置到当前请求线程
	setCurrentSession(currentSession);
	return currentSession;
}
上面这段代码有几个点,这里单独来解释下。
getCurrentSession
这是为了在同一个请求过程中不需要重复的去从存储中获取session,在一个新的进来时,将当前的 session 设置到当前请求中,在后续处理过程如果需要getSession就不需要再去存储介质中再拿一次。
getRequestedSession
这个是根据请求信息去取 session ,这里面就包括了 sessionId 解析,从存储获取 session 对象等过程。
是否创建新的 session 对象
在当前请求中和存储中都没有获取到 session 信息的情况下,这里会根据 create 参数来判断是否创建新的 session 。这里一般用户首次登录时或者 session 失效时会走到。
1.4 getRequestedSession
根据请求信息来获取 session 对象
private S getRequestedSession() {
 // 缓存的请求session是否存在
	if (!this.requestedSessionCached) {
  // 获取 sessionId
  List<String> sessionIds = SessionRepositoryFilter.this.httpSessionIdResolver
  		.resolveSessionIds(this);
  // 通过sessionId来从存储中获取session
  for (String sessionId : sessionIds) {
  	if (this.requestedSessionId == null) {
  		this.requestedSessionId = sessionId;
  	}
  	S session = SessionRepositoryFilter.this.sessionRepository
  			.findById(sessionId);
  	if (session != null) {
  		this.requestedSession = session;
  		this.requestedSessionId = sessionId;
  		break;
  	}
  }
  this.requestedSessionCached = true;
	}
	return this.requestedSession;
}
这段代码还是很有意思的,这里获取 sessionId 返回的是个列表。当然这里是 SpringSession 的实现策略,因为支持 session ,所以这里以列表的形式返回的。OK,继续来看如何解析 sessionId 的:

这里可以看到 SpringSession 对于 sessionId 获取的两种策略,一种是基于 cookie ,一种是基于 header ;分别来看下具体实现。
1.4.1 CookieHttpSessionIdResolver 获取 sessionId
CookieHttpSessionIdResolver 中获取 sessionId 的核心代码如下:
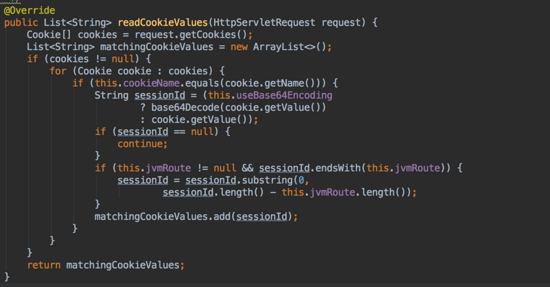
其实这里没啥好说的,就是读 cookie 。从 request 将 cookie 信息拿出来,然后遍历找当前 sessionId 对应的 cookie ,这里的判断也很简单, 如果是以 SESSION 开头,则表示是 SessionId ,毕竟 cookie 是共享的,不只有 sessionId,还有可能存储其他内容。
另外这里面有个 jvmRoute,这个东西实际上很少能够用到,因为大多数情况下这个值都是null。这个我们在分析 CookieSerializer 时再来解释。
1.4.2 HeaderHttpSessionIdResolver 获取 sessionId

这个获取更直接粗暴,就是根据 headerName 从 header中取值。
回到 getRequestedSession ,剩下的代码中核心的都是和 sessionRepository 这个有关系,这部分就会涉及到存储部分。不在本篇的分析范围之内,会在存储实现部分来分析。
1.5 HttpSessionWrapper
上面的代码中当我们拿到 session 实例是通常会包装下,那么用到的就是这个 HttpSessionWrapper 。
HttpSessionWrapper 继承了 HttpSessionAdapter ,这个 HttpSessionAdapter 就是将SpringSession 转换成一个标准 HttpSession 的适配类。 HttpSessionAdapter 实现了标准 servlet 规范的 HttpSession 接口。
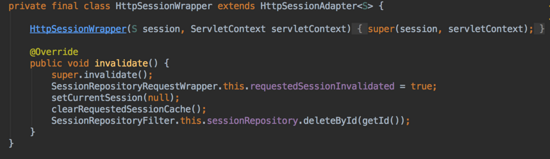
1.5.1 HttpSessionWrapper
HttpSessionWrapper 重写了 invalidate 方法。从代码来看,调用该方法产生的影响是:
requestedSessionInvalidated 置为 true ,标识当前 session 失效。
将当前请求中的 session 设置为 null ,那么在请求的后续调用中通过 getCurrentSession 将拿不到 session 信息。
当前缓存的 session 清楚,包括sessionId,session实例等。
删除存储介质中的session对象。
1.5.2 HttpSessionAdapter
SpringSession 和标准 HttpSession 的配置器类。这个怎么理解呢,来看下一段代码:
@Override
public Object getAttribute(String name) {
	checkState();
	return this.session.getAttribute(name);
}
对于基于容器本身实现的 HttpSession 来说, getAttribute 的实现也是有容器本身决定。但是这里做了转换之后, getAttribute 将会通过 SpringSession 中实现的方案来获取。其他的 API 适配也是基于此实现。
SessionCommittingRequestDispatcher
实现了 RequestDispatcher 接口。关于 RequestDispatcher 可以参考这篇文章【Servlet】关于RequestDispatcher的原理 。 SessionCommittingRequestDispatcher 对 forward 的行为并没有改变。 对于 include 则是在 include 之前提交 session 。为什么这么做呢?
因为 include 方法使原先的 Servlet 和转发到的 Servlet 都可以输出响应信息,即原先的 Servlet 还可以继续输出响应信息;即请求转发后,原先的 Servlet 还可以继续输出响应信息,转发到的 Servlet 对请求做出的响应将并入原先 Servlet 的响应对象中。
所以这个在 include 调用之前调用 commit ,这样可以确保被包含的 Servlet 程序不能改变响应消息的状态码和响应头。
2 响应重写
响应重写的目的是确保在请求提交时能够把session保存起来。来看下 SessionRepositoryResponseWrapper 类的实现:

这里面实现还就是重写 onResponseCommitted ,也就是上面说的,在请求提交时能够通过这个回调函数将 session
保存到存储容器中。
2.1 session 提交
最后来看下 commitSession
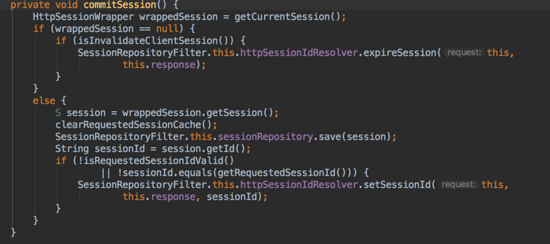
这个过程不会再去存储容器中拿 session 信息,而是直接从当前请求中拿。如果拿不到,则在回写 cookie 时会将当前 session 对应的 cookie 值设置为空,这样下次请求过来时携带的 sessionCookie 就是空,这样就会重新触发登陆。
如果拿到,则清空当前请求中的 session 信息,然后将 session 保存到存储容器中,并且将 sessionId 回写到 cookie 中。
上述内容就是使用SpringSession怎么实现请求与响应重写,你们学到知识或技能了吗?如果还想学到更多技能或者丰富自己的知识储备,欢迎关注亿速云行业资讯频道。
免责声明:本站发布的内容(图片、视频和文字)以原创、转载和分享为主,文章观点不代表本网站立场,如果涉及侵权请联系站长邮箱:is@yisu.com进行举报,并提供相关证据,一经查实,将立刻删除涉嫌侵权内容。


