本篇内容主要讲解“CentOS一键安装LNMP的脚本分享”,感兴趣的朋友不妨来看看。本文介绍的方法操作简单快捷,实用性强。下面就让小编来带大家学习“CentOS一键安装LNMP的脚本分享”吧!
分享一个自己写的一键安装LNMP的脚本。
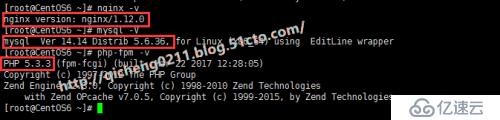
CentOS6安装效果:
#!/bin/bash
# Author:      Zhangbin
# Website:     http://qicheng0211.blog.51cto.com/
# Description: CentOS6/7一键安装lnmp(基于yum)

PATH=/bin:/sbin:/usr/bin:/usr/sbin:/usr/local/bin:/usr/local/sbin:~/bin
export PATH

err_echo() {
    echo -e "\e[31m[ Error ]\033[0m $@"
    exit 1
}

info_echo() {
    echo -e "\e[32m[ Info ]\033[0m $@"
    sleep 1
}

# 检查是否root用户
if [ $EUID -ne 0 ]; then
    err_echo "please run this script as root user."
fi

# 检查操作系统版本
if egrep "CentOS release 6" /etc/redhat-release > /dev/null 2>&1; then
    OS=CentOS6
elif egrep "CentOS Linux release 7" /etc/redhat-release > /dev/null 2>&1; then
    OS=CentOS7
else
    err_echo "This script is used for CentOS 6.x or 7.x only."
fi

# 检查网络
ping -c 1 mirrors.163.com &>/dev/null
[ $? != 0 ] && err_echo "Network does not work."

which wget &>/dev/null || yum install wget -y

# CentOS6安装yum的axel插件,使yum支持多线程下载:
if [ "$OS" == "CentOS6" ];then
    wget https://mirrors.tuna.tsinghua.edu.cn/repoforge/redhat/el6/en/x86_64/rpmforge/RPMS/axel-2.4-1.el6.rf.x86_64.rpm
    rpm -ivh axel-2.4-1.el6.rf.x86_64.rpm

    axelget_conf_start=$(grep -n 'axelget.conf start_line' "$0" | grep -v grep | awk -F: '{print $1}')
    axelget_conf_end=$(grep -n 'axelget.conf end_line' "$0" | grep -v grep | awk -F: '{print $1}')
    ((axelget_conf_start++))
    ((axelget_conf_end--))
    sed -n "${axelget_conf_start},${axelget_conf_end}p" "$0" > /etc/yum/pluginconf.d/axelget.conf

    axelget_py_start=$(grep -n 'axelget.py start_line' "$0" | grep -v grep | awk -F: '{print $1}')
    axelget_py_end=$(grep -n 'axelget.py end_line' "$0" | grep -v grep | awk -F: '{print $1}')
    ((axelget_py_start++))
    ((axelget_py_end--))
    sed -n "${axelget_py_start},${axelget_py_end}p" "$0" > /usr/lib/yum-plugins/axelget.py
fi

# 安装163 yum源:
if [ "$OS" == "CentOS6" ];then
    wget http://mirrors.163.com/.help/CentOS6-Base-163.repo -O CentOS-Base.repo
else
    wget http://mirrors.163.com/.help/CentOS7-Base-163.repo -O CentOS-Base.repo
fi
cp -p /etc/yum.repos.d/CentOS-Base.repo /etc/yum.repos.d/CentOS-Base.repo.bak
mv -f CentOS-Base.repo /etc/yum.repos.d/CentOS-Base.repo
yum clean all
yum makecache

# 安装epel yum源:
yum -y install epel-release
sed -i 's/^mirrorlist=https/mirrorlist=http/' /etc/yum.repos.d/epel.repo
# CentOS7安装yum的axel插件,依赖epel源
if [ "$OS" == "CentOS7" ];then
    yum -y install yum-axelget
    sed -i '/^maxconn=/c\maxconn=10' /etc/yum/pluginconf.d/axelget.conf
fi

# nginx的yum源:
cat > /etc/yum.repos.d/nginx.repo << 'EOF'
[nginx]
name=nginx repo
baseurl=http://nginx.org/packages/centos/$releasever/$basearch/
enabled=1
gpgcheck=0
EOF

# 关闭selinux:
setenforce 0
sed -i '/^SELINUX=/c\SELINUX=disabled' /etc/selinux/config

# 安装nginx、php:
yum -y install nginx php-fpm php-soap php-bcmath php-xml php-opcache php-gd php-mcrypt php-pdo php-mysql php-mbstring php-xmlrpc

# 修改/etc/nginx/nginx.conf
cp /etc/nginx/nginx.conf /etc/nginx/nginx.conf.bak
cat > /etc/nginx/nginx.conf << 'EOF'

user  nginx;
worker_processes auto;

error_log  /data/logs/nginx_error.log  crit;

worker_rlimit_nofile 65535;

events
{
    use epoll;
    worker_connections 65535;
}

http {
    include       mime.types;
    default_type  application/octet-stream;

    server_names_hash_bucket_size 128;
    client_header_buffer_size 32k;
    large_client_header_buffers 4 32k;
    client_max_body_size 8m;

    sendfile on;
    tcp_nopush     on;

    keepalive_timeout 15;

    tcp_nodelay on;
    proxy_buffer_size 16k;
    proxy_buffering on;
    proxy_buffers  4 64k;
    proxy_busy_buffers_size 128k;
    fastcgi_connect_timeout 300;
    fastcgi_send_timeout 300;
    fastcgi_read_timeout 300;
    fastcgi_buffer_size 64k;
    fastcgi_buffers 4 64k;
    fastcgi_busy_buffers_size 128k;
    fastcgi_temp_file_write_size 128k;

    gzip on;
    gzip_min_length  1k;
    gzip_buffers     4 16k;
    gzip_http_version 1.0;
    gzip_comp_level 2;
    gzip_types       text/plain application/x-javascript text/css application/xml;
    gzip_vary on;
    gzip_disable msie6;

    log_format  access   '$remote_addr - $remote_user [$time_local] "$request"  '
     '$status $body_bytes_sent "$http_referer"  '
     '"$http_user_agent" $http_x_forwarded_for ';
    access_log /data/logs/access.log access;

    include conf.d/*.conf;

    server_tokens off;
    reset_timedout_connection on;
}
EOF

mkdir -p /data/logs
chown -R nginx. /data/logs

# 修改php-fpm运行用户为nginx
sed -i 's/^user = apache/user = nginx/' /etc/php-fpm.d/www.conf
sed -i 's/^group = apache/group = nginx/' /etc/php-fpm.d/www.conf
chown -R nginx /var/log/php-fpm/
mkdir /var/lib/php/session
chown -R nginx /var/lib/php/

# 启动php-fpm:
service php-fpm start
[ $? -eq 0 ] && info_echo "php-fpm start OK."

# 启动nginx:
nginx -t && service nginx start
[ $? -eq 0 ] && info_echo "nginx start OK."

# 设置nginx、php-fpm开机启动:
if [ "$OS" == "CentOS6" ];then
    chkconfig php-fpm on
    chkconfig nginx on
else
    systemctl enable php-fpm
    systemctl enable nginx
fi

# 安装Mysql的yum源:
if [ "$OS" == "CentOS6" ];then
    rpm -Uvh http://dev.mysql.com/get/mysql-community-release-el6-5.noarch.rpm
else
    rpm -Uvh http://dev.mysql.com/get/mysql-community-release-el7-5.noarch.rpm
fi

# 安装mysql:
yum -y install mysql mysql-server mysql-devel

# 修改/etc/my.cnf
cat > /etc/my.cnf << 'EOF'
# Example MySQL config file. mysql5.6 RAM 1G zhangbin

[client]
port		= 3306
socket		= /var/lib/mysql/mysql.sock

[mysqld]
user = mysql
port = 3306
datadir = /var/lib/mysql/
socket = /var/lib/mysql/mysql.sock
sql_mode=NO_ENGINE_SUBSTITUTION,STRICT_TRANS_TABLES,NO_AUTO_CREATE_USER
bind-address = 0.0.0.0
server-id = 1
skip-name-resolve
skip-external-locking

back_log = 600
max_connections = 512
max_connect_errors = 6000
open_files_limit = 65535
table_open_cache = 512
max_allowed_packet = 4M
max_heap_table_size = 8M
tmp_table_size = 16M
read_buffer_size = 2M
read_rnd_buffer_size = 8M
sort_buffer_size = 8M
join_buffer_size = 8M
thread_cache_size = 8
query_cache_size = 2M
query_cache_limit = 2M
key_buffer_size = 64M
interactive_timeout = 28800
wait_timeout = 28800

# myisam
bulk_insert_buffer_size = 8M
myisam_sort_buffer_size = 8M
myisam_max_sort_file_size = 10G
myisam_repair_threads = 1

# bin log
log_bin = /var/lib/mysql/mysql-bin.log
binlog_cache_size = 2M
binlog_format = MIXED
expire_logs_days = 7

# slow log
slow_query_log = 1
slow_query_log_file = /var/lib/mysql/mysql-slow.log
long_query_time = 3
log_queries_not_using_indexes = 1

# innodb
default-storage-engine = InnoDB
innodb_data_home_dir = /var/lib/mysql/
innodb_data_file_path = ibdata1:10M:autoextend
innodb_log_group_home_dir = /var/lib/mysql/
innodb_buffer_pool_size = 512M
innodb_log_file_size = 128M
innodb_log_files_in_group=3
innodb_log_buffer_size = 8M
innodb_flush_log_at_trx_commit = 2
innodb_lock_wait_timeout = 120

innodb_file_per_table = 1
innodb_open_files = 500
innodb_read_io_threads = 4
innodb_write_io_threads = 4
innodb_thread_concurrency=0
innodb_purge_threads = 1
innodb_max_dirty_pages_pct = 90

[mysqldump]
quick
max_allowed_packet = 16M

[mysql]
no-auto-rehash

[myisamchk]
key_buffer = 20M
sort_buffer_size = 20M
read_buffer = 2M
write_buffer = 2M

[mysqlhotcopy]
interactive-timeout
EOF

# 启动mysql:
service mysqld start
[ $? -eq 0 ] && info_echo "mysqld start OK."
# 安全设置:
#mysql_secure_installation

# 设置mysqld开机启动:
if [ "$OS" == "CentOS6" ];then
    chkconfig mysqld on
else
    systemctl enable mysqld
fi

exit 0

# axelget.conf start_line
[main]
enabled=1
onlyhttp=1
enablesize=54000
cleanOnException=1
# axelget.conf end_line
# axelget.py start_line
from yum.plugins import PluginYumExit, TYPE_CORE, TYPE_INTERACTIVE
from urlparse import urljoin
import os,time

requires_api_version = '2.3'
plugin_type = (TYPE_CORE, TYPE_INTERACTIVE)

enablesize=300000
trymirrornum=-1
maxconn=10
httpdownloadonly=False
cleanOnException=0

def init_hook(conduit):
	global enablesize,trymirrornum,maxconn,cleanOnException,httpdownloadonly
	enablesize = conduit.confInt('main','enablesize',default=30000)
	trymirrornum = conduit.confInt('main','trymirrornum',default=-1)
	maxconn = conduit.confInt('main','maxconn',default=10)
	httpdownloadonly=conduit.confBool('main','onlyhttp',default=False)
	cleanOnException=conduit.confInt('main','cleanOnException',default=0)
	return

def predownload_hook(conduit):
	global enablesize,cleanOnException,httpdownloadonly
	preffermirror=""
	PkgIdx=0
	TotalPkg=len(conduit.getDownloadPackages())
	for po in (conduit.getDownloadPackages()):
		PkgIdx+=1
		if hasattr(po, 'pkgtype') and po.pkgtype == 'local':
			continue
		totsize = long(po.size)
		ret = False
		if totsize <= enablesize:
			conduit.info(2, "Package %s download size %d less than %d,Skip plugin!"  % (po.repo.id,totsize,enablesize))
			continue
		else:
			conduit.info(2, "[%d/%d]Ok,we will try to use axel to download this big file:%d" % (PkgIdx,TotalPkg,totsize))
		local = po.localPkg()
		if os.path.exists(local):
			if not os.path.exists(local+".st"):
				fstate=os.stat(local)
				if totsize == fstate.st_size:
					conduit.info(2,"Target already exists,skip to next file!")
					continue
		localall = "%s %s" % (local,local+".st")
		rmcmd = "rm -f %s" % (localall)
		curmirroridx = 0
		conduit.info(2,"Before we start,clean all the key files")
		os.system(rmcmd)
		connnum = totsize / enablesize
		if connnum*enablesize<totsize:
			connnum+=1
		if connnum > maxconn:
			connnum = maxconn
		mirrors=[]
		mirrors[:0]=po.repo.urls
		if preffermirror != "":
			mirrors[:0] = [preffermirror]
		for url in mirrors:
			if url.startswith("ftp://") and httpdownloadonly:
				print "Skip Ftp Site:",url
				continue
			if url.startswith("file://"):
				print "Skip Local Site:",url
				continue
			curmirroridx += 1
			if (curmirroridx > trymirrornum) and (trymirrornum != -1):
				conduit.info(2, "Package %s has tried %d mirrors,Skip plugin!" % (po.repo.id,trymirrornum))
				break
			remoteurl =  "%s/%s" % (url,po.remote_path)
			syscmd = "axel -a -n %s %s -o %s" % (connnum,remoteurl,local)
			conduit.info(2, "Execute axel cmd:\n%s"  % syscmd)
			os.system(syscmd)
			time.sleep(2)
			if os.path.exists(local+".st"):
				conduit.info(2,"axel exit by exception,let's try another mirror")
				if cleanOnException:
					conduit.info(2,"because cleanOnException is set to 1,we do remove key file first")
					os.system(rmcmd)
				continue
			elif not os.path.exists(local):#this mirror may not update yet
				continue
			else:
				ret = True
				preffermirror=url
				break
		if not ret:
			conduit.info (2,"try to run rm cmd:%s"  % rmcmd)
			os.system(rmcmd)
# axelget.py end_line
到此,相信大家对“CentOS一键安装LNMP的脚本分享”有了更深的了解,不妨来实际操作一番吧!这里是亿速云网站,更多相关内容可以进入相关频道进行查询,关注我们,继续学习!
免责声明:本站发布的内容(图片、视频和文字)以原创、转载和分享为主,文章观点不代表本网站立场,如果涉及侵权请联系站长邮箱:is@yisu.com进行举报,并提供相关证据,一经查实,将立刻删除涉嫌侵权内容。


