监控利器Nagios之一:监控本地NFS和外部HTTP、MySQL服务
Nagios是一款开源的免费网络监视工具,能有效监控Windows、Linux和Unix的主机状态,交换机路由器等网络设置,打印机等。在系统或服务状态异常时发出邮件或短信报警第一时间通知网站运维人员,在状态恢复后发出正常的邮件或短信通知。
Nagios的特点:
1、监控服务http、MySQL、nfs、tcp、ping等
2、监控主机资源cpu、负载、I/O、虚拟及内存磁盘利用率等
3、支持邮件微信等报警通信。
4、可选web见面用于查看当前的网络状态等
Nagios的组成:
Nagios监控软件是一个监控平台。Nagios监控一般由一个主程序(nagios)、一个插件程序(nagios-plugins)和一些可选的插件组成。
1、NRPE组件
Nrpe组件一般工作在备监控端,朱勇用于监控本地资源,包括负载(uptime)、CPU(top、Sar)、磁盘(df -hi)、内存(free)、I/O(iostat)等
2、NSClient++
3、NDOUtils
Nagios的监控完整图:
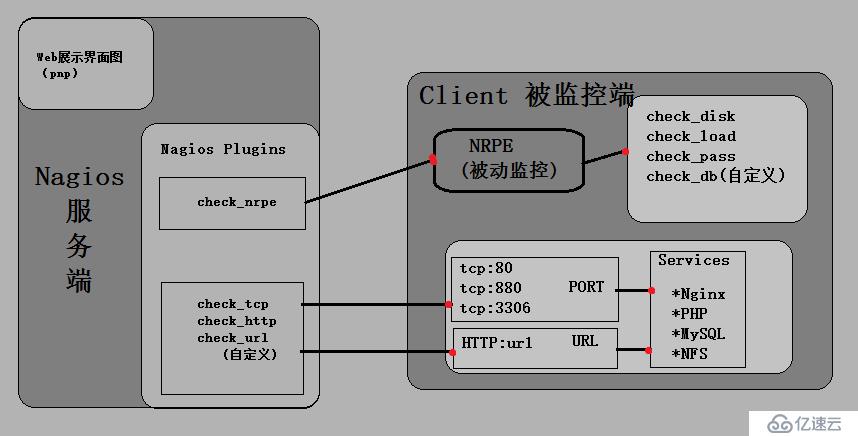
原理如下:
通常由nagios服务端发起获取数据请求,由check_nrpe插件携带要获取的命令,传给给监控端nrpe守护进程,默认是5666端口,nrpe进程读取nrpe.Cfg里对应服务器端发送的命令信息,通过调用本地插件获取数据,然后返回给nagios服务器端的check_nrpe,进而传给nagios战术的web页面中。
一:实验目标
1、监控外部服务器NFS,服务端当做客户端
2、监控外部服务器的MySQL服务
3、监控外部服务器httpd
4、监控外部服务器的私有信息
二:实验环境
VMare | 作用 | 主机名 | Ip地址 | 安装的软件 |
RHEL-6.5 | 服务端 | yu61 | 192.168.1.61 | Nagios软件,nagios插件,nrpe,LAMP环境、NFS |
RHEL-6.5 | 客户端 | yu62 | 192.168.1.62 | nagios插件,nrpe、mysql-server、IO |
RHEL-6.5 | 客户端 | yu63 | 192.168.1.63 | nagios插件,nrpe、NFS、Http、 |
#所有服务器都需要关闭防火墙
三:实验步骤
安装服务端环境
1、安装LAMP环境
Nagios服务端需要有web界面用来展示监控效果,而监控的内容是属于动态的,因此使用LAMP环境,Apache用作于web展示监控效果,PHP用于展示监控动态信息。
[root@yu61 ~]# mkdir -p /home/yu/tools
[root@yu61 ~]# yum install -y httpd gccglibc glibc-common php gd gd-devel libpng libmng libjpeg zlib mysql-server
[root@yu61 ~]# service iptables stop
[root@yu61 ~]# service httpd restart
[root@yu61 ~]# vim /var/www/html/index.php
<?php
phpinfo();
?>
2、添加用户
Apache用户默认是存在的,属组默认的是daemon,需要把它改成nagios。这样它才能有权限访问安装的nagios目录,执行相关的cgi命令,如通过浏览器界面关闭nagios、停止某个故障对象发送报警信息等。
添加nagios帐户,以用来运行Nagios。当然也可以用root运行,但出于安全考虑而使用普通帐号来运行,并且不给这个账号分配shell登录权限
[root@yu61 tools]# useradd  -s /sbin/nollogin  nagios
[root@yu61 tools]# groupadd nagcmd
[root@yu61 tools]# usermod -a -G nagcmd nagios
[root@yu61 tools]# usermod -a -G nagcmd apache
3、安装nagios主程序
[root@yu61 tools]# tar jxvf nagios-cn-3.2.3.tar.bz2
[root@yu61 tools]# cd nagios-cn-3.2.3
[root@yu61 nagios-cn-3.2.3]# ./configure --with-command-group=nagcmd
[root@yu61 nagios-cn-3.2.3]#make all
[root@yu61 nagios-cn-3.2.3]# make install
[root@yu61 nagios-cn-3.2.3]# make install-init
[root@yu61 nagios-cn-3.2.3]#make install-commandmode
[root@yu61 nagios-cn-3.2.3]# make install-config
[root@yu61 nagios-cn-3.2.3]# make install-webconf
[root@yu61 nagios-cn-3.2.3]# htpasswd -c /usr/local/nagios/etc/htpasswd.users mobanche
用于检测文件的完整性的方法有两种。一种是绝对路径,一种是启动检测
第一种:
[root@yu61 nagios]# /usr/local/nagios/bin/nagios -v /usr/local/nagios/etc/nagios.cfg
第二种:
[root@yu61 nrpe-2.12]# vim /etc/init.d/nagios
#删掉启动项中178行中的“ > /dev/null 2>&1;”内容。

[root@yu61 objects]# vim /usr/local/nagios/etc/cgi.cfg
use_authentication=0 #改为0

[root@yu61 nrpe-2.12]# /etc/init.d/nagios checkconfig
Total Warnings: 0
Total Errors:   0
4、安装nagios-plugins插件包
Nagios的插件包就是实现获取数据信息的命令或者程序,用过这些命令或程序,nagios可以获取到需要的数据,然后进行报警和展示。
[root@yu61 tools]# yum install perl-devel openssl-devel -y
[root@yu61 tools]# tar zxvf nagios-plugins-1.4.16.tar.gz
[root@yu61 tools]# cd nagios-plugins-1.4.16
[root@yu61 nagios-plugins-1.4.16]# ./configure  --with-nagios-user=nagios --with-nagios-group=nagcmd --enable-perl-modules --with-mysql
[root@yu61 nagios-plugins-1.4.16]# make -j 4
[root@yu61 nagios-plugins-1.4.16]# make install
5、安装nrpe软件包
Nrpe是通常用于安装被监控端的,这里在服务端也安装的了nrpe软件,是因为nagios服务器端需要check_nrpe插件做被动检查,如果服务端不安装nrpe插件,那么也就没有这个插件了,其次nagios服务器端本地的资源也需要被监控,因此nagios服务器端也会被认作客户端。
[root@yu61 tools]# tar zxvf nrpe-2.12.tar.gz
[root@yu61 tools]# cd nrpe-2.12
[root@yu61 nrpe-2.12]# ./configure
[root@yu61 nrpe-2.12]# make all && make instll
6、服务端附件
(1)检查登录nagios的管理账户信息
[root@yu61 nagios-cn-3.2.3]# grep AuthUserFile /etc/httpd/conf.d/nagios.conf
   AuthUserFile /usr/local/nagios/etc/htpasswd.users
   AuthUserFile /usr/local/nagios/etc/htpasswd.users
   AuthUserFile /usr/local/nagios/etc/htpasswd.users
(2)设置nagios开机自启动
[root@yu61 nagios-cn-3.2.3]# chkconfig postfix on
[root@yu61 nagios-cn-3.2.3]# chkconfig postfix --list
postfix        0:关闭1:关闭2:启用3:启用4:启用5:启用6:关闭
(3)邮件报警
[root@yu61 nagios-cn-3.2.3]# /etc/init.d/httpd reload
[root@yu61 nagios-cn-3.2.3]# sed -n '35p ' /usr/local/nagios/etc/objects/contacts.cfg
        email                           741215208@qq.com; <<***** CHANGE THIS TO YOUR EMAIL ADDRESS ******
[root@yu61 nagios-cn-3.2.3]# /etc/init.d/postfix start
[root@yu61 nagios-cn-3.2.3]# lsof -i :25
COMMAND  PID USER   FD   TYPE DEVICE SIZE/OFF NODE NAME
master  2094 root   12u  IPv4  12921      0t0  TCP localhost:smtp (LISTEN)
master  2094 root   13u  IPv6  12923      0t0  TCP localhost:smtp (LISTEN)
[root@yu61 nagios-cn-3.2.3]# mail -s "test" 741215208@qq.com < /etc/hosts
[root@yu61 nagios-cn-3.2.3]# mailq
-Queue ID- --Size-- ----Arrival Time---- -Sender/Recipient-------
A1C723FFA6      599 Sun May 21 12:23:56  root@yu61.localdomain
(lost connection with mx2.qq.com[14.17.41.170] while performing the HELO handshake)
                                         741215208@qq.com
安装客户端端环境
注释:三台客户端同时安装,安装的内容一样。
1、添加用户
[root@yu62 ~]# mkdir -p /home/yu/tools
[root@yu62 ~]# cd /home/yu/tools/
[root@yu62 tools]# yum install perl-devel openssl-devel -y
[root@yu62 tools]#  useradd -s /sbin/nologin nagios
[root@yu62 tools]#  groupadd nagcmd
[root@yu62 tools]#  usermod -G nagcmd nagios
2、安装nagios-plugins插件包
[root@yu62 tools]# tar zxvf nagios-plugins-1.4.16.tar.gz
[root@yu62 tools]# cd nagios-plugins-1.4.16
[root@yu62 nagios-plugins-1.4.16]# ./configure  --with-nagios-user=nagios --with-nagios-group=nagcmd --enable-perl-modules --with-mysql
[root@yu62 nagios-plugins-1.4.16]# make -j 4 && make install
3、安装nrpe软件包
[root@yu62 tools]# tar zxvf nrpe-2.12.tar.gz
[root@yu62 tools]# cd nrpe-2.12
[root@yu62 nrpe-2.12]# ./configure &&  make all && make install
实战:监控外部服务器MySQL服务
1、服务端修改配置文件
root@yu61 ~]# cd /usr/local/nagios/etc
[root@yu61 etc]# vim nagios.cfg
改:cfg_file=/usr/local/nagios/etc/objects/localhost.cfg
为:注释localhost这一项,添加以下两行:
#cfg_file=/usr/local/nagios/etc/objects/localhost.cfg
cfg_file=/usr/local/nagios/etc/objects/hosts.cfg
cfg_file=/usr/local/nagios/etc/objects/service.cfg
2、修改配置文件、生成要检测的主机配置文件和服务配置文件:
[root@yu61 etc]# cd objects/
[root@yu61 objects]# vim hosts.cfg  # 添加以下内容
####################chreck_host###########################
define host{
        use                     linux-server
        host_name               yu62
        alias                   mysql服务
        address                 192.168.1.64
        icon_p_w_picpath              switch.gif
        statusmap_p_w_picpath         switch.gd2
        2d_coords               100,200
        3d_coords               100,200,100
        }
[root@yu61 objects]# vim service.cfg # 添加以下内容
###################check_server_mysql#############################
define service{
use local-service
host_name yu62
service_groups mysql服务组
service_description mysql服务
check_command check_mysql
}
##########################check_server_mysql_groups#########################define servicegroup{
servicegroup_name mysql服务组
alias mysql服务器
members yu62,mysql服务
}
[root@yu61 objects]# vim commands.cfg #在此文件最后添加以下内容:
define command{
command_name check_mysql
command_line $USER1$/check_mysql -H$HOSTADDRESS$ -u nagdb -d nagdb
}
[root@yu61 nrpe-2.12]# /etc/init.d/nagios checkconfig
3、客户端上安装MySQL服务
[root@xuegod62 ~]# yum install mysql-server -y
[root@xuegod62 ~]# service mysqld restart
[root@xuegod62~]# mysql
mysql>create database nagdb;
mysql> grant select on nagdb.* to yu@'192.168.1.61';
4、重启mysqld、nagios服务
[root@yu62 ~]# /etc/init.d/httpd restart
[root@yu62 ~]# /etc/init.d/mysqld restart
[root@yu61 ~]# /etc/init.d/nagios restart
[root@yu61 objects]#/usr/local/nagios/libexec/check_mysql -H 192.168.1.64 -u nagdb -d nagdb
Uptime: 516  Threads: 1 Questions: 6  Slow queries: 0  Opens: 15 Flush tables: 1  Open tables:8  Queries per second avg: 0.11
#上述命令执行后,出现以下信息,表示正常,连接192.168.1.64的mysql里面的用户是正常的
5)测试查看主机和服务:
http://192.168.1.63/nagios/

实战:监控外部服务器NFS服务
1、安装配置NFS服务器
[root@yu61 objects]# service rpcbind status
rpcbind (pid  1614) 正在运行...
[root@yu61 ~]# vim /etc/exports
/tmp *(rw)
[root@yu61 ~]# /etc/init.d/nfs restart
[root@yu61 ~]# showmount -e 192.168.1.61
Export list for 192.168.1.61:
/tmp *
2、编辑check_nfs命令脚本
[root@yu61 libexec]# pwd
/usr/local/nagios/libexec
[root@yu61 libexec]# cat check_nfs
check_nfs
#!/bin/bash
. /data1/server/nagios/libexec/utils.sh
CHECKNAME="Mount NFS"
RESULT=""
EXIT_STATUS=$STATE_OK
NFSFSTAB=`LC_ALL=C awk '!/^#/ && $3 ~ /^nfs/ && $3 != "nfsd" && $4 !~ /noauto/ { print $1 }' /etc/fstab`
NFSMTAB=`LC_ALL=C awk '$3 ~ /^nfs/ && $3 != "nfsd" && $2 != "/" { print $1 }' /proc/mounts`
theend() {
    echo $RESULT
    exit $EXIT_STATUS
}
CHECK_MOUNT(){
    LIST=""
    for list in $NFSFSTAB
    do
        NFS_MOUNT=$(LC_ALL=C cat /proc/mounts |cut -d " " -f 1|grep "${list}$")
        if [ -z "${NFS_MOUNT}" ];then
            LIST="$LIST$list "
        fi
    done
}
if [ -n "${NFSMTAB}" ];then
    CHECK_MOUNT
    if [ -z "${LIST}" ];then
        RESULT="$CHECKNAME OK - NFS BE MOUNTED PROPERLY"
        EXIT_STATUS=$STATE_OK
    else
        RESULT="$CHECKNAME WARNING - ${LIST} NOT BE MOUNTED"
        EXIT_STATUS=$STATE_WARNING
    fi
else
    RESULT="$CHECKNAME CRITICAL - ALL NFS NOT BE MOUNTED"
    EXIT_STATUS=$STATE_CRITICAL
fi
Theend注释:为了安全起见修改权限,不修改默认为644 root
[root@yu61 libexec]# chmod 755 check_nfs
[root@yu61 libexec]# chown nagios:nagcmd check_nfs
[root@yu61 libexec]# ll check_nfs
-rwxr-xr-x 1 nagios nagcmd 973 5月  22 13:27 check_nfs
3、修改配置文件
[root@yu61 objects]# cat hosts.cfg    ##末尾添加
####################chreck_host###########################
define host{
        use                     linux-server
        host_name               yu61
        alias                   nfs服务
        address                 192.168.1.61
        icon_p_w_picpath              switch.gif
        statusmap_p_w_picpath         switch.gd2
        2d_coords               100,200
        3d_coords               100,200,100
        }
[root@yu61 objects]# cat service.cfg  ##末尾添加
###################check_server_mysql#############################
define service{
                use                     local-service
                host_name               yu61
                service_groups          nfs服务组
                service_description     nfs服务
                check_command           check_nrpe!check_nfs
                }

##########################check_server_mysql_groups######################
define servicegroup{
                servicegroup_name       nfs服务组
                alias                   nfs服务器
                members                 yu61,nfs服务
}
[root@yu61 objects]# vim commands.cfg ##末尾添加
#'check_nrpe' command definition
definecommand{
command_name check_nrpe
command_line $USER1$/check_nrpe -H $HOSTADDRESS$ -c$ARG1$
}
define command{
command_name check_nfs
command_line $USER1$/check_nfs
}4、检测服务配置及启动服务
[root@yu61 objects]# /etc/init.d/nagios checkconfig
Total Warnings: 0
Total Errors:   0
[root@yu61 objects]# /etc/init.d/nagios reload
5、测试查看主机和服务
http://192.168.1.63/nagios/

实战:监控外部服务器httpd服务
1、修改配置文件
[root@yu61 objects]# cat hosts.cfg   ##最后编辑
define host{
        use                     linux-server
        host_name               yu63
        alias                   http服务
        address                 192.168.1.63
        icon_p_w_picpath              switch.gif
        statusmap_p_w_picpath         switch.gd2
        2d_coords               100,200
        3d_coords               100,200,100
        }
[root@yu61 objects]# cat service.cfg ##最后添加
###################check_server_httpd-63#############################
define service{
use local-service
host_name yu63
service_groups http服务组
service_description http服务
check_command check_http
}
##########################check_server_http-63_groups######################
define servicegroup{
servicegroup_name http服务组
alias http服务器
members yu63,http服务
}
#Check_http的命令默认就有的
2、检测配置文件和重启服务
[root@yu61 objects]# /etc/init.d/nagios checkconfig
Total Warnings: 0
Total Errors:   0
[root@yu63 nrpe-2.12]# service iptables stop
[root@yu63 nrpe-2.12]# setenforce 1
setenforce: SELinux is disabled
[root@yu63 nrpe-2.12]# service httpd restart
3、测试查看主机和服务

免责声明:本站发布的内容(图片、视频和文字)以原创、转载和分享为主,文章观点不代表本网站立场,如果涉及侵权请联系站长邮箱:is@yisu.com进行举报,并提供相关证据,一经查实,将立刻删除涉嫌侵权内容。


