Spring BootеҰӮдҪ•иҝһжҺҘLDAP
е°Ҹзј–з»ҷеӨ§е®¶еҲҶдә«дёҖдёӢSpring BootеҰӮдҪ•иҝһжҺҘLDAPпјҢзӣёдҝЎеӨ§йғЁеҲҶдәәйғҪиҝҳдёҚжҖҺд№ҲдәҶи§ЈпјҢеӣ жӯӨеҲҶдә«иҝҷзҜҮж–Үз« з»ҷеӨ§е®¶еҸӮиҖғдёҖдёӢпјҢеёҢжңӣеӨ§е®¶йҳ…иҜ»е®ҢиҝҷзҜҮж–Үз« еҗҺеӨ§жңү收иҺ·пјҢдёӢйқўи®©жҲ‘们дёҖиө·еҺ»дәҶи§ЈдёҖдёӢеҗ§пјҒ
жң¬ж–Үзӣ®зҡ„пјҡдҪҝз”ЁSpring Bootжһ„е»әйЎ№зӣ®пјҢеё®еҠ©иҜ»иҖ…еҝ«йҖҹй…ҚзҪ®е№¶дҪҝз”ЁSpring LDAPж“ҚдҪңLDAPгҖӮеӨ§иҮҙжӯҘйӘӨеҰӮдёӢпјҡ
1.еҲӣе»әSpring BootйЎ№зӣ®пјҲзәҰ1еҲҶй’ҹпјү
2.ж·»еҠ pom.xmlж–Ү件дёӯSpring LDAPдҫқиө–пјҲзәҰ1еҲҶй’ҹпјү
3.й…ҚзҪ®Spring LDAPиҝһжҺҘдҝЎжҒҜпјҲзәҰ1еҲҶй’ҹпјү
4.еҲӣе»әе®һдҪ“зұ»дҪңдёәLDAPдёӯзҡ„entryжҳ е°„пјҲODMжҳ е°„еҠҹиғҪпјҢзұ»дјјORMпјү
5.дҪҝз”ЁldapTemplateд№ҰеҶҷserviceеұӮзҡ„ж–№жі•пјҲзәҰ3еҲҶй’ҹпјү
6.зј–еҶҷcontrollerеұӮпјҲзәҰ3еҲҶй’ҹпјү
1.еҲӣе»әSpring BootйЎ№зӣ®пјҲзәҰ1еҲҶй’ҹпјү
IDEAдёӯзӮ№еҮ»file - new - project
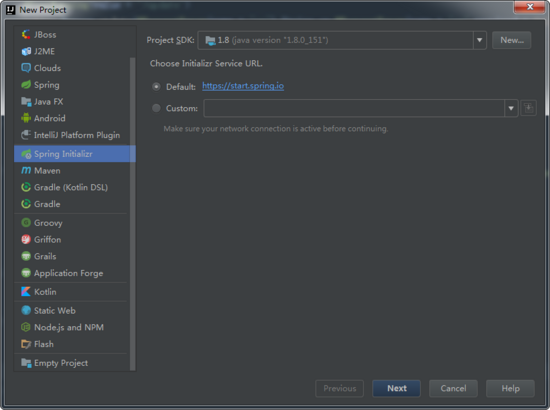
еӣҫ1
еҰӮдёҠеӣҫпјҢйҖүжӢ©е·Ұдҫ§зҡ„ Spring Initializrеё®еҠ©еҲқе§ӢеҢ–springйЎ№зӣ®пјҢй…ҚзҪ®еҘҪSDKеҗҺпјҢзӮ№еҮ»nextгҖӮ
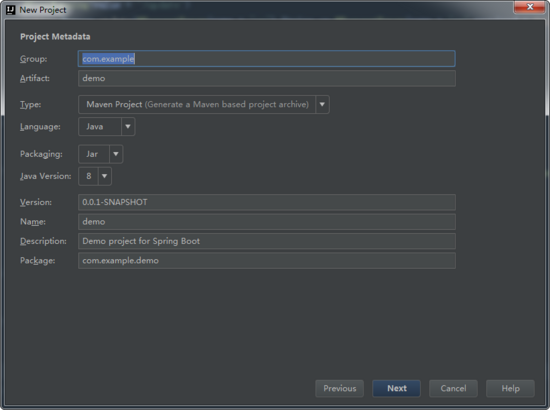
еӣҫ2
зӮ№еҮ»еҗҺпјҢеҰӮеӣҫ2пјҢеҰӮжһңеҸӘжҳҜеҒҡdemoпјҢиҜҘйЎөйқўй»ҳи®ӨеҚіеҸҜпјҢзӮ№еҮ»nextгҖӮ
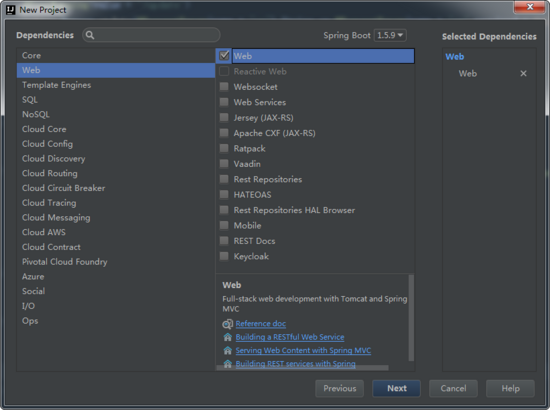
еӣҫ3
еҰӮеӣҫ3пјҢжҲ‘们йҖүжӢ©webпјҢеҸідҫ§дјҡжҳҫзӨәwebзӣёе…ізҡ„组件пјҢжҲ‘们йҖүжӢ©еҸідҫ§дёӯзҡ„WebпјҢе°Ҷе…¶еүҚйқўзҡ„жЎҶеӢҫйҖүдёҠгҖӮиҝҷд»ЈиЎЁеңЁеҲӣе»әзҡ„spring bootйЎ№зӣ®дёӯдјҡеј•е…Ҙwebзӣёе…ізҡ„дҫқиө–гҖӮзӮ№еҮ»nextгҖӮ
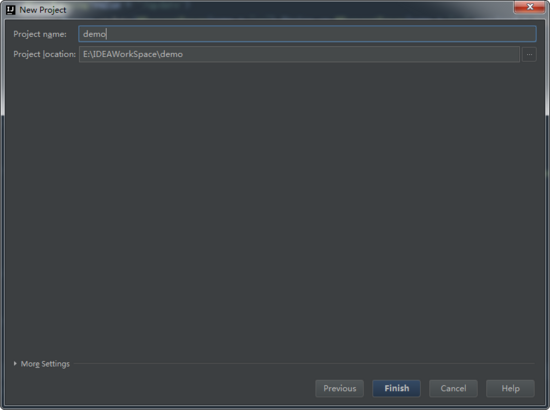
еӣҫ4
еҰӮеӣҫ4пјҢиҝҷйҮҢиҮӘе·ұе‘ҪеҗҚеҚіеҸҜпјҢзӮ№еҮ»finishгҖӮ
2.ж·»еҠ pom.xmlж–Ү件дёӯSpring LDAPдҫқиө–пјҲзәҰ1еҲҶй’ҹпјү
еӣҫ5
еҰӮдёҠеӣҫеӣҫ5пјҢеңЁйЎ№зӣ®дёӯеҸҢеҮ»pom.xmlжқҘж·»еҠ дҫқиө–гҖӮ

еӣҫ6
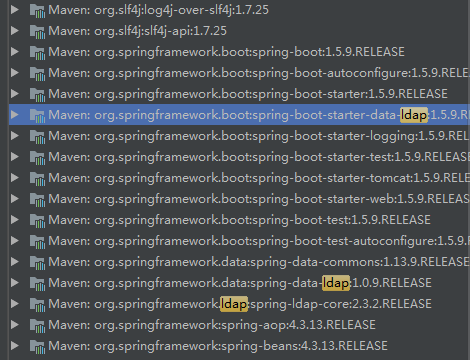
еҰӮеӣҫ6жүҖзӨәпјҢж–Ү件дёӯе·Із»ҸеҠ иҪҪдәҶspring-boot-starter-webдҫқиө–пјҢжҲ‘们иҰҒдҪҝз”ЁSpring LDAPжқҘж“ҚдҪңLDAPжңҚеҠЎеҷЁйңҖиҰҒж·»еҠ spring-boot-starter-data-ldapгҖӮиҜҘдҫқиө–дјҡиҮӘеҠЁеҠ иҪҪspring-ldap-core дёҺ spring-data-ldapдҫқиө–гҖӮе…¶дёӯspring-ldap-coreжҳҜldapж“ҚдҪңзҡ„ж ёеҝғдҫқиө–пјҢиҖҢspring-data-ldapжҸҗдҫӣдәҶODMзҡ„еҠҹиғҪпјҢиғҪеӨҹз®ҖеҢ–ж“ҚдҪңгҖӮжҲ‘们еҸҜд»ҘеңЁйЎ№зӣ®зҡ„External LibrariesдёӯзңӢеҲ°иҝҷдёӨдёӘдҫқиө–пјҢеҰӮдёӢеӣҫеӣҫ7дёӯдёүдёӘй»„иүІй«ҳдә®еӨ„пјҡ
еӣҫ7
3.й…ҚзҪ®Spring LDAPиҝһжҺҘдҝЎжҒҜ
еӣҫ8
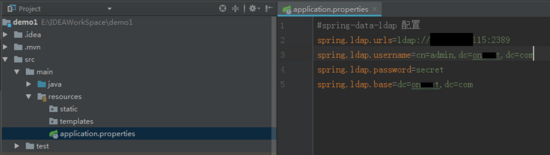
еҰӮдёҠеӣҫеӣҫ8пјҢж №жҚ®spring bootе®ҳзҪ‘еҜ№ldapй…ҚзҪ®зҡ„иҜҙжҳҺжқҘй…ҚзҪ®пјҢеҸҜд»ҘзңӢиҝҷйҮҢгҖӮиҝҷж ·й…ҚзҪ®д№ӢеҗҺпјҢspring bootдјҡиҮӘеҠЁиҜ»еҸ–иҜҘй…ҚзҪ®гҖӮ
4.еҲӣе»әе®һдҪ“зұ»дҪңдёәLDAPдёӯзҡ„entryжҳ е°„
жң¬дҫӢдёӯдҪҝз”ЁODMеҠҹиғҪпјҢжһҒеӨ§зҡ„з®ҖеҢ–дәҶLDAPзҡ„ж“ҚдҪңпјҢе…ідәҺODMжӣҙеӨҡзҡ„дҝЎжҒҜпјҢеҸҜд»ҘеҸӮиҖғзҝ»иҜ‘зҡ„е®ҳж–№ж–ҮжЎЈгҖӮ
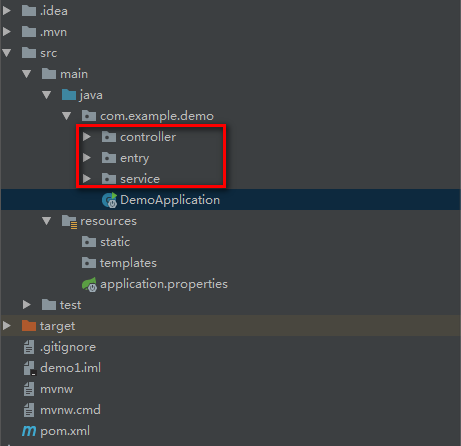
жҲ‘们еңЁйЎ№зӣ®дёӯеҲӣе»әеҰӮдёӢз»“жһ„пјҡ
еӣҫ9
зҺ°еңЁпјҢжҲ‘们еңЁentryеҢ…дёӢеҶҷдёҺentryдә’зӣёжҳ е°„зҡ„е®һдҪ“зұ»гҖӮе…¶дёӯпјҢжҲ‘зҡ„LDAPз»“жһ„еҰӮдёӢ
еӣҫ10
ж–°е»әPersonзұ»
package com.example.demo.entry;
import com.fasterxml.jackson.annotation.JsonIgnore;
import org.springframework.ldap.odm.annotations.Attribute;
import org.springframework.ldap.odm.annotations.Entry;
import org.springframework.ldap.odm.annotations.Id;
import org.springframework.ldap.support.LdapNameBuilder;
import javax.naming.Name;
/**
 * @Author: geng_pool
 * @Description:
 * @Date: Created in 2017/12/27 10:24
 * @Modified by:
 */
@Entry(objectClasses = {"organizationalPerson","person","top"},base = "o=myorg")
public class Person {
 @Id
 @JsonIgnore
 private Name dn;

 @Attribute(name="cn")
 private String cn;

 @Attribute(name="sn")
 private String sn;

 @Attribute(name="userPassword")
 private String userPassword;

 public Person(String cn) {
  Name dn = LdapNameBuilder.newInstance()
    .add("o", "myorg")
    .add("cn", cn)
    .build();
  this.dn = dn;
 }
 public Person(){}

 /* getter */
 public Name getDn() {
  return dn;
 }

 public String getCn() {
  return cn;
 }

 public String getSn() {
  return sn;
 }

 public String getUserPassword() {
  return userPassword;
 }

 /* setter */
 public void setDn(Name dn) {
  this.dn = dn;
 }

 public void setCn(String cn) {
  this.cn = cn;
  if(this.dn==null){
   Name dn = LdapNameBuilder.newInstance()
     .add("o", "myorg")
     .add("cn", cn)
     .build();
   this.dn = dn;
  }
 }

 public void setSn(String sn) {
  this.sn = sn;
 }

 public void setUserPassword(String userPassword) {
  this.userPassword = userPassword;
 }

 @Override
 public String toString() {
  return "Person{" +
    "dn=" + dn.toString() +
    ", cn='" + cn + '\'' +
    ", sn='" + sn + '\'' +
    ", userPassword='" + userPassword + '\'' +
    '}';
 }
}жіЁж„Ҹ@EntryдёҺ@Idдёәеҝ…йЎ»зҡ„гҖӮиҖҢ@JsonIgnoreжҳҜдёәдәҶе°Ҷpersonдј з»ҷеүҚз«Ҝж—¶дёҚжҠҘй”ҷпјҢеӣ дёәNameзұ»еһӢзҡ„ж— жі•иҮӘеҠЁи§ЈжһҗжҲҗjsonж јејҸгҖӮжіЁж„ҸжҲ‘дёәдәҶж–№дҫҝпјҢеңЁ public Person(String cn) {}жһ„йҖ ж–№жі•дёӯеҶҷдёҠдәҶDNеҖјзҡ„з”ҹжҲҗж–№жі•пјҢеңЁsetCnдёӯд№ҹеҶҷдёҠдәҶиҜҘж–№жі•пјҢеҪ“然еӯҳеңЁд»Јз ҒйҮҚеӨҚй—®йўҳпјҢеҝҪз•Ҙе°ұеҘҪгҖӮ
5.дҪҝз”ЁldapTemplateд№ҰеҶҷserviceеұӮзҡ„ж–№жі•
еңЁserviceеҢ…дёӯпјҢж–°е»әOdmPersonRepoзұ»
package com.example.demo.service;
import com.example.demo.entry.Person;
import org.springframework.beans.factory.annotation.Autowired;
import org.springframework.ldap.core.LdapTemplate;
import org.springframework.stereotype.Service;
import static org.springframework.ldap.query.LdapQueryBuilder.query;

/**
 * @Author: geng_pool
 * @Description:
 * @Date: Created in 2017/12/27 10:37
 * @Modified by:
 */
@Service
public class OdmPersonRepo {

 @Autowired
 private LdapTemplate ldapTemplate;

 public Person create(Person person){
  ldapTemplate.create(person);
  return person;
 }

 public Person findByCn(String cn){
  return ldapTemplate.findOne(query().where("cn").is(cn),Person.class);
 }

 public Person modifyPerson(Person person){
  ldapTemplate.update(person);
  return person;
 }

 public void deletePerson(Person person){
  ldapTemplate.delete(person);
 }

}еҸҜд»ҘзңӢеҲ°пјҢеҹәжң¬зҡ„еўһеҲ ж”№жҹҘж“ҚдҪңйғҪеё®жҲ‘们е®һзҺ°дәҶпјҢжҲ‘们еҸӘиҰҒи°ғз”ЁдёҖдёӢldapTemplateдёӯзҡ„ж–№жі•еҚіеҸҜгҖӮиӢҘиҰҒжӣҙиҮӘз”ұзҡ„ж“ҚдҪңldapзҡ„еўһеҲ ж”№жҹҘпјҢеҸҜеҸӮйҳ…зҝ»иҜ‘зҡ„е®ҳж–№ж–ҮжЎЈгҖӮ
6.зј–еҶҷcontrollerеұӮ
еңЁcontrollerеҢ…дёӢпјҢж–°е»әдёҖдёӘtestControllerзұ»жқҘжөӢиҜ•LDAPзҡ„ж“ҚдҪңгҖӮ
package com.example.demo.controller;

import com.example.demo.entry.Person;
import com.example.demo.service.OdmPersonRepo;
import org.springframework.beans.factory.annotation.Autowired;
import org.springframework.ldap.core.LdapTemplate;
import org.springframework.web.bind.annotation.*;

/**
 * @Author: geng_pool
 * @Description:
 * @Date: Created in 2017/12/27 10:50
 * @Modified by:
 */
@RestController
public class testController {
 @Autowired
 private OdmPersonRepo odmPersonRepo;

 @RequestMapping(value = "/findOne",method = RequestMethod.POST)
 public Person findByCn(@RequestParam(name = "cn",required = true) String cn){
  return odmPersonRepo.findByCn(cn);
 }

 @PostMapping(value = "/create")
 public Person create(@RequestParam(name = "cn") String cn,@RequestParam(name = "sn") String sn,@RequestParam(name = "userPassword") String userPassworld){
  Person person = new Person();
  person.setCn(cn);
  person.setSn(sn);
  person.setUserPassword(userPassworld);
  return odmPersonRepo.create(person);
 }


 @PostMapping(value = "/update")
 public Person update(@RequestParam(name = "cn") String cn,@RequestParam(name = "sn") String sn,@RequestParam(name = "userPassword") String userPassworld){
  Person person = new Person();
  person.setCn(cn);
  person.setSn(sn);
  person.setUserPassword(userPassworld);
  return odmPersonRepo.modifyPerson(person);
 }

 @PostMapping(value = "/delete")
 public void delete(@RequestParam(name = "cn")String cn){
  Person person = new Person();
  person.setCn(cn);
  odmPersonRepo.deletePerson(person);
 }

}иҮіжӯӨпјҢдёҖдёӘеҹәжң¬зҡ„demoе®ҢжҲҗе•ҰгҖӮдёӢйқўжҲ‘们жөӢиҜ•дёҖдёӢ
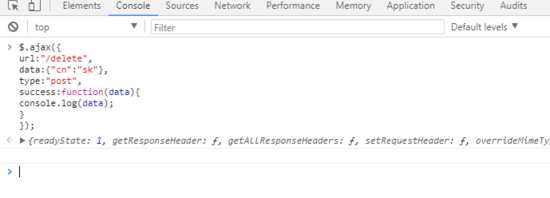
жөӢиҜ•
дёәдәҶеӨ§е®¶йғҪиғҪи·ҹзқҖжӯҘйӘӨжқҘпјҢжҲ‘е°ұдёҚдҪҝз”ЁPostmanжқҘжөӢиҜ•пјҢиҖҢжҳҜеңЁжөҸи§ҲеҷЁдёӯжөӢиҜ•жҺҘеҸЈгҖӮгҖҒ
еҗҜеҠЁspring bootпјҢжІЎжңүжҠҘй”ҷзҡ„иҜқпјҢжү“ејҖжөҸи§ҲеҷЁеҲ° localhost:8080/ пјҢжҢүдёӢF12пјҢеј№еҮәејҖеҸ‘иҖ…жЁЎејҸпјҢжүҫеҲ°consoleжҺ§еҲ¶еҸ°ж–№дҫҝжҲ‘们еҸ‘йҖҒжөӢиҜ•иҜӯеҸҘгҖӮ
йҰ–е…ҲпјҢеј•е…Ҙjquery.jsгҖӮжү“ејҖjquery.jsпјҢе…ЁйҖү-еӨҚеҲ¶-еңЁconsoleдёӯзІҳиҙҙ-еӣһиҪҰпјҢеҰӮдёӢеӣҫпјҡ
еӣҫ11
жҳҫзӨәдёәtrueпјҢд»ЈиЎЁеҠ иҪҪжҲҗеҠҹпјҢжҲ‘们еҸҜд»ҘдҪҝз”Ёjqueryзҡ„ajaxжқҘжөӢиҜ•дәҶгҖӮ
ж–°еўһж•°жҚ®
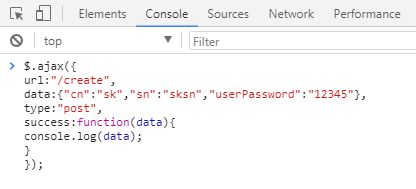
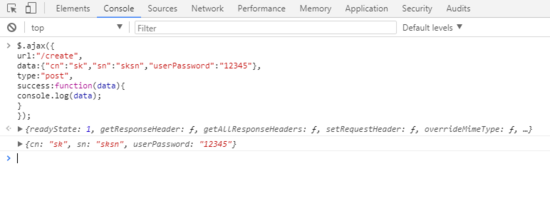
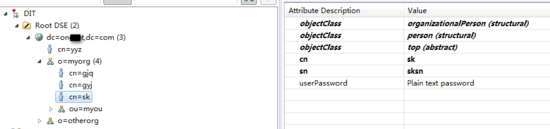
еӣҫ12
жӯЈеҰӮcontrollerеұӮзҡ„testControllerиҰҒжұӮзҡ„йӮЈж ·пјҢжҲ‘们еңЁең°еқҖ /create дёҠдҪҝз”Ёpostж–№жі•пјҢе°Ҷж•°жҚ®cn sn userPasswordдј иҝҮеҺ»
еӣҫ13
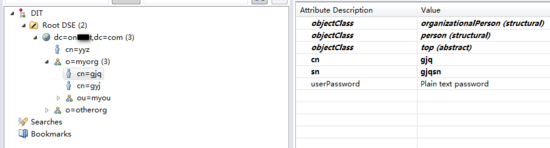
иҖҢеңЁLDAPжңҚеҠЎеҷЁдёӯпјҢд№ҹжҳҫзӨәдәҶж–°еўһзҡ„ж•°жҚ®
еӣҫ14
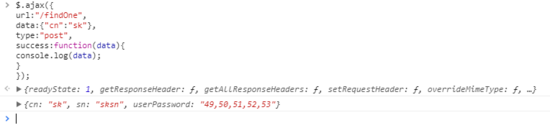
жҹҘжүҫж•°жҚ®
еӣҫ15
д№ҹиғҪж №жҚ®cnжӯЈзЎ®жҹҘжүҫеҲ°ж•°жҚ®гҖӮ
дҝ®ж”№ж•°жҚ®
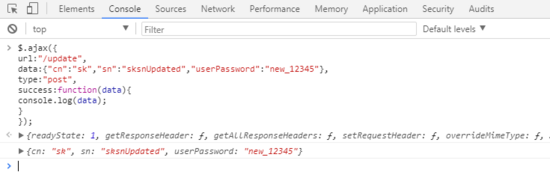
еӣҫ16
жҲ‘们жҹҘзңӢLDAPдёӯжҳҜеҗҰдҝ®ж”№
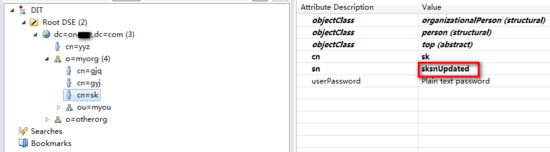
еӣҫ17
еҸҜд»ҘзңӢеҲ°иғҪеӨҹжӯЈеёёдҝ®ж”№ж•°жҚ®
еҲ йҷӨж•°жҚ®
еӣҫ18
жҹҘзңӢLDAPдёӯжҳҜеҗҰеҲ йҷӨ
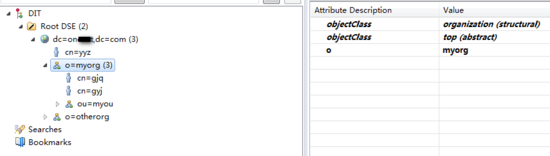
еӣҫ19
еҸҜд»ҘзңӢеҲ°пјҢж•°жҚ®иў«жӯЈзЎ®еҲ йҷӨдәҶгҖӮ
е…¶д»–иҜҙжҳҺ
еҲҡжүҚзҡ„дҫӢеӯҗдёӯпјҢд»Јз ҒжңүйңҖиҰҒе®Ңе–„зҡ„ең°ж–№пјҢдҪҶеҜ№дәҺdemoжј”зӨәжқҘиҜҙе®Ңе…ЁеҸҜд»ҘеҝҚеҸ—гҖӮеӨ§е®¶еҸҜиғҪд№ҹзңӢеҲ°дәҶиҝҷд№ҲеҒҡд№ҹжңүдәӣзјәзӮ№пјҢжҲ‘еңЁupdateзҡ„ж—¶еҖҷпјҢйңҖиҰҒе°Ҷдҝ®ж”№еҗҺзҡ„personзҡ„жүҖжңүеұһжҖ§еҖјйғҪдј еҲ°еҗҺеҸ°жқҘпјҲиҝҷд№ҹдёҚз®—е•ҘзјәзӮ№пјҢе…ізі»ж•°жҚ®еә“зҡ„жӣҙж–°д№ҹжҳҜиҝҷж ·пјүпјҢ并且дёҚиғҪдҝ®ж”№cnзҡ„еҖј(иҝҷе°ұжҳҜдёәд»Җд№Ҳе…¶д»–дҫӢеӯҗдёӯйғҪжҳҜдҪҝз”ЁuidжқҘдҪңдёәdnзҡ„дёҖйғЁеҲҶпјҢзұ»дјјдәҺе…ізі»ж•°жҚ®еә“зҡ„дё»й”®зҡ„дҪңз”Ё)пјҢеӣ дёәдҝ®ж”№еҗҺиҜҘentryзҡ„dnеҖје°ұеҸҳеҢ–дәҶпјҢODMе°ұж— жі•зЎ®е®ҡжӣҙж–°е“ӘдёӘж•°жҚ®гҖӮдјҡжҠҘ javax.naming.NameNotFoundException: [LDAP: error code 32 - No Such Object] й”ҷиҜҜгҖӮ
еҲ йҷӨж“ҚдҪңд№ҹеғҸе…ізі»ж•°жҚ®еә“зҡ„ж“ҚдҪңдёҖж ·пјҢзӣҙжҺҘз»ҷcnеҚіеҸҜпјҢиҝҷжҳҜеӣ дёәжҲ‘们еңЁpersonзұ»дёӯsetCn()ж–№жі•еҶ…еҶҷдәҶdnзҡ„з”ҹжҲҗеҮҪж•°пјҢиҝҷж ·ODMжүҚиғҪж №жҚ®иў«@IdжүҖжіЁйҮҠзҡ„dnжқҘжүҫеҲ°LDAPдёӯзҡ„entry并жү§иЎҢеҲ йҷӨж“ҚдҪңгҖӮ
жҲ‘们еңЁPersonзұ»дёӯеҶҷдәҶNameзұ»еһӢзҡ„dnеҖјзҡ„жһ„е»әж–№жі•пјҢдҪҶжҳҜжҲ‘дёҖејҖе§ӢжҢүз…§е®ҳзҪ‘зҡ„д»Јз ҒжқҘеҶҷпјҢжҖ»жҳҜеҮәй—®йўҳпјҢеңЁstackOverFlowдёӯжүҫеҲ°дәҶзӯ”жЎҲгҖӮй“ҫжҺҘеңЁиҝҷйҮҢгҖӮ
жғіиҰҒжӣҙж·ұе…Ҙзҡ„дәҶи§ЈпјҢеҸҜд»ҘеҸӮиҖғзҝ»иҜ‘зҡ„е®ҳж–№ж–ҮжЎЈгҖӮдәҶи§ЈжӣҙиҮӘз”ұжӣҙдёӘжҖ§еҢ–зҡ„ж“ҚдҪңгҖӮ
д»ҘдёҠжҳҜвҖңSpring BootеҰӮдҪ•иҝһжҺҘLDAPвҖқиҝҷзҜҮж–Үз« зҡ„жүҖжңүеҶ…е®№пјҢж„ҹи°ўеҗ„дҪҚзҡ„йҳ…иҜ»пјҒзӣёдҝЎеӨ§е®¶йғҪжңүдәҶдёҖе®ҡзҡ„дәҶи§ЈпјҢеёҢжңӣеҲҶдә«зҡ„еҶ…е®№еҜ№еӨ§е®¶жңүжүҖеё®еҠ©пјҢеҰӮжһңиҝҳжғіеӯҰд№ жӣҙеӨҡзҹҘиҜҶпјҢж¬ўиҝҺе…іжіЁдәҝйҖҹдә‘иЎҢдёҡиө„и®Ҝйў‘йҒ“пјҒ


