Android Tab 控件详解及实例
在桌面应用中Tab控件使用得非常普遍,那么我们经常在Android中也见到以Tab进行布局的客户端。那么Android中的Tab是如何使用的呢?
1.Activity
package com.wicresoft.activity;

import com.wicresoft.myandroid.R;

import android.app.TabActivity;
import android.os.Bundle;
import android.util.Log;
import android.widget.TabHost;
import android.widget.TabHost.OnTabChangeListener;

@SuppressWarnings("deprecation")
public class mainActivity extends TabActivity {
  private TabHost tabhost;
  @Override
  protected void onCreate(Bundle savedInstanceState){
    super.onCreate(savedInstanceState);
    setContentView(R.layout.main_activity);
    //从TabActivity上面获取放置Tab的TabHost
    tabhost = getTabHost();
    tabhost.addTab(tabhost
         //创建新标签one
        .newTabSpec("one")
        //设置标签标题
        .setIndicator("红色")
        //设置该标签的布局内容
        .setContent(R.id.widget_layout_red));
    tabhost.addTab(tabhost
        .newTabSpec("two")
        .setIndicator("黄色")
        .setContent(R.id.widget_layout_yellow));
    tabhost.addTab(tabhost
        .newTabSpec("three")
        .setIndicator("蓝色")
        .setContent(R.id.widget_layout_blue));
    tabhost.setOnTabChangedListener(listener);
  }

  private OnTabChangeListener listener = new OnTabChangeListener(){
    @Override
    public void onTabChanged(String arg0) {
      // TODO Auto-generated method stub
      Log.i("TabChange", arg0);
    }
  };
}
2.布局文件
<?xml version="1.0" encoding="utf-8"?>
<TabHost xmlns:android="http://schemas.android.com/apk/res/android"
  android:layout_width="match_parent"
  android:layout_height="match_parent"
  android:id="@android:id/tabhost">

<LinearLayout
  android:layout_width="match_parent"
  android:layout_height="match_parent"
  android:orientation="vertical">

  <TabWidget
    android:layout_width="match_parent"
    android:layout_height="wrap_content"
    android:id="@android:id/tabs">
  </TabWidget>

  <FrameLayout
    android:layout_width="match_parent"
    android:layout_height="0dp"
    android:layout_weight="1"
    android:id="@android:id/tabcontent">
    <LinearLayout
      android:layout_width="match_parent"
      android:layout_height="match_parent"
      android:id="@+id/widget_layout_red"
      android:background="#ff0000"
      android:orientation="vertical">
    </LinearLayout>

     <LinearLayout
      android:layout_width="match_parent"
      android:layout_height="match_parent"
      android:id="@+id/widget_layout_yellow"
      android:background="#FCD209"
      android:orientation="vertical">
     </LinearLayout>
     <LinearLayout
      android:layout_width="match_parent"
      android:layout_height="match_parent"
      android:id="@+id/widget_layout_blue"
      android:background="#0000E3"
      android:orientation="vertical">
     </LinearLayout>
  </FrameLayout>
 </LinearLayout>
</TabHost>
3.Manifest文件
<manifest xmlns:android="http://schemas.android.com/apk/res/android"
  package="com.wicresoft.myandroid"
  android:versionCode="1"
  android:versionName="1.0" >

  <uses-sdk
    android:minSdkVersion="8"
    android:targetSdkVersion="19" />

  <application
    android:allowBackup="true"
    android:icon="@drawable/ic_launcher"
    android:label="@string/app_name"
    android:theme="@style/AppTheme" >
    <activity
      android:name="com.wicresoft.activity.mainActivity"
      android:label="@string/app_name">
      <intent-filter>
        <action android:name="android.intent.action.MAIN"/>
        <category android:name="android.intent.category.LAUNCHER"/>
      </intent-filter>
    </activity>
  </application>

</manifest>
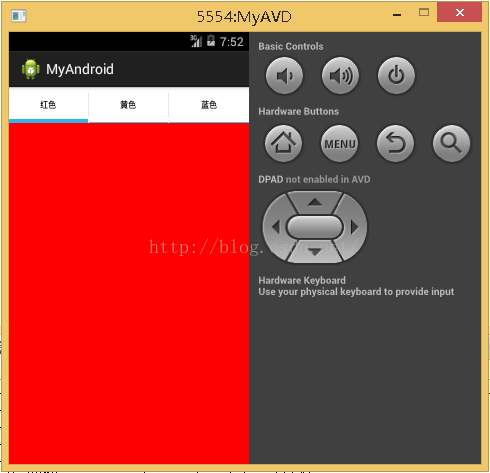
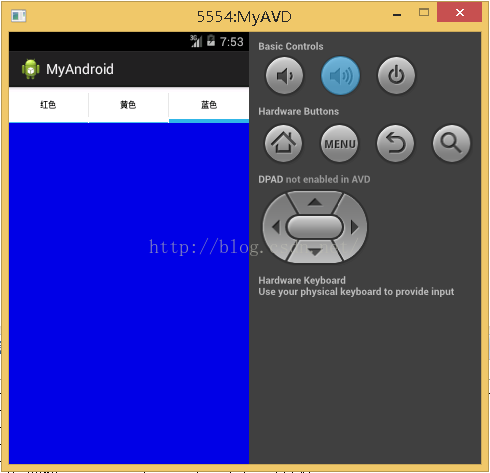
4.效果


感谢阅读,希望能帮助到大家,谢谢大家对本站的支持!
免责声明:本站发布的内容(图片、视频和文字)以原创、转载和分享为主,文章观点不代表本网站立场,如果涉及侵权请联系站长邮箱:is@yisu.com进行举报,并提供相关证据,一经查实,将立刻删除涉嫌侵权内容。