本篇内容主要讲解“elasticsearch6.7.1集群搭建步骤”,感兴趣的朋友不妨来看看。本文介绍的方法操作简单快捷,实用性强。下面就让小编来带大家学习“elasticsearch6.7.1集群搭建步骤”吧!
elasticsearch下载地址:ttps://github.com/elastic/elasticsearch/releases
ik下载地址:https://github.com/medcl/elasticsearch-analysis-ik/releases
1.下载解压es和jdk包
[root@node1 ~]# wget https://artifacts.elastic.co/downloads/elasticsearch/elasticsearch-6.7.1.tar.gz
[root@node1 ~]# tar xvf elasticsearch-6.7.1.tar.gz -C /opt/
[root@node1 ~]# wget https://download.oracle.com/otn-pub/java/jdk/8u202-b08/1961070e4c9b4e26a04e7f5a083f551e/jdk-8u202-linux-x64.rpm?AuthParam=1552723272_02cde009ff2384cfcf01e2c377d085cc
[root@node1 ~]# scp jdk-8u202-linux-x64.rpm node2:/root/ --将jdk传到各节点上
[root@node1 ~]# scp jdk-8u202-linux-x64.rpm node3:/root/ --将jdk传到各节点上
[root@node1 ~]# rpm -ivh jdk-8u202-linux-x64.rpm --在各节点安装jdk
[root@node1 ~]# cd /opt/elasticsearch-6.7.1/
[root@node1 elasticsearch-6.7.1]# useradd wuhan --创建es用户,es不能用root用户启动
[root@node1 elasticsearch-6.7.1]# passwd wuhan
更改用户 wuhan 的密码 。
新的 密码:
无效的密码: 密码少于 8 个字符
重新输入新的 密码:
passwd:所有的身份验证令牌已经成功更新。
[root@node1 elasticsearch-6.7.1]# chown -R wuhan:wuhan /opt/elasticsearch-6.7.1/
[root@node1 elasticsearch-6.7.1]# vim /etc/security/limits.conf
* soft nofile 65535
* hard nofile 65535
[root@node1 elasticsearch-6.7.1]# vim /etc/sysctl.conf
vm.max_map_count=262144
[root@node1 elasticsearch-6.7.1]# sysctl -p
[root@node1 elasticsearch-6.7.1]# vim /opt/elasticsearch-6.7.1/config/elasticsearch.yml
cluster.name: wuhan --设置集群节点名
node.name: node-1 --为每台机器设置node名字,各节点名字不能一样
path.data: /opt/elasticsearch-6.7.1/data --es数据目录
path.logs: /opt/elasticsearch-6.7.1/logs --日志目录
discovery.zen.ping.unicast.hosts: ["node1", "node2", "node3", "node4"]
network.host: 172.16.8.23 --绑定本机的IP地址
http.port: 9200 --指定端口
[root@node1 elasticsearch-6.7.1]#
2.将node1的es文件复制到其它节点(与node1配置一样)
[root@node1 opt]# scp -r elasticsearch-6.7.1 node2:/opt/
[root@node1 opt]# scp -r elasticsearch-6.7.1 node3:/opt/
[root@node2 ~]# chown -R wuhan:wuhan /opt/elasticsearch-6.7.1/
[root@node2 ~]# vim /etc/security/limits.conf
* soft nofile 65535
* hard nofile 65535
[root@node2 ~]# vim /etc/sysctl.conf
vm.max_map_count=262144
[root@node2 ~]# sysctl -p
3.启动各节点的es服务
[root@node1 ~]# su - wuhan
[wuhan@node1 ~]$ cd /opt/elasticsearch-6.7.1/bin/
[wuhan@node1 bin]$ ./elasticsearch -d
[wuhan@node1 bin]# curl http://172.16.8.23:9200
{
"name" : "node-1",
"cluster_name" : "wuhan",
"cluster_uuid" : "_na_",
"version" : {
"number" : "6.7.1",
"build_flavor" : "default",
"build_type" : "tar",
"build_hash" : "2f32220",
"build_date" : "2019-04-02T15:59:27.961366Z",
"build_snapshot" : false,
"lucene_version" : "7.7.0",
"minimum_wire_compatibility_version" : "5.6.0",
"minimum_index_compatibility_version" : "5.0.0"
},
"tagline" : "You Know, for Search"
}
[wuhan@node1 bin]#
4.安装head插件
[root@node1 ~]$ wget https://nodejs.org/dist/v11.13.0/node-v11.13.0-linux-x64.tar.xz
[root@node1 ~]$ tar xvf node-v11.13.0-linux-x64.tar.xz
[root@node1 ~]$ mv node-v11.13.0-linux-x64 /opt/node-v11.13.0
[root@node1 ~]$ vim /etc/profile
export PATH=$PATH:/opt/node-v11.13.0/bin
[root@node1 ~]$ git clone git://github.com/mobz/elasticsearch-head.git
[root@node1 ~]# cd elasticsearch-head/
[root@node1 elasticsearch-head]# npm install
npm WARN elasticsearch-head@0.0.0 license should be a valid SPDX license expression
npm WARN optional SKIPPING OPTIONAL DEPENDENCY: fsevents@1.2.7 (node_modules/fsevents):
npm WARN notsup SKIPPING OPTIONAL DEPENDENCY: Unsupported platform for fsevents@1.2.7: wanted {"os":"darwin","arch":"any"} (current: {"os":"linux","arch":"x64"})
added 9 packages from 13 contributors and audited 1853 packages in 157.775s
found 33 vulnerabilities (19 low, 8 moderate, 6 high)
run `npm audit fix` to fix them, or `npm audit` for details
[root@node1 elasticsearch-head]# npm run start
> elasticsearch-head@0.0.0 start /root/elasticsearch-head
> grunt server
Running "connect:server" (connect) task
Waiting forever...
Started connect web server on http://localhost:9100
5.修改es配置文件,重启服务
[wuhan@node1 bin]# vim /opt/elasticsearch-6.7.1/config/elasticsearch.yml
http.cors.enabled: true
http.cors.allow-origin: "*"
[wuhan@node1 bin]$ jps
17849 Elasticsearch
17935 Jps
[wuhan@node1 bin]$ kill -9 17849
[wuhan@node1 bin]$ cd /opt/elasticsearch-6.7.1/bin
[wuhan@node1 bin]$ ./elasticsearch -d
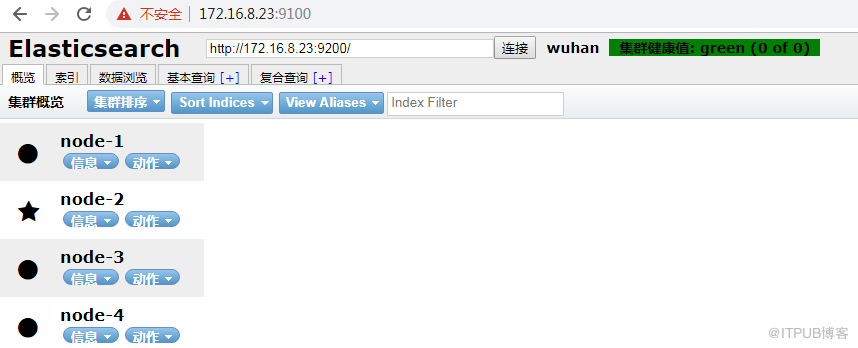
6.访问web页面
[root@node1 elasticsearch-head]# grunt server &
[1] 20212
[root@node1 elasticsearch-head]#
错误提示:
npm ERR! code ELIFECYCLE
npm ERR! errno 1
npm ERR! phantomjs-prebuilt@2.1.16 install: `node install.js`
npm ERR! Exit status 1
npm ERR!
npm ERR! Failed at the phantomjs-prebuilt@2.1.16 install script.
npm ERR! This is probably not a problem with npm. There is likely additional logging output above.
npm ERR! A complete log of this run can be found in:
npm ERR! /root/.npm/_logs/2019-04-09T11_24_27_132Z-debug.log
解决方法:
[root@node1 elasticsearch-head]# npm install phantomjs-prebuilt@2.1.16 --ignore-scripts
npm notice created a lockfile as package-lock.json. You should commit this file.
npm WARN elasticsearch-head@0.0.0 license should be a valid SPDX license expression
npm WARN optional SKIPPING OPTIONAL DEPENDENCY: fsevents@1.2.7 (node_modules/fsevents):
npm WARN notsup SKIPPING OPTIONAL DEPENDENCY: Unsupported platform for fsevents@1.2.7: wanted {"os":"darwin","arch":"any"} (current: {"os":"linux","arch":"x64"})
+ phantomjs-prebuilt@2.1.16
added 62 packages from 64 contributors, removed 4 packages and audited 1717 packages in 20.487s
found 31 vulnerabilities (18 low, 7 moderate, 6 high)
run `npm audit fix` to fix them, or `npm audit` for details
[root@node1 elasticsearch-head]#
错误提示:
[2019-04-10T14:42:30,931][ERROR][o.e.b.Bootstrap ] [node-1] Exception
java.lang.IllegalArgumentException: Plugin [analysis-ik] was built for Elasticsearch version 6.7.0 but version 6.7.1 is running
at org.elasticsearch.plugins.PluginsService.verifyCompatibility(PluginsService.java:346) ~[elasticsearch-6.7.1.jar:6.7.1]
at org.elasticsearch.plugins.PluginsService.loadBundle(PluginsService.java:531) ~[elasticsearch-6.7.1.jar:6.7.1]
at org.elasticsearch.plugins.PluginsService.loadBundles(PluginsService.java:471) ~[elasticsearch-6.7.1.jar:6.7.1]
at org.elasticsearch.plugins.PluginsService.<init>(PluginsService.java:163) ~[elasticsearch-6.7.1.jar:6.7.1]
at org.elasticsearch.node.Node.<init>(Node.java:339) ~[elasticsearch-6.7.1.jar:6.7.1]
at org.elasticsearch.node.Node.<init>(Node.java:266) ~[elasticsearch-6.7.1.jar:6.7.1]
解决方法:
ES和ik版本必须一至,否则会出错
到此,相信大家对“elasticsearch6.7.1集群搭建步骤”有了更深的了解,不妨来实际操作一番吧!这里是亿速云网站,更多相关内容可以进入相关频道进行查询,关注我们,继续学习!
免责声明:本站发布的内容(图片、视频和文字)以原创、转载和分享为主,文章观点不代表本网站立场,如果涉及侵权请联系站长邮箱:is@yisu.com进行举报,并提供相关证据,一经查实,将立刻删除涉嫌侵权内容。


