如何使用OpenCV及Python搭建图片缩略图服务器,很多新手对此不是很清楚,为了帮助大家解决这个难题,下面小编将为大家详细讲解,有这方面需求的人可以来学习下,希望你能有所收获。
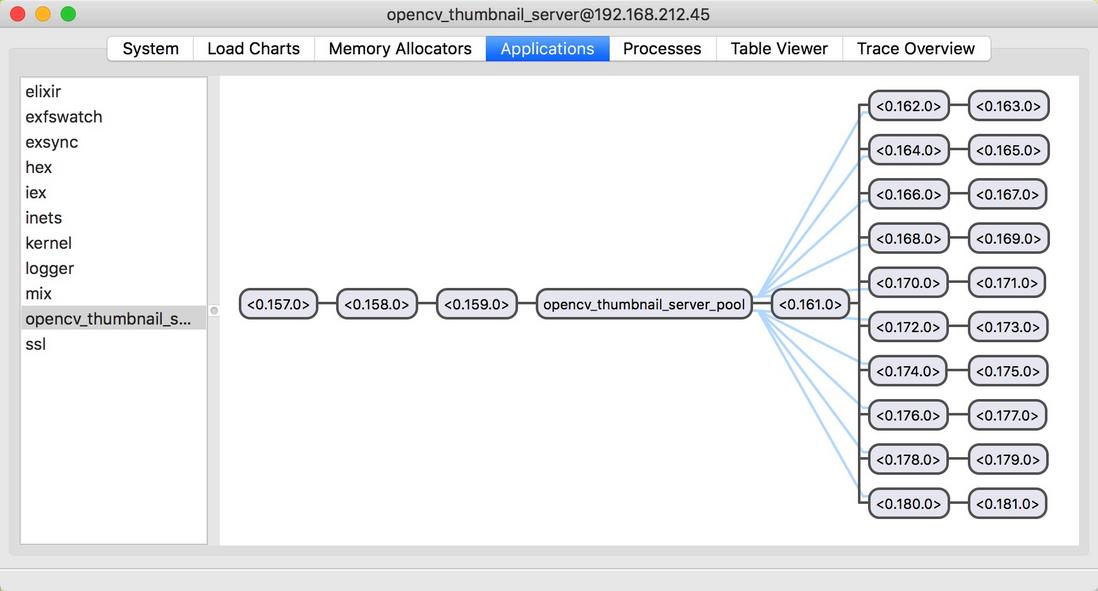
应用程序进程树, 默认 Poolboy 中初始化10个用于处理图片的 Python 工作进程(Worker)
ruby -e "$(curl -fsSL https://raw.githubusercontent.com/Homebrew/install/master/install)" brew install python brew tap homebrew/science brew install opencv sudo pip install numpy sudo pip install matplotlib |
使用 Homebrew 的 Python 版本, 而不是 Mac OS X 系统自带的 Python
alias python='/usr/local/bin/python' |
? mix new opencv_thumbnail_server --sup * creating README.md * creating .gitignore * creating mix.exs * creating config * creating config/config.exs * creating lib * creating lib/opencv_thumbnail_server.ex * creating test * creating test/test_helper.exs * creating test/opencv_thumbnail_server_test.exs
Your Mix project was created successfully. You can use "mix" to compile it, test it, and more:
cd opencv_thumbnail_server mix test
Run "mix help" for more commands. |
Elixir 模块
require Logger defmodule OpencvThumbnailServer do use Application def start(_type, _args) do Logger.info "Start opencv thumbnail server" OpencvThumbnailServer.Supervisor.start_link() end end |
defmodule OpencvThumbnailServer.Supervisor do use Supervisor
<a href="http://www.jobbole.com/members/chkconfig">@config</a> Application.get_env :opencv_thumbnail_server, :settings
def start_link() do Supervisor.start_link(__MODULE__, [], name: {:global,__MODULE__}) end
def init([]) do pool_options = @config[:poolboy] {_, name} = pool_options[:name] children = [ :poolboy.child_spec(name, pool_options, @config[:module_name]) ] supervise(children, strategy: :one_for_all, max_restarts: 1000, max_seconds: 3600) end end |
defmodule OpencvThumbnailServer.Worker do use GenServer <a href="http://www.jobbole.com/members/chkconfig">@config</a> Application.get_env(:opencv_thumbnail_server, :settings)
def start_link(python_module) do GenServer.start_link(__MODULE__, python_module, []) end
def call_python(worker, function, args) do GenServer.call(worker, {:call_python, function, args}, 10_000) end
def init(python_module) do IO.puts "Start worker" {:ok, pid} = :python.start_link([ {:python_path, @config[:python_path]}, {:python, @config[:python]} ]) state = {python_module, pid} {:ok, state} end
def handle_call({:call_python, function, args}, _from, state) do {module, pid} = state result = :python.call(pid, module, function, args) reply = {:ok, result} {:reply, reply, state} end
def handle_call(_request, _from, state) do {:stop, :error, :bad_call, state} end
def handle_info(_msg, {module,py_pid}) do {:stop, :error, {module,py_pid}} end
def terminate(_reason, {_, py_pid}) do :python.stop(py_pid) :ok end end |
获取宽高
# -*- coding: utf-8 -*-
import urllib2 as urllib import numpy as np import cv2
def load_image_url(url): resp = urllib.urlopen(url) buf = resp.read() return buf
def load_image_file(filename): image = cv2.imdecode(filename, cv2.IMREAD_COLOR) return image
def get_photo_sizes(): return [ [160, 160], [320, 320], [640, 640], [1060, 1060], [1280, 1280] ] def show(buf): # print buf # x = cv2.imdecode(image, cv2.IMREAD_COLOR) # d = cv2.cvtColor(c, cv2.COLOR_RGB2BGR) np_ndarray = np.fromstring(buf, dtype=np.uint8) x = cv2.imdecode(np_ndarray, cv2.IMREAD_UNCHANGED) return cv2.imshow('NBA Image', x)
def write(buf): nparray = np.fromstring(buf, dtype=np.uint8) img = cv2.imdecode(nparray, cv2.IMREAD_UNCHANGED) return cv2.imwrite('/tmp/imwrite.png', img)
# def get_dimension(): # url = 'http://img1.gtimg.com/16/1601/160106/16010642_1200x1000_0.jpg' # resp = urllib.urlopen(url) # buf = resp.read() # x = np.fromstring(buf, dtype=np.uint8) # img = cv2.imdecode(x, cv2.IMREAD_UNCHANGED) # # height = np.size(img, 0) # # width = np.size(img, 1) # height, width = image.shape[:2] # return (width, height)
def get_dimension(buffer): # 把原始的二进制图片数据转换为NpArray nparray = np.fromstring(buffer, dtype=np.uint8) # 把 nparray 转换为 opencv 的图像格式 image = cv2.imdecode(nparray, cv2.IMREAD_UNCHANGED) height, width = image.shape[:2] return (width, height)
def convert_color(): url = 'http://ww3.sinaimg.cn/mw690/6941baebgw1epzcuv9vmxj20me0hy0u1.jpg' resp = urllib.urlopen(url) buf = resp.read() x = np.fromstring(buf, dtype=np.uint8) img = cv2.imdecode(x, cv2.IMREAD_UNCHANGED)
if __name__ == '__main__': get_dimension() |
Erlang 的binary()数据类型和 Python 之间的映射关系, 在Python 2.x 中二进制数据类型为 str() 表示, Python 3.x 中为 bytes()
buf = resp.read(), 其中变量 buf 的类型为
在 Elixir 我们看的如下的值
Python
{:ok, <<255, 216, 255, 224, 0, 16, 74, 70, 73, 70, 0, 1, 1, 1, 0, 72, 0, 72, 0, 0, 255, 219, 0, 67, 0, 8, 6, 6, 7, 6, 5, 8, 7, 7, 7, 9, 9, 8, 10, 12, 20, 13, 12, 11, 11, 12, 25, 18, 19, ...>>} |
{:ok, data} = OpencvThumbnailServer.Api.load_image_url("https://segmentfault.com/img/bVwhAW") OpencvThumbnailServer.Api.get_dimension(data) {:ok, {800, 431}} |
之前的 Python 图像处理模块可以组织到一个项目中单独维护. 这里使用工具 cookiecutter创建 Python 一个基本的项目骨架, 用于实现缩略图的功能
cookiecutter 可以通过多种方式安装, 包括pip, easy_install, conda, brew
pip install cookiecutter easy_install cookiecutter conda install -c https://conda.binstar.org/pydanny cookiecutter brew install cookiecutter(Mac OS X) |
目录结构
? opencv_thumbnail git:(master) tree . ├── AUTHORS.rst ├── CONTRIBUTING.rst ├── HISTORY.rst ├── LICENSE ├── MANIFEST.in ├── Makefile ├── README.rst ├── build │ ├── bdist.macosx-10.11-x86_64 │ └── lib │ └── opencv_thumbnail │ ├── __init__.py │ └── opencv_thumbnail.py ├── dist │ └── opencv_thumbnail-0.1.0-py2.7.egg ├── docs │ ├── Makefile │ ├── authors.rst │ ├── conf.py │ ├── contributing.rst │ ├── history.rst │ ├── index.rst │ ├── installation.rst │ ├── make.bat │ ├── readme.rst │ └── usage.rst ├── opencv_thumbnail │ ├── __init__.py │ ├── __init__.pyc │ ├── opencv_thumbnail.py │ └── opencv_thumbnail.pyc ├── opencv_thumbnail.egg-info │ ├── PKG-INFO │ ├── SOURCES.txt │ ├── dependency_links.txt │ ├── not-zip-safe │ └── top_level.txt ├── requirements_dev.txt ├── setup.cfg ├── setup.py ├── tests │ ├── __init__.py │ └── test_opencv_thumbnail.py ├── tox.ini └── travis_pypi_setup.py
9 directories, 36 files |
调用需要从 Poolboy 池中取出一个工作进程, 并调用工作进程的call_python, 进程使用完成后返回 Poolboy 进程池, 这里封装一下以简化调用厦门叉车出租公司
defmodule OpencvThumbnailServer.Api do alias OpencvThumbnailServer.Worker
def get_dimension(data) do worker = :poolboy.checkout(:opencv_thumbnail_server_pool) {w, h} = Worker.call_python(worker, :get_dimension, [data]) :poolboy.checkin(:opencv_thumbnail_server_pool, worker) {w, h} end
def load_image_url(url) do worker = :poolboy.checkout(:opencv_thumbnail_server_pool) image_bin = Worker.call_python(worker, :load_image_url, [url]) :poolboy.checkin(:opencv_thumbnail_server_pool, worker) image_bin end end |
看完上述内容是否对您有帮助呢?如果还想对相关知识有进一步的了解或阅读更多相关文章,请关注亿速云行业资讯频道,感谢您对亿速云的支持。
免责声明:本站发布的内容(图片、视频和文字)以原创、转载和分享为主,文章观点不代表本网站立场,如果涉及侵权请联系站长邮箱:is@yisu.com进行举报,并提供相关证据,一经查实,将立刻删除涉嫌侵权内容。