这期内容当中小编将会给大家带来有关如何在SpringBoot环境中上传图片,文章内容丰富且以专业的角度为大家分析和叙述,阅读完这篇文章希望大家可以有所收获。
1、单张图片上传
1.1、前端用表单提交
前端代码:
<!DOCTYPE html>
<html lang="en">
<head>
 <meta charset="UTF-8">
 <title>Title</title>
</head>
<body>
<form method="post" action="/uploads" enctype="multipart/form-data">
 <input type="file" name="files" multiple>
 <input type="submit" value="上传">
</form>
</body>
</html>
后端代码;
SimpleDateFormat formatter = new SimpleDateFormat("/yyyy/MM/dd/");
 @RequestMapping("/upload")
 public String fileUpload(MultipartFile file, HttpServletRequest request){
  String time = formatter.format(new Date());
  //图片上传服务器后所在的文件夹
  String realPath = request.getServletContext().getRealPath("/img") + time;
  File folder = new File(realPath);
  if(!folder.exists())
   folder.mkdirs();

  //通常需要修改图片的名字(防止重复)
  String oldName = file.getOriginalFilename();
  String newName = UUID.randomUUID() + oldName.substring(oldName.lastIndexOf("."));

  try {
   //将文件放到目标文件夹
   file.transferTo(new File(folder, newName));

   //通常还需要返回图片的URL,为了通用性,需要动态获取协议,不要固定写死
   String returnUrl = request.getScheme() + "://" + request.getServerName() + ":" + request.getServerPort() + "/img" + time + newName;
   return returnUrl;
  } catch (IOException e) {
   e.printStackTrace();
  }


  return null;
 }
1.2、前端用ajax提交
前端代码与上面的略有不同,后台代码是一样的。
<!DOCTYPE html>
<html lang="en">
<head>
 <meta charset="UTF-8">
 <title>Title</title>

</head>
<body>
 <input type="file" id="file">
 <input type="submit" value="上传" onclick="uploadFile()">
<h2 id="result"></h2>
</body>

<script src="https://apps.bdimg.com/libs/jquery/2.1.4/jquery.min.js">
</script>
<script>
function uploadFile() {
 var file = $("#file")[0].files[0];
 var formData = new FormData();
 formData.append("file", file);
 $.ajax({
  type:"post",
  url:"/upload",
  processData:false,
  contentType:false,
  data:formData,
  success:function (msg) {
   $("#result").html(msg);
  }
 })
}
</script>
</html>
2、多个图片上传
前端代码:
<!DOCTYPE html>
<html lang="en">
<head>
 <meta charset="UTF-8">
 <title>Title</title>
</head>
<body>
<form method="post" action="/uploads" enctype="multipart/form-data">
 <input type="file" name="files" multiple>
 <input type="submit" value="上传">
</form>
</body>
</html>
后台代码:
 @RequestMapping("/uploads")
 public String fileUploads(MultipartFile[]files, HttpServletRequest request){
  String time = formatter.format(new Date());
  //图片上传服务器后所在的文件夹
  String realPath = request.getServletContext().getRealPath("/img") + time;
  File folder = new File(realPath);
  if(!folder.exists())
   folder.mkdirs();

  for (MultipartFile file : files) {
   //通常需要修改图片的名字(防止重复)
   String oldName = file.getOriginalFilename();
   String newName = UUID.randomUUID() + oldName.substring(oldName.lastIndexOf("."));

   try {
    //将文件放到目标文件夹
    file.transferTo(new File(folder, newName));

    //通常还需要返回图片的URL,为了通用性,需要动态获取协议,不要固定写死
    String returnUrl = request.getScheme() + "://" + request.getServerName() + ":" + request.getServerPort() + "/img" + time + newName;
    System.out.println(returnUrl);
   } catch (IOException e) {
    e.printStackTrace();
   }
  }

  return null;
 }
3、问题记录
在后台代码中,有一行需要注意下:
String realPath = request.getServletContext().getRealPath("/img") + time;需要理解一下realPath究竟指的是什么。刚开始测试的时候,图片上传成功后,后台idea里找不到对应的图片,然后根据它返回的realPath,在C盘用户目录下的某个文件夹里找到了该图片(user/AppData/....)。
shift+shift 全局搜索 getCommonDocumentRoot这个方法,点进去,有个静态数组:COMMON_DOC_ROOTS
private static final String[] COMMON_DOC_ROOTS = new String[]{"src/main/webapp", "public", "static"};发现默认是指webapp下,或者根目录下的public、static文件夹(与src并列)。然而这些目录都没有,所以Spring定向到了工程目录以外的一个位置。
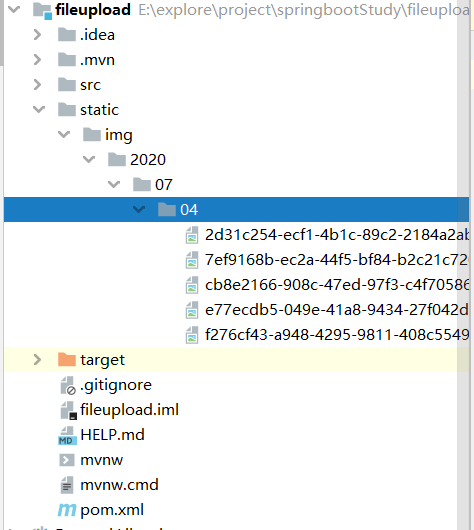
于是我在根目录下新建一个static文件夹,再次上传,果然有效了。
上述就是小编为大家分享的如何在SpringBoot环境中上传图片了,如果刚好有类似的疑惑,不妨参照上述分析进行理解。如果想知道更多相关知识,欢迎关注亿速云行业资讯频道。
免责声明:本站发布的内容(图片、视频和文字)以原创、转载和分享为主,文章观点不代表本网站立场,如果涉及侵权请联系站长邮箱:is@yisu.com进行举报,并提供相关证据,一经查实,将立刻删除涉嫌侵权内容。


