一、安装环境
1、操作系统版本:Red Hat Enterprise Linux Server release 6.5 (Santiago)
2、Mysql版本:MySQL-5.6.38-1.el6.x86_64.rpm-bundle.tar
二、安装说明
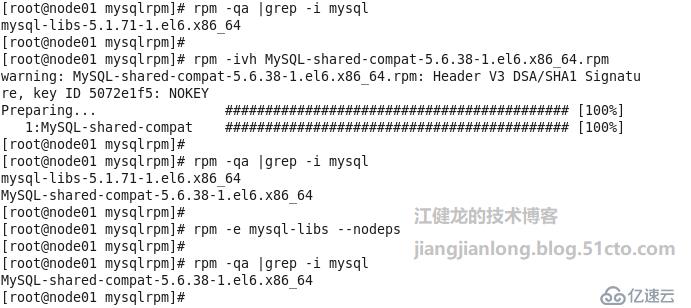
网上不少资料在使用rpm包安装Mysql 5.6之前,都会先卸载系统自带的mysql-libs,但有的资料是用yum remove mysql,但这样会把依赖mysql-libs的8个包也一同卸载,其中就包括postfix、crontab等软件包,造成了非预期目的的卸载,有的资料就使用rpm -e --nodeps mysql-libs来避免卸载其他依赖mysql-libs的软件包,但是也并非完全正确的做法,Mysql官方提供的Mysql-shared-compat正是替代mysql-libs的rpm包,应先安装此包,再单独卸载mysql-libs,官方说明如下:

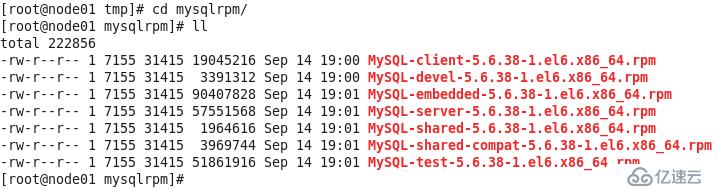
解压MySQL-5.6.38-1.el6.x86_64.rpm-bundle.tar后,可以看到包含了多个rpm包文件
网上不少资料都选择了安装Mysql-server、Mysql-client和Mysql-devel三个包,但实际上Mysql-devel的作用是如果需要编译其他mysql客户端例如perl mysql模块或者打算编译C API应用程序,实际上大多数情况下标准安装并不需要安装Mysql-devel,只需要按照Mysql-server和Mysql-client就行,本文就是这样安装。官网的介绍如下:


三、安装过程
1、首先安装一下Mysql-shared-compat,再单独卸载mysql-libs。
2、安装mysql-server,根据提示安装完成后的随机密码在/root/.mysql_secret,并且可以运行安全配置向导/usr/bin/mysql_secure_installation,还有配置文件在/usr/my.cnf(按习惯一般拷贝到/etc/my.cnf)
[root@node01
mysqlrpm]# rpm -ivh MySQL-server-5.6.38-1.el6.x86_64.rpm
warning:
MySQL-server-5.6.38-1.el6.x86_64.rpm: Header V3 DSA/SHA1 Signature, key ID
5072e1f5: NOKEY
Preparing...
########################################### [100%]
   1:MySQL-server
########################################### [100%]
warning: user mysql
does not exist - using root
warning: group mysql
does not exist - using root
warning: user mysql
does not exist - using root
warning: group mysql
does not exist - using root
2017-10-28 20:57:24
0 [Warning] TIMESTAMP with implicit DEFAULT value is deprecated. Please use
--explicit_defaults_for_timestamp server option (see documentation for more
details).
2017-10-28 20:57:24
0 [Note] Ignoring --secure-file-priv value as server is running with --bootstrap.
2017-10-28 20:57:24
0 [Note] /usr/sbin/mysqld (mysqld 5.6.38) starting as process 8869 ...
2017-10-28 20:57:24
8869 [Note] InnoDB: Using atomics to ref count buffer pool pages
2017-10-28 20:57:24
8869 [Note] InnoDB: The InnoDB memory heap is disabled
2017-10-28 20:57:24
8869 [Note] InnoDB: Mutexes and rw_locks use GCC atomic builtins
2017-10-28 20:57:24
8869 [Note] InnoDB: Memory barrier is not used
2017-10-28 20:57:24
8869 [Note] InnoDB: Compressed tables use zlib 1.2.3
2017-10-28 20:57:24
8869 [Note] InnoDB: Using Linux native AIO
2017-10-28 20:57:24
8869 [Note] InnoDB: Using CPU crc32 instructions
2017-10-28 20:57:24
8869 [Note] InnoDB: Initializing buffer pool, size = 128.0M
2017-10-28 20:57:24
8869 [Note] InnoDB: Completed initialization of buffer pool
2017-10-28 20:57:24
8869 [Note] InnoDB: The first specified data file ./ibdata1 did not exist: a
new database to be created!
2017-10-28 20:57:24
8869 [Note] InnoDB: Setting file ./ibdata1 size to 12 MB
2017-10-28 20:57:24
8869 [Note] InnoDB: Database physically writes the file full: wait...
2017-10-28 20:57:25
8869 [Note] InnoDB: Setting log file ./ib_logfile101 size to 48 MB
2017-10-28 20:57:26
8869 [Note] InnoDB: Setting log file ./ib_logfile1 size to 48 MB
2017-10-28 20:57:27
8869 [Note] InnoDB: Renaming log file ./ib_logfile101 to ./ib_logfile0
2017-10-28 20:57:27
8869 [Warning] InnoDB: New log files created, LSN=45781
2017-10-28 20:57:27
8869 [Note] InnoDB: Doublewrite buffer not found: creating new
2017-10-28 20:57:27
8869 [Note] InnoDB: Doublewrite buffer created
2017-10-28 20:57:27
8869 [Note] InnoDB: 128 rollback segment(s) are active.
2017-10-28 20:57:27
8869 [Warning] InnoDB: Creating foreign key constraint system tables.
2017-10-28 20:57:27
8869 [Note] InnoDB: Foreign key constraint system tables created
2017-10-28 20:57:27
8869 [Note] InnoDB: Creating tablespace and datafile system tables.
2017-10-28 20:57:27
8869 [Note] InnoDB: Tablespace and datafile system tables created.
2017-10-28 20:57:27
8869 [Note] InnoDB: Waiting for purge to start
2017-10-28 20:57:27
8869 [Note] InnoDB: 5.6.38 started; log sequence number 0
A random root password has been set. You will find it in '/root/.mysql_secret'.
2017-10-28 20:57:28
8869 [Note] Binlog end
2017-10-28 20:57:28
8869 [Note] InnoDB: FTS optimize thread exiting.
2017-10-28 20:57:28
8869 [Note] InnoDB: Starting shutdown...
2017-10-28 20:57:29
8869 [Note] InnoDB: Shutdown completed; log sequence number 1625977
2017-10-28 20:57:29
0 [Warning] TIMESTAMP with implicit DEFAULT value is deprecated. Please use
--explicit_defaults_for_timestamp server option (see documentation for more
details).
2017-10-28 20:57:29
0 [Note] Ignoring --secure-file-priv value as server is running with
--bootstrap.
2017-10-28 20:57:29
0 [Note] /usr/sbin/mysqld (mysqld 5.6.38) starting as process 8891 ...
2017-10-28 20:57:29
8891 [Note] InnoDB: Using atomics to ref count buffer pool pages
2017-10-28 20:57:29
8891 [Note] InnoDB: The InnoDB memory heap is disabled
2017-10-28 20:57:29
8891 [Note] InnoDB: Mutexes and rw_locks use GCC atomic builtins
2017-10-28 20:57:29
8891 [Note] InnoDB: Memory barrier is not used
2017-10-28 20:57:29
8891 [Note] InnoDB: Compressed tables use zlib 1.2.3
2017-10-28 20:57:29
8891 [Note] InnoDB: Using Linux native AIO
2017-10-28 20:57:29
8891 [Note] InnoDB: Using CPU crc32 instructions
2017-10-28 20:57:29
8891 [Note] InnoDB: Initializing buffer pool, size = 128.0M
2017-10-28 20:57:29
8891 [Note] InnoDB: Completed initialization of buffer pool
2017-10-28 20:57:29
8891 [Note] InnoDB: Highest supported file format is Barracuda.
2017-10-28 20:57:29
8891 [Note] InnoDB: 128 rollback segment(s) are active.
2017-10-28 20:57:29
8891 [Note] InnoDB: Waiting for purge to start
2017-10-28 20:57:29
8891 [Note] InnoDB: 5.6.38 started; log sequence number 1625977
2017-10-28 20:57:29
8891 [Note] Binlog end
2017-10-28 20:57:29
8891 [Note] InnoDB: FTS optimize thread exiting.
2017-10-28 20:57:29
8891 [Note] InnoDB: Starting shutdown...
2017-10-28 20:57:31
8891 [Note] InnoDB: Shutdown completed; log sequence number 1625987

A RANDOM PASSWORD HAS BEEN SET FOR THE MySQL root USER !
You will find that password in '/root/.mysql_secret'.

You must change that password on your first connect,
no other statement but 'SET PASSWORD' will be accepted.
See the manual for the semantics of the 'password expired' flag.

Also, the account for the anonymous user has been removed.

In addition, you can run:   /usr/bin/mysql_secure_installation

which will also give you the option of removing the test database.This is strongly
recommended for production servers.

See the manual for more instructions.

Please report any problems at http://bugs.mysql.com/

The latest information about MySQL is available on the web at http://www.mysql.com

Support MySQL by buying support/licenses at http://shop.mysql.com

New default config file was created as /usr/my.cnf and will be used by
default by the server when you start it.
You may edit this file to change server settings
3、安装Mysql-client

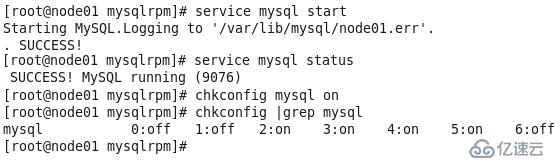
4、复制my.conf并启动服务
[root@node01 mysqlrpm]# cp /usr/my.cnf /etc/my.cnf
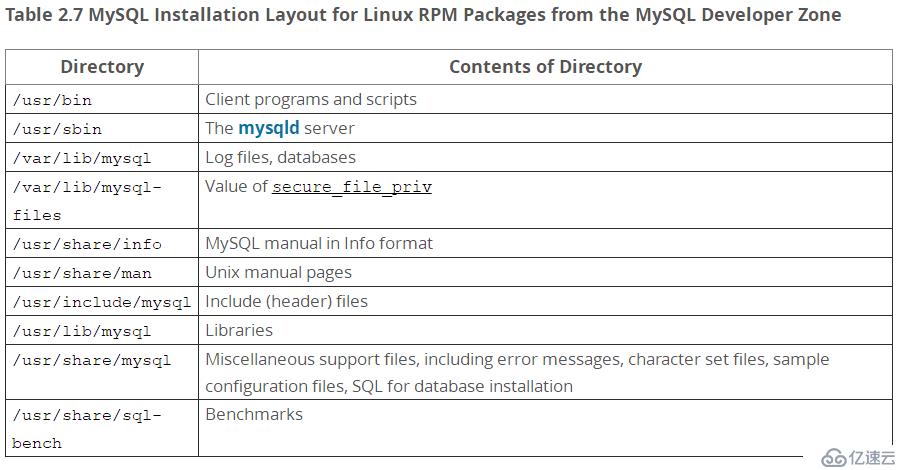
5、RPM包安装后的目录结构如下:
四、初始化配置Mysql并登录数据库
1、网上很多资料在RPM安装完Mysql 5.6后还执行了/usr/bin/mysql_install_db进行初始化安装但安全配置向导却没运行,实际上在Mysql 5.6.8开始,用RPM包全新安装时会调用/usr/bin/mysql_install_db并带上随机密码参数,因此并不需要再执行mysql_install_db,反而运行安全配置向导很有必要。官网说明如下:

2、运行安全配置向导,由于需要输入root密码,因此先查看一下随机生成的密码文件。
[root@node01 ~]# cat /root/.mysql_secret
# The random password set for the root user at Sat Oct 28 20:57:28 2017 (local time):
LyE_R5rVp7p1vLMe
安全配置向导主要执行以下操作:
a)是否为root用户设置密码
b)是否删除匿名账号
c)是否取消root用户远程登录
d)是否删除test库和对test库的访问权限
e)是否刷新授权表使修改生效
[root@node01 ~]# cat /root/.mysql_secret
# The random password set for the root user at Sat Oct 28 20:57:28 2017 (local time):
LyE_R5rVp7p1vLMe

[root@node01 ~]# /usr/bin/mysql_secure_installation

NOTE: RUNNING ALL PARTS OF THIS SCRIPT IS RECOMMENDED FOR ALL MySQL SERVERS IN PRODUCTION
USE! PLEASE READ EACH STEP CAREFULLY!

In order to log into MySQL to secure it, we'll need the current password for the
root user.  If you've just installed MySQL, andyou haven't set the root password yet, the
password will be blank,so you should just press enter here.

Enter current password for root (enter for none):
OK, successfully
used password, moving on...

Setting the root password ensures that nobody can log into the MySQL
root user without the proper authorisation.

You already have a root password set, so you can safely answer 'n'.

Change the root password? [Y/n] y
New password:
Re-enter new
password:
Password updated
successfully!
Reloading privilege tables..
 ... Success!


By default, a MySQL installation has an anonymous user, allowing anyone to log into MySQL
without having to have a user account created for them.  This is intended only for testing, and to
make the installation go a bit smoother.  You should remove them before moving into a
production environment.

Remove anonymous users? [Y/n] y
 ... Success!

Normally, root should only be allowed to connect from 'localhost'.  This ensures that
someone cannot guess at the root password from the network.

Disallow root login remotely? [Y/n] n
 ... skipping.

By default, MySQL comes with a database named 'test' that anyone can access.
This is also intended only for testing, and should be removed before moving into a
production environment.

Remove test database and access to it? [Y/n] n
 ... skipping.

Reloading the privilege tables will ensure that all changes made so far will take effect
immediately.

Reload privilege tables now? [Y/n] y
 ... Success!

All done!  If you've completed all of the above steps,your MySQL installation should
now be secure.

Thanks for using MySQL!

Cleaning up...
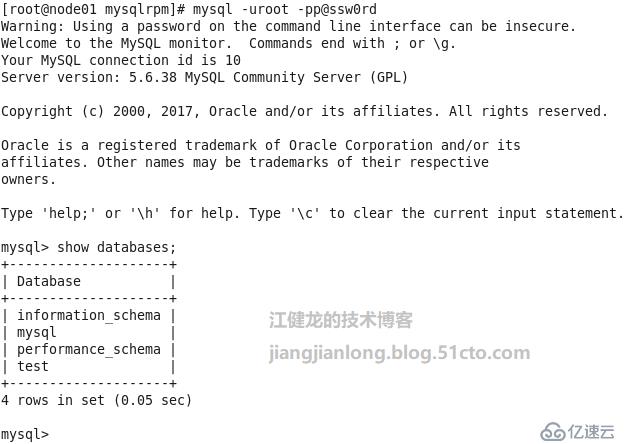
3、登录数据库,确认安装成功完成
免责声明:本站发布的内容(图片、视频和文字)以原创、转载和分享为主,文章观点不代表本网站立场,如果涉及侵权请联系站长邮箱:is@yisu.com进行举报,并提供相关证据,一经查实,将立刻删除涉嫌侵权内容。


