Mysql一个熟悉的概念,一个全新的知识领域。开始我全方位数据库学习之旅。
一切,从安装开始,自己动手每一步。
Linux在安装的过程中,可以勾选Mysql的安装,但是安装的版本是Mysql-5.1.73,版本非常低。必须重新安装,当前最新版本是5.7。但是卸载再安装,明显比空白Linux安装麻烦一点。
下面开始卸载/安装过程。
1. Mysql下载地址
mysql-5.7.22-1.el6.x86_64.rpm-bundle.tar
https://dev.mysql.com/downloads/file/?id=476884
2. 确认OS版本
# more /etc/issue
CentOS release 6.7 (Final)
Kernel \r on an \m
# lsb_release -a
LSB Version:    :base-4.0-amd64:base-4.0-noarch:core-4.0-amd64:core-4.0-noarch:graphics-4.0-amd64:graphics-4.0-noarch:printing-4.0-amd64:printing-4.0-noarch
Distributor ID: CentOS
Description:    CentOS release 6.7 (Final)
Release:        6.7
Codename:       Final
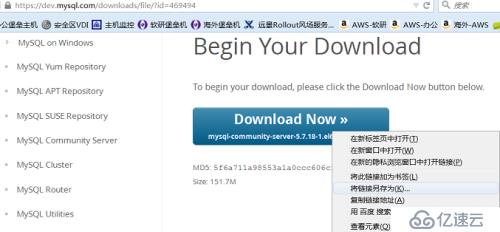
3. 根据OS版本,找到需要下载的Mysql版本,右键“将链接另存为”,即可获得下载地址
4. 到Linux下,通过wget下载
wget https://dev.mysql.com/get/Downloads/MySQL-5.7/mysql-community-server-5.7.18-1.el6.x86_64.rpm
下面三个rpm包存在依赖关系,也需要下载
# wget https://cdn.mysql.com//Downloads/MySQL-5.7/mysql-community-common-5.7.18-1.el6.x86_64.rpm
# wget https://cdn.mysql.com//Downloads/MySQL-5.7/mysql-community-client-5.7.18-1.el6.x86_64.rpm
# wget https://cdn.mysql.com//Downloads/MySQL-5.7/mysql-community-libs-5.7.18-1.el6.x86_64.rpm
5. 检查查询发现,已经安装Mysql-5.1.73,版本非常低。必须重新安装,当前最新版本是5.7
# rpm -qa | grep mysql
mysql-server-5.1.73-5.el6_6.x86_64
mysql-libs-5.1.73-5.el6_6.x86_64
mysql-5.1.73-5.el6_6.x86_64
mysql-connector-odbc-5.1.5r1144-7.el6.x86_64
6. 准备安装,安装前,就怀疑,会不会覆盖?会不会冲突?安装一下试试,就知道了。
同时安装4个rpm包
# rpm -ivh mysql-community-server-5.7.18-1.el6.x86_64.rpm mysql-community-client-5.7.18-1.el6.x86_64.rpm mysql-community-common-5.7.18-1.el6.x86_64.rpm mysql-community-libs-5.7.18-1.el6.x86_64.rpm
7. 果然冲突了
warning: mysql-community-server-5.7.18-1.el6.x86_64.rpm: Header V3 DSA/SHA1 Signature, key ID 5072e1f5: NOKEY
Preparing...                ########################################### [100%]
file /usr/share/mysql/czech/errmsg.sys from install of mysql-community-common-5.7.18-1.el6.x86_64 conflicts with file from package mysql-libs-5.1.73-5.el6_6.x86_64
file /usr/share/mysql/danish/errmsg.sys from install of mysql-community-common-5.7.18-1.el6.x86_64 conflicts with file from package mysql-libs-5.1.73-5.el6_6.x86_64
file /usr/share/mysql/dutch/errmsg.sys from install of mysql-community-common-5.7.18-1.el6.x86_64 conflicts with file from package mysql-libs-5.1.73-5.el6_6.x86_64
file /usr/share/mysql/english/errmsg.sys from install of mysql-community-common-5.7.18-1.el6.x86_64 conflicts with file from package mysql-libs-5.1.73-5.el6_6.x86_64
file /usr/share/mysql/estonian/errmsg.sys from install of mysql-community-common-5.7.18-1.el6.x86_64 conflicts with file from package mysql-libs-5.1.73-5.el6_6.x86_64
......
8. 经过查询,也安装失败了,还是5.1.73版本
# rpm -qa|grep mysql
mysql-server-5.1.73-5.el6_6.x86_64
mysql-libs-5.1.73-5.el6_6.x86_64
mysql-5.1.73-5.el6_6.x86_64
mysql-connector-odbc-5.1.5r1144-7.el6.x86_64
9. 开始卸载原有的5.1.73的Mysql,几种卸载方式,首推YUM方式卸载
# yum remove mysql
# rpm -e mysql  // 普通删除模式
# rpm -e --nodeps mysql  // 强力删除模式,如果使用上面命令删除时,提示有依赖的其它文件,则用该命令可以对其进行强力删除
10 .还剩余下面两个包
# rpm -qa|grep mysql
mysql-libs-5.1.73-5.el6_6.x86_64
mysql-connector-odbc-5.1.5r1144-7.el6.x86_64
11. 执行yum localinstall安装,发现需要卸载mysql-libs-5.1.73-5.el6_6.x86_64,通过yun卸载这个包后,可以安装了。
# yum localinstall mysql-community-server-5.7.18-1.el6.x86_64.rpm mysql-community-client-5.7.18-1.el6.x86_64.rpm mysql-community-common-5.7.18-1.el6.x86_64.rpm  mysql-community-libs-5.7.18-
1.el6.x86_64.rpm
~~~~~~~~~~~~~~~~~~~~~~~~~~~~~~~~~~~~~~~~~~~~~~~~~~~~~~~~~
Loaded plugins: fastestmirror, refresh-packagekit, security
Setting up Local Package Process
Examining mysql-community-server-5.7.18-1.el6.x86_64.rpm: mysql-community-server-5.7.18-1.el6.x86_64
Marking mysql-community-server-5.7.18-1.el6.x86_64.rpm to be installed
Loading mirror speeds from cached hostfile
* base: mirrors.163.com
* extras: mirrors.cn99.com
* updates: mirrors.163.com
Examining mysql-community-client-5.7.18-1.el6.x86_64.rpm: mysql-community-client-5.7.18-1.el6.x86_64
Marking mysql-community-client-5.7.18-1.el6.x86_64.rpm to be installed
Examining mysql-community-common-5.7.18-1.el6.x86_64.rpm: mysql-community-common-5.7.18-1.el6.x86_64
Marking mysql-community-common-5.7.18-1.el6.x86_64.rpm to be installed
Examining mysql-community-libs-5.7.18-1.el6.x86_64.rpm: mysql-community-libs-5.7.18-1.el6.x86_64
Marking mysql-community-libs-5.7.18-1.el6.x86_64.rpm to be installed
Resolving Dependencies
--> Running transaction check
---> Package mysql-community-client.x86_64 0:5.7.18-1.el6 will be installed
---> Package mysql-community-common.x86_64 0:5.7.18-1.el6 will be installed
---> Package mysql-community-libs.x86_64 0:5.7.18-1.el6 will be installed
---> Package mysql-community-server.x86_64 0:5.7.18-1.el6 will be installed
--> Finished Dependency Resolution
Dependencies Resolved
==================================================================================================================================
Package                         Arch            Version               Repository                                            Size
==================================================================================================================================
Installing:
mysql-community-client          x86_64          5.7.18-1.el6          /mysql-community-client-5.7.18-1.el6.x86_64          100 M
mysql-community-common          x86_64          5.7.18-1.el6          /mysql-community-common-5.7.18-1.el6.x86_64          2.5 M
mysql-community-libs            x86_64          5.7.18-1.el6          /mysql-community-libs-5.7.18-1.el6.x86_64            8.9 M
mysql-community-server          x86_64          5.7.18-1.el6          /mysql-community-server-5.7.18-1.el6.x86_64          769 M
Transaction Summary
==================================================================================================================================
Install       4 Package(s)
Total size: 880 M
Installed size: 880 M
Is this ok [y/N]: y
Downloading Packages:
Running rpm_check_debug
Running Transaction Test
Transaction Test Succeeded
Running Transaction
Installing : mysql-community-common-5.7.18-1.el6.x86_64                                                                     1/4
Installing : mysql-community-libs-5.7.18-1.el6.x86_64                                                                       2/4
Installing : mysql-community-client-5.7.18-1.el6.x86_64                                                                     3/4
Installing : mysql-community-server-5.7.18-1.el6.x86_64                                                                     4/4
Verifying  : mysql-community-server-5.7.18-1.el6.x86_64                                                                     1/4
Verifying  : mysql-community-libs-5.7.18-1.el6.x86_64                                                                       2/4
Verifying  : mysql-community-common-5.7.18-1.el6.x86_64                                                                     3/4
Verifying  : mysql-community-client-5.7.18-1.el6.x86_64                                                                     4/4
Installed:
mysql-community-client.x86_64 0:5.7.18-1.el6                    mysql-community-common.x86_64 0:5.7.18-1.el6
mysql-community-libs.x86_64 0:5.7.18-1.el6                      mysql-community-server.x86_64 0:5.7.18-1.el6
Complete!
12. 最后检查,已经安装成功
# rpm -qa|grep mysql
mysql-community-client-5.7.18-1.el6.x86_64
mysql-community-libs-5.7.18-1.el6.x86_64
mysql-community-common-5.7.18-1.el6.x86_64
mysql-community-server-5.7.18-1.el6.x86_64
13. 安装完成,但是启动的时候遇到了问题:
# service mysqld restart
Stopping mysqld:                                           [  OK  ]
Initializing MySQL database:  2017-07-11T15:23:50.462866Z 0 [Warning] TIMESTAMP with implicit DEFAULT value is deprecated. Please use --explicit_defaults_for_timestamp server option (see documentation for more details).
2017-07-11T15:23:50.465315Z 0 [ERROR] --initialize specified but the data directory has files in it. Aborting.
2017-07-11T15:23:50.465365Z 0 [ERROR] Aborting
[FAILED]
14. 百度的解决方法(是由于之前老版本的数据库已经占用这个文件夹,需要清空,或者在/etc/my.cnf中重新指定--datadir)
保证 --datadir目录为空。 /usr/local/var/mysql 这个目录
15. 启动成功
# cd /var/lib/mysql
# ls
auto.cnf  ib_buffer_pool  ibdata1  ib_logfile0  ib_logfile1
# rm *
rm: remove regular file `auto.cnf'? y
rm: remove regular file `ib_buffer_pool'? y
rm: remove regular file `ibdata1'? y
rm: remove regular file `ib_logfile0'? y
rm: remove regular file `ib_logfile1'? y
# service mysqld restart
Stopping mysqld:                                           [  OK  ]
Initializing MySQL database:                               [  OK  ]
Installing validate password plugin:                       [  OK  ]
Starting mysqld:                                           [  OK  ]
# ps -ef|grep mysql
root      4533     1  0 23:25 pts/0    00:00:00 /bin/sh /usr/bin/mysqld_safe --datadir=/var/lib/mysql --socket=/var/lib/mysql/mysql.sock --pid-file=/var/run/mysqld/mysqld.pid --basedir=/usr --user=mysql
mysql     4727  4533  4 23:25 pts/0    00:00:00 /usr/sbin/mysqld --basedir=/usr --datadir=/var/lib/mysql --plugin-dir=/usr/lib64/mysql/plugin --user=mysql --log-error=/var/log/mysqld.log --pid-file=/var/run/mysqld/mysqld.pid --socket=/var/lib/mysql/mysql.sock
root      4762  3752  0 23:25 pts/0    00:00:00 grep mysql
16. 然而启动的过程中,又遇到一些问题,密码不知道了,重置密码
# mysql -u root
ERROR 1045 (28000): Access denied for user 'root'@'localhost' (using password: NO)
[root@test mysql]# mysql -u root -p
Enter password:
ERROR 1045 (28000): Access denied for user 'root'@'localhost' (using password: YES)
编辑mysql配置文件/etc/my.cnf,在[mysqld]这个条目下加入 skip-grant-tables 保存退出后重启mysql
# vi /etc/my.cnf
[root@test mysql]# service mysqld restart
Stopping mysqld:                                           [  OK  ]
Starting mysqld:                                           [  OK  ]
# mysql
Welcome to the MySQL monitor.  Commands end with ; or \g.
Your MySQL connection id is 4
Server version: 5.7.18 MySQL Community Server (GPL)
Copyright (c) 2000, 2017, Oracle and/or its affiliates. All rights reserved.
Oracle is a registered trademark of Oracle Corporation and/or its
affiliates. Other names may be trademarks of their respective
owners.
Type 'help;' or '\h' for help. Type '\c' to clear the current input statement.
mysql> show databases;
+--------------------+
| Database           |
+--------------------+
| information_schema |
| mysql              |
| performance_schema |
| sys                |
+--------------------+
4 rows in set (0.00 sec)
设置密码,然后删除/etc/my.cnf中的 skip-grant-tables
再次重启mysql
mysql> use mysql;
Database changed
--.给root用户设置新密码:
5.7版本之前:
mysql> update user set password=password("新密码") where user="root";
Query OK, 1 rows affected (0.01 sec)
Rows matched: 1 Changed: 1 Warnings: 0
在5.7版本之后,mysql数据库下已经没有password这个字段了,password字段改成了authentication_string。
update mysql.user set authentication_string=PASSWORD('oracle') where User='root';mysql> flush privileges; Query OK, 0 rows affected (0.00 sec)
---退出mysql,重启然后重新登录
# service mysqld restart
Stopping mysqld:                                           [  OK  ]
Starting mysqld:                                           [  OK  ]
# mysql -uroot -poracle
mysql: [Warning] Using a password on the command line interface can be insecure.
Welcome to the MySQL monitor.  Commands end with ; or \g.
Your MySQL connection id is 5
Server version: 5.7.18
Copyright (c) 2000, 2017, Oracle and/or its affiliates. All rights reserved.
Oracle is a registered trademark of Oracle Corporation and/or its
affiliates. Other names may be trademarks of their respective
owners.
Type 'help;' or '\h' for help. Type '\c' to clear the current input statement.
mysql>
免责声明:本站发布的内容(图片、视频和文字)以原创、转载和分享为主,文章观点不代表本网站立场,如果涉及侵权请联系站长邮箱:is@yisu.com进行举报,并提供相关证据,一经查实,将立刻删除涉嫌侵权内容。


