这篇文章主要介绍“HTML5 Canvas如何实现纹理填充与描边”,在日常操作中,相信很多人在HTML5 Canvas如何实现纹理填充与描边问题上存在疑惑,小编查阅了各式资料,整理出简单好用的操作方法,希望对大家解答”HTML5 Canvas如何实现纹理填充与描边”的疑惑有所帮助!接下来,请跟着小编一起来学习吧!
演示HTML5 Canvas Fill 与Stroke文字效果,基于Canvas如何实现纹理填充与描边。
一:颜色填充与描边
颜色填充可以通过fillStyle来实现,描边颜色可以通过strokeStyle来实现。简单示例
如下:
代码如下:
// fill and stroke text
ctx.font = '60pt Calibri';
ctx.lineWidth = 3;
ctx.strokeStyle = 'green';
ctx.strokeText('Hello World!', 20, 100);
ctx.fillStyle = 'red';
ctx.fillText('Hello World!', 20, 100);
二:纹理填充与描边
HTML5 Canvas还支持纹理填充,通过加载一张纹理图像,然后创建画笔模式,创建纹理模式的API为ctx.createPattern(imageTexture,"repeat");第二参数支持四个值,分别为”repeat-x”, ”repeat-y”, ”repeat”,”no-repeat”意思是纹理分别沿着X轴,Y轴,XY方向沿重复或者不重复。纹理描边与填充的代码如下:
代码如下:
var woodfill = ctx.createPattern(imageTexture,"repeat");
ctx.strokeStyle = woodfill;
ctx.strokeText('Hello World!', 20, 200);
// fill rectangle
ctx.fillStyle = woodfill;
ctx.fillRect(60, 240, 260, 440);
纹理图片: 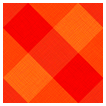
三:运行效果 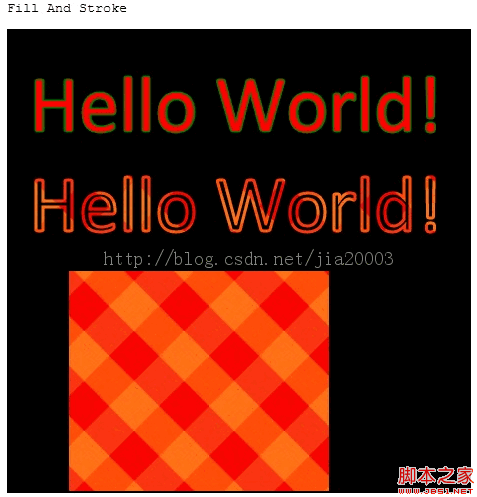
代码:
代码如下:
<!DOCTYPE html>
<html>
<head>
<meta http-equiv="X-UA-Compatible" content="chrome=IE8">
<meta http-equiv="Content-type" content="text/html;charset=UTF-8">
<title>Canvas Fill And Stroke Text Demo</title>
<link href="default.css" rel="stylesheet" />
<script>
var ctx = null; // global variable 2d context
var imageTexture = null;
window.onload = function() {
var canvas = document.getElementById("text_canvas");
console.log(canvas.parentNode.clientWidth);
canvas.width = canvas.parentNode.clientWidth;
canvas.height = canvas.parentNode.clientHeight;
if (!canvas.getContext) {
console.log("Canvas not supported. Please install a HTML5 compatible browser.");
return;
}
// get 2D context of canvas and draw rectangel
ctx = canvas.getContext("2d");
ctx.fillStyle="black";
ctx.fillRect(0, 0, canvas.width, canvas.height);
// fill and stroke text
ctx.font = '60pt Calibri';
ctx.lineWidth = 3;
ctx.strokeStyle = 'green';
ctx.strokeText('Hello World!', 20, 100);
ctx.fillStyle = 'red';
ctx.fillText('Hello World!', 20, 100);
// fill and stroke by pattern
imageTexture = document.createElement('img');
imageTexture.src = "../pattern.png";
imageTexture.onload = loaded();
}
function loaded() {
// delay to image loaded
setTimeout(textureFill, 1000/30);
}
function textureFill() {
// var woodfill = ctx.createPattern(imageTexture, "repeat-x");
// var woodfill = ctx.createPattern(imageTexture, "repeat-y");
// var woodfill = ctx.createPattern(imageTexture, "no-repeat");
var woodfill = ctx.createPattern(imageTexture, "repeat");
ctx.strokeStyle = woodfill;
ctx.strokeText('Hello World!', 20, 200);
// fill rectangle
ctx.fillStyle = woodfill;
ctx.fillRect(60, 240, 260, 440);
}
</script>
</head>
<body>
<h2>HTML5 Canvas Text Demo - By Gloomy Fish</h2>
<pre>Fill And Stroke</pre>
<div id="my_painter">
<canvas id="text_canvas"></canvas>
</div>
</body>
</html>
到此,关于“HTML5 Canvas如何实现纹理填充与描边”的学习就结束了,希望能够解决大家的疑惑。理论与实践的搭配能更好的帮助大家学习,快去试试吧!若想继续学习更多相关知识,请继续关注亿速云网站,小编会继续努力为大家带来更多实用的文章!
免责声明:本站发布的内容(图片、视频和文字)以原创、转载和分享为主,文章观点不代表本网站立场,如果涉及侵权请联系站长邮箱:is@yisu.com进行举报,并提供相关证据,一经查实,将立刻删除涉嫌侵权内容。


