йҳ»еЎһйҳҹеҲ—д№ӢеҰӮдҪ•зҗҶи§ЈLinkedBlockingQueueжәҗз Ғ
жң¬зҜҮеҶ…е®№д»Ӣз»ҚдәҶвҖңйҳ»еЎһйҳҹеҲ—д№ӢеҰӮдҪ•зҗҶи§ЈLinkedBlockingQueueжәҗз ҒвҖқзҡ„жңүе…ізҹҘиҜҶпјҢеңЁе®һйҷ…жЎҲдҫӢзҡ„ж“ҚдҪңиҝҮзЁӢдёӯпјҢдёҚе°‘дәәйғҪдјҡйҒҮеҲ°иҝҷж ·зҡ„еӣ°еўғпјҢжҺҘдёӢжқҘе°ұи®©е°Ҹзј–еёҰйўҶеӨ§е®¶еӯҰд№ дёҖдёӢеҰӮдҪ•еӨ„зҗҶиҝҷдәӣжғ…еҶөеҗ§пјҒеёҢжңӣеӨ§е®¶д»”з»Ҷйҳ…иҜ»пјҢиғҪеӨҹеӯҰжңүжүҖжҲҗпјҒ
LinkedBlockingQueue з”ұй“ҫжҺҘиҠӮзӮ№ж”ҜжҢҒзҡ„еҸҜйҖүжңүз•ҢйҳҹеҲ—пјҢжҳҜдёҖдёӘеҹәдәҺй“ҫиЎЁзҡ„ж— з•ҢйҳҹеҲ—(зҗҶи®әдёҠжңүз•Ң)пјҢйҳҹеҲ—жҢүз…§е…Ҳиҝӣе…ҲеҮәзҡ„йЎәеәҸиҝӣиЎҢжҺ’еәҸгҖӮLinkedBlockingQueueдёҚеҗҢдәҺArrayBlockingQueueпјҢе®ғеҰӮжһңдёҚжҢҮе®ҡе®№йҮҸпјҢй»ҳи®Өдёә Integer.MAX_VALUEпјҢд№ҹе°ұжҳҜж— з•ҢйҳҹеҲ—гҖӮжүҖд»ҘдёәдәҶйҒҝе…ҚйҳҹеҲ—иҝҮеӨ§йҖ жҲҗжңәеҷЁиҙҹиҪҪжҲ–иҖ…еҶ…еӯҳзҲҶж»Ўзҡ„жғ…еҶөеҮәзҺ°пјҢжҲ‘们еңЁдҪҝз”Ёзҡ„ж—¶еҖҷе»әи®®жүӢеҠЁдј дёҖдёӘйҳҹеҲ—зҡ„еӨ§е°ҸгҖӮ
йҳҹеҲ—еҲӣе»ә
BlockingQueue blockingQueue = new LinkedBlockingQueue<>();
дёҠйқўиҝҷж®өд»Јз ҒдёӯпјҢblockingQueue зҡ„е®№йҮҸе°Ҷи®ҫзҪ®дёә Integer.MAX_VALUE гҖӮ
еә”з”ЁеңәжҷҜ
еӨҡз”ЁдәҺд»»еҠЎйҳҹеҲ—пјҢеҚ•зәҝзЁӢеҸ‘еёғд»»еҠЎпјҢд»»еҠЎж»ЎдәҶе°ұеҒңжӯўзӯүеҫ…йҳ»еЎһпјҢеҪ“д»»еҠЎиў«е®ҢжҲҗж¶Ҳиҙ№е°‘дәҶеҸҲејҖе§ӢиҙҹиҙЈеҸ‘еёғд»»еҠЎгҖӮ
жҲ‘们жқҘзңӢдёҖдёӘдҫӢеӯҗпјҡ
package com.niuh.queue.linked; import org.apache.commons.lang.RandomStringUtils; import java.util.concurrent.CountDownLatch; import java.util.concurrent.ExecutorService; import java.util.concurrent.Executors; import java.util.concurrent.LinkedBlockingQueue; import java.util.concurrent.TimeUnit; import java.util.concurrent.atomic.AtomicLong; public class TestLinkedBlockingQueue { private static LinkedBlockingQueue<String> queue = new LinkedBlockingQueue<String>(); // зәҝзЁӢжҺ§еҲ¶ејҖе…і private final CountDownLatch latch = new CountDownLatch(1); // зәҝзЁӢжұ private final ExecutorService pool; // AtomicLong и®Ўж•° з”ҹдә§ж•°йҮҸ private final AtomicLong output = new AtomicLong(0); // AtomicLong и®Ўж•° й”Җе”®ж•°йҮҸ private final AtomicLong sales = new AtomicLong(0); // жҳҜеҗҰеҒңжӯўзәҝзЁӢ private final boolean clear; public TestLinkedBlockingQueue(boolean clear) { this.pool = Executors.newCachedThreadPool(); this.clear = clear; } public void service() throws InterruptedException { Consumer a = new Consumer(queue, sales, latch, clear); pool.submit(a); Producer w = new Producer(queue, output, latch); pool.submit(w); latch.countDown(); } public static void main(String[] args) { TestLinkedBlockingQueue t = new TestLinkedBlockingQueue(false); try { t.service(); } catch (InterruptedException e) { e.printStackTrace(); } } } /** * ж¶Ҳиҙ№иҖ…пјҲй”Җе”®дә§е“Ғпјү */ class Consumer implements Runnable { private final LinkedBlockingQueue<String> queue; private final AtomicLong sales; private final CountDownLatch latch; private final boolean clear; public Consumer(LinkedBlockingQueue<String> queue, AtomicLong sales, CountDownLatch latch, boolean clear) { this.queue = queue; this.sales = sales; this.latch = latch; this.clear = clear; } public void run() { try { latch.await(); // ж”ҫй—ёд№ӢеүҚиҖҒе®һзҡ„зӯүеҫ…зқҖ for (; ; ) { sale(); Thread.sleep(500); } } catch (InterruptedException e) { if (clear) { // е“Қеә”дёӯж–ӯиҜ·жұӮеҗҺ,еҰӮжһңжңүиҰҒжұӮеҲҷй”Җе”®е®ҢйҳҹеҲ—зҡ„дә§е“ҒеҗҺеҶҚз»ҲжӯўзәҝзЁӢ cleanWarehouse(); } else { System.out.println("Seller Thread will be interrupted..."); } } } public void sale() { System.out.println("==еҸ–take="); try { String item = queue.poll(50, TimeUnit.MILLISECONDS); System.out.println(item); if (item != null) { sales.incrementAndGet(); // еҸҜд»ҘеЈ°жҳҺlongеһӢзҡ„еҸӮж•°иҺ·еҫ—иҝ”еӣһеҖј,дҪңдёәж—Ҙеҝ—зҡ„еҸӮж•° } } catch (InterruptedException e) { e.printStackTrace(); } } /** * й”Җе”®е®ҢйҳҹеҲ—еү©дҪҷзҡ„дә§е“Ғ */ private void cleanWarehouse() { try { while (queue.size() > 0) { sale(); } } catch (Exception ex) { System.out.println("Seller Thread will be interrupted..."); } } } /** * з”ҹдә§иҖ…пјҲз”ҹдә§дә§е“Ғпјү * */ class Producer implements Runnable { private LinkedBlockingQueue<String> queue; private CountDownLatch latch; private AtomicLong output; public Producer() { } public Producer(LinkedBlockingQueue<String> queue, AtomicLong output, CountDownLatch latch) { this.queue = queue; this.latch = latch; this.output = output; } public void run() { try { latch.await(); // зәҝзЁӢзӯүеҫ… for (; ; ) { work(); Thread.sleep(100); } } catch (InterruptedException e) { System.out.println("Producer thread will be interrupted..."); } } /** * е·ҘдҪң */ public void work() { try { String product = RandomStringUtils.randomAscii(3); boolean success = queue.offer(product, 100, TimeUnit.MILLISECONDS); if (success) { output.incrementAndGet();// еҸҜд»ҘеЈ°жҳҺlongеһӢзҡ„еҸӮж•°иҺ·еҫ—иҝ”еӣһеҖј,дҪңдёәж—Ҙеҝ—зҡ„еҸӮж•° } } catch (InterruptedException e) { e.printStackTrace(); } } }е·ҘдҪңеҺҹзҗҶ
LinkedBlockingQueueеҶ…йғЁз”ұеҚ•й“ҫиЎЁе®һзҺ°пјҢеҸӘиғҪд»ҺheadеҸ–е…ғзҙ пјҢд»Һtailж·»еҠ е…ғзҙ гҖӮж·»еҠ е…ғзҙ е’ҢиҺ·еҸ–е…ғзҙ йғҪжңүзӢ¬з«Ӣзҡ„й”ҒпјҢд№ҹе°ұжҳҜиҜҙLinkedBlockingQueueжҳҜиҜ»еҶҷеҲҶзҰ»зҡ„пјҢиҜ»еҶҷж“ҚдҪңеҸҜд»Ҙ并иЎҢжү§иЎҢгҖӮLinkedBlockingQueueйҮҮз”ЁеҸҜйҮҚе…Ҙй”Ғ(ReentrantLock)жқҘдҝқиҜҒеңЁе№¶еҸ‘жғ…еҶөдёӢзҡ„зәҝзЁӢе®үе…ЁгҖӮ
еҗ‘ж— йҷҗйҳҹеҲ—ж·»еҠ е…ғзҙ зҡ„жүҖжңүж“ҚдҪңйғҪе°Ҷж°ёиҝңдёҚдјҡйҳ»еЎһпјҢ[жіЁж„ҸиҝҷйҮҢдёҚжҳҜиҜҙдёҚдјҡеҠ й”ҒдҝқиҜҒзәҝзЁӢе®үе…Ё]пјҢеӣ жӯӨе®ғеҸҜд»Ҙеўһй•ҝеҲ°йқһеёёеӨ§зҡ„е®№йҮҸгҖӮ
дҪҝз”Ёж— йҷҗ BlockingQueue и®ҫи®Ўз”ҹдә§иҖ… - ж¶Ҳиҙ№иҖ…жЁЎеһӢж—¶жңҖйҮҚиҰҒзҡ„жҳҜ ж¶Ҳиҙ№иҖ…еә”иҜҘиғҪеӨҹеғҸз”ҹдә§иҖ…еҗ‘йҳҹеҲ—ж·»еҠ ж¶ҲжҒҜдёҖж ·еҝ«ең°ж¶Ҳиҙ№ж¶ҲжҒҜгҖӮеҗҰеҲҷпјҢеҶ…еӯҳеҸҜиғҪдјҡеЎ«ж»ЎпјҢ然еҗҺе°ұдјҡеҫ—еҲ°дёҖдёӘ OutOfMemory ејӮеёёгҖӮ
жәҗз ҒеҲҶжһҗ
е®ҡд№ү
LinkedBlockingQueueзҡ„зұ»з»§жүҝе…ізі»еҰӮдёӢпјҡ
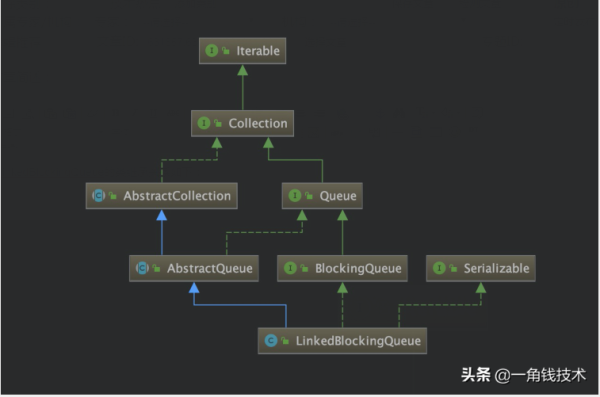
е…¶еҢ…еҗ«зҡ„ж–№жі•е®ҡд№үеҰӮдёӢпјҡ

жҲҗе‘ҳеұһжҖ§
/** * иҠӮзӮ№зұ»пјҢз”ЁдәҺеӯҳеӮЁж•°жҚ® */ static class Node<E> { E item; Node<E> next; Node(E x) { item = x; } } /** йҳ»еЎһйҳҹеҲ—зҡ„еӨ§е°Ҹ, й»ҳи®ӨдёәInteger.MAX_VALUE */ private final int capacity; /** еҪ“еүҚйҳ»еЎһйҳҹеҲ—дёӯзҡ„е…ғзҙ дёӘж•° */ private final AtomicInteger count = new AtomicInteger(); /** * йҳ»еЎһйҳҹеҲ—зҡ„еӨҙиҠӮзӮ№ */ transient Node<E> head; /** * йҳ»еЎһйҳҹеҲ—зҡ„е°ҫиҠӮзӮ№ */ private transient Node<E> last; /** иҺ·еҸ–并移йҷӨе…ғзҙ ж—¶дҪҝз”Ёзҡ„й”ҒпјҢеҰӮtakeпјҢpollпјҢetc */ private final ReentrantLock takeLock = new ReentrantLock(); /** notEmpty жқЎд»¶еҜ№иұЎпјҢеҪ“йҳҹеҲ—жІЎжңүж•°жҚ®ж—¶з”ЁдәҺжҢӮиө·жү§иЎҢеҲ йҷӨзҡ„зәҝзЁӢ */ private final Condition notEmpty = takeLock.newCondition(); /** ж·»еҠ е…ғзҙ ж—¶дҪҝз”Ёзҡ„й”ҒпјҢеҰӮ putпјҢofferпјҢetc */ private final ReentrantLock putLock = new ReentrantLock(); /** notFull жқЎд»¶еҜ№иұЎпјҢжҜҸеҪ“йҳҹеҲ—ж•°жҚ®е·Іж»Ўж—¶з”ЁдәҺжҢӮиө·жү§иЎҢж·»еҠ зҡ„зәҝзЁӢ */ private final Condition notFull = putLock.newCondition();д»ҺдёҠйқўзҡ„еұһжҖ§жҲ‘们зҹҘйҒ“пјҢжҜҸдёӘж·»еҠ еҲ°LinkedBlockingQueueйҳҹеҲ—дёӯзҡ„ж•°жҚ®йғҪе°Ҷиў«е°ҒиЈ…жҲҗNodeиҠӮзӮ№пјҢж·»еҠ зҡ„й“ҫиЎЁйҳҹеҲ—дёӯпјҢе…¶дёӯheadе’ҢlastеҲҶеҲ«жҢҮеҗ‘йҳҹеҲ—зҡ„еӨҙз»“зӮ№е’Ңе°ҫз»“зӮ№гҖӮдёҺArrayBlockingQueueдёҚеҗҢзҡ„жҳҜпјҢLinkedBlockingQueueеҶ…йғЁеҲҶеҲ«дҪҝз”ЁдәҶtakeLock е’Ң putLock еҜ№е№¶еҸ‘иҝӣиЎҢжҺ§еҲ¶пјҢд№ҹе°ұжҳҜиҜҙпјҢж·»еҠ е’ҢеҲ йҷӨж“ҚдҪң并дёҚжҳҜдә’ж–Ҙж“ҚдҪңпјҢеҸҜд»ҘеҗҢж—¶иҝӣиЎҢпјҢиҝҷж ·д№ҹе°ұеҸҜд»ҘеӨ§еӨ§жҸҗй«ҳеҗһеҗҗйҮҸгҖӮ
иҝҷйҮҢеҰӮжһңдёҚжҢҮе®ҡйҳҹеҲ—зҡ„е®№йҮҸеӨ§е°ҸпјҢд№ҹе°ұжҳҜдҪҝз”Ёй»ҳи®Өзҡ„Integer.MAX_VALUEпјҢеҰӮжһңеӯҳеңЁж·»еҠ йҖҹеәҰеӨ§дәҺеҲ йҷӨйҖҹеәҰж—¶еҖҷпјҢжңүеҸҜиғҪдјҡеҶ…еӯҳжәўеҮәпјҢиҝҷзӮ№еңЁдҪҝз”ЁеүҚеёҢжңӣж…ҺйҮҚиҖғиҷ‘гҖӮ
еҸҰеӨ–пјҢLinkedBlockingQueueеҜ№жҜҸдёҖдёӘlockй”ҒйғҪжҸҗдҫӣдәҶдёҖдёӘConditionз”ЁжқҘжҢӮиө·е’Ңе”ӨйҶ’е…¶д»–зәҝзЁӢгҖӮ
жһ„йҖ еҮҪж•°
й»ҳи®Өзҡ„жһ„йҖ еҮҪж•°е’ҢжңҖеҗҺдёҖдёӘжһ„йҖ еҮҪж•°еҲӣе»әзҡ„йҳҹеҲ—еӨ§е°ҸйғҪдёә Integer.MAX_VALUEпјҢеҸӘжңү第дәҢдёӘжһ„йҖ еҮҪж•°з”ЁжҲ·еҸҜд»ҘжҢҮе®ҡйҳҹеҲ—зҡ„еӨ§е°ҸгҖӮ第дәҢдёӘжһ„йҖ еҮҪж•°жңҖеҗҺеҲқе§ӢеҢ–дәҶlastе’ҢheadиҠӮзӮ№пјҢи®©е®ғ们йғҪжҢҮеҗ‘дәҶдёҖдёӘе…ғзҙ дёәnullзҡ„иҠӮзӮ№гҖӮ
жңҖеҗҺдёҖдёӘжһ„йҖ еҮҪж•°дҪҝз”ЁдәҶputLockжқҘиҝӣиЎҢеҠ й”ҒпјҢдҪҶжҳҜиҝҷйҮҢ并дёҚжҳҜдёәдәҶеӨҡзәҝзЁӢзҡ„з«һдәүиҖҢеҠ й”ҒпјҢеҸӘжҳҜдёәдәҶж”ҫе…Ҙзҡ„е…ғзҙ иғҪз«ӢеҚіеҜ№е…¶д»–зәҝзЁӢеҸҜи§ҒгҖӮ
public LinkedBlockingQueue() { // й»ҳи®ӨеӨ§е°ҸдёәInteger.MAX_VALUE this(Integer.MAX_VALUE); } public LinkedBlockingQueue(int capacity) { if (capacity <= 0) throw new IllegalArgumentException(); this.capacity = capacity; last = head = new Node<E>(null); } public LinkedBlockingQueue(Collection<? extends E> c) { this(Integer.MAX_VALUE); final ReentrantLock putLock = this.putLock; putLock.lock(); // Never contended, but necessary for visibility try { int n = 0; for (E e : c) { if (e == null) throw new NullPointerException(); if (n == capacity) throw new IllegalStateException("Queue full"); enqueue(new Node<E>(e)); ++n; } count.set(n); } finally { putLock.unlock(); } }е…Ҙйҳҹж–№жі•
LinkedBlockingQueueжҸҗдҫӣдәҶеӨҡз§Қе…Ҙйҳҹж“ҚдҪңзҡ„е®һзҺ°жқҘж»Ўи¶ідёҚеҗҢжғ…еҶөдёӢзҡ„йңҖжұӮпјҢе…Ҙйҳҹж“ҚдҪңжңүеҰӮдёӢеҮ з§Қпјҡ
е…¶дёӯпјҡ
offerж–№жі•жңүдёӨдёӘйҮҚиҪҪзүҲжң¬пјҢеҸӘжңүдёҖдёӘеҸӮж•°зҡ„зүҲжң¬пјҢеҰӮжһңйҳҹеҲ—ж»ЎдәҶе°ұиҝ”еӣһfalseпјҢеҗҰеҲҷеҠ е…ҘеҲ°йҳҹеҲ—дёӯпјҢиҝ”еӣһtrueпјҢaddж–№жі•е°ұжҳҜи°ғз”ЁжӯӨзүҲжң¬зҡ„offerж–№жі•;еҸҰдёҖдёӘеёҰж—¶й—ҙеҸӮж•°зҡ„зүҲжң¬пјҢеҰӮжһңйҳҹеҲ—ж»ЎдәҶеҲҷзӯүеҫ…пјҢеҸҜжҢҮе®ҡзӯүеҫ…зҡ„ж—¶й—ҙпјҢеҰӮжһңиҝҷжңҹй—ҙдёӯж–ӯдәҶеҲҷжҠӣеҮәејӮеёёпјҢеҰӮжһңзӯүеҫ…и¶…ж—¶дәҶеҲҷиҝ”еӣһfalseпјҢеҗҰеҲҷеҠ е…ҘеҲ°йҳҹеҲ—дёӯиҝ”еӣһtrue;
putж–№жі•и·ҹеёҰж—¶й—ҙеҸӮж•°зҡ„offerж–№жі•йҖ»иҫ‘дёҖж ·пјҢдёҚиҝҮжІЎжңүзӯүеҫ…зҡ„ж—¶й—ҙйҷҗеҲ¶пјҢдјҡдёҖзӣҙзӯүеҫ…зӣҙеҲ°йҳҹеҲ—жңүз©әдҪҷдҪҚзҪ®дәҶпјҢеҶҚжҸ’е…ҘеҲ°йҳҹеҲ—дёӯпјҢиҝ”еӣһtrueгҖӮ
put(E e)
public void put(E e) throws InterruptedException { if (e == null) throw new NullPointerException(); int c = -1; Node<E> node = new Node<E>(e); final ReentrantLock putLock = this.putLock; final AtomicInteger count = this.count; // иҺ·еҸ–й”Ғдёӯж–ӯ putLock.lockInterruptibly(); try { //еҲӨж–ӯйҳҹеҲ—жҳҜеҗҰе·Іж»ЎпјҢеҰӮжһңе·Іж»Ўйҳ»еЎһзӯүеҫ… while (count.get() == capacity) { notFull.await(); } // жҠҠnodeж”ҫе…ҘйҳҹеҲ—дёӯ enqueue(node); c = count.getAndIncrement(); // еҶҚж¬ЎеҲӨж–ӯйҳҹеҲ—жҳҜеҗҰжңүеҸҜз”Ёз©әй—ҙпјҢеҰӮжһңжңүе”ӨйҶ’дёӢдёҖдёӘзәҝзЁӢиҝӣиЎҢж·»еҠ ж“ҚдҪң if (c + 1 < capacity) notFull.signal(); } finally { putLock.unlock(); } // еҰӮжһңйҳҹеҲ—дёӯжңүдёҖжқЎж•°жҚ®пјҢе”ӨйҶ’ж¶Ҳиҙ№зәҝзЁӢиҝӣиЎҢж¶Ҳиҙ№ if (c == 0) signalNotEmpty(); }е°Ҹз»“putж–№жі•жқҘзңӢпјҢе®ғжҖ»е…ұеҒҡдәҶд»ҘдёӢжғ…еҶөзҡ„иҖғиҷ‘пјҡ
йҳҹеҲ—е·Іж»ЎпјҢйҳ»еЎһзӯүеҫ…гҖӮ
йҳҹеҲ—жңӘж»ЎпјҢеҲӣе»әдёҖдёӘnodeиҠӮзӮ№ж”ҫе…ҘйҳҹеҲ—дёӯпјҢеҰӮжһңж”ҫе®Ңд»ҘеҗҺйҳҹеҲ—иҝҳжңүеү©дҪҷз©әй—ҙпјҢ继з»ӯе”ӨйҶ’дёӢдёҖдёӘж·»еҠ зәҝзЁӢиҝӣиЎҢж·»еҠ гҖӮеҰӮжһңж”ҫд№ӢеүҚйҳҹеҲ—дёӯжІЎжңүе…ғзҙ пјҢж”ҫе®Ңд»ҘеҗҺиҰҒе”ӨйҶ’ж¶Ҳиҙ№зәҝзЁӢиҝӣиЎҢж¶Ҳиҙ№гҖӮ
жҲ‘们еҶҚзңӢзңӢputж–№жі•дёӯз”ЁеҲ°зҡ„еҮ дёӘе…¶д»–ж–№жі•пјҢе…ҲжқҘзңӢзңӢ enqueue(Node node) ж–№жі•пјҡ
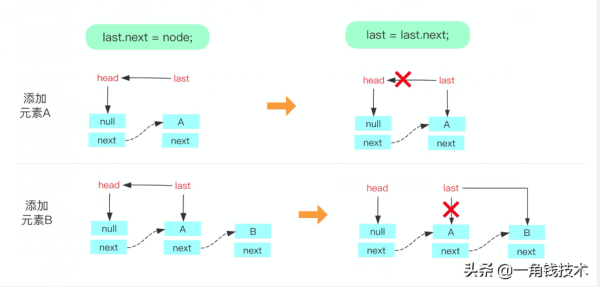
private void enqueue(Node<E> node) { last = last.next = node; }з”ЁдёҖеј еӣҫжқҘзңӢзңӢеҫҖйҳҹеҲ—йҮҢдҫқж¬Ўж”ҫе…Ҙе…ғзҙ Aе’Ңе…ғзҙ BпјҢеҰӮдёӢпјҡ
жҺҘдёӢжқҘжҲ‘们зңӢзңӢsignalNotEmptyпјҢйЎәеёҰзқҖзңӢsignalNotFullж–№жі•гҖӮ
private void signalNotEmpty() { final ReentrantLock takeLock = this.takeLock; takeLock.lock(); try { notEmpty.signal(); } finally { takeLock.unlock(); } } private void signalNotFull() { final ReentrantLock putLock = this.putLock; putLock.lock(); try { notFull.signal(); } finally { putLock.unlock(); } }дёәд»Җд№ҲиҰҒиҝҷд№ҲеҶҷ?еӣ дёәsignalзҡ„ж—¶еҖҷиҰҒиҺ·еҸ–еҲ°иҜҘsignalеҜ№еә”зҡ„ConditionеҜ№иұЎзҡ„й”ҒжүҚиЎҢгҖӮ
offer(E e)
public boolean offer(E e) { if (e == null) throw new NullPointerException(); final AtomicInteger count = this.count; if (count.get() == capacity) return false; int c = -1; Node<E> node = new Node<E>(e); final ReentrantLock putLock = this.putLock; putLock.lock(); try { // йҳҹеҲ—жңүеҸҜз”Ёз©әй—ҙпјҢж”ҫе…ҘnodeиҠӮзӮ№пјҢеҲӨж–ӯж”ҫе…Ҙе…ғзҙ еҗҺжҳҜеҗҰиҝҳжңүеҸҜз”Ёз©әй—ҙпјҢ // еҰӮжһңжңүпјҢе”ӨйҶ’дёӢдёҖдёӘж·»еҠ зәҝзЁӢиҝӣиЎҢж·»еҠ ж“ҚдҪңгҖӮ if (count.get() < capacity) { enqueue(node); c = count.getAndIncrement(); if (c + 1 < capacity) notFull.signal(); } } finally { putLock.unlock(); } if (c == 0) signalNotEmpty(); return c >= 0; }еҸҜд»ҘзңӢеҲ°offerд»…д»…еҜ№putж–№жі•ж”№еҠЁдәҶдёҖзӮ№зӮ№пјҢеҪ“йҳҹеҲ—жІЎжңүеҸҜз”Ёе…ғзҙ зҡ„ж—¶еҖҷпјҢдёҚеҗҢдәҺputж–№жі•зҡ„йҳ»еЎһзӯүеҫ…пјҢofferж–№жі•зӣҙжҺҘж–№жі•falseгҖӮ
offer(E e, long timeout, TimeUnit unit)
public boolean offer(E e, long timeout, TimeUnit unit) throws InterruptedException { if (e == null) throw new NullPointerException(); long nanos = unit.toNanos(timeout); int c = -1; final ReentrantLock putLock = this.putLock; final AtomicInteger count = this.count; putLock.lockInterruptibly(); try { // зӯүеҫ…и¶…ж—¶ж—¶й—ҙnanosпјҢи¶…ж—¶ж—¶й—ҙеҲ°дәҶиҝ”еӣһfalse while (count.get() == capacity) { if (nanos <= 0) return false; nanos = notFull.awaitNanos(nanos); } enqueue(new Node<E>(e)); c = count.getAndIncrement(); if (c + 1 < capacity) notFull.signal(); } finally { putLock.unlock(); } if (c == 0) signalNotEmpty(); return true; }иҜҘж–№жі•еҸӘжҳҜеҜ№offerж–№жі•иҝӣиЎҢдәҶйҳ»еЎһи¶…ж—¶еӨ„зҗҶпјҢдҪҝз”ЁдәҶConditionзҡ„awaitNanosжқҘиҝӣиЎҢи¶…ж—¶зӯүеҫ…пјҢиҝҷйҮҢдёәд»Җд№ҲиҰҒз”ЁwhileеҫӘзҺҜ?еӣ дёәawaitNanosж–№жі•жҳҜеҸҜдёӯж–ӯзҡ„пјҢдёәдәҶйҳІжӯўеңЁзӯүеҫ…иҝҮзЁӢдёӯзәҝзЁӢиў«дёӯж–ӯпјҢиҝҷйҮҢдҪҝз”ЁwhileеҫӘзҺҜиҝӣиЎҢзӯүеҫ…иҝҮзЁӢдёӯдёӯж–ӯзҡ„еӨ„зҗҶпјҢ继з»ӯзӯүеҫ…еү©дёӢйңҖзӯүеҫ…зҡ„ж—¶й—ҙгҖӮ
еҮәйҳҹж–№жі•
е…ҘйҳҹеҲ—зҡ„ж–№жі•иҜҙе®ҢеҗҺпјҢжҲ‘们жқҘиҜҙиҜҙеҮәйҳҹеҲ—зҡ„ж–№жі•гҖӮLinkedBlockingQueueжҸҗдҫӣдәҶеӨҡз§ҚеҮәйҳҹж“ҚдҪңзҡ„е®һзҺ°жқҘж»Ўи¶ідёҚеҗҢжғ…еҶөдёӢзҡ„йңҖжұӮпјҢеҰӮдёӢпјҡ
take()
public E take() throws InterruptedException { E x; int c = -1; final AtomicInteger count = this.count; final ReentrantLock takeLock = this.takeLock; takeLock.lockInterruptibly(); try { // йҳҹеҲ—дёәз©әпјҢйҳ»еЎһзӯүеҫ… while (count.get() == 0) { notEmpty.await(); } x = dequeue(); c = count.getAndDecrement(); // йҳҹеҲ—дёӯиҝҳжңүе…ғзҙ пјҢе”ӨйҶ’дёӢдёҖдёӘж¶Ҳиҙ№зәҝзЁӢиҝӣиЎҢж¶Ҳиҙ№ if (c > 1) notEmpty.signal(); } finally { takeLock.unlock(); } // 移йҷӨе…ғзҙ д№ӢеүҚйҳҹеҲ—жҳҜж»Ўзҡ„пјҢе”ӨйҶ’з”ҹдә§зәҝзЁӢиҝӣиЎҢж·»еҠ е…ғзҙ if (c == capacity) signalNotFull(); return x; }takeж–№жі•зңӢиө·жқҘе°ұжҳҜputж–№жі•зҡ„йҖҶеҗ‘ж“ҚдҪңпјҢе®ғжҖ»е…ұеҒҡдәҶд»ҘдёӢжғ…еҶөзҡ„иҖғиҷ‘пјҡ
йҳҹеҲ—дёәз©әпјҢйҳ»еЎһзӯүеҫ…
йҳҹеҲ—дёҚдёәз©әпјҢд»ҺеҜ№йҰ–иҺ·еҸ–并移йҷӨдёҖдёӘе…ғзҙ пјҢеҰӮжһңж¶Ҳиҙ№еҗҺиҝҳжңүе…ғзҙ еңЁйҳҹеҲ—дёӯпјҢ继з»ӯе”ӨйҶ’дёӢдёҖдёӘж¶Ҳиҙ№зәҝзЁӢиҝӣиЎҢе…ғзҙ 移йҷӨгҖӮеҰӮжһңж”ҫд№ӢеүҚйҳҹеҲ—жҳҜж»Ўе…ғзҙ зҡ„жғ…еҶөпјҢ移йҷӨе®ҢеҗҺйңҖиҰҒе”ӨйҶ’з”ҹдә§зәҝзЁӢиҝӣиЎҢж·»еҠ е…ғзҙ гҖӮ
жҲ‘们жқҘзңӢзңӢdequeueж–№жі•
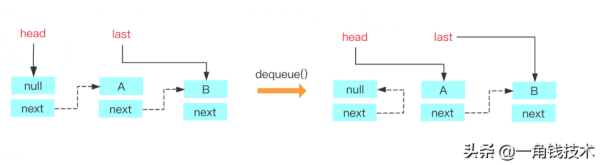
private E dequeue() { // иҺ·еҸ–еҲ°headиҠӮзӮ№ Node<E> h = head; // иҺ·еҸ–еҲ°headиҠӮзӮ№жҢҮеҗ‘зҡ„дёӢдёҖдёӘиҠӮзӮ№ Node<E> first = h.next; // headиҠӮзӮ№еҺҹжқҘжҢҮеҗ‘зҡ„иҠӮзӮ№зҡ„nextжҢҮеҗ‘иҮӘе·ұпјҢзӯүеҫ…дёӢж¬Ўgcеӣһ收 h.next = h; // help GC // headиҠӮзӮ№жҢҮеҗ‘ж–°зҡ„иҠӮзӮ№ head = first; // иҺ·еҸ–еҲ°ж–°зҡ„headиҠӮзӮ№зҡ„itemеҖј E x = first.item; // ж–°headиҠӮзӮ№зҡ„itemеҖји®ҫзҪ®дёәnull first.item = null; return x; }жҲ‘们结еҗҲжіЁйҮҠе’ҢеӣҫжқҘзңӢдёҖдёӢй“ҫиЎЁз®—жі•пјҡ
е…¶е®һиҝҷдёӘеҶҷжі•зңӢиө·жқҘеҫҲз»•пјҢжҲ‘们其е®һд№ҹеҸҜд»Ҙиҝҷд№ҲеҶҷпјҡ
private E dequeue() { // иҺ·еҸ–еҲ°headиҠӮзӮ№ Node<E> h = head; // иҺ·еҸ–еҲ°headиҠӮзӮ№жҢҮеҗ‘зҡ„дёӢдёҖдёӘиҠӮзӮ№пјҢд№ҹе°ұжҳҜиҠӮзӮ№A Node<E> first = h.next; // иҺ·еҸ–еҲ°дёӢдёӢдёӘиҠӮзӮ№пјҢд№ҹе°ұжҳҜиҠӮзӮ№B Node<E> next = first.next; // headзҡ„nextжҢҮеҗ‘дёӢдёӢдёӘиҠӮзӮ№пјҢд№ҹе°ұжҳҜеӣҫдёӯзҡ„BиҠӮзӮ№ h.next = next; // еҫ—еҲ°иҠӮзӮ№Aзҡ„еҖј E x = first.item; first.item = null; // help GC first.next = first; // help GC return x; }poll()
public E poll() { final AtomicInteger count = this.count; if (count.get() == 0) return null; E x = null; int c = -1; final ReentrantLock takeLock = this.takeLock; takeLock.lock(); try { if (count.get() > 0) { x = dequeue(); c = count.getAndDecrement(); if (c > 1) notEmpty.signal(); } } finally { takeLock.unlock(); } if (c == capacity) signalNotFull(); return x; }pollж–№жі•еҺ»йҷӨдәҶtakeж–№жі•дёӯе…ғзҙ дёәз©әеҗҺйҳ»еЎһзӯүеҫ…иҝҷдёҖжӯҘйӘӨпјҢиҝҷйҮҢд№ҹе°ұдёҚиҜҰз»ҶиҜҙдәҶгҖӮеҗҢзҗҶпјҢpoll(long timeout, TimeUnit unit)д№ҹе’Ңoffer(E e, long timeout, TimeUnit unit)дёҖж ·пјҢеҲ©з”ЁдәҶConditionзҡ„awaitNanosж–№жі•жқҘиҝӣиЎҢйҳ»еЎһзӯүеҫ…зӣҙиҮіи¶…ж—¶гҖӮиҝҷйҮҢе°ұдёҚеҲ—еҮәжқҘиҜҙдәҶгҖӮ
иҺ·еҸ–е…ғзҙ ж–№жі•
public E peek() { if (count.get() == 0) return null; final ReentrantLock takeLock = this.takeLock; takeLock.lock(); try { Node<E> first = head.next; if (first == null) return null; else return first.item; } finally { takeLock.unlock(); } }еҠ й”ҒеҗҺпјҢиҺ·еҸ–еҲ°headиҠӮзӮ№зҡ„nextиҠӮзӮ№пјҢеҰӮжһңдёәз©әиҝ”еӣһnullпјҢеҰӮжһңдёҚдёәз©әпјҢиҝ”еӣһnextиҠӮзӮ№зҡ„itemеҖјгҖӮ
еҲ йҷӨе…ғзҙ ж–№жі•
public boolean remove(Object o) { if (o == null) return false; // дёӨдёӘlockе…ЁйғЁдёҠй”Ғ fullyLock(); try { // д»ҺheadејҖе§ӢйҒҚеҺҶе…ғзҙ пјҢзӣҙеҲ°жңҖеҗҺдёҖдёӘе…ғзҙ for (Node<E> trail = head, p = trail.next; p != null; trail = p, p = p.next) { // еҰӮжһңжүҫеҲ°зӣёзӯүзҡ„е…ғзҙ пјҢи°ғз”Ёunlinkж–№жі•еҲ йҷӨе…ғзҙ if (o.equals(p.item)) { unlink(p, trail); return true; } } return false; } finally { // дёӨдёӘlockе…ЁйғЁи§Јй”Ғ fullyUnlock(); } } void fullyLock() { putLock.lock(); takeLock.lock(); } void fullyUnlock() { takeLock.unlock(); putLock.unlock(); }еӣ дёәremoveж–№жі•дҪҝз”ЁдёӨдёӘй”Ғе…ЁйғЁдёҠй”ҒпјҢжүҖд»Ҙе…¶д»–ж“ҚдҪңйғҪйңҖиҰҒзӯүеҫ…е®ғе®ҢжҲҗпјҢиҖҢиҜҘж–№жі•йңҖиҰҒд»ҺheadиҠӮзӮ№йҒҚеҺҶеҲ°е°ҫиҠӮзӮ№пјҢжүҖд»Ҙж—¶й—ҙеӨҚжқӮеәҰдёәO(n)гҖӮжҲ‘们жқҘзңӢзңӢunlinkж–№жі•гҖӮ
void unlink(Node<E> p, Node<E> trail) { // pзҡ„е…ғзҙ зҪ®дёәnull p.item = null; // pзҡ„еүҚдёҖдёӘиҠӮзӮ№зҡ„nextжҢҮеҗ‘pзҡ„nextпјҢд№ҹе°ұжҳҜжҠҠpд»Һй“ҫиЎЁдёӯеҺ»йҷӨдәҶ trail.next = p.next; // еҰӮжһңlastжҢҮеҗ‘pпјҢеҲ йҷӨpеҗҺи®©lastжҢҮеҗ‘trail if (last == p) last = trail; // еҰӮжһңеҲ йҷӨд№ӢеүҚе…ғзҙ жҳҜж»Ўзҡ„пјҢеҲ йҷӨд№ӢеҗҺе°ұжңүз©әй—ҙдәҶпјҢе”ӨйҶ’з”ҹдә§зәҝзЁӢж”ҫе…Ҙе…ғзҙ if (count.getAndDecrement() == capacity) notFull.signal(); }жҖ»з»“
LinkedBlockingQueueжҳҜдёҖдёӘйҳ»еЎһйҳҹеҲ—пјҢеҶ…йғЁз”ұдёӨдёӘReentrantLockжқҘе®һзҺ°еҮәе…ҘйҳҹеҲ—зҡ„зәҝзЁӢе®үе…ЁпјҢз”ұеҗ„иҮӘзҡ„ConditionеҜ№иұЎзҡ„awaitе’ҢsignalжқҘе®һзҺ°зӯүеҫ…е’Ңе”ӨйҶ’еҠҹиғҪгҖӮе®ғе’ҢArrayBlockingQueueзҡ„дёҚеҗҢзӮ№еңЁдәҺпјҡ
йҳҹеҲ—еӨ§е°ҸжңүжүҖдёҚеҗҢпјҢArrayBlockingQueueжҳҜжңүз•Ңзҡ„еҲқе§ӢеҢ–еҝ…йЎ»жҢҮе®ҡеӨ§е°ҸпјҢиҖҢLinkedBlockingQueueеҸҜд»ҘжҳҜжңүз•Ңзҡ„д№ҹеҸҜд»ҘжҳҜж— з•Ңзҡ„(Integer.MAX_VALUE)пјҢеҜ№дәҺеҗҺиҖ…иҖҢиЁҖпјҢеҪ“ж·»еҠ йҖҹеәҰеӨ§дәҺ移йҷӨйҖҹеәҰж—¶пјҢеңЁж— з•Ңзҡ„жғ…еҶөдёӢпјҢеҸҜиғҪдјҡйҖ жҲҗеҶ…еӯҳжәўеҮәзӯүй—®йўҳгҖӮ
ж•°жҚ®еӯҳеӮЁе®№еҷЁдёҚеҗҢпјҢArrayBlockingQueueйҮҮз”Ёзҡ„жҳҜж•°з»„дҪңдёәж•°жҚ®еӯҳеӮЁе®№еҷЁпјҢиҖҢLinkedBlockingQueueйҮҮз”Ёзҡ„еҲҷжҳҜд»ҘNodeиҠӮзӮ№дҪңдёәиҝһжҺҘеҜ№иұЎзҡ„й“ҫиЎЁгҖӮ
з”ұдәҺArrayBlockingQueueйҮҮз”Ёзҡ„жҳҜж•°з»„зҡ„еӯҳеӮЁе®№еҷЁпјҢеӣ жӯӨеңЁжҸ’е…ҘжҲ–еҲ йҷӨе…ғзҙ ж—¶дёҚдјҡдә§з”ҹжҲ–й”ҖжҜҒд»»дҪ•йўқеӨ–зҡ„еҜ№иұЎе®һдҫӢпјҢиҖҢLinkedBlockingQueueеҲҷдјҡз”ҹжҲҗдёҖдёӘйўқеӨ–зҡ„NodeеҜ№иұЎгҖӮиҝҷеҸҜиғҪеңЁй•ҝж—¶й—ҙеҶ…йңҖиҰҒй«ҳж•Ҳ并еҸ‘ең°еӨ„зҗҶеӨ§жү№йҮҸж•°жҚ®зҡ„ж—¶пјҢеҜ№дәҺGCеҸҜиғҪеӯҳеңЁиҫғеӨ§еҪұе“ҚгҖӮ
дёӨиҖ…зҡ„е®һзҺ°йҳҹеҲ—ж·»еҠ жҲ–移йҷӨзҡ„й”ҒдёҚдёҖж ·пјҢArrayBlockingQueueе®һзҺ°зҡ„йҳҹеҲ—дёӯзҡ„й”ҒжҳҜжІЎжңүеҲҶзҰ»зҡ„пјҢеҚіж·»еҠ ж“ҚдҪңе’Ң移йҷӨж“ҚдҪңйҮҮз”Ёзҡ„еҗҢдёҖдёӘReenterLockй”ҒпјҢиҖҢLinkedBlockingQueueе®һзҺ°зҡ„йҳҹеҲ—дёӯзҡ„й”ҒжҳҜеҲҶзҰ»зҡ„пјҢе…¶ж·»еҠ йҮҮз”Ёзҡ„жҳҜputLockпјҢ移йҷӨйҮҮз”Ёзҡ„еҲҷжҳҜtakeLockпјҢиҝҷж ·иғҪеӨ§еӨ§жҸҗй«ҳйҳҹеҲ—зҡ„еҗһеҗҗйҮҸпјҢд№ҹж„Ҹе‘ізқҖеңЁй«ҳ并еҸ‘зҡ„жғ…еҶөдёӢз”ҹдә§иҖ…е’Ңж¶Ҳиҙ№иҖ…еҸҜд»Ҙ并иЎҢең°ж“ҚдҪңйҳҹеҲ—дёӯзҡ„ж•°жҚ®пјҢд»ҘжӯӨжқҘжҸҗй«ҳж•ҙдёӘйҳҹеҲ—зҡ„并еҸ‘жҖ§иғҪгҖӮ
вҖңйҳ»еЎһйҳҹеҲ—д№ӢеҰӮдҪ•зҗҶи§ЈLinkedBlockingQueueжәҗз ҒвҖқзҡ„еҶ…е®№е°ұд»Ӣз»ҚеҲ°иҝҷйҮҢдәҶпјҢж„ҹи°ўеӨ§е®¶зҡ„йҳ…иҜ»гҖӮеҰӮжһңжғідәҶи§ЈжӣҙеӨҡиЎҢдёҡзӣёе…ізҡ„зҹҘиҜҶеҸҜд»Ҙе…іжіЁдәҝйҖҹдә‘зҪ‘з«ҷпјҢе°Ҹзј–е°ҶдёәеӨ§е®¶иҫ“еҮәжӣҙеӨҡй«ҳиҙЁйҮҸзҡ„е®һз”Ёж–Үз« пјҒ


