本篇文章为大家展示了Silverlight 2是怎么解决ListBox中一个Layout Bug,内容简明扼要并且容易理解,绝对能使你眼前一亮,通过这篇文章的详细介绍希望你能有所收获。
Silverlight自身还有没有问题? 谁也没法回答.
工作中遇到了一个关于ListBox的问题. 简单描述一下: 使用ListBox来显示某对象集合, 在排版的时候, 发现无论怎么调整ListBox的属性, 都无法让ListItem充满整个空间; 令人郁闷的是,ListItem中排放的TextBlock/TextBox总会根据自身文本的大小, 自动设定自己的长度; ListItem中的所有控件都自动向左对齐,造成了一副"甘特图"式的图像, 举例(姓名, 年龄, 邮件地址)如下:
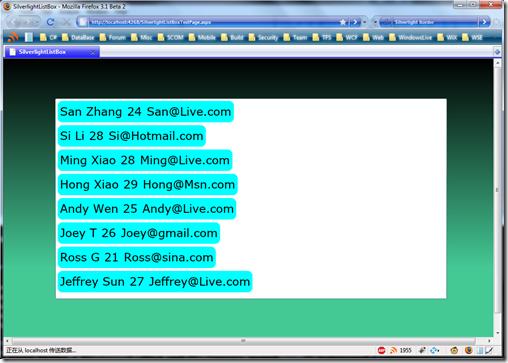
在设置了浅蓝色的Border之后, 这个现象实在是太明显了!
按照MSDN的说法, 我们只需要在ListBox的属性中加入如下设定语句, 就会强制长度自动Fill了:
HorizontalContentAlignment="Stretch"
但是加入之后没有效果! 这显然是Silverlight 2的又一个bug.
我们可以在MSDN上看到ItemContainer的默认Style(你也可以从这里看: http://msdn.microsoft.com/en-us/library/cc278062%28vs.95%29.aspx):
1: <Style TargetType="ListBoxItem">
2: <Setter Property="Padding" Value="3" />
3: <Setter Property="HorizontalContentAlignment" Value="Left" />
4: <Setter Property="VerticalContentAlignment" Value="Top" />
5: <Setter Property="Background" Value="Transparent" />
6: <Setter Property="BorderThickness" Value="1"/>
7: <Setter Property="TabNavigation" Value="Local" />
8: <Setter Property="Template">
9: <Setter.Value>
10: <ControlTemplate TargetType="ListBoxItem">
11: <Grid Background="{TemplateBinding Background}">12: <vsm:VisualStateManager.VisualStateGroups>
13: <vsm:VisualStateGroup x:Name="CommonStates">
14: <vsm:VisualState x:Name="Normal" />
15: <vsm:VisualState x:Name="MouseOver">
16: <Storyboard>
17: <DoubleAnimation Storyboard.TargetName="fillColor" Storyboard.TargetProperty="Opacity" Duration="0" To=".35"/>
18: </Storyboard>
19: </vsm:VisualState>
20: </vsm:VisualStateGroup>
21: <vsm:VisualStateGroup x:Name="SelectionStates">
22: <vsm:VisualState x:Name="Unselected" />
23: <vsm:VisualState x:Name="Selected">
24: <Storyboard>
25: <DoubleAnimation Storyboard.TargetName="fillColor2" Storyboard.TargetProperty="Opacity" Duration="0" To=".75"/>
26: </Storyboard>
27: </vsm:VisualState>
28: </vsm:VisualStateGroup>
29: <vsm:VisualStateGroup x:Name="FocusStates">
30: <vsm:VisualState x:Name="Focused">
31: <Storyboard>
32: <ObjectAnimationUsingKeyFrames Storyboard.TargetName="FocusVisualElement" Storyboard.TargetProperty="Visibility" Duration="0">
33: <DiscreteObjectKeyFrame KeyTime="0">
34: <DiscreteObjectKeyFrame.Value>
35: <Visibility>Visible</Visibility>
36: </DiscreteObjectKeyFrame.Value>
37: </DiscreteObjectKeyFrame>
38: </ObjectAnimationUsingKeyFrames>
39: </Storyboard>
40: </vsm:VisualState>
41: <vsm:VisualState x:Name="Unfocused"/>
42: </vsm:VisualStateGroup>
43: </vsm:VisualStateManager.VisualStateGroups>
44: <Rectangle x:Name="fillColor" Opacity="0" Fill="#FFBADDE9" IsHitTestVisible="False" RadiusX="1" RadiusY="1"/>
45: <Rectangle x:Name="fillColor2" Opacity="0" Fill="#FFBADDE9" IsHitTestVisible="False" RadiusX="1" RadiusY="1"/>
46: <ContentPresenter
47: x:Name="contentPresenter"
48: Content="{TemplateBinding Content}" 49: ContentTemplate="{TemplateBinding ContentTemplate}"50: HorizontalAlignment="Left"
51: Margin="{TemplateBinding Padding}"/>52: <Rectangle x:Name="FocusVisualElement" Stroke="#FF45D6FA" StrokeThickness="1" Visibility="Collapsed" RadiusX="1" RadiusY="1" />
53: </Grid>
54: </ControlTemplate>
55: </Setter.Value>
56: </Setter>
57: </Style>
可以看出来, 值设置为Left的属性仅有2个:
第3行 HorizontalContentAlignment
第50行 HorizontalAlignment
问题出在了第50行的这个Left,它默认将一个List Item中的所有内容都按照想做对齐的方式排列,由于这个style已经写在了Silverlight Runtime内,所以我们只能重写这个Style去掉这一行并为ListBox指定新的Style。
解决方法:
为ListBox添加属性 HorizontalContentAlignment="Stretch", 强制Fill
在App.xaml中添加命名空间: xmlns:vsm="clr-namespace:System.Windows;assembly=System.Windows"
在App.xaml中添加去掉了HorizontalAlignment="Left"的Style, 并给它的key命名为ListBoxItemContainerStyle ---x:Key="ListBoxItemContainerStyle"
为ListBox添加属性 ItemContainerStyle="{StaticResource ListBoxItemContainerStyle}, 指定用户自定义Style
Done!
现在你可以看到这个运行结果了:
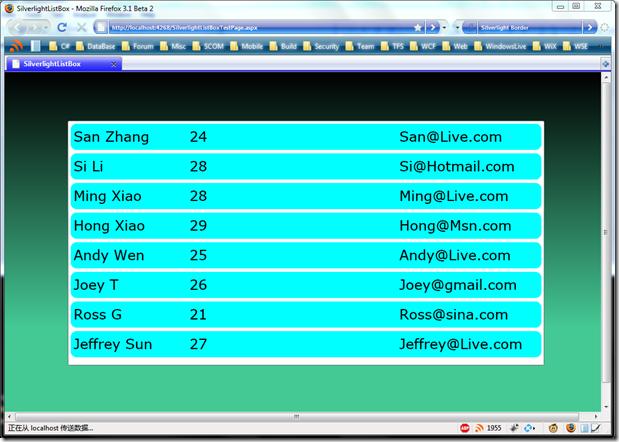
中间的年龄部分是可以随着窗体大小变化自动变化宽度的.
上述内容就是Silverlight 2是怎么解决ListBox中一个Layout Bug,你们学到知识或技能了吗?如果还想学到更多技能或者丰富自己的知识储备,欢迎关注亿速云行业资讯频道。
免责声明:本站发布的内容(图片、视频和文字)以原创、转载和分享为主,文章观点不代表本网站立场,如果涉及侵权请联系站长邮箱:is@yisu.com进行举报,并提供相关证据,一经查实,将立刻删除涉嫌侵权内容。


