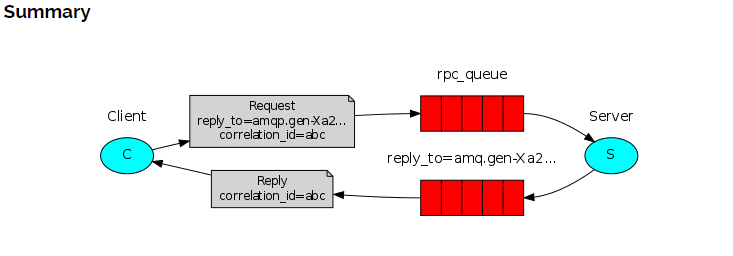
今天就跟大家聊聊有关怎么进行spring boot rabbitMQ RPC实现,可能很多人都不太了解,为了让大家更加了解,小编给大家总结了以下内容,希望大家根据这篇文章可以有所收获。
环境配置
package com.example.demo;

import org.springframework.amqp.core.Binding;
import org.springframework.amqp.core.BindingBuilder;
import org.springframework.amqp.core.DirectExchange;
import org.springframework.amqp.core.Queue;
import org.springframework.amqp.rabbit.annotation.EnableRabbit;
import org.springframework.amqp.rabbit.connection.ConnectionFactory;
import org.springframework.amqp.rabbit.core.RabbitTemplate;
import org.springframework.beans.factory.annotation.Autowired;
import org.springframework.beans.factory.annotation.Qualifier;
import org.springframework.beans.factory.config.ConfigurableBeanFactory;
import org.springframework.context.annotation.Bean;
import org.springframework.context.annotation.Configuration;
import org.springframework.context.annotation.Scope;


@Configuration
@EnableRabbit
public class RabbitMQConfigurer {

    @Autowired
    private ConnectionFactory connectionFactory;

    @Bean
    @Scope(ConfigurableBeanFactory.SCOPE_PROTOTYPE)
    public RabbitTemplate rabbitTemplate() {
        //必须是prototype类型
        //Reply received after timeout
        RabbitTemplate rabbitTemplate =  new RabbitTemplate(this.connectionFactory);
        rabbitTemplate.setReceiveTimeout(9000);
        return rabbitTemplate;
    }


    @Bean
    @Qualifier("rpcTestExchange")
    public DirectExchange rpcTestExchange() {
        return new DirectExchange("rpcTest");
    }


    @Bean
    public Queue rpcTestQueue() {
        return new Queue("rpcTestQueue");
    }


    @Bean
    public Binding rpcTestBind() {
        return BindingBuilder.bind(rpcTestQueue()).to(rpcTestExchange()).with("addUser");
    }


}
server 端
package com.example.demo;

import com.rabbitmq.client.Channel;
import org.slf4j.Logger;
import org.slf4j.LoggerFactory;
import org.springframework.amqp.rabbit.annotation.RabbitHandler;
import org.springframework.amqp.rabbit.annotation.RabbitListener;
import org.springframework.amqp.rabbit.core.RabbitTemplate;
import org.springframework.amqp.support.AmqpHeaders;
import org.springframework.beans.factory.annotation.Autowired;
import org.springframework.messaging.handler.annotation.Header;
import org.springframework.messaging.handler.annotation.Payload;
import org.springframework.stereotype.Component;


@Component
@RabbitListener(queues = "rpcTestQueue")
public class UserServer {
    private static final Logger LOGGER = LoggerFactory.getLogger(UserServer.class);

    private final RabbitTemplate rabbitTemplate;

    @Autowired
    public UserServer(RabbitTemplate rabbitTemplate) {
        this.rabbitTemplate = rabbitTemplate;
    }

    @RabbitHandler
    public void process(@Payload String payload, Channel channel, @Header(AmqpHeaders.REPLY_TO) String replyTo,
                        @Header(AmqpHeaders.CORRELATION_ID) String correlationId) throws Exception {
        LOGGER.info("====== server receive data 【{}】  ====== ", payload);

        this.rabbitTemplate.convertAndSend(replyTo, "then " + payload + " is create", message -> {
            message.getMessageProperties().setCorrelationId(correlationId);
            return message;
        });

        LOGGER.info("====== server response queue 【{}】 ======", replyTo);
    }


}
client 端
package com.example.demo;

import org.slf4j.Logger;
import org.slf4j.LoggerFactory;
import org.springframework.amqp.rabbit.core.RabbitTemplate;
import org.springframework.beans.factory.annotation.Autowired;
import org.springframework.stereotype.Component;

import java.util.Arrays;

@Component
public class Client {
    private static final Logger LOGGER = LoggerFactory.getLogger(Client.class);

    private final RabbitTemplate rabbitTemplate;

    @Autowired
    public Client(RabbitTemplate rabbitTemplate) {
        this.rabbitTemplate = rabbitTemplate;

    }

    public void doRequest() {
        for (String name : Arrays.asList("张三", "李四", "王五")) {
            LOGGER.info("---- client send user name is 【{}】", name);

            Object response = this.rabbitTemplate.convertSendAndReceive("rpcTest", "addUser", name);
            LOGGER.info("---- and response is : {} -------", response);
        }

    }


}
客户端:
在请求发送消息之前,创建一个【匿名队列】绑定至默认的交换机(即 /)。将队【匿名队列】名称放在 reply_to 中与消息一起发送。
服务端:
处理理消息后,将应答消息发送至默认交换机即(/)。
看完上述内容,你们对怎么进行spring boot rabbitMQ RPC实现有进一步的了解吗?如果还想了解更多知识或者相关内容,请关注亿速云行业资讯频道,感谢大家的支持。
免责声明:本站发布的内容(图片、视频和文字)以原创、转载和分享为主,文章观点不代表本网站立场,如果涉及侵权请联系站长邮箱:is@yisu.com进行举报,并提供相关证据,一经查实,将立刻删除涉嫌侵权内容。