这篇文章将为大家详细讲解有关Android开发如何实现NFC刷卡读取,小编觉得挺实用的,因此分享给大家做个参考,希望大家阅读完这篇文章后可以有所收获。
①:Manifest注册方式:这种方式主要是在Manifest文件对应的activity下,配置过滤器,以响应不同类型NFC Action。使用这种方式,在刷卡时,如果手机中有多个应用都存在该NFC实现方案,系统会弹出能响应NFC事件的应用列表供用户选择,用户需要点击目标应用来响应本次NFC刷卡事件。目前我公司这边项目中使用了该逻辑,比较简便,这里先贴一下该方式的实现逻辑。
Manifest配置:
<!--权限要加,这是一个普通权限,不需要动态申请,但是在小米手机里需要动态申请-->
     <uses-permission android:name="android.permission.NFC" />

     <uses-feature
        android:name="android.hardware.nfc"
        android:required="false" />

     <application>
        ...
        <activity
            android:name=".NfcActivity"
            android:launchMode="singleTask"
            android:screenOrientation="portrait"
            android:theme="@android:style/Theme.Translucent">
            <!--透明主题,把刷卡变成一个无感知的过程-->
            <intent-filter>
                <action android:name="android.nfc.action.NDEF_DISCOVERED" />
            </intent-filter>
            <intent-filter>
                <action android:name="android.nfc.action.TAG_DISCOVERED" />

                <category android:name="android.intent.category.DEFAULT" />
            </intent-filter>
            <intent-filter>
                <action android:name="android.nfc.action.TECH_DISCOVERED" />
                <!--使用这个过滤器 这里其实还要用 meta-data 配置一下标签过滤,-->
                <!--我项目中是 NDEF_DISCOVERED 这个TECH_DISCOVERED形同虚设-->
            </intent-filter>
            <meta-data
                android:name="android.nfc.action.TECH_DISCOVERED"
                android:resource="@xml/nfc_tech" />
        </activity>
</application>
nfc_tech.xml:这个文件就是TECH_DISCOVERED需要配置的,其中,tech-list之间是逻辑或关系,tech之间是逻辑与关系,与方案②中的techLists原理以及用途是类似的。
<?xml version="1.0" encoding="utf-8"?>
<resources xmlns:android="http://schemas.android.com/apk/res/android">

    <tech-list>
        <tech>android.nfc.tech.Ndef</tech>
        <tech>android.nfc.tech.NfcA</tech>
    </tech-list>

    <tech-list>
        <tech>android.nfc.tech.NfcB</tech>
    </tech-list>
    <tech-list>
        <tech>android.nfc.tech.NfcF</tech>
    </tech-list>
</resources>
NfcActivity:
public class NfcActivity extends Activity {

    @Override
    protected void onCreate(@Nullable Bundle savedInstanceState) {
        super.onCreate(savedInstanceState);
        setContentView(R.layout.activity_nfc);
        initData();
    }

    /**
     * 初始化数据
     */
    private void initData() {
        NfcAdapter adapter = NfcAdapter.getDefaultAdapter(this);
        if (null == adapter) {
            Toast.makeText(this, "不支持NFC功能", Toast.LENGTH_SHORT).show();
        } else if (!adapter.isEnabled()) {
            Intent intent = new Intent(Settings.ACTION_NFC_SETTINGS);
            // 根据包名打开对应的设置界面
            startActivity(intent);
        }

        //我项目中是拿了NFC卡的tag中的id数据,这根据具体情况来;
        // 可以在NfcAdapter源码中查看,具体能拿到哪些数据
        Tag tag = getIntent().getParcelableExtra(NfcAdapter.EXTRA_TAG);
        String id = bytesToHex(tag.getId());

        //TODO 目前我这边项目中,拿到数据后,通过EventBus分发到对应的activity,当然也能使用其他分发响应方式,

        //关闭动画,毕竟对用户来说,刷卡应当是一个无感知的过程
        overridePendingTransition(0, 0);
        finish();
    }

    @Override
    protected void onNewIntent(Intent intent) {
        super.onNewIntent(intent);
        initData();
    }

    /**
     *  2转10
     * @param src
     * @return
     */
    private static String bytesToTenNum(byte[] src) {
        StringBuilder stringBuilder = new StringBuilder();
        if (src == null || src.length <= 0) {
            return null;
        }
        char[] buffer = new char[2];
        for (int i = 0; i < src.length; i++) {
            buffer[1] = Character.toUpperCase(Character.forDigit(
                    (src[i] >>> 4) & 0x0F, 16));
            buffer[0] = Character.toUpperCase(Character.forDigit(src[i] & 0x0F,
                    16));
            stringBuilder.append(buffer);
        }
        stringBuilder.reverse();
        BigInteger bigi = new BigInteger(stringBuilder.toString(), 16);
        return bigi.toString();
    }

    /**
     * 2转16
     * @param src
     * @return
     */
    private static String bytesToHex(byte[] src){
        StringBuffer sb = new StringBuffer();
        if (src == null || src.length <= 0) {
            return null;
        }
        String sTemp;
        for (int i = 0; i < src.length; i++) {
            sTemp = Integer.toHexString(0xFF & src[i]);
            if (sTemp.length() < 2){
                sb.append(0);
            }
            sb.append(sTemp.toUpperCase());
        }
        return sb.toString();
    }
}②:前台响应机制:这种方式与第一种的区别如下:方法一中,NFC事件由系统分发,需要选择应用去响应事件;而方法二,直接使用前台activity来捕获NFC事件进行响应,并且优先级高于方案一。
下面对该方案进行解析,直接怼上代码。这里我新建了一个NfcTestActivity进行测试,布局文件就补贴了,随便丢一个就行。
NfcTestActivity:
/**
 * @author Flash
 * 创建时间:2021-07-30 11:14
 */
public class NfcTestActivity extends AppCompatActivity {

    NfcAdapter mNfcAdapter;
    PendingIntent pIntent;

    @Override
    protected void onCreate(Bundle savedInstanceState) {
        super.onCreate(savedInstanceState);
        setContentView(R.layout.activity_nfc_test);
        initNfc();
        Log.i("FlashTestNFC", "onCreate");
    }

    @Override
    protected void onStop() {
        super.onStop();
        Log.i("FlashTestNFC", "onStop");
    }

    @Override
    protected void onDestroy() {
        super.onDestroy();
        Log.i("FlashTestNFC", "onDestroy");
    }

    /**
     * 初始化
     */
    private void initNfc(){
        mNfcAdapter = NfcAdapter.getDefaultAdapter(this);
        pIntent = PendingIntent.getActivity(this, 0,
                //在Manifest里或者这里设置当前activity启动模式,否则每次向阳NFC事件,activity会重复创建
                // 当然也要按照具体情况来,你设置成singleTask也不是不行,
                new Intent(this, getClass()).addFlags(Intent.FLAG_ACTIVITY_SINGLE_TOP),
                0);
    }

    @Override
    protected void onNewIntent(Intent intent) {
        super.onNewIntent(intent);
        //这里必须setIntent,set  NFC事件响应后的intent才能拿到数据
        setIntent(intent);
        Log.i("FlashTestNFC", "onNewIntent");
        Tag tag = getIntent().getParcelableExtra(NfcAdapter.EXTRA_TAG);

        //TODO 获取数据进行下一步处理

        Log.i("FlashTestNFC--Tag", bytesToHex(tag.getId()));
    }

    @Override
    protected void onResume() {
        super.onResume();
        Log.i("FlashTestNFC", "onResume");
        if (mNfcAdapter != null) {
            //添加intent-filter
            IntentFilter ndef = new IntentFilter(NfcAdapter.ACTION_NDEF_DISCOVERED);
            IntentFilter tag = new IntentFilter(NfcAdapter.ACTION_TAG_DISCOVERED);
            IntentFilter tech = new IntentFilter(NfcAdapter.ACTION_TECH_DISCOVERED);
            IntentFilter[] filters = new IntentFilter[]{ndef, tag, tech};

            //添加 ACTION_TECH_DISCOVERED 情况下所能读取的NFC格式,这里列的比较全,实际我这里是没有用到的,因为测试的卡是NDEF的
            String[][] techList = new String[][]{
                    new String[]{
                            "android.nfc.tech.Ndef",
                            "android.nfc.tech.NfcA",
                            "android.nfc.tech.NfcB",
                            "android.nfc.tech.NfcF",
                            "android.nfc.tech.NfcV",
                            "android.nfc.tech.NdefFormatable",
                            "android.nfc.tech.MifareClassic",
                            "android.nfc.tech.MifareUltralight",
                            "android.nfc.tech.NfcBarcode"
                    }
            };
            mNfcAdapter.enableForegroundDispatch(this, pIntent, filters, techList);
        }
    }

    @Override
    protected void onPause() {
        super.onPause();
        Log.i("FlashTestNFC", "onPause");
        if (mNfcAdapter != null) {
            mNfcAdapter.disableForegroundDispatch(this);
        }
    }

    /**
     * 2进制to 16进制
     * @param src
     * @return
     */
    private static String bytesToHex(byte[] src){
        StringBuffer sb = new StringBuffer();
        if (src == null || src.length <= 0) {
            return null;
        }
        String sTemp;
        for (int i = 0; i < src.length; i++) {
            sTemp = Integer.toHexString(0xFF & src[i]);
            if (sTemp.length() < 2){
                sb.append(0);
            }
            sb.append(sTemp.toUpperCase());
        }
        return sb.toString();
    }
}解析:主要其实就是NfcAdapter.enableForegroundDispatch(),开启前台响应;在onNewIntent中获取系统传递过来的数据,并解析;在前台activity停止时,使用NfcAdapter.disableForegroundDispatch()关闭响应。下图是该activity在设置启动模式为singleTop或singleTask情况下,刷卡后该activity生命周期变化:

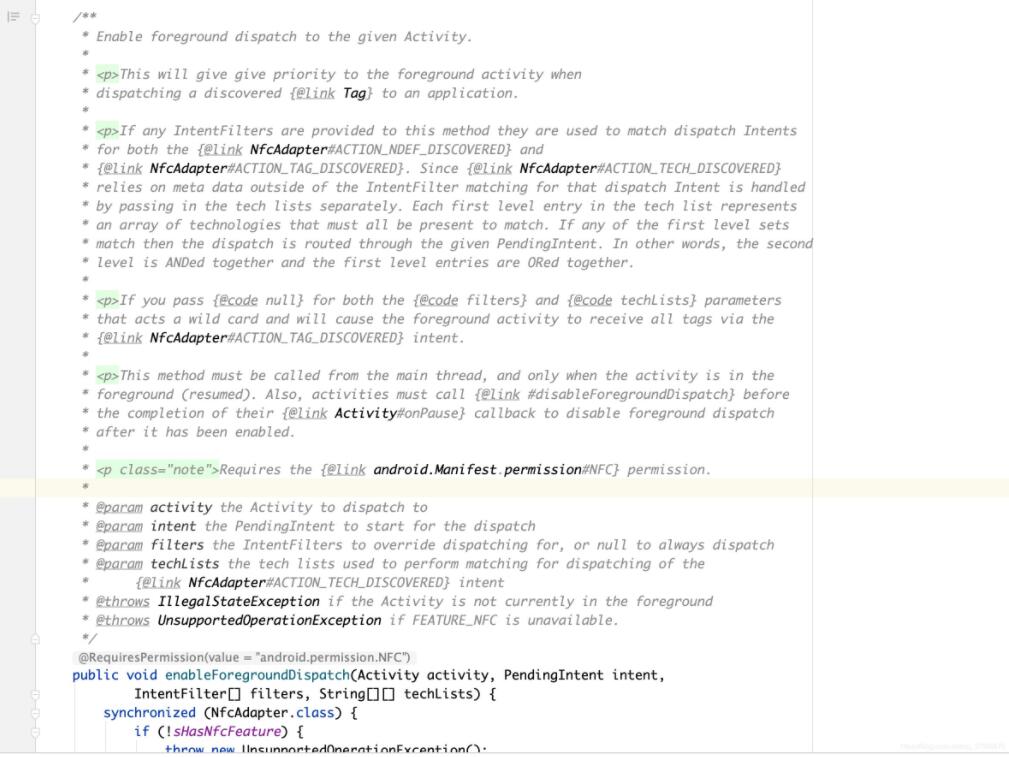
enableForegroundDispatch源码注释解析,这里大致翻译一下:
将发现的tag(可以理解为NFC刷卡事件)优先分配给应用程序的前台activity;
如果给该方法提供了任何IntentFilters,那么会优先去匹配ACTION_NDEF_DISCOVERED和ACTION_TAG_DISCOVERED。由于ACTION_TECH_DISCOVERED依赖于 IntentFilter 匹配之外的元数据,使用改IntentFilter要通过单独传入techLists来处理的。techLists中的每个第一级条目下的配置必须全部匹配才行。如果任何一级下的内容都匹配,则分派将通过给定的 PendingIntent 进行路由。(这三句话我解释一下:techLists参数是一个二维数组,可以设置很多级,每一级下是第二级,在第二级中放置相关匹配项;看我方法②中对techLists数组的构建方式就能明白)。换句话说,第一级内容是逻辑或关系,第二级内容是逻辑与关系。
如果IntentFilters和techLists都传了null,那么会默认匹配ACTION_TAG_DISCOVERED
这个方法必须在主线程调用,并且activity必须处于前台的情况下。同时,在activity调用enableForegroundDispatch方法后,必须在onPause时调用disableForegroundDispatch进行关闭。
Manifest文件中要声明NFC权限。
关于“Android开发如何实现NFC刷卡读取”这篇文章就分享到这里了,希望以上内容可以对大家有一定的帮助,使各位可以学到更多知识,如果觉得文章不错,请把它分享出去让更多的人看到。
免责声明:本站发布的内容(图片、视频和文字)以原创、转载和分享为主,文章观点不代表本网站立场,如果涉及侵权请联系站长邮箱:is@yisu.com进行举报,并提供相关证据,一经查实,将立刻删除涉嫌侵权内容。


