Flutter如何实现底部导航栏创建,很多新手对此不是很清楚,为了帮助大家解决这个难题,下面小编将为大家详细讲解,有这方面需求的人可以来学习下,希望你能有所收获。
ConvexBottomBar是一个底部导航栏组件,用于展现凸起的TAB效果,支持多种内置样式与动画交互。你可以在https://appbar.codemagic.app/上找到在线样例。
在你的项目中去 pubspec。添加依赖项: 添加https://pub.dev/packages/convex_bottom_bar的最新版本。
运行下列代码,添加依赖
flutter pub add convex_bottom_bar
environment:
  sdk: '>=2.12.0 <3.0.0'
dependencies:
  flutter:
    sdk: flutter
  cupertino_icons: ^1.0.2
  convex_bottom_bar: ^3.0.0
我们使用convax_bottom_bar 来创建一个非常nice的底部导航栏。
通常, 「ConvexAppBar」 可以通过设置它的 bottomNavigationBar 来与脚手架一起工作。ConvexAppBar具有两个构造函数,ConvexAppBar()将使用默认样式来简化选项卡的创建。
import 'package:convex_bottom_bar/convex_bottom_bar.dart';

Scaffold(
  bottomNavigationBar: ConvexAppBar(
    items: [
      TabItem(icon: Icons.home, title: 'Home'),
      TabItem(icon: Icons.map, title: 'Discovery'),
      TabItem(icon: Icons.add, title: 'Add'),
      TabItem(icon: Icons.message, title: 'Message'),
      TabItem(icon: Icons.people, title: 'Profile'),
    ],
    initialActiveIndex: 2,//optional, default as 0
    onTap: (int i) => print('click index=$i'),
  )
);提供多种内部样式
能够更改AppBar的主题
提供Builder API以自定义新样式
在AppBar上添加徽章
支持优雅的过渡动画
提供Hook API来重载一些内部样式
RTL布局支持
关于支持的样式,可以从这儿查看
https://pub.flutter-io.cn/packages/convex_bottom_bar
下面是 「*Convex_Bottom_Bar*」 的一些属性:
「fixed」 (副标题图标停留在中心)
「fixedCircle」 (相同,但在固定图标的所有边上都有一个白色的圆圈)
「react」 (上标图标取代点击另一个图标)
「reactCircle」 (与上标图标中的白色圆圈相同)
「textIn」 (选定的离子出现相应的标题)
「titled」 (未选择的图标是显示其标题的单个图标)
「flip」 (点击图标显示一个 flip 动画)
「custom」 (使用 ConvexBottomAppBar 构建器自定义预定义的参数)
「height」 (grabbing the appbar)
「top」 (grabbing the superscripted icon)
「curveSize」 (拉伸上标图标的曲线)
「color」 (设置图标的颜色)
「backgroundColor」 (设置 appbar 背景颜色)
「gradient」 (使用渐变小部件设置 appbar 背景颜色)
「activeColor」 (设置圆形颜色)
AppBar默认使用内置样式,您可能需要为其设置主题。 以下是一些支持的属性:
| Attributes | Description |
|---|---|
| backgroundColor | AppBar 背景 |
| gradient | 渐变属性,可以覆盖backgroundColor |
| height | AppBar 高度 |
| color | icon/text 的颜色值 |
| activeColor | icon/text 的选中态颜色值 |
| curveSize | 凸形大小 |
| top | 凸形到AppBar上边缘的距离 |
| style | 支持的样式: fixed, fixedCircle, react, reactCircle, ... |
| chipBuilder | 角标构造器builder, ConvexAppBar.badge会使用默认样式 |
在 Convex_Bottom_Bar 演示中,首先,我们在这个类中创建一个名为 MyHomePage ()的有状态类,我们创建一个值为 0 的变量 selectedpage 类型的 integer pass。定义一个名为 pageList的列表,在这个列表中我们传递要添加到 bootom 导航栏中的所有页面。
  int selectedpage = 0;
  final _pageList= [Home(), Message(), Persion(), Detail()];
在 BuildContext ()中,我们定义 Scaffold。
appBar: AppBar(
  centerTitle: true,
  title: Text('Convex Bottom Bar'),
),
首先在正文中传递 _pageno,其值为 selectedPage。使用 scaffold 属性,我们使用 bottomNavigationBar。在这里,我们创建 ConvexAppBar ()并传递 Items、 initialActiveIndex 和 onTap。在条目中,我们通过所有的屏幕,我们希望在我们的应用程序中显示。在 initialActiveIndexwe 中,我们传递已经定义的变量 selectedpage,在 onTap 中,我们传递 index 并在 setState 中定义 setState () ,我们传递 selectedpage 相当于 index。
bottomNavigationBar: ConvexAppBar(
  items: [
    TabItem(icon: Icons._home_, title: 'Home'),
    TabItem(icon: Icons._favorite_, title: 'Favorite'),
    TabItem(icon: Icons._shopping_cart_, title: 'Cart'),
    TabItem(icon: Icons._person_, title: 'Profile'),
  ],
  initialActiveIndex: selectedpage,
  onTap: (int index){
      setState(() {
        selectedpage = index;
      });
  },
),
main.dart
import 'package:convex_bottom_bar/convex_bottom_bar.dart';
import 'package:flutter/material.dart';
import 'detail.dart';
import 'home.dart';
import 'message.dart';
import 'persion.dart';
void main() {
runApp(MyApp());
}
class MyApp extends StatelessWidget {
// This widget is the root of your application.
@override
Widget build(BuildContext context) {
return MaterialApp(
debugShowCheckedModeBanner: false,
theme: ThemeData(
primarySwatch: Colors.teal,
),
home: MyHomePage(),
);
}
}
class MyHomePage extends StatefulWidget {
@override
_MyHomePageState createState() => _MyHomePageState();
}
class _MyHomePageState extends State<MyHomePage> {
int selectedpage = 0;
final _pageNo = [Home(), Message(), Persion(), Detail()];
@override
Widget build(BuildContext context) {
return Scaffold(
appBar: AppBar(
centerTitle: true,
title: Text('Convex Bottom Bar'),
),
body: _pageNo[selectedpage],
bottomNavigationBar: ConvexAppBar(
color: Colors.white,
activeColor: Colors.red,
backgroundColor: Colors.orange,
items: [
TabItem(icon: Icons.person, title: '新'),
TabItem(icon: Icons.favorite, title: '年'),
TabItem(icon: Icons.brush, title: '快'),
TabItem(icon: Icons.car_rental, title: '乐'),
],
initialActiveIndex: selectedpage,
onTap: (int index) {
setState(() {
selectedpage = index;
});
},
),
);
}
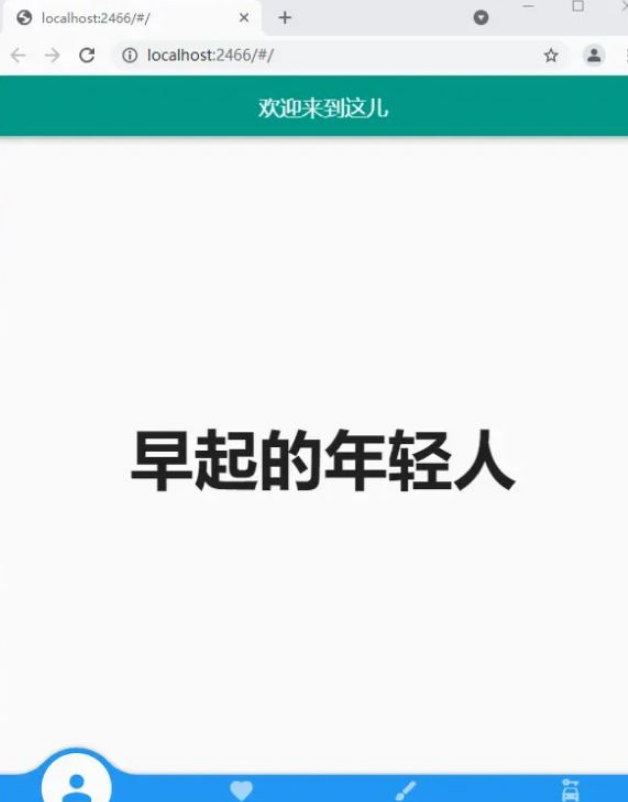
}如果我们创建不同的页面, Home(), Favorite(), CartPage(), ProfilePage(). 在 Home 类中,我们定义一个带有背景颜色的文本。
Home 页
import 'package:flutter/cupertino.dart';
import 'package:flutter/material.dart';
class Home extends StatefulWidget {
const Home({Key? key}) : super(key: key);
@override
_HomeState createState() => _HomeState();
}
class _HomeState extends State<Home> {
@override
Widget build(BuildContext context) {
return Scaffold(
appBar: AppBar(
centerTitle: true,
title: Text('欢迎来到这儿'),
),
body: Center(
child: Text(
'早起的年轻人',
style: TextStyle(fontSize: 60, fontWeight: FontWeight.bold),
),
),
);
}
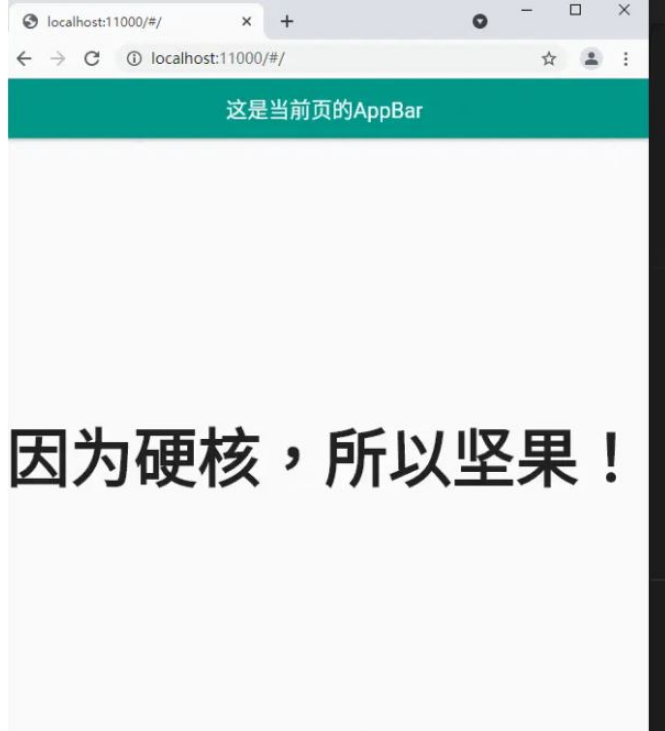
}Message页:
import 'package:flutter/cupertino.dart';
import 'package:flutter/material.dart';

class Message extends StatefulWidget {
  const Message({Key? key}) : super(key: key);

  @override
  _MessageState createState() => _MessageState();
}

class _MessageState extends State<Message> {
  @override
  Widget build(BuildContext context) {
    return Scaffold(
      appBar: AppBar(
        centerTitle: true,
        title: Text('这是当前页的AppBar'),
      ),
      body: Center(
        child: Text(
          '因为硬核,所以坚果!',
          style: TextStyle(fontSize: 60, fontWeight: FontWeight.bold),
        ),
      ),
    );
  }
}
Persion页
import 'package:flutter/cupertino.dart';
import 'package:flutter/material.dart';

class Persion extends StatefulWidget {
  const Persion({Key? key}) : super(key: key);

  @override
  _PersionState createState() => _PersionState();
}

class _PersionState extends State<Persion> {
  @override
  Widget build(BuildContext context) {
    return Scaffold(  appBar: AppBar(
        centerTitle: true,
        title: Text('公众号'),
      ),
      body: Center(
        child: Text(
          '大前端之旅',
          style: TextStyle(fontSize: 60, fontWeight: FontWeight.bold),
        ),
      ),
    );
  }
}
Detail页面
// ignore: file_names
import 'package:flutter/cupertino.dart';
import 'package:flutter/material.dart';
class Detail extends StatefulWidget {
const Detail({Key? key}) : super(key: key);
@override
_DetailState createState() => _DetailState();
}
class _DetailState extends State<Detail> {
String image =
"https://luckly007.oss-cn-beijing.aliyuncs.com/image/image-20220114111115931.png";
@override
Widget build(BuildContext context) {
return Scaffold(
appBar: AppBar(
centerTitle: true,
title: Text('扫码关注'),
),
body: Center(
child: new Image(image: new NetworkImage(image)),
),
);
}
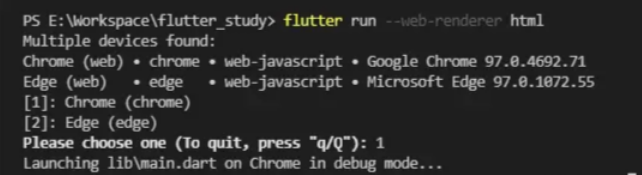
}当我们运行应用程序,我们应该得到屏幕的输出像下面的报错信息。
这是一个

flutter build web --release --web-renderer html
flutter run --web-renderer html
flutter run -d chrome --web-renderer html
看完上述内容是否对您有帮助呢?如果还想对相关知识有进一步的了解或阅读更多相关文章,请关注亿速云行业资讯频道,感谢您对亿速云的支持。
免责声明:本站发布的内容(图片、视频和文字)以原创、转载和分享为主,文章观点不代表本网站立场,如果涉及侵权请联系站长邮箱:is@yisu.com进行举报,并提供相关证据,一经查实,将立刻删除涉嫌侵权内容。


