Linuxзі»з»ҹжҖҺд№Ҳе®үиЈ…ES
иҝҷзҜҮж–Үз« дё»иҰҒд»Ӣз»ҚвҖңLinuxзі»з»ҹжҖҺд№Ҳе®үиЈ…ESвҖқпјҢеңЁж—Ҙеёёж“ҚдҪңдёӯпјҢзӣёдҝЎеҫҲеӨҡдәәеңЁLinuxзі»з»ҹжҖҺд№Ҳе®үиЈ…ESй—®йўҳдёҠеӯҳеңЁз–‘жғ‘пјҢе°Ҹзј–жҹҘйҳ…дәҶеҗ„ејҸиө„ж–ҷпјҢж•ҙзҗҶеҮәз®ҖеҚ•еҘҪз”Ёзҡ„ж“ҚдҪңж–№жі•пјҢеёҢжңӣеҜ№еӨ§е®¶и§Јзӯ”вҖқLinuxзі»з»ҹжҖҺд№Ҳе®үиЈ…ESвҖқзҡ„з–‘жғ‘жңүжүҖеё®еҠ©пјҒжҺҘдёӢжқҘпјҢиҜ·и·ҹзқҖе°Ҹзј–дёҖиө·жқҘеӯҰд№ еҗ§пјҒ
ESзұ»дјјMySQLж•°жҚ®еә“пјҢд№ҹжҳҜз”ЁжқҘеӯҳеӮЁж•°жҚ®еҫ—пјҢESжҜ”MySQLжҸҗдҫӣдәҶжӣҙеӨҡзҡ„еҠҹиғҪпјҢдҫӢеҰӮпјҡеҲҶиҜҚжҗңзҙўпјҢе…іиҒ”еәҰзӯүпјҢESиғҪеӨҹе®һзҺ°зҷҫдёҮж•°жҚ®/з§’зҡ„жҹҘиҜўйҖҹеәҰгҖӮ
дёӢиҪҪе®үиЈ…еҢ…
зӣҙжҺҘи®ҝй—®esе®ҳзҪ‘пјҢдёӢиҪҪ 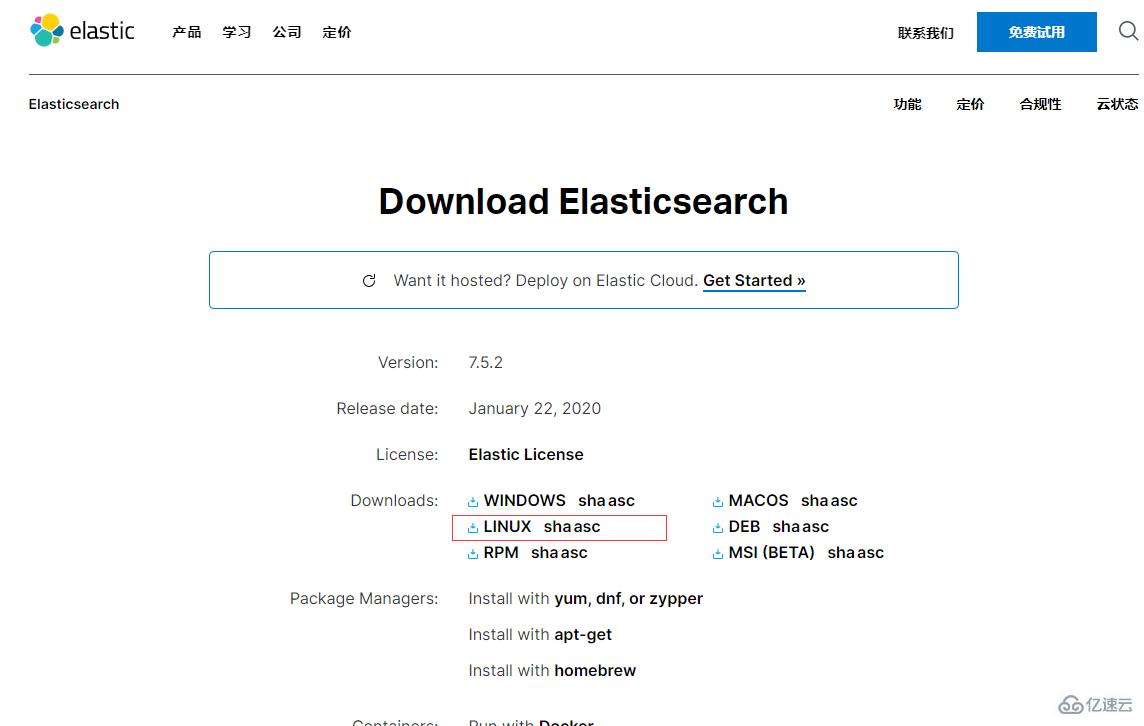
дёҠдј е®үиЈ…еҢ…еҲ°иҷҡжӢҹжңә并解еҺӢ
дёҠдј еҲ°/home/software/
и§ЈеҺӢеҺӢзј©еҢ…
tar -zxvf elasticsearch-7.5.1-linux-x86_64.tar.gz
移еҠЁи§ЈеҺӢеҗҺзҡ„esж–Ү件еӨ№
mv elasticsearch-7.5.1 /usr/local/
es зӣ®еҪ•д»Ӣз»Қ
binпјҡеҸҜжү§иЎҢж–Ү件еңЁйҮҢйқўпјҢиҝҗиЎҢesзҡ„е‘Ҫд»Өе°ұеңЁиҝҷдёӘйҮҢйқўпјҢеҢ…еҗ«дәҶдёҖдәӣи„ҡжң¬ж–Ү件зӯү
configпјҡй…ҚзҪ®ж–Ү件зӣ®еҪ•
JDKпјҡjavaзҺҜеўғ
libпјҡдҫқиө–зҡ„jarпјҢзұ»еә“
logsпјҡж—Ҙеҝ—ж–Ү件
modulesпјҡesзӣёе…ізҡ„жЁЎеқ—
pluginsпјҡеҸҜд»ҘиҮӘе·ұејҖеҸ‘зҡ„жҸ’件
dataпјҡиҝҷдёӘзӣ®еҪ•жІЎжңүпјҢиҮӘе·ұж–°е»әдёҖдёӢпјҢеҗҺйқўиҰҒз”Ё -> mkdir dataпјҢиҝҷдёӘдҪңдёәзҙўеј•зӣ®еҪ•
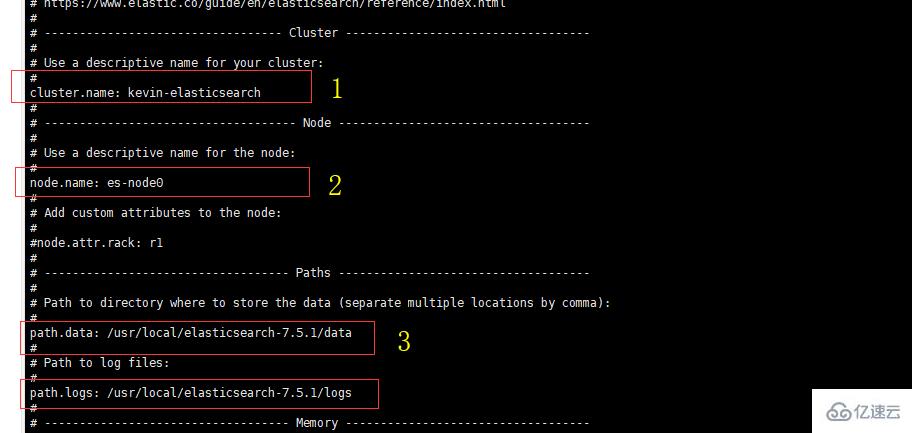
дҝ®ж”№ж ёеҝғй…ҚзҪ®ж–Ү件elasticearch.yml
дҝ®ж”№йӣҶзҫӨеҗҚз§°
дҝ®ж”№еҪ“еүҚзҡ„esиҠӮзӮ№еҗҚз§°
дҝ®ж”№dataж•°жҚ®дҝқеӯҳең°еқҖе’Ңж—Ҙеҝ—ж•°жҚ®дҝқеӯҳең°еқҖ
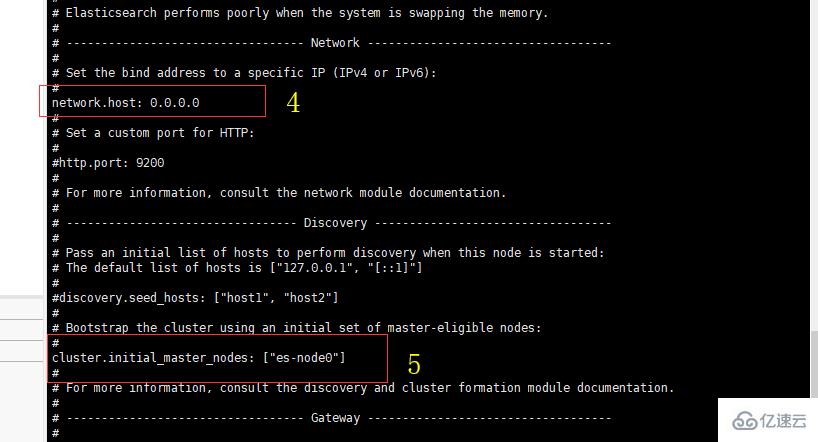
з»‘е®ҡesзҪ‘з»ңip
йӣҶзҫӨиҠӮзӮ№дҝ®ж”№дёәд№ӢеүҚзҡ„иҠӮзӮ№еҗҚз§°
дҝ®ж”№jvmеҸӮж•°
жү“ејҖ jvm.options ж–Ү件 иҝҷйҮҢдҪҝз”Ёзҡ„жҳҜиҷҡжӢҹжңә
## JVM configuration
################################################################
## IMPORTANT: JVM heap size
################################################################
##
## You should always set the min and max JVM heap
## size to the same value. For example, to set
## the heap to 4 GB, set:
##
## -Xms4g
## -Xmx4g
##
## See https://www.elastic.co/guide/en/elasticsearch/reference/current/heap-size.html
## for more information
##
################################################################
# Xms represents the initial size of total heap space
# Xmx represents the maximum size of total heap space
# дҝ®ж”№иҝҷйҮҢзҡ„й…ҚзҪ®
-Xms128m
-Xmx128m
ж·»еҠ з”ЁжҲ·
ESдёҚе…Ғи®ёдҪҝз”Ёrootж“ҚдҪңesпјҢйңҖиҰҒж·»еҠ з”ЁжҲ·пјҢж“ҚдҪңеҰӮдёӢпјҡ
 useradd esuser
 chown -R esuser:esuser /usr/local/elasticsearch-7.5.1
 su esuser
еҗҜеҠЁes
./elasticsearch еҰӮжһңеҮәзҺ°еҰӮдёӢй”ҷиҜҜпјҡ
 ERROR: [3] bootstrap checks failed
 [1]: max file descriptors [4096] for elasticsearch process is too low, increase to at least [65535]
 [2]: max number of threads [3795] for user [esuser] is too low, increase to at least [4096]
 [3]: max virtual memory areas vm.max_map_count [65530] is too low, increase to at least [262144]
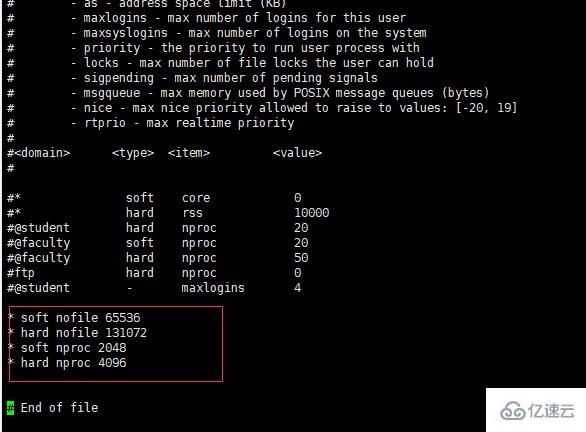
йңҖиҰҒеҲҮжҚўеҲ°rootз”ЁжҲ·дҝ®ж”№й…ҚзҪ®
еўһеҠ дёӢйқўеҶ…е®№
 * soft nofile 65536
 * hard nofile 131072
 * soft nproc 2048
 * hard nproc 4096
 # sysctl settings are defined through files in
 # /usr/lib/sysctl.d/, /run/sysctl.d/, and /etc/sysctl.d/.
 #
 # Vendors settings live in /usr/lib/sysctl.d/.
 # To override a whole file, create a new file with the same in
 # /etc/sysctl.d/ and put new settings there. To override
 # only specific settings, add a file with a lexically later
 # name in /etc/sysctl.d/ and put new settings there.
 #
 # For more information, see sysctl.conf(5) and sysctl.d(5).

 vm.max_map_count=262145
дҝ®ж”№е®ҢеҗҺ sysctl -p еҲ·ж–°дёҖдёӢ
еҶҚж¬ЎеҲҮжҚўеҲ°esuser иҝӣиЎҢеҗҜеҠЁ
еҗҜеҠЁдёҺжҡӮеҒң
еҗҜеҠЁж–№ејҸ1
иҝҗиЎҢ ./elasticsearch зңӢеҲ°иҝҗиЎҢз»“жһң
 [2020-02-02T01:09:51,843][INFO ][o.e.h.AbstractHttpServerTransport] [es-node0] publish_address {192.168.247.8:9200}, bound_addresses {[::]:9200}
 [2020-02-02T01:09:51,844][INFO ][o.e.n.Node               ] [es-node0] started
 [2020-02-02T01:09:52,199][INFO ][o.e.l.LicenseService     ] [es-node0] license [9614ee2b-6350-4f99-ad43-5ec0d632f93c] mode [basic] - valid
 [2020-02-02T01:09:52,200][INFO ][o.e.x.s.s.SecurityStatusChangeListener] [es-node0] Active license is now [BASIC]; Security is disabled
[2020-02-02T01:09:52,222][INFO ][o.e.g.GatewayService ] [es-node0] recovered [0] indices into cluster_stateи®ҝй—® 192.168.247.8:9200 иҝҷйҮҢжҚўжҲҗдҪ зҡ„ip
и®ҝй—®з»“жһң
 {
   "name": "es-node0",
   "cluster_name": "kevin-elasticsearch",
   "cluster_uuid": "sSzLTAt-SDiCbQ57WMPqlg",
   "version": {
     "number": "7.5.1",
     "build_flavor": "default",
     "build_type": "tar",
     "build_hash": "3ae9ac9a93c95bd0cdc054951cf95d88e1e18d96",
     "build_date": "2019-12-16T22:57:37.835892Z",
     "build_snapshot": false,
     "lucene_version": "8.3.0",
     "minimum_wire_compatibility_version": "6.8.0",
     "minimum_index_compatibility_version": "6.0.0-beta1"
   },
   "tagline": "You Know, for Search"
}еҪ“еүҚеҗҜеҠЁж–№ејҸж—¶еүҚз«ҜеҗҜеҠЁгҖӮеҒңжӯўжңҚеҠЎзҡ„иҜқзӣҙжҺҘctrl+c е°ұеҘҪдәҶ
еҗҜеҠЁж–№ејҸ2
жҲ‘们еҸҜд»ҘеҗҺз«ҜеҗҜеҠЁ
./elasticsearch -d
зЁҚзӯүзүҮеҲ»пјҢеҶҚж¬Ўи®ҝй—®ең°еқҖпјҢиҝҳжҳҜзӣёеҗҢз»“жһң
жӯӨж—¶пјҢеҰӮжһңжғіе…ій—ӯжңҚеҠЎ
 [esuser@localhost bin]$ ps -ef|grep elasticsearch
 esuser     3318   3007  0 Feb01 pts/1    00:00:00 vi elasticsearch.yml
 esuser     3856      1 21 01:15 pts/0    00:00:18 /usr/local/elasticsearch-7.5.1/jdk/bin/java -Des.networkaddress.cache.ttl=60 -Des.networkaddress.cache.negative.ttl=10 -XX:+AlwaysPreTouch -Xss1m -Djava.awt.headless=true -Dfile.encoding=UTF-8 -Djna.nosys=true -XX:-OmitStackTraceInFastThrow -Dio.netty.noUnsafe=true -Dio.netty.noKeySetOptimization=true -Dio.netty.recycler.maxCapacityPerThread=0 -Dio.netty.allocator.numDirectArenas=0 -Dlog4j.shutdownHookEnabled=false -Dlog4j2.disable.jmx=true -Djava.locale.providers=COMPAT -Xms128m -Xmx128m -XX:+UseConcMarkSweepGC -XX:CMSInitiatingOccupancyFraction=75 -XX:+UseCMSInitiatingOccupancyOnly -Djava.io.tmpdir=/tmp/elasticsearch-9874251960424438570 -XX:+HeapDumpOnOutOfMemoryError -XX:HeapDumpPath=data -XX:ErrorFile=logs/hs_err_pid%p.log -Xlog:gc*,gc+age=trace,safepoint:file=logs/gc.log:utctime,pid,tags:filecount=32,filesize=64m -XX:MaxDirectMemorySize=67108864 -Des.path.home=/usr/local/elasticsearch-7.5.1 -Des.path.conf=/usr/local/elasticsearch-7.5.1/config -Des.distribution.flavor=default -Des.distribution.type=tar -Des.bundled_jdk=true -cp /usr/local/elasticsearch-7.5.1/lib/* org.elasticsearch.bootstrap.Elasticsearch -d
 esuser     3871   3856  0 01:15 pts/0    00:00:00 /usr/local/elasticsearch-7.5.1/modules/x-pack-ml/platform/linux-x86_64/bin/controller
 esuser     3921   3521  0 01:16 pts/0    00:00:00 grep --color=auto elasticsearch
 [esuser@localhost bin]$ jps
 3856 Elasticsearch
 3922 Jps
 [esuser@localhost bin]$ kill 3856
 [esuser@localhost bin]$ jps
 3940 Jps
 [esuser@localhost bin]$
дәҢгҖҒе®үиЈ…headжҸ’件
Elasticsearch Head PluginпјҡheadжҸ’件жҳҜдёҖдёӘESйӣҶзҫӨзҡ„webеүҚз«Ҝе·Ҙе…·пјҢе®ғжҸҗдҫӣеҸҜи§ҶеҢ–зҡ„йЎөйқўж–№дҫҝз”ЁжҲ·жҹҘзңӢиҠӮзӮ№дҝЎжҒҜпјҢеҜ№ESиҝӣиЎҢеҗ„з§Қж“ҚдҪңпјҢеҰӮжҹҘиҜўгҖҒеҲ йҷӨгҖҒжөҸи§Ҳзҙўеј•зӯүгҖӮ
1гҖҒе®үиЈ…зӣёе…ідҫқиө–еҢ…
(1)е®үиЈ…head
з”ұдәҺheadжҸ’件жң¬иҙЁдёҠиҝҳжҳҜдёҖдёӘnodejsзҡ„е·ҘзЁӢпјҢеӣ жӯӨйңҖиҰҒе®үиЈ…nodeпјҢдҪҝз”ЁnpmжқҘе®үиЈ…дҫқиө–зҡ„еҢ…гҖӮпјҲnpmеҸҜд»ҘзҗҶи§Јдёәmavenпјү
wget https://nodejs.org/dist/v9.3.0/node-v9.3.0-linux-x64.tar.xzгҖҖгҖҖ# дёӢиҪҪnodejsжңҖж–°зҡ„binеҢ…
xz -d node-v9.3.0-linux-x64.tar.xzгҖҖгҖҖ# и§ЈеҺӢеҢ…
tar -xf node-v9.3.0-linux-x64.tarгҖҖгҖҖ# и§ЈеҺӢеҢ…
ln -s ~/node-v9.3.0-linux-x64/bin/node /usr/bin/node # йғЁзҪІbinж–Ү件пјҢе…ҲзЎ®е®ҡnodejsзҡ„binи·Ҝеҫ„
ln -s ~/node-v9.3.0-linux-x64/bin/npm /usr/bin/npm
жөӢиҜ•пјҡ
 node -v
 npm
npmеҠ йҖҹ е…ЁеұҖе®үиЈ…cnpm жҢҮе®ҡжқҘжәҗж·ҳе®қй•ңеғҸ
npm install -g cnpm –registry=https://registry.npm.taobao.org
пјҲ2пјүе®үиЈ…gruntпјҲе®үиЈ…е®Ңelasticsearch-headеҗҺе®үиЈ…пјү
gruntжҳҜдёҖдёӘеҫҲж–№дҫҝзҡ„жһ„е»әе·Ҙе…·пјҢеҸҜд»ҘиҝӣиЎҢжү“еҢ…еҺӢзј©гҖҒжөӢиҜ•гҖҒжү§иЎҢзӯүзӯүзҡ„е·ҘдҪңпјҢ5.0йҮҢзҡ„headжҸ’件е°ұжҳҜйҖҡиҝҮgruntеҗҜеҠЁзҡ„гҖӮеӣ жӯӨйңҖиҰҒе®үиЈ…дёҖдёӢgruntпјҡ
cd /usr/local/elasticsearch-head
npm install -g grunt-cli //жү§иЎҢеҗҺдјҡз”ҹжҲҗnode_modulesж–Ү件еӨ№
npm install
жіЁпјҡ
пјҲ1пјү5.0д»ҘдёҠпјҢelasticsearch-head дёҚиғҪж”ҫеңЁelasticsearchзҡ„ pluginsгҖҒmodules зӣ®еҪ•дёӢпјҢеҗҰеҲҷelasticsearchеҗҜеҠЁдјҡжҠҘй”ҷгҖӮ
пјҲ2пјүиҝҷйҮҢеҰӮжһңgruntжІЎжңүе®үиЈ…жҲҗеҠҹд№ҹж— жүҖи°“пјҢеҸҜд»ҘйҖҡиҝҮе…¶д»–ж–№ејҸеҗҜеҠЁelasticsearch-headжҸ’件пјҲnpm run startпјүгҖӮ
2гҖҒе®үиЈ…elasticsearch-head
еҸҰеӨ–пјҡ5.0д»ҘеүҚзҡ„зүҲжң¬еҸҜд»ҘйҖҡиҝҮelasticseachиҮӘеёҰзҡ„pluginе‘Ҫд»Ө е®үиЈ…elasticsearch-headпјҢ5.0д»ҘеҗҺдёҚж”ҜжҢҒдәҶгҖӮеҸӘеҸҜд»ҘеҺ»дёӢиҪҪelasticsearch-headеҜ№еә”зҡ„жәҗз ҒеҢ…еҺ»е®үиЈ…гҖӮ
cd /usr/local/ git clone git://github.com/mobz/elasticsearch-head.git cd elasticsearch-head
npm install
й…ҚзҪ®пјҡ
vi _site/app.js
# дҝ®ж”№ this.base_uri = this.config.base_uri || this.prefs.get("app-base_uri") || "http://localhost:9200"; # еңЁж–Ү件зҡ„4354иЎҢйҷ„иҝ‘
# иҝҷйҮҢзҡ„ localhost жҳҜжҢҮиҝӣе…Ҙelasticsearch-headйЎөйқўж—¶й»ҳи®Өи®ҝй—®зҡ„ESйӣҶзҫӨең°еқҖпјҢжҠҠеҘ№дҝ®ж”№дёәе…¶дёӯдёҖеҸ°ESиҠӮзӮ№зҡ„ең°еқҖеҚіеҸҜ
this.base_uri = this.config.base_uri || this.prefs.get("app-base_uri") || "http://192.168.60.200:9200";иҝҳиҰҒдҝ®ж”№Headдё»зӣ®еҪ•дёӢзҡ„Gruntfile.jsпјҢз”ұдәҺй»ҳи®Өж–Ү件дёӯжҳҜжІЎжңүhostnameеұһжҖ§зҡ„пјҢжҲ‘们йңҖиҰҒжүӢеҠЁж·»еҠ пјҡ
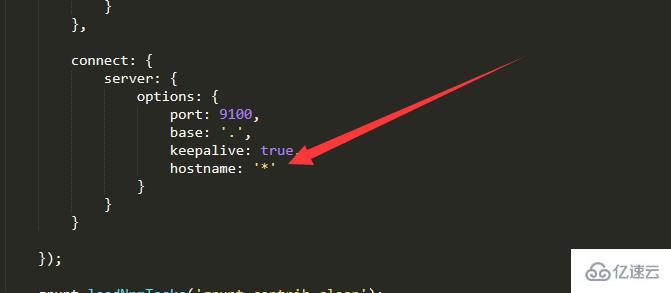
дёәд»Җд№ҲйңҖиҰҒдҝ®ж”№й…ҚзҪ®ж–Ү件пјҡ
headжҸ’件иҝһжҺҘelasticsearchйңҖиҰҒжіЁж„Ҹзҡ„зӮ№пјҡ
еӣ дёәheadжҸ’件жҳҜдёҖдёӘзӢ¬з«ӢиҝӣзЁӢпјҢеҗҜеҠЁеҗҺжҳҜдёҖдёӘзӢ¬з«Ӣзҡ„жңҚеҠЎеҷЁеӨ–еҠ з«ҜеҸЈпјҢжҜ”еҰӮжҲ‘зҡ„иҷҡжӢҹжңәipең°еқҖпјҡhttp://192.168.0.111:9100/
иҖҢelasticsearchеҗҜеҠЁеҗҺд№ҹжҳҜдёҖдёӘзӢ¬з«Ӣзҡ„иҝӣзЁӢпјҢipең°еқҖпјҡhttp://192.168.0.111:9200/
иҝҷж ·дёӨдёӘзӢ¬з«ӢиҝӣзЁӢпјҢиҷҪ然жңҚеҠЎеҷЁipең°еқҖзӣёеҗҢпјҢдҪҶжҳҜз«ҜеҸЈдёҚеҗҢпјҢжӯӨж—¶дјҡеҸ‘з”ҹи·Ёеҹҹзҡ„жғ…еҶөгҖӮгҖӮ
дәҺжҳҜе®ҳж–№з»ҷеҮәиҝҷж ·дёҖж®өиҜқпјҢжҲ‘们еңЁеҜ№elasticsearchеҗҜеҠЁзҡ„ж—¶еҖҷиҝҪеҠ дёӨдёӘй…ҚзҪ®ж–Ү件еұһжҖ§еҚіеҸҜйҳІжӯўи·ЁеҹҹгҖӮ
еҚіпјҡеңЁelasticsearch.ymlж–Ү件зҡ„жңҖеҗҺпјҢж·»еҠ еҰӮдёӢеҶ…е®№пјҡ
 http.cors.enabled: true
 http.cors.allow-origin: "*"
й…ҚзҪ®е®ҢжҜ•гҖӮ
3гҖҒеҗҜеҠЁelasticsearchйӣҶзҫӨ
еңЁдёүеҸ°жңәеҷЁдёҠпјҢеҲҶеҲ«еҗҜеҠЁelasticsearchеҚіеҸҜгҖӮ
./bin/elasticsearch
4гҖҒеҗҜеҠЁelasticsearch-head
cd /usr/local/elasticsearch-head //е…Ҳи·іиҪ¬еҲ°headзӣ®еҪ•дёӢ
grunt server //иӢҘжғіеңЁеҗҺеҸ°иҝҗиЎҢпјҢз»“е°ҫиҝҪеҠ вҖң&вҖқ,д№ҹеҸҜд»ҘдҪҝз”Ё npm run startеҗҜеҠЁ
5гҖҒи®ҝй—®elasticsearch-headз•Ңйқў
http://192.168.60.200:9100
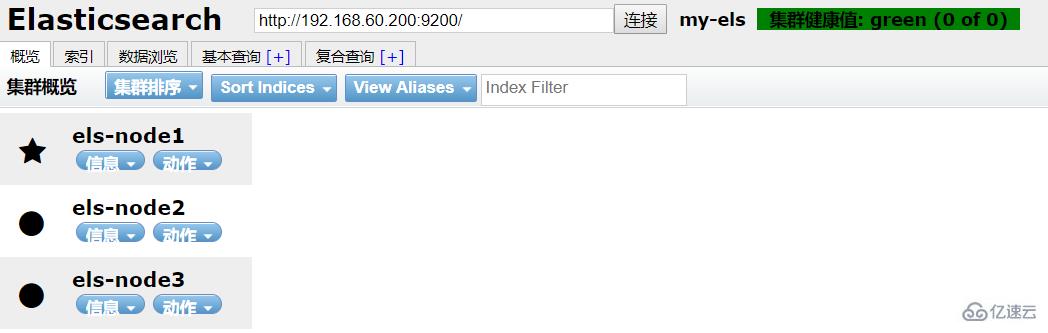
еҸҜд»ҘзңӢеҲ°пјҢдёүеҸ°жңәеҷЁз»„жҲҗдәҶesйӣҶзҫӨгҖӮйӣҶзҫӨзҡ„зҠ¶жҖҒдёәз»ҝиүІпјҢеҒҘеә·зҠ¶жҖҒгҖӮеёҰжҳҹж Үзҡ„иҠӮзӮ№els-node1дёәдё»иҠӮзӮ№пјҲйҖүдёҫпјүгҖӮиҝҳеҸҜд»ҘеҒҡдёҖдәӣеўһеҠ /еҲ йҷӨзҙўеј•пјҢжҹҘиҜўзӯүж“ҚдҪңгҖӮ
еҲ°жӯӨпјҢе…ідәҺвҖңLinuxзі»з»ҹжҖҺд№Ҳе®үиЈ…ESвҖқзҡ„еӯҰд№ е°ұз»“жқҹдәҶпјҢеёҢжңӣиғҪеӨҹи§ЈеҶіеӨ§е®¶зҡ„з–‘жғ‘гҖӮзҗҶи®әдёҺе®һи·өзҡ„жҗӯй…ҚиғҪжӣҙеҘҪзҡ„её®еҠ©еӨ§е®¶еӯҰд№ пјҢеҝ«еҺ»иҜ•иҜ•еҗ§пјҒиӢҘжғіз»§з»ӯеӯҰд№ жӣҙеӨҡзӣёе…ізҹҘиҜҶпјҢиҜ·з»§з»ӯе…іжіЁдәҝйҖҹдә‘зҪ‘з«ҷпјҢе°Ҹзј–дјҡ继з»ӯеҠӘеҠӣдёәеӨ§е®¶еёҰжқҘжӣҙеӨҡе®һз”Ёзҡ„ж–Үз« пјҒ


