NginxжңҚеҠЎLNMPдёӯWordPressйғЁзҪІжөҒзЁӢжӯҘйӘӨзҡ„зӨәдҫӢеҲҶжһҗ
иҝҷзҜҮж–Үз« дё»иҰҒдёәеӨ§е®¶еұ•зӨәдәҶвҖңNginxжңҚеҠЎLNMPдёӯWordPressйғЁзҪІжөҒзЁӢжӯҘйӘӨзҡ„зӨәдҫӢеҲҶжһҗвҖқпјҢеҶ…е®№з®ҖиҖҢжҳ“жҮӮпјҢжқЎзҗҶжё…жҷ°пјҢеёҢжңӣиғҪеӨҹеё®еҠ©еӨ§е®¶и§ЈеҶіз–‘жғ‘пјҢдёӢйқўи®©е°Ҹзј–еёҰйўҶеӨ§е®¶дёҖиө·з ”究并еӯҰд№ дёҖдёӢвҖңNginxжңҚеҠЎLNMPдёӯWordPressйғЁзҪІжөҒзЁӢжӯҘйӘӨзҡ„зӨәдҫӢеҲҶжһҗвҖқиҝҷзҜҮж–Үз« еҗ§гҖӮ
е®һйӘҢзҺҜеўғ
е®һйӘҢзҺҜеўғпјҡ
[root@lnmp ~]# uname -r
2.6.32-754.el6.x86_64
[root@lnmp ~]# cat /etc/redhat-release
CentOS release 6.10 (Final)
[root@lnmp ~]# cat /etc/hosts
192.168.1.30 lnmp
172.16.1.30 lnmp
иҪҜ件зүҲжң¬пјҡ
NGINXпјҡnginx-1.12.2.tar.gz
MYSQLпјҡmysql-5.6.47-linux-glibc2.12-x86_64.tar.gz
PHPпјҡphp-5.5.3.tar.gz
libiconvпјҡlibiconv-1.16.tar.gz
wordpressпјҡwordpress-4.7.3-zh_CN.tar.gz
е®үиЈ…NginxжңҚеҠЎ
NginxжңҚеҠЎйғЁзҪІиҝҮзЁӢпјҡ
иҜ·еҸӮиҖғпјҡе°ҸзҷҪд№ҹеҸҜд»Ҙе®ҢжҲҗзҡ„0еҹәзЎҖйғЁзҪІNginxжңҚеҠЎ
е®үиЈ…Mysqlж•°жҚ®еә“
дёӢиҪҪдәҢиҝӣеҲ¶MySQLеҢ…пјҡ
[root@lnmp tools]# wget -q https://mirrors.tuna.tsinghua.edu.cn/mysql/downloads/MySQL-5.6/mysql-5.6.47-linux-glibc2.12-x86_64.tar.gz
и§ЈеҺӢMySQLеҢ…пјҡ
[root@lnmp tools]# tar xf mysql-5.6.47-linux-glibc2.12-x86_64.tar.gz -C /app/
еҲӣе»әMySQLз”ЁжҲ·еҸҠжҺҲжқғпјҡ
[root@lnmp tools]# cd /app/
[root@lnmp app]# ln -s mysql-5.6.47-linux-glibc2.12-x86_64/ /app/mysql
[root@lnmp tools]# useradd mysql -s /sbin/nologin -M
[root@lnmp mysql]# chown mysql.mysql /app/mysql/data/
еҲқе§ӢеҢ–MySQLпјҡ
第дёҖйҒҚеҲқе§ӢеҢ–жҠҘй”ҷпјҢ然еҗҺжҲ‘жҠҠdataзӣ®еҪ•дёӢдёңиҘҝе№ІжҺүеҗҺе°ұеҘҪдәҶгҖӮд»Җд№ҲеҺҹзҗҶпјҹ
[root@lnmp mysql]# bin/mysqld --user=mysql --datadir=/app/mysql/data --basedir=/app/mysql
еҲ¶дҪңMySQLеҗҜеҠЁи„ҡжң¬пјҡ
[root@lnmp data]# cp /app/mysql/support-files/mysql.server /etc/init.d/mysqld
cpпјҡжҳҜеҗҰиҰҶзӣ–"/etc/init.d/mysqld"пјҹ y
[root@lnmp mysql]# sed -ri 's#/usr/local#/app#g' /etc/init.d/mysqld /app/mysql/bin/mysqld_safe
еҲӣе»әй…ҚзҪ®ж–Ү件пјҡ
[root@lnmp mysql]# cp /app/mysql/support-files/my-default.cnf /etc/my.cnf
cpпјҡжҳҜеҗҰиҰҶзӣ–"/etc/my.cnf"пјҹ y
еҗҜеҠЁMySQLпјҡ
[root@lnmp mysql]# /etc/init.d/mysqld restart
Shutting down MySQL.. SUCCESS!
Starting MySQL. SUCCESS!
[root@lnmp mysql]# netstat -utpln | grep mysqld
tcp        0      0 :::3306                     :::*                        LISTEN      17796/mysqld
и®ҫзҪ®зҺҜеўғеҸҳйҮҸпјҡ
[root@lnmp mysql]# echo 'export PATH=/app/mysql/bin:$PATH' >>/etc/profile
[root@lnmp mysql]# source /etc/profile
зҷ»еҪ•ж•°жҚ®еә“пјҡ
еӣ дёәеҲқе§ӢеҜҶз Ғдёәз©әпјҢжүҖд»Ҙзҷ»еҪ•еҗҺиҰҒдҝ®ж”№еҜҶз Ғ
[root@lnmp mysql]# mysql
Welcome to the MySQL monitor.  Commands end with ; or \g.
Your MySQL connection id is 2
Server version: 5.6.47 MySQL Community Server (GPL)
Copyright (c) 2000, 2020, Oracle and/or its affiliates. All rights reserved.
Oracle is a registered trademark of Oracle Corporation and/or its
affiliates. Other names may be trademarks of their respective
owners.
Type 'help;' or '\h' for help. Type '\c' to clear the current input statement.
mysql>
[root@lnmp mysql]# mysqladmin -u root password '123123'
Warning: Using a password on the command line interface can be insecure.
[root@lnmp mysql]# mysql -uroot -p
Enter password:
Welcome to the MySQL monitor.  Commands end with ; or \g.
Your MySQL connection id is 4
Server version: 5.6.47 MySQL Community Server (GPL)
Copyright (c) 2000, 2020, Oracle and/or its affiliates. All rights reserved.
Oracle is a registered trademark of Oracle Corporation and/or its
affiliates. Other names may be trademarks of their respective
owners.
Type 'help;' or '\h' for help. Type '\c' to clear the current input statement.
mysql>
е®үиЈ…PHP
дёӢиҪҪPHPеҢ…еҸҠliblconvеҢ…пјҡ
[root@lnmp ~]# cd /server/tools/
[root@lnmp tools]# wget https://museum.php.net/php5/php-5.5.3.tar.gz
[root@lnmp tools]# wget https://ftp.gnu.org/pub/gnu/libiconv/libiconv-1.16.tar.gz
е®үиЈ…дҫқиө–еҢ…пјҡ
[root@lnmp tools]# yum -y install zlib-devel libxml2-devel libjpeg-devel libjpeg-turbo-devel
[root@lnmp tools]# yum -y install libiconv-devel freetype-devel libpng-devel gd-devel
[root@lnmp tools]# yum -y install libcurl-devel libxslt-devel
[root@lnmp tools]# yum -y install libmcrypt-devel mhash mcrypt
зј–иҜ‘е®үиЈ…иҜӯиЁҖиҪ¬жҚўе·Ҙе…·пјҡ
[root@lnmp tools]# tar xf libiconv-1.16.tar.gz
[root@lnmp tools]# cd libiconv-1.16
[root@lnmp libiconv-1.16]# ./configure --prefix=/usr/local/libiconv
[root@lnmp libiconv-1.16]# make && make install
и§ЈеҺӢPHPеҢ…иҝӣиЎҢйў„зј–иҜ‘пјҡ
[root@lnmp libiconv-1.16]# cd /server/tools/
[root@lnmp tools]# tar xf php-5.5.3.tar.gz
[root@lnmp tools]# cd php-5.5.3
[root@lnmp php-5.5.3]# mkdir -p /app/php-5.5.3
[root@lnmp php-5.5.3]# ./configure --prefix=/app/php-5.5.3 --with-mysql --with-pdo-mysql=mysqlnd --with-iconv-dir=/usr/local/libiconv --with-freetype-dir --with-jpeg-dir --with-png-dir --with-zlib --with-libxml-dir=/usr --enable-xml --disable-rpath --enable-bcmath --enable-shmop --enable-sysvsem --enable-inline-optimization --with-curl --enable-mbregex --enable-fpm --enable-mbstring --with-mcrypt --with-gd --enable-gd-native-ttf --with-openssl --with-mhash --enable-pcntl --enable-sockets --with-xmlrpc --enable-soap --enable-short-tags --enable-static --with-xsl --with-fpm-user=www --with-fpm-group=www --enable-ftp --enable-opcache=no
[root@lnmp php-5.5.3]# echo $?
0
йҳІжҠҘй”ҷеӨ„зҗҶпјҡ
[root@lnmp php-5.5.3]# ln -s /app/mysql/lib/libmysqlclient.so.18 /usr/lib64/
[root@lnmp php-5.5.3]# touch ext/phar/phar.phar
зј–иҜ‘е®үиЈ…PHPпјҡ
[root@lnmp php-5.5.3]# make && make install
[root@lnmp php-5.5.3]# echo $?
0
[root@lnmp php-5.5.3]# cp php.ini-production /app/php-5.5.3/lib/
[root@lnmp php-5.5.3]# ln -s /app/php-5.5.3/ /app/php
[root@lnmp php-5.5.3]# cd /app/php/etc/
[root@lnmp etc]# ll
жҖ»з”ЁйҮҸ 28
-rw-r--r-- 1 root root 1152 8жңҲ 25 06:39 pear.conf
-rw-r--r-- 1 root root 21846 8жңҲ 25 06:39 php-fpm.conf.default
[root@lnmp etc]# cp php-fpm.conf.default php-fpm.conf
[root@lnmp etc]# vim php-fpm.conf
listen = 172.16.1.30:9000
еҗҜеҠЁPHPпјҡ
[root@lnmp etc]# useradd -s /sbin/nologin -M www
[root@lnmp etc]# /app/php/sbin/php-fpm
[root@lnmp etc]# netstat -utpln | grep php
tcp        0      0 172.16.1.30:9000            0.0.0.0:*                   LISTEN      39741/php-fpm
дҝ®ж”№Nginxй…ҚзҪ®ж–Ү件
[root@lnmp etc]# cd /app/nginx/conf/
[root@lnmp conf]# cp nginx.conf nginx.conf.bak
[root@lnmp conf]# grep -Ev "#|^$" nginx.conf.default >nginx.conf
[root@lnmp conf]# vim nginx.conf
[root@lnmp conf]# cat nginx.conf
worker_processes  1;
events {
    worker_connections  1024;
}
http {
    include       mime.types;
    default_type  application/octet-stream;
    sendfile        on;
    keepalive_timeout  65;
    server {
        listen       80;
        server_name  192.168.1.30;
        location / {
            root   html/www;
            index  index.html index.htm index.php;
            location ~* .*\.(php|php5)?$ {
                   fastcgi_pass 172.16.1.30:9000;
                   fastcgi_index index.php;
                   include fastcgi.conf;
             }
	}
        error_page   500 502 503 504  /50x.html;
        location = /50x.html {
            root   html;
        }
    }
}
[root@lnmp conf]# /app/nginx/sbin/nginx -t
nginx: the configuration file /app/nginx-1.12.2//conf/nginx.conf syntax is ok
nginx: configuration file /app/nginx-1.12.2//conf/nginx.conf test is successfulйҮҚж–°еҗҜеҠЁNginxжңҚеҠЎпјҡ
[root@lnmp etc]# /app/nginx/sbin/nginx -s reload
жөӢиҜ•пјҡ
[root@lnmp etc]# cd /app/nginx/html/
[root@lnmp html]# ls
50x.html index.html
[root@lnmp html]# vim test_php.php
[root@lnmp html]# cat test_php.php
<?php
phpinfo();
?>
зҪ‘йЎөи®ҝй—®пјҡ192.168.1.30/test_php.phpеҮәзҺ°phpйЎөйқўпјҢд»ЈиЎЁжӯЈеёё
йғЁзҪІWordPressдёӘдәәеҚҡе®ў
дёӢиҪҪе®үиЈ…еҢ…пјҡ
[root@lnmp tools]# wget https://cn.wordpress.org/wordpress-4.7.3-zh_CN.tar.gz
[root@lnmp tools]# tar xf wordpress-4.7.3-zh_CN.tar.gz
йғЁзҪІз«ҷзӮ№пјҡ
[root@lnmp tools]# mkdir -p /app/nginx/html/www
[root@lnmp tools]# mv wordpress/* /app/nginx/html/www
[root@lnmp tools]# chown -R www.www /app/nginx/html/www/
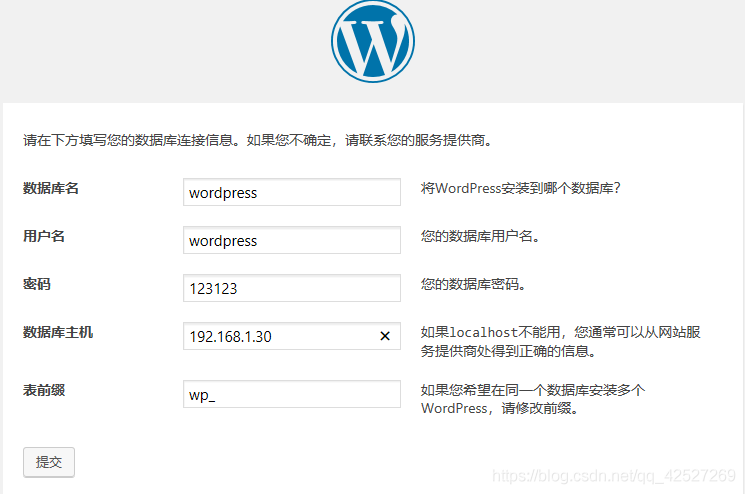
еҲӣе»әж•°жҚ®еә“дҝЎжҒҜ:
[root@lnmp tools]# mysql -uroot -p123123
mysql> create database wordpress;
Query OK, 1 row affected (0.01 sec)
mysql> grant all on wordpress.* to 'wordpress'@'localhost' identified by '123123';
Query OK, 0 rows affected (0.04 sec)
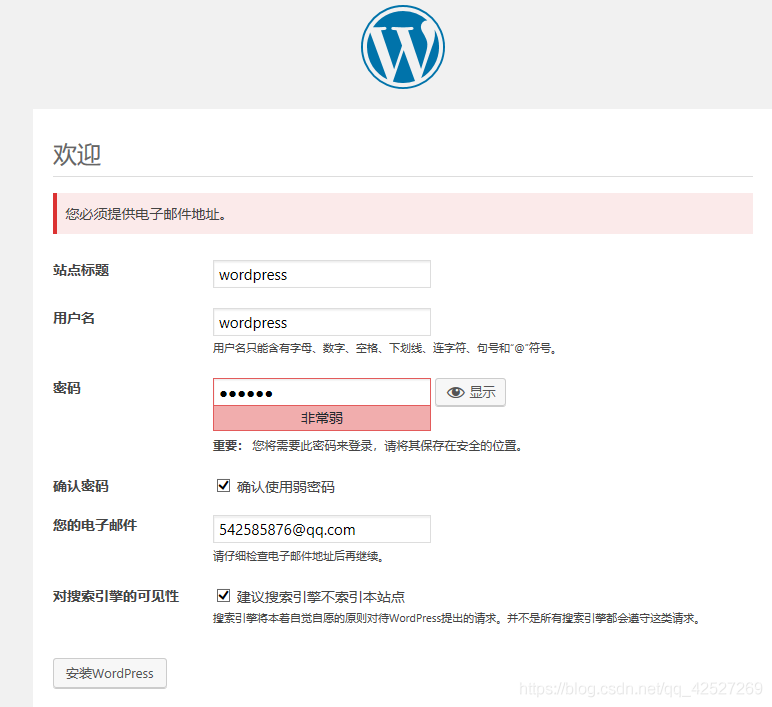
зҷ»еҪ•зҪ‘з«ҷй…ҚзҪ®зҪ‘з«ҷпјҡ
http://ip/wp-admin
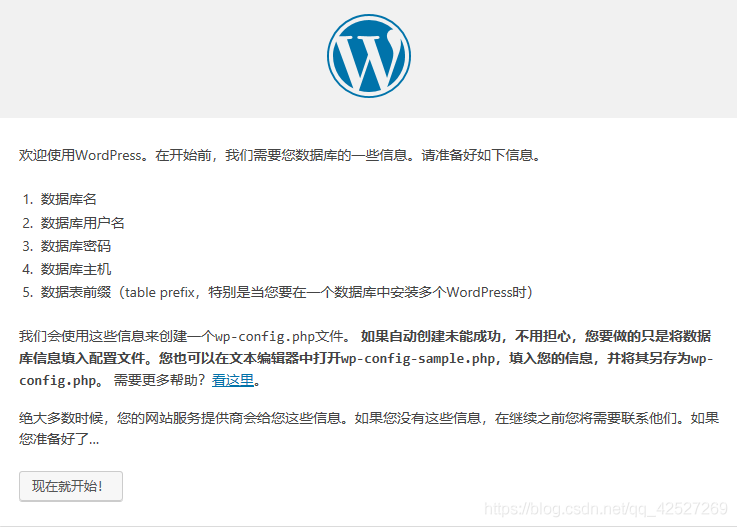
дё»жңәй»ҳи®ӨlocalhostгҖӮжҲӘй”ҷдәҶ
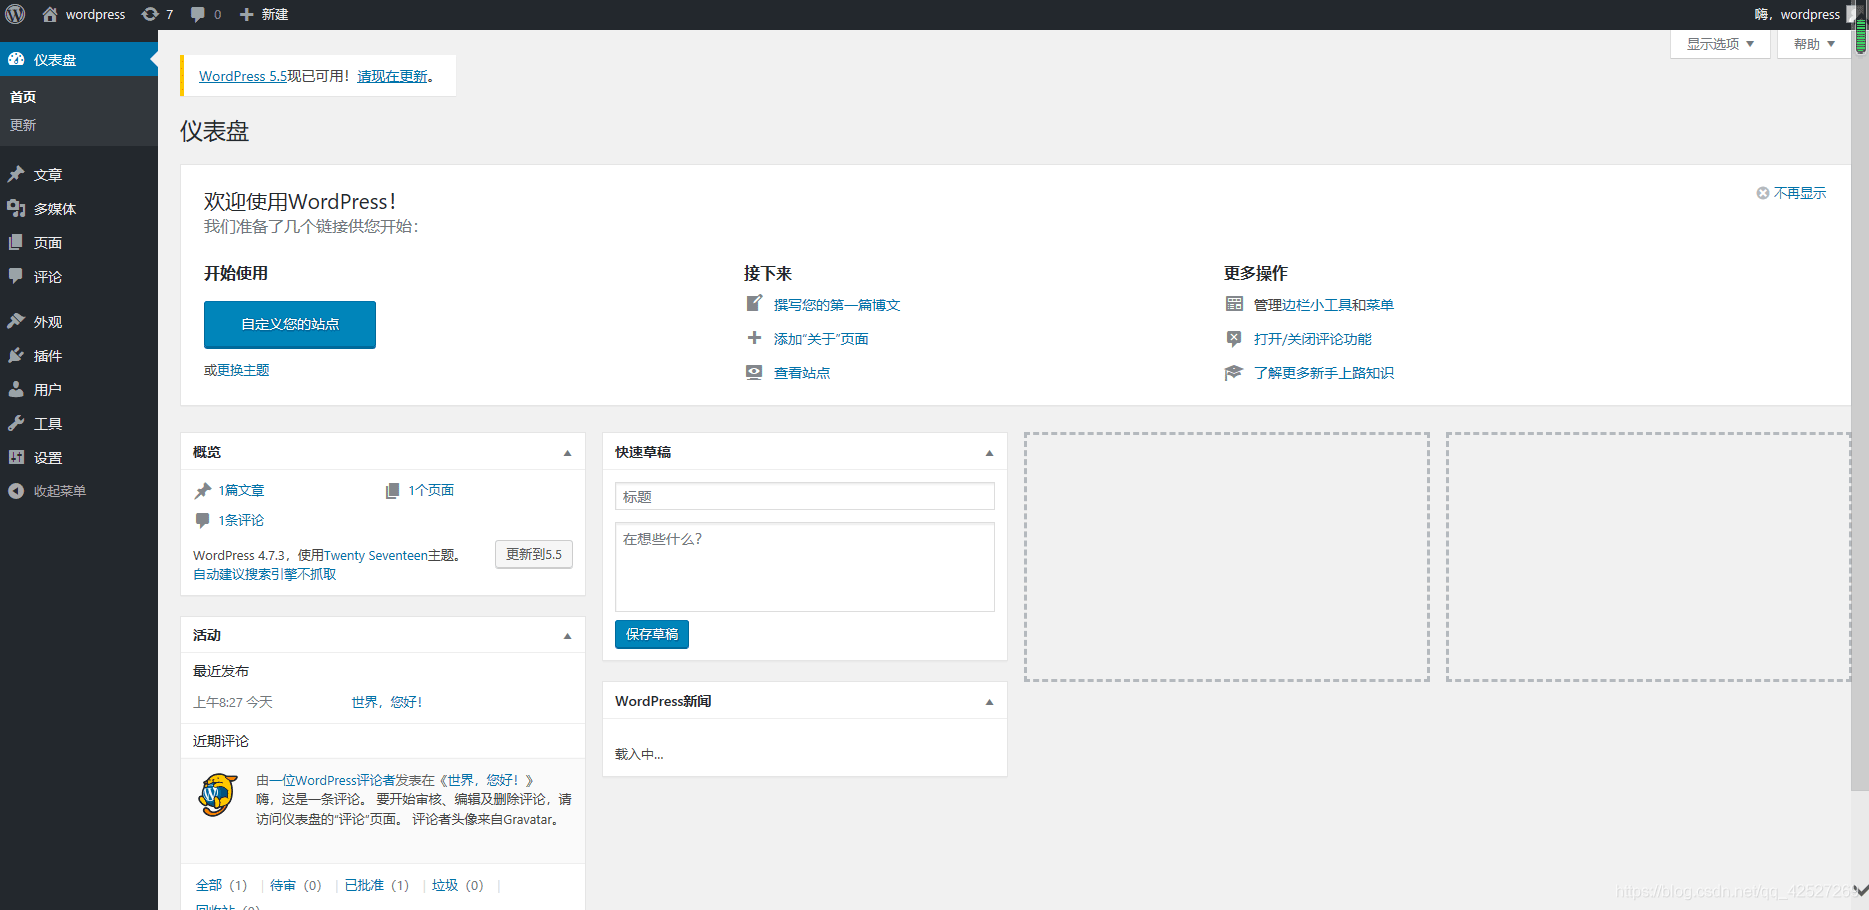
д»ҘдёҠжҳҜвҖңNginxжңҚеҠЎLNMPдёӯWordPressйғЁзҪІжөҒзЁӢжӯҘйӘӨзҡ„зӨәдҫӢеҲҶжһҗвҖқиҝҷзҜҮж–Үз« зҡ„жүҖжңүеҶ…е®№пјҢж„ҹи°ўеҗ„дҪҚзҡ„йҳ…иҜ»пјҒзӣёдҝЎеӨ§е®¶йғҪжңүдәҶдёҖе®ҡзҡ„дәҶи§ЈпјҢеёҢжңӣеҲҶдә«зҡ„еҶ…е®№еҜ№еӨ§е®¶жңүжүҖеё®еҠ©пјҢеҰӮжһңиҝҳжғіеӯҰд№ жӣҙеӨҡзҹҘиҜҶпјҢж¬ўиҝҺе…іжіЁдәҝйҖҹдә‘иЎҢдёҡиө„и®Ҝйў‘йҒ“пјҒ


