前一篇文章主要讲了自定义View为什么要重载onMeasure()方法,那么,自定义ViewGroup又都有哪些方法需要重载或者实现呢 ?
Android开发中,对于自定义View,分为两种,一种是自定义控件(继承View类),另一种是自定义布局容器(继承ViewGroup)。如果是自定义控件,则一般需要重载两个方法,一个是onMeasure(),用来测量控件尺寸,另一个是onDraw(),用来绘制控件的UI。而自定义布局容器,则一般需要实现/重载三个方法,一个是onMeasure(),也是用来测量尺寸;一个是onLayout(),用来布局子控件;还有一个是dispatchDraw(),用来绘制UI。
本文主要分析自定义ViewGroup的onLayout()方法的实现。
ViewGroup类的onLayout()函数是abstract型,继承者必须实现,由于ViewGroup的定位就是一个容器,用来盛放子控件的,所以就必须定义要以什么的方式来盛放,比如LinearLayout就是以横向或者纵向顺序存放,而RelativeLayout则以相对位置来摆放子控件,同样,我们的自定义ViewGroup也必须给出我们期望的布局方式,而这个定义就通过onLayout()函数来实现。
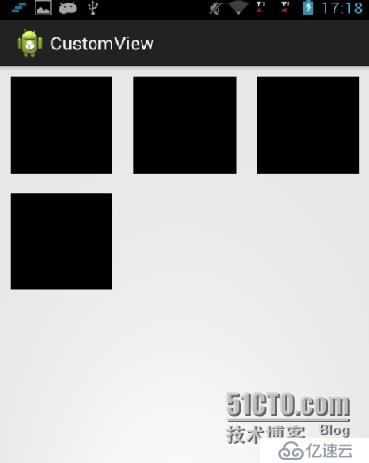
我们通过实现一个水平优先布局的视图容器来更加深入地了解onLayout()的实现吧,效果如图所示(黑色方块为子控件,白色部分为自定义布局容器)。该容器的布局方式是,首先水平方向上摆放子控件,水平方向放不下了,则另起一行继续水平摆放。
1. 自定义ViewGroup的派生类
第一步,则是自定ViewGroup的派生类,继承默认的构造函数。
public class CustomViewGroup extends ViewGroup {

   public CustomViewGroup(Context context) {
       super(context);
    }

   public CustomViewGroup(Context context, AttributeSet attrs) {
       super(context, attrs);
    }

   public CustomViewGroup(Context context, AttributeSet attrs, intdefStyle) {
       super(context, attrs, defStyle);
    }
}
2. 重载onMeasure()方法
为什么要重载onMeasure()方法这里就不赘述了,上一篇文章已经讲过,这里需要注意的是,自定义ViewGroup的onMeasure()方法中,除了计算自身的尺寸外,还需要调用measureChildren()函数来计算子控件的尺寸。
onMeasure()的定义不是本文的讨论重点,因此这里我直接使用默认的onMeasure()定义,当然measureChildren()是必须得加的。
@Override
protected void onMeasure(int widthMeasureSpec, int heightMeasureSpec) {
    super.onMeasure(widthMeasureSpec, heightMeasureSpec);
    measureChildren(widthMeasureSpec, heightMeasureSpec);
}
3. 实现onLayout()方法
onLayout()函数的原型如下:
//@param changed 该参数指出当前ViewGroup的尺寸或者位置是否发生了改变
//@param left top right bottom 当前ViewGroup相对于其父控件的坐标位置
protected void onLayout(boolean changed,int left, int top, int right, int bottom);
由于我们希望优先横向布局子控件,那么,首先,我们知道总宽度是多少,这个值可以通过getMeasuredWidth()来得到,当然子控件的宽度也可以通过子控件对象的getMeasuredWidth()来得到。
这样,就不复杂了,具体的实现代码如下所示:
protected void onLayout(boolean changed, int left, int top, int right, int bottom) {

    int mViewGroupWidth  = getMeasuredWidth();  //当前ViewGroup的总宽度

    int mPainterPosX = left;  //当前绘图光标横坐标位置
    int mPainterPosY = top;  //当前绘图光标纵坐标位置

    int childCount = getChildCount();
    for ( int i = 0; i < childCount; i++ ) {

        View childView = getChildAt(i);

        int width  = childView.getMeasuredWidth();
        int height = childView.getMeasuredHeight();

        //如果剩余的空间不够,则移到下一行开始位置
        if( mPainterPosX + width > mViewGroupWidth ) {
            mPainterPosX = left;
            mPainterPosY += height;
        }

        //执行ChildView的绘制
        childView.layout(mPainterPosX,mPainterPosY,mPainterPosX+width, mPainterPosY+height);

        //记录当前已经绘制到的横坐标位置
        mPainterPosX += width;
    }
}
4. 布局文件测试
下面我们就尝试写一个简单的xml文件,来测试一下我们的自定义ViewGroup,我们把子View的背景颜色都设置为黑色,方便我们辨识。
<com.titcktick.customview.CustomViewGroup xmlns:android="http://schemas.android.com/apk/res/android"
    xmlns:tools="http://schemas.android.com/tools"
    android:layout_width="match_parent"
    android:layout_height="match_parent">

    <View
        android:layout_width="100dp"
        android:layout_height="100dp"
        android:layout_margin="10dp"
        android:background="@android:color/black"/>

    <View
        android:layout_width="100dp"
        android:layout_height="100dp"
        android:layout_margin="10dp"
        android:background="@android:color/black"/>

    <View
        android:layout_width="100dp"
        android:layout_height="100dp"
        android:layout_margin="10dp"
        android:background="@android:color/black"/>

    <View
        android:layout_width="100dp"
        android:layout_height="100dp"
        android:layout_margin="10dp"
        android:background="@android:color/black"/>

</com.titcktick.customview.CustomViewGroup>
5. 添加layout_margin
为了让核心逻辑更加清晰,上面的onLayout()实现我隐去了margin的计算,这样就会导致子控件的layout_margin不起效果,所以上述效果是子控件一个个紧挨着排列,中间没有空隙。那么,下面我们来研究下如何添加margin效果。
其实,如果要自定义ViewGroup支持子控件的layout_margin参数,则自定义的ViewGroup类必须重载generateLayoutParams()函数,并且在该函数中返回一个ViewGroup.MarginLayoutParams派生类对象,这样才能使用margin参数。
ViewGroup.MarginLayoutParams的定义关键部分如下,它记录了子控件的layout_margin值:
public static class MarginLayoutParams extends ViewGroup.LayoutParams {
    public int leftMargin;
    public int topMargin;
    public int rightMargin;
    public int bottomMargin;
}
你可以跟踪源码看看,其实XML文件中View的layout_xxx参数都是被传递到了各种自定义ViewGroup.LayoutParams派生类对象中。例如LinearLayout的LayoutParams定义的关键部分如下:
public class LinearLayout extends ViewGroup {

public static class LayoutParams extends ViewGroup.MarginLayoutParams {

    public float weight;
    public int gravity = -1;

    public LayoutParams(Context c, AttributeSet attrs) {

            super(c, attrs);

            TypedArray a = c.obtainStyledAttributes(attrs, com.android.internal.R.styleable.LinearLayout_Layout);
            weight = a.getFloat(com.android.internal.R.styleable.LinearLayout_Layout_layout_weight, 0);
            gravity = a.getInt(com.android.internal.R.styleable.LinearLayout_Layout_layout_gravity, -1);

            a.recycle();
        }
    }

    @Override
    public LayoutParams generateLayoutParams(AttributeSet attrs) {
        return new LinearLayout.LayoutParams(getContext(), attrs);
    }
}
这样你大概就可以理解为什么LinearLayout的子控件支持weight和gravity的设置了吧,当然我们也可以这样自定义一些属于我们ViewGroup特有的params,这里就不详细讨论了,我们只继承MarginLayoutParams来获取子控件的margin值。
public class CustomViewGroup extends ViewGroup {

    public static class LayoutParams extends ViewGroup.MarginLayoutParams {
        public LayoutParams(Context c, AttributeSet attrs) {
            super(c, attrs);
        }
    }

    @Override
    public LayoutParams generateLayoutParams(AttributeSet attrs) {
        return new CustomViewGroup.LayoutParams(getContext(), attrs);
    }

}
这样修改之后,我们就可以在onLayout()函数中获取子控件的layout_margin值了,添加了layout_margin的onLayout()函数实现如下所示:
@Override
protected void onLayout(boolean changed, int left, int top, int right, int bottom) {

    int mViewGroupWidth  = getMeasuredWidth();  //当前ViewGroup的总宽度
    int mViewGroupHeight = getMeasuredHeight(); //当前ViewGroup的总高度

    int mPainterPosX = left; //当前绘图光标横坐标位置
    int mPainterPosY = top;  //当前绘图光标纵坐标位置

    int childCount = getChildCount();
    for ( int i = 0; i < childCount; i++ ) {

        View childView = getChildAt(i);

        int width  = childView.getMeasuredWidth();
        int height = childView.getMeasuredHeight();

        CustomViewGroup.LayoutParams margins = (CustomViewGroup.LayoutParams)(childView.getLayoutParams());

        //ChildView占用的width  = width+leftMargin+rightMargin
        //ChildView占用的height = height+topMargin+bottomMargin
        //如果剩余的空间不够,则移到下一行开始位置
        if( mPainterPosX + width + margins.leftMargin + margins.rightMargin > mViewGroupWidth ) {
            mPainterPosX = left;
            mPainterPosY += height + margins.topMargin + margins.bottomMargin;
        }

        //执行ChildView的绘制
        childView.layout(mPainterPosX+margins.leftMargin, mPainterPosY+margins.topMargin,mPainterPosX+margins.leftMargin+width, mPainterPosY+margins.topMargin+height);

        mPainterPosX += width + margins.leftMargin + margins.rightMargin;
    }
}
6. 总结
费了好大劲,终于算是把自定义ViewGroup的onLayout()相关知识点讲清楚了,如果有任何疑问欢迎留言或者来信lujun.hust@gmail.com交流,,或者关注我的新浪微博 @卢_俊 获取最新的文章和资讯。
免责声明:本站发布的内容(图片、视频和文字)以原创、转载和分享为主,文章观点不代表本网站立场,如果涉及侵权请联系站长邮箱:is@yisu.com进行举报,并提供相关证据,一经查实,将立刻删除涉嫌侵权内容。


