本篇内容介绍了“SpringCloud之SpringCloud gateway网关路由怎么配置”的有关知识,在实际案例的操作过程中,不少人都会遇到这样的困境,接下来就让小编带领大家学习一下如何处理这些情况吧!希望大家仔细阅读,能够学有所成!
微服务中经常用到gateway作为网关,它有什么作用,怎么使用?
Spring Cloud Gateway的目标提供统一的路由方式且基于Filter 链的方式提供了网关基本的功能, 例如:安全、监控、指标和限流 。
Spring Cloud Gateway的通信框架使用的是Netty。
特点:
1、动态路由:能够匹配任何请求属性
2、可以对路由指定Predicate(断言)和Filter(过滤器) :
predicate,可以理解为匹配条件;filter,可以理解为拦截器。
3、集成Hystrix的断路器功能
4、集成SpringCloud服务发现功能
5、请求限流功能
6、支持路径重写
为了更好的理解,我们先配置几个请求路径
yml格式配置如下:
server:
  port: 9999
#服务名称
spring:
  application:
    name: zhufeng-gateway-config
  cloud:
    nacos:
      config:
        server-addr: ${spring.cloud.nacos.discovery.server-addr}
      discovery:
         server-addr: 127.0.0.1:8848
    gateway:
      routes:
        - id: zhufeng-web-user  # 请求 http://localhost:9999/user/info 会转发到 zhufeng-web-user 服务
          uri: lb://zhufeng-web-user  #在服务注册中心找服务名为 zhufeng-web-user 的服务
          predicates:
            - Path=/user/info  # 设置路由断言,当请求 /user/info 时进行转发
        - id: zhufeng-web-msg  # 请求 http://localhost:9999/route/msg/info 会转发到 zhufeng-web-msg 服务
          uri: lb://zhufeng-web-msg
          predicates:
            - Path=/route/msg/info  # 设置路由断言,当请求 /msg/info 时进行转发
          filters:
            - StripPrefix=1  # 前缀, 在当前路径匹配中表示去掉第一个前缀 /route
配置说明:
1、定义gateway的端口为9999
2、注册中心使用nacos
3、配置路由规则:
请求 http://localhost:9999/user/info 会转发到 zhufeng-web-user 服务
请求 http://localhost:9999/route/msg/info 会转发到 zhufeng-web-msg 服务
如果使用的是properties配置文件,则需要对数组的配置进行转换:
#服务端口
server.port=9999
#服务名称
spring.application.name=zhufeng-gateway-config
# 请求 http://localhost:9999/user/info 会转发到 zhufeng-web-user 服务
spring.cloud.gateway.routes[0].id=zhufeng-web-user
# 在服务注册中心找服务名为 zhufeng-web-user 的服务
spring.cloud.gateway.routes[0].uri=lb://zhufeng-web-user
# 设置路由断言,当请求 /user/info 时进行转发
spring.cloud.gateway.routes[0].predicates[0]=Path=/user/info
# 请求 http://localhost:9999/msg/info 会转发到 zhufeng-web-msg 服务
spring.cloud.gateway.routes[1].id=zhufeng-web-msg
# 在服务注册中心找服务名为 zhufeng-web-msg 的服务 #lb://zhufeng-web-msg
spring.cloud.gateway.routes[1].uri=lb://zhufeng-web-msg
# 设置路由断言,当请求 /msg/info 时进行转发
spring.cloud.gateway.routes[1].predicates[0]=Path=/route/msg/info
# 前缀, 在当前路径匹配中表示去掉第一个前缀 /route
spring.cloud.gateway.routes[1].filters[0]=StripPrefix=1
使用的微服务的版本信息如下:
<spring-boot.version>2.3.7.RELEASE</spring-boot.version>
<spring-cloud.version>Hoxton.SR12</spring-cloud.version>
<spring-cloud-alibaba.version>2.2.7.RELEASE</spring-cloud-alibaba.version>
<dependencies>
	<!--gateway 网关依赖,内置webflux 依赖 -->
	<dependency>
		<groupId>org.springframework.cloud</groupId>
		<artifactId>spring-cloud-starter-gateway</artifactId>
	</dependency>

	<!--断路器依赖 -->
	<dependency>
		<groupId>com.alibaba.cloud</groupId>
		<artifactId>spring-cloud-alibaba-sentinel-gateway</artifactId>
	</dependency>
	<dependency>
		<groupId>org.springframework.cloud</groupId>
		<artifactId>spring-cloud-starter-netflix-hystrix</artifactId>
	</dependency>
	<dependency>
		<groupId>com.alibaba.csp</groupId>
		<artifactId>sentinel-datasource-extension</artifactId>
	</dependency>

	<dependency>
		<groupId>org.springframework.cloud</groupId>
		<artifactId>spring-cloud-starter-sleuth</artifactId>
	</dependency>
</dependencies>
注意:
如果nacos使用的不是2.x版本,需要从spring-cloud-starter-alibaba-nacos-discovery中移除默认nacos-client版本,替换方式如下:
<!--注册中心客户端 -->
<dependency>
	<groupId>com.alibaba.cloud</groupId>
	<artifactId>spring-cloud-starter-alibaba-nacos-discovery</artifactId>
	<exclusions>
		<!--移除默认版本,默认为2.x版本-->
		<exclusion>
			<groupId>com.alibaba.nacos</groupId>
			<artifactId>nacos-client</artifactId>
		</exclusion>
	</exclusions>
</dependency>

<dependency>
	<groupId>com.alibaba.nacos</groupId>
	<artifactId>nacos-client</artifactId>
	<version>1.4.3</version>
</dependency>
启动类:
package com.zhufeng.gateway.config;

import org.springframework.boot.SpringApplication;
import org.springframework.cloud.client.SpringCloudApplication;

/**
 * @ClassName: GatewayConfigApplication
 * @Description 网关启动类
 * @author 月夜烛峰
 * @date 2022/7/22 20:11
 */
@SpringCloudApplication
public class GatewayConfigApplication {

	public static void main(String[] args) throws Exception {
		SpringApplication.run(GatewayConfigApplication.class, args);
	}

}创建两个微服务 zhufeng-web-user 、 zhufeng-web-msg
在zhufeng-web-user创建Controller:
package com.zhufeng.web.controller;

import com.alibaba.fastjson.JSONObject;
import org.springframework.web.bind.annotation.RequestMapping;
import org.springframework.web.bind.annotation.RestController;
/**
 * @ClassName: UserController
 * @Description User路由测试
 * @author 月夜烛峰
 * @date 2022/7/22 20:01
 */
@RestController
@RequestMapping("user")
public class UserController {

    @RequestMapping("info")
    public String userInfo(){
        JSONObject userJson = new JSONObject();
        userJson.put("id","user1001");
        userJson.put("name","月夜烛峰");
        return userJson.toJSONString();
    }
}
配置文件:
#服务端口
server.port=8081
#服务名称
spring.application.name=zhufeng-web-user
在 zhufeng-web-msg 创建对应Controller
package com.zhufeng.web.controller;

import org.springframework.web.bind.annotation.RequestMapping;
import org.springframework.web.bind.annotation.RestController;


/**
 * @ClassName: MsgController
 * @Description 消息路由测试
 * @author 月夜烛峰
 * @date 2022/7/22 20:33
 */
@RequestMapping("msg")
@RestController
public class MsgController {

    @RequestMapping("info")
    public String showInfo() {
        return "good luck~";
    }
}
配置文件:
#服务端口
server.port=8080
#服务名称
spring.application.name=zhufeng-web-msg
分别启动网关微服务、zhufeng-web-user、zhufeng-web-msg
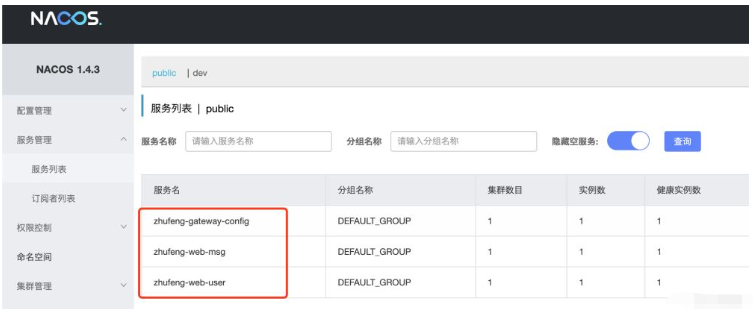
进入nacos控制台,可以看到已经注册成功。
zhufeng-gateway-config微服务只有一个启动类,没有其它代码,所有的请求会根据路由规则进行转发。
请求 http://localhost:9999/user/info 会转发到 zhufeng-web-user 服务
请求 http://localhost:9999/route/msg/info 会转发到 zhufeng-web-msg 服务
转发到 zhufeng-web-user 的路由规则 比较好理解,就是根据请求路径进行转发,但是在zhufeng-web-msg微服务中,我们并没有配置 route 的请求前缀,但依然可以转发到 MsgController , 这是因为gateway通过过滤器 filters 属性 StripPrefix=1 去掉了第一个uri前缀。
如果设置 StripPrefix=2 ,则会去掉前面两个前缀
原uri /route/msg/info 转换为 /info
网关中配置的都是我们自己的微服务,如果请求的服务并没有注册到我们nacos中,或者请求的服务为第三方,该如何处理?
在gateway中新增配置项,properties格式如下:
spring.cloud.gateway.routes[2].id=zhufeng-route-zhufeng
#请求 http://localhost:9999/route/yyzhufeng 会转发到 https://www.csdn.net/
spring.cloud.gateway.routes[2].uri=https://www.csdn.net/
spring.cloud.gateway.routes[2].predicates[0]=Path=/route/yyzhufeng
# 前缀, 在当前路径匹配中表示去掉前两个前缀 /route/yyzhufeng
spring.cloud.gateway.routes[2].filters[0]=StripPrefix=2
请求 http://localhost:9999/route/yyzhufeng 会转发到 https://www.csdn.net/
“SpringCloud之SpringCloud gateway网关路由怎么配置”的内容就介绍到这里了,感谢大家的阅读。如果想了解更多行业相关的知识可以关注亿速云网站,小编将为大家输出更多高质量的实用文章!
免责声明:本站发布的内容(图片、视频和文字)以原创、转载和分享为主,文章观点不代表本网站立场,如果涉及侵权请联系站长邮箱:is@yisu.com进行举报,并提供相关证据,一经查实,将立刻删除涉嫌侵权内容。


