本篇内容介绍了“微信小程序商城分类滚动列表锚点怎么实现”的有关知识,在实际案例的操作过程中,不少人都会遇到这样的困境,接下来就让小编带领大家学习一下如何处理这些情况吧!希望大家仔细阅读,能够学有所成!
最近接了个商城小程序的项目,在做商品分类页面的时候,一开始是普通分类列表,但是客户觉得效果不理想,想要滚动列表的效果,需要实现以下功能:
列表滑动效果;
滑动切换分类;
点击分类跳转到相应的分类位置。
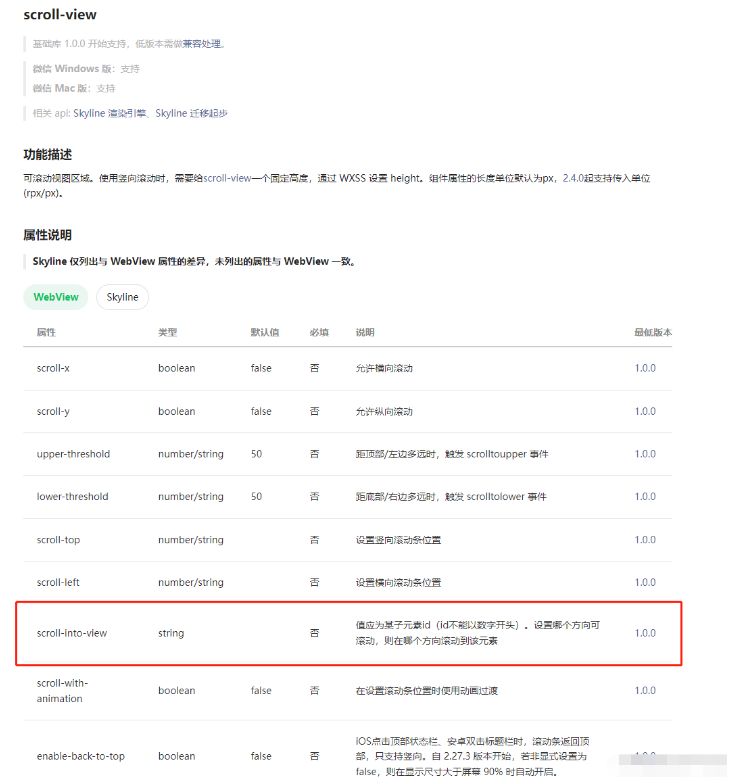
思路是用使用官方组件scroll-view,给每个分类(子元素)添加锚点,然后记录每个分类项的高度,监听scroll-view组件滚动事件,计算分类的跳转
下面要使用到的方法都来自于查阅微信小程序官方文档
创建一个scoll-view 并配置需要用到的属性scroll-into-view根据文档描述此属性是子元素的id,值为哪个就跳到那个子元素。为了使跳转不显得生硬,再添加scroll-with-animation属性,然后创建动态生成分类的dom元素并为每个子元素添加相应的id
        <view class="content">
          <!-- 左侧分类 -->
            <scroll-view scroll-y scroll-with-animation class="left"  scroll-into-view='{{leftId}}'>
              <view id='left{{index}}' class="left-item {{activeKey===index?'active':''}}" wx:for="{{navData}}" data-index='{{index}}' wx:key='id' bindtap="onChange">
                <text class='name'>{{item.name}}</text>
              </view>
            </scroll-view>
            <!-- 滚动列表 -->
            <scroll-view class="right" scroll-y scroll-with-animation scroll-into-view="{{selectedId}}" bindscroll="changeScroll" style='height:{{height}}rpx;'>
            <!-- 每个分类 -->
              <view class="item" wx:for="{{goodslist}}" wx:key="id" id='type{{index}}'>
              <!-- 分类标题 -->
                <view class="type">【{{item.name}}】</view>
                <!-- 分类下的商品 -->
                <view class="item-list">
                  <navigator  class="list-item" wx:for="{{item.list}}" wx:for-item='key' wx:key="id" url='/pages/goods/goods?id={{key.id}}'>
                    <image  src="{{key.imgurl}}" />
                    <view class="item-name">{{key.goods_name}}</view>
                  </navigator>
                </view>
                <view wx:if="{{item.list.length===0}}" class="nodata">
                  暂无商品
                </view>
              </view>
            </scroll-view>
          </view>
css部分
这里用到了吸顶效果position: sticky;
        .content {
            width: 100%;
            height: calc(100% - 108rpx);
            overflow-y: hidden;
            display: flex;

            .left {
              height: 100%;
              overflow-y: scroll;
              .left-item {
                width: 100%;
                padding: 20rpx;
                box-sizing: border-box;

                .name {
                  word-wrap: break-word;
                  font-size: 28rpx;
                  color: #323233;
                }
              }

              .active {
                border-left: 6rpx #ee0a24 solid;
                background-color: #fff;
              }
            }

            .right {
              flex: 1;

              .item {
                position: relative;
                padding: 20rpx;

                .type {
                  margin-bottom: 10rpx;
                  padding: 5rpx;
                  position: sticky;
                  top: 0;
                  background-color: #fff;
                }

                .item-list {
                  width: 100%;
                  display: grid;
                  grid-template-columns: 1fr 1fr 1fr;
                  grid-gap: 20rpx;
                  text-align: center;

                  .item-name {
                    color: #3a3a3a;
                    font-size: 26rpx;
                    margin-top: 10rpx;
                  }
                }

                .nodata{
                  padding: 20rpx;
                  color: #ccc;
                }
              }
            }
          }
2. 在列表渲染完成之后计算出每个分类的高度并且保存成一个数组
// 用到的data
data:{
// 分类列表
navData:[],
// 商品列表
goodslist:[],
// 左侧分类选中项 分类列表数组的下标
activeKey:0,
// 计算出的锚点的位置
heightList:[],
// 右侧子元素的锚点
selectedId: 'type0',
// 左侧分类的锚点
leftId:'left0',
// scroll-view 的高度
height:0
},
onShow() {
let Height = 0;
wx.getSystemInfo({
success: (res) => {
Height = res.windowHeight
}
})
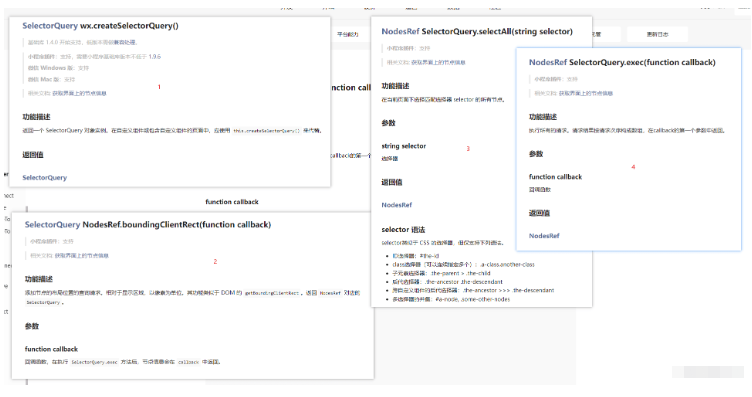
const query = wx.createSelectorQuery();
query.selectAll('.search').boundingClientRect()
query.exec((res) => {
// 计算滚动列表的高度 视口高度减去顶部高度 *2是因为拿到的是px 虽然也可以 但是我们通常使用的是rpx
this.setData({
height: (Height - res[0][0].height) * 2
})
})
},
//计算右侧每个锚点的高距离顶部的高
selectHeight() {
let h = 0;
const query = wx.createSelectorQuery();
query.exec((res) => {
console.log('res', res)
let arr=res[0].map((item,index)=>{
h+ = item.height
return h
})
this.setData({
heightList: arr,
})
console.log('height', this.data.heightList)
})
},使用到的相关API
3.监听scroll-view的滚动事件,通过滚动位置计算当前是哪个分类。
changeScroll(e) {
    // 获取距离顶部的距离
    let scrollTop = e.detail.scrollTop;
    // 当前分类选中项,分类列表下标
    let {activeKey,heightList} = this.data;
    // 防止超出分类              判断滚动距离是否超过当前分类距离顶部高度
    if (activeKey + 1 < heightList.length && scrollTop >= heightList[activeKey]) {
        this.setData({
            // 左侧分类选中项改变
            activeKey: activeKey + 1,
            // 左侧锚点对应位置
            leftId: `left${activeKey + 1}`
        })
    }
    if (activeKey - 1 >= 0 && scrollTop < heightList\[activeKey - 1]) {
        this.setData({
            activeKey: activeKey - 1,
            leftId: `left${activeKey - 1}`
        })
    }
},
4. 监听分类列表点击事件,点击分类跳转相应的分类商品列表
onChange(event) {
    let index = event.currentTarget.dataset.index
    this.setData({
      activeKey: index,
      selectId: "item" + index
    });
},
“微信小程序商城分类滚动列表锚点怎么实现”的内容就介绍到这里了,感谢大家的阅读。如果想了解更多行业相关的知识可以关注亿速云网站,小编将为大家输出更多高质量的实用文章!
免责声明:本站发布的内容(图片、视频和文字)以原创、转载和分享为主,文章观点不代表本网站立场,如果涉及侵权请联系站长邮箱:is@yisu.com进行举报,并提供相关证据,一经查实,将立刻删除涉嫌侵权内容。


