fabric.jsеӣҫеұӮеҠҹиғҪзӢ¬з«ӢжҳҫйҡҗгҖҒж·»еҠ гҖҒеҲ йҷӨгҖҒйў„и§ҲжҖҺд№Ҳе®һзҺ°
иҝҷзҜҮж–Үз« дё»иҰҒд»Ӣз»ҚвҖңfabric.jsеӣҫеұӮеҠҹиғҪзӢ¬з«ӢжҳҫйҡҗгҖҒж·»еҠ гҖҒеҲ йҷӨгҖҒйў„и§ҲжҖҺд№Ҳе®һзҺ°вҖқзҡ„зӣёе…ізҹҘиҜҶпјҢе°Ҹзј–йҖҡиҝҮе®һйҷ…жЎҲдҫӢеҗ‘еӨ§е®¶еұ•зӨәж“ҚдҪңиҝҮзЁӢпјҢж“ҚдҪңж–№жі•з®ҖеҚ•еҝ«жҚ·пјҢе®һз”ЁжҖ§ејәпјҢеёҢжңӣиҝҷзҜҮвҖңfabric.jsеӣҫеұӮеҠҹиғҪзӢ¬з«ӢжҳҫйҡҗгҖҒж·»еҠ гҖҒеҲ йҷӨгҖҒйў„и§ҲжҖҺд№Ҳе®һзҺ°вҖқж–Үз« иғҪеё®еҠ©еӨ§е®¶и§ЈеҶій—®йўҳгҖӮ
еҺҹзҗҶ
fabricжң¬иә«жңүжҸҗдҫӣgroupеҠҹиғҪпјҢжң¬ж„ҸжҳҜи®©дҪ е°Ҷз”»еёғдёҠзҡ„дёҖдәӣе…ғзҙ з»„еҗҲиө·жқҘпјҢиҝҷд№ҹе°ҶжҲҗдёәжң¬ж¬ЎеӣҫеұӮеҠҹиғҪзҡ„еҹәзЎҖ ж—ўд»ҘдёҖдёӘgroupд»ЈиЎЁдёҖдёӘеӣҫеұӮпјҢз”»еёғдёӢ第дёҖеұӮchildrenеҸӘжңүеӣҫеұӮ(group)пјҢиҖҢеңЁgroupдёӯпјҢжүҚжҳҜз”ЁжҲ·е®һйҷ…з»ҳеҲ¶зҡ„еҶ…е®№
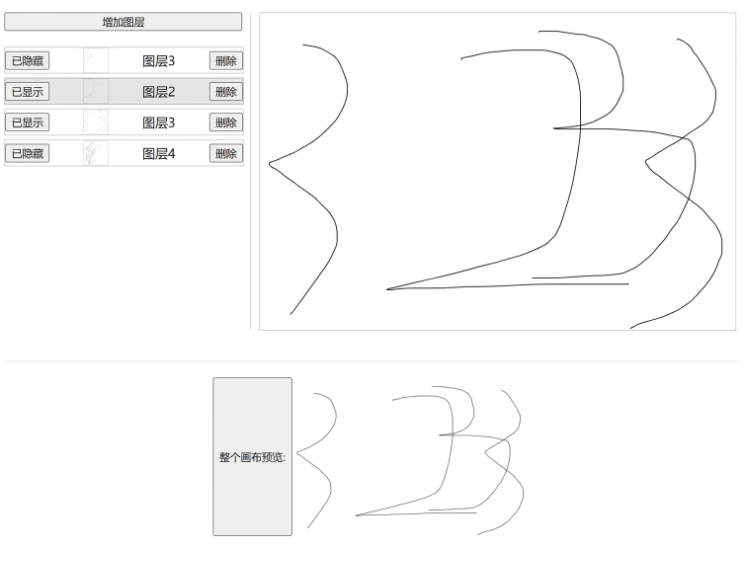
ж•Ҳжһңйў„и§Ҳ
жң¬ж¬Ўdemoе®һзҺ°пјҡ
з”ЁжҲ·еҸҜжүӢеҠЁж·»еҠ /еҲ йҷӨеӣҫеұӮ
еҸҜеҜ№жҜҸдёӘеӣҫеұӮиҝӣиЎҢзӢ¬з«Ӣжҳҫйҡҗж“ҚдҪңпјҢ并еҸҚйҰҲеҲ°з”»еёғдёӯ
еҸҜеҜ№жҜҸдёӘеӣҫеұӮеҚ•зӢ¬йў„и§Ҳ
ж•Ҳжһңеӣҫпјҡ
е°ҸTips
йҰ–е…ҲfabricжҳҜйңҖиҰҒеҲ°е®ҳж–№дёҠдёӢиҪҪзҡ„пјҢеңЁйҖүжӢ©дҪ йңҖиҰҒзҡ„жЁЎеқ—еҗҺеҶҚиҝӣиЎҢжү“еҢ…
иҷҪ然npmдёҠд№ҹеҸҜд»ҘдёӢиҪҪпјҢдҪҶйӮЈдёҚжҳҜе®ҳж–№зҡ„еҢ…пјҢжҳҜжңүзҪ‘еҸӢжү“еҢ…еҘҪд»ҘеҗҺдёҠдј зҡ„пјҢе…¶дёӯжІЎжңүеҢ…еҗ«ж©Ўзҡ®ж“ҰжЁЎеқ—пјҢеҫҲеҸҜиғҪдјҡдёҚз¬ҰеҗҲдҪ зҡ„йңҖжұӮ
жүҖд»ҘжҲ‘дёӘдәәе»әи®®дҪ еҸҜд»ҘиҮӘиЎҢеҺ»е®ҳзҪ‘дёҠжү“еҢ…пјҢ然еҗҺдј еҲ°дҪ зҡ„з§Ғжңүnpmеә“йҮҢпјҢ然еҗҺе°ұеҸҜд»ҘйҖҡиҝҮnpmжқҘз®ЎзҗҶдәҶ
fabricиҮӘе®ҡд№үжү“еҢ…дёӢиҪҪең°еқҖпјҡCustom Fabric build — Fabric.js Javascript Canvas Library (fabricjs.com)
fabricзҡ„дәӢ件ж–ҮжЎЈпјҡEvent inspector | Fabric.js Demos (fabricjs.com)
жҺҘдёӢжқҘзҡ„demoе°ҶдјҡйҖҡиҝҮзӣҙжҺҘеј•е…Ҙзҡ„ж–№ејҸжқҘдҪҝз”ЁfabricпјҢиҷҪ然жҲ‘е№іж—¶еҶҷйЎ№зӣ®йғҪжҳҜtsпјҢдҪҶз»ғжүӢdemoжҲ‘дёӘдәәе»әи®®иҝҳжҳҜjsпјҢй—®е°ұжҳҜзңҒдәӢ
е®Ңж•ҙд»Јз Ғ
зӣ®еҪ•пјҡ
fabric.jsеҚідёәе®ҳзҪ‘дёӢиҪҪзҡ„жҸ’件еҢ…пјҢиҝҷдёӘж–Ү件е°ұдёҚж”ҫдәҶпјҢеӨ§е®¶еҸҜд»ҘиҮӘиЎҢеҺ»е®ҳзҪ‘жү“еҢ…дёӢиҪҪ
index.htmlеҚіжң¬ж¬Ўзҡ„йЎөйқўпјҢдё»иҰҒиҙҹиҙЈdomзҡ„еӨ„зҗҶпјҢзӣҙжҺҘжү”жөҸи§ҲеҷЁиҝҗиЎҢе°ұеҸҜд»Ҙ
sketchpad.js жҳҜеҜ№fabricзҡ„дәҢж¬Ўе°ҒиЈ…пјҢеҗҢж—¶д№ҹйҒҝе…ҚеңЁhtmlдёӯеҶҷеӨӘеӨҡfabricеҠҹиғҪд»Јз Ғ
index.htmlд»Јз Ғ
<!DOCTYPE html>
<html lang="en">
<head>
<meta charset="UTF-8">
<meta http-equiv="X-UA-Compatible" content="IE=edge">
<meta name="viewport" content="width=device-width, initial-scale=1.0">
<title>Document</title>
<style>
.content {
display: flex;
}
.preview {
margin-top: 40px;
padding-top: 20px;
width: 100%;
display: flex;
justify-content: center;
border-top: 1px solid rgba(0,0,0,0.1);
}
.preview > img {
width: 300px;
height: 200px;
}
.layer-list {
width: 300px;
display: flex;
flex-direction: column;
padding-right: 10px;
margin-right: 10px;
box-sizing: content-box;
border-right: 1px solid rgba(0,0,0, 0.2);
}
.layer {
width: 300px;
display: flex;
justify-content: space-between;
align-items: center;
margin-bottom: 5px;
border: 1px solid rgba(0,0,0, 0.2);
}
.layer > img {
width: 30px;
height: 30px;
border: 1px solid rgba(0,0,0,0.1);
}
</style>
</head>
<body>
<div id="app">
<div class="content">
<!-- е·Ұдҫ§зҡ„еӣҫеұӮеҲ—иЎЁ -->
<div class="layer-list">
<button @click="addLayer">еўһеҠ еӣҫеұӮ</button>
<div @click="changeCurrentLayer(item.id)" class="layer" : v-for="item of layers" :key="item.id">
<button @click="changeVisible(item.id)">{{ item.show ? 'е·ІжҳҫзӨә' : 'е·Ійҡҗи—Ҹ'}}</button>
<img :src="item.data">
<span>{{ item.name }}</span>
<button @click="deleteLayer(item.id)">еҲ йҷӨ</button>
</div>
</div>
<!-- еҸідҫ§зҡ„з”»жқҝ -->
<div class="sketchpad-layout" >
<canvas id="sketchpad" width="600" height="400" ></canvas>
</div>
</div>
<!-- еҜ№ж•ҙеј з”»еёғиҝӣиЎҢеӣҫзүҮйў„и§Ҳ -->
<div class="preview">
<button @click="updatePreview">ж•ҙдёӘз”»еёғйў„и§Ҳ:</button>
<img :src="preview">
</div>
</div>
<!-- дҪҝз”Ёvue3жқҘиҝӣиЎҢuiзҡ„жёІжҹ“пјҢжҮ’еҫ—ж“ҚдҪңdomдәҶ -->
<script src="https://unpkg.com/vue@3/dist/vue.global.js"></script>
<!-- жү“еҢ…еҘҪзҡ„fabricж–Ү件 -->
<script src="./fabric.js"></script>
<!-- sketchpadйҮҢйқўе°ұжҳҜе°Ҷfabricе°ҒиЈ…дәҶдёҖеұӮ -->
<script src="./sketchpad.js"></script>
<script>
const { createApp } = Vue
/** еҚ•жқЎзҡ„ж•°жҚ®зұ»еһӢе®ҡд№ү */
const LayerData = {
/** з”ЁдәҺжҳҫзӨәзҡ„еҗҚз§° */
name: 'еӣҫеұӮеҗҚз§°',
/** еӣҫеұӮзҡ„idпјҢд№ҹз”ЁдәҺз®ЎзҗҶеӣҫеұӮ */
id: '1111',
/** еӣҫеұӮзҡ„жҳҫзӨәзҠ¶жҖҒ */
show: true,
/** еӣҫеұӮзҡ„ж•°жҚ®пјҢз”ЁдәҺжҳҫзӨәйў„и§Ҳеӣҫ */
data: '',
}
createApp({
data() {
return {
layers: [],// еӣҫеұӮж•°з»„пјҢж–№дҫҝз®ЎзҗҶ
sketchpad: null,// з”»жқҝ
currentLayer: '',// еҪ“еүҚеӣҫеұӮзҡ„id
preview: '',// йў„и§Ҳеӣҫзҡ„base64ж•°жҚ®
}
},
methods: {
/**
* ж”№еҸҳеӣҫеұӮзҡ„жҳҫзӨә/йҡҗи—Ҹ
* @param id еӣҫеұӮзҡ„id
*/
changeVisible(id) {
const index = this.layers.findIndex(v => v.id === id);
if (index > -1) {
this.layers[index].show = !this.layers[index].show;
}
this.sketchpad.changeLayerVisible(id)
},
/**
* еҲ йҷӨеӣҫеұӮ
* @param id еӣҫеұӮзҡ„id
*/
deleteLayer(id) {
const index = this.layers.findIndex(v => v.id === id);
if (index > -1) {
this.layers.splice(index, 1)
this.sketchpad.deleteLayer(id)
}
},
/**
* еўһеҠ еӣҫеұӮ
*/
addLayer() {
const item = {
...LayerData
}
item.id = new Date().getTime()
item.name = `еӣҫеұӮ${this.layers.length + 1}`
this.layers.push(item)
this.sketchpad.addLayer(item.id)
this.changeCurrentLayer(item.id)
},
/** йҖүжӢ©еҪ“еүҚиҰҒж“ҚдҪңзҡ„еӣҫеұӮ */
changeCurrentLayer(id) {
this.currentLayer = id
this.sketchpad.changeCurrentLayer(id)
},
/**
* жӣҙж–°йў„и§Ҳеӣҫ
*/
updatePreview() {
this.preview = this.sketchpad.getImage()
},
/** еӣҫеұӮж•°жҚ®жӣҙж–°зҡ„еӣһи°ғ */
onChangeData(id, data) {
const index = this.layers.findIndex(v => v.id === id);
if (index > -1) {
this.layers[index].data = data;
}
}
},
mounted() {
this.sketchpad = new Sketchpad('sketchpad', {
change: this.onChangeData
});
this.addLayer()
}
}).mount('#app')
</script>
</body>
</html>sketchpad.jsд»Јз Ғ
console.log('Sketchpad load');
class Sketchpad {
/** fabricе®һдҫӢ */
instance = null;
/** еҪ“еүҚжүҖеңЁеӣҫеұӮзҡ„id */
currentLayer = '';
/** з”»еёғе®ҪеәҰ */
width = 600;
/** з”»еёғй«ҳеәҰ */
height = 600
/** дәӢ件订йҳ… */
listeners = {
/**
* еӣҫеұӮеҶ…е®№еҸҳеҢ–ж—¶зҡ„еӣһи°ғ
* @param {string} id еӣҫеұӮid
* @param {base64} data еӣҫеұӮеҶ…е®№зҡ„base64ж јејҸ
*/
change: (id, data) => {}
}
constructor(id, listeners) {
this.instance = new fabric.Canvas(id);
this.width = this.instance.width;
this.height = this.instance.height;
this.instance.isDrawingMode = true;
this.listeners.change = listeners.change
this.instance.on('object:added', ((options) => {
if (options.target.type === 'group') return;
const groups = this.instance.getObjects()
groups.forEach(v => {
if (v.layerId === this.currentLayer && v.type === 'group') {
v.addWithUpdate(options.target);
this.instance.remove(options.target);
this.listeners.change(v.layerId, v.toDataURL({
width: this.width,
height: this.height
}))
}
})
}))
console.log('Sketchpad init')
}
/** ж·»еҠ еӣҫеұӮ */
addLayer(id) {
const group = new fabric.Group([], {
width: this.width,
height: this.width,
});
// еңЁиҝҷйҮҢеўһеҠ дёҖдёӘиҮӘе®ҡд№үеұһжҖ§ layerId пјҢз”ЁдәҺеҢәеҲҶеӣҫеұӮ
group.layerId = id
this.instance.add(group)
this.currentLayer = id;
this.listeners.change(id, group.toDataURL({
width: this.width,
height: this.height
}))
}
/** ж”№еҸҳеӣҫеұӮзҡ„жҳҫзӨә/йҡҗи—Ҹ */
changeLayerVisible(id) {
const groups = this.instance.getObjects()
groups.forEach(v => {
if (v.layerId === id && v.type === 'group') {
v.visible = !v.visible;
this.instance.renderAll() // еҲ·ж–°з”»еёғпјҢж”№еҸҳgroupзҡ„visibleеұһжҖ§пјҢеҝ…йЎ»йҖҡиҝҮеҲ·ж–°з”»еёғпјҢжүҚиғҪеә”з”Ёж–°еұһжҖ§еҖј
}
})
}
/** йҖүжӢ©иҰҒж“ҚдҪңзҡ„еӣҫеұӮ */
changeCurrentLayer(id) {
this.currentLayer = id
}
/** еҲ йҷӨеӣҫеұӮ */
deleteLayer(id) {
const groups = this.instance.getObjects()
groups.forEach(v => {
if (v.layerId === id && v.type === 'group') {
this.instance.remove(v)
this.instance.renderAll() // еҲ·ж–°з”»еёғ
}
})
}
/** иҺ·еҸ–з”»еёғж•°жҚ®пјҢд»Ҙimgж ҮзӯҫеҸҜд»ҘиҜҶеҲ«зҡ„base64ж јејҸ */
getImage() {
return this.instance.toDataURL()
}
}е°Ҷд»ҘдёҠиҝҷдёӨдёӘж–Ү件代з ҒзӣҙжҺҘеӨҚеҲ¶зІҳиҙҙеҲ°зј–иҫ‘еҷЁйҮҢпјҢ然еҗҺеҶҚеҺ»жү“еҢ…дёӘfabric.jsд№ҹж”ҫиҝӣзј–иҫ‘еҷЁйҮҢпјҢе°ұеҸҜд»ҘиҝҗиЎҢе•Ұ
е…ідәҺвҖңfabric.jsеӣҫеұӮеҠҹиғҪзӢ¬з«ӢжҳҫйҡҗгҖҒж·»еҠ гҖҒеҲ йҷӨгҖҒйў„и§ҲжҖҺд№Ҳе®һзҺ°вҖқзҡ„еҶ…е®№е°ұд»Ӣз»ҚеҲ°иҝҷйҮҢдәҶпјҢж„ҹи°ўеӨ§е®¶зҡ„йҳ…иҜ»гҖӮеҰӮжһңжғідәҶи§ЈжӣҙеӨҡиЎҢдёҡзӣёе…ізҡ„зҹҘиҜҶпјҢеҸҜд»Ҙе…іжіЁдәҝйҖҹдә‘иЎҢдёҡиө„и®Ҝйў‘йҒ“пјҢе°Ҹзј–жҜҸеӨ©йғҪдјҡдёәеӨ§е®¶жӣҙж–°дёҚеҗҢзҡ„зҹҘиҜҶзӮ№гҖӮ


