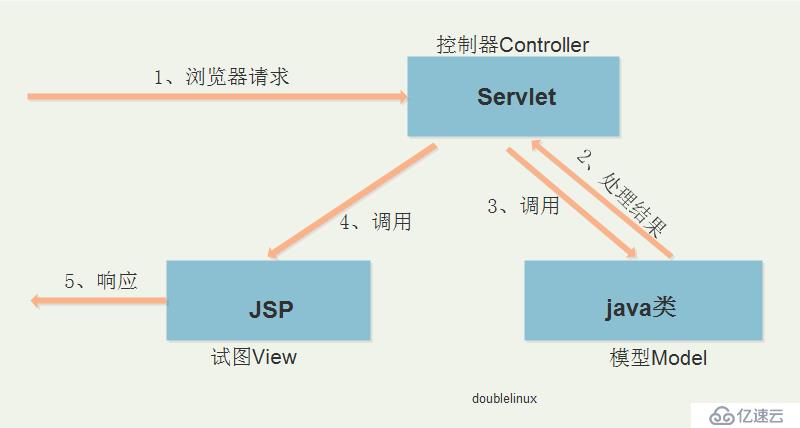
1、MVC
2、SpringMVC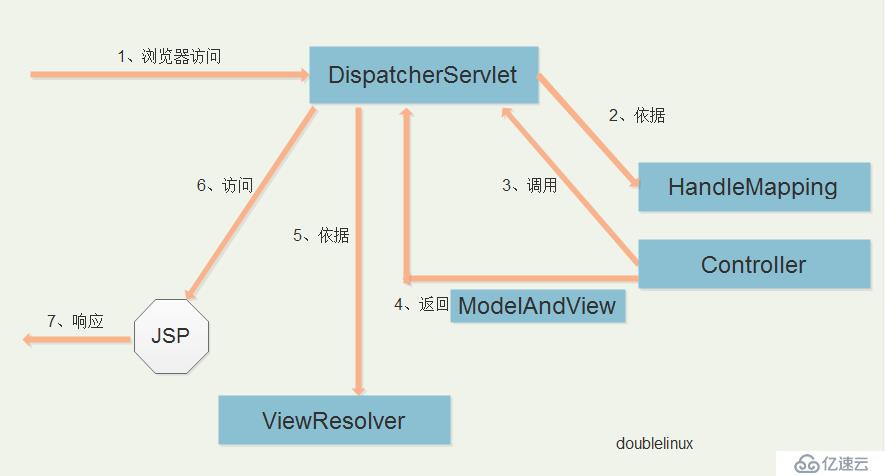
1、导包;
2、添加spring的配置文件;
3、配置DispatcherServlet(与web.xml中配置);
4、写Controller(处理器);
5、写JSP;
1、导包
使用maven导包,在maven配置文件pom.xml配置如下(使用阿里云的mavev):
<project xmlns="http://maven.apache.org/POM/4.0.0" xmlns:xsi="http://www.w3.org/2001/XMLSchema-instance" xsi:schemaLocation="http://maven.apache.org/POM/4.0.0 http://maven.apache.org/xsd/maven-4.0.0.xsd">
    <modelVersion>4.0.0</modelVersion>
    <groupId>cn.qiuuuu</groupId>
    <artifactId>springmvc</artifactId>
    <version>0.0.1-SNAPSHOT</version>
    <packaging>war</packaging>
    <dependencies>
        <dependency>
        <groupId>junit</groupId>
        <artifactId>junit</artifactId>
        <version>4.10</version>
        <scope>test</scope>
        </dependency>
        <dependency>
        <groupId>org.statefulj.framework</groupId>
        <artifactId>statefulj-framework-binders-springmvc</artifactId>
        <version>2.1</version>
        <classifier>javadoc</classifier>
    </dependency>
    </dependencies>
</project>
导包完成后,会在Maven Dependencies中多出maven基础依赖包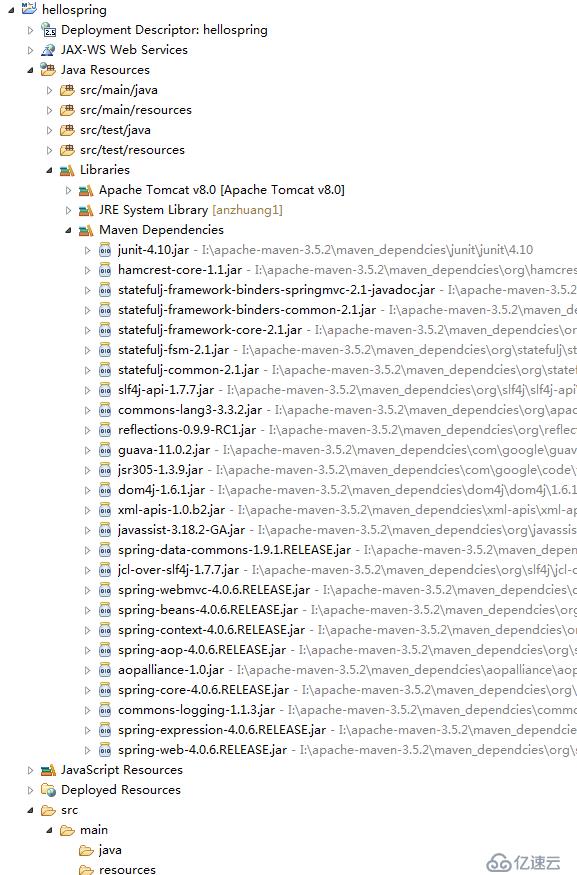
2、添加spring配置文件
在项目的src/main/resources中新建一个xml文件来作为spring的配置文件,命名为:spring.xml,写入:
<?xml version="1.0" encoding="UTF-8"?>
<beans xmlns="http://www.springframework.org/schema/beans" xmlns:xsi="http://www.w3.org/2001/XMLSchema-instance"
    xmlns:context="http://www.springframework.org/schema/context" xmlns:util="http://www.springframework.org/schema/util"
    xmlns:jee="http://www.springframework.org/schema/jee" xmlns:tx="http://www.springframework.org/schema/tx"
    xmlns:jpa="http://www.springframework.org/schema/data/jpa" xmlns:mvc="http://www.springframework.org/schema/mvc"
    xsi:schemaLocation="
        http://www.springframework.org/schema/beans http://www.springframework.org/schema/beans/spring-beans-3.2.xsd
        http://www.springframework.org/schema/context http://www.springframework.org/schema/context/spring-context-3.2.xsd
        http://www.springframework.org/schema/util http://www.springframework.org/schema/util/spring-util-3.2.xsd
        http://www.springframework.org/schema/jee http://www.springframework.org/schema/jee/spring-jee-3.2.xsd
        http://www.springframework.org/schema/tx http://www.springframework.org/schema/tx/spring-tx-3.2.xsd
        http://www.springframework.org/schema/data/jpa http://www.springframework.org/schema/data/jpa/spring-jpa-1.3.xsd
        http://www.springframework.org/schema/mvc http://www.springframework.org/schema/mvc/spring-mvc-3.2.xsd">

</beans>
3、配置DispatcherServlet
在项目的web.xml中配置一个servlet:
<?xml version="1.0" encoding="UTF-8"?>
<web-app xmlns:xsi="http://www.w3.org/2001/XMLSchema-instance" xmlns="http://java.sun.com/xml/ns/javaee" xsi:schemaLocation="http://java.sun.com/xml/ns/javaee http://java.sun.com/xml/ns/javaee/web-app_2_5.xsd" version="2.5">
    <display-name>springmvc</display-name>
    <welcome-file-list>
        <welcome-file>index.html</welcome-file>
        <welcome-file>index.htm</welcome-file>
        <welcome-file>index.jsp</welcome-file>
        <welcome-file>default.html</welcome-file>
        <welcome-file>default.htm</welcome-file>
        <welcome-file>default.jsp</welcome-file>
    </welcome-file-list>
    <servlet>
        <servlet-name>springmvc</servlet-name>
        <servlet-class>
            org.springframework.web.servlet.DispatcherServlet
        </servlet-class>
        <!-- DispatcherServlet在初始化方法里面会读取该初始化参数的值来获得
                 spring配置文件的位置 ,然后启动spring容器。 -->
        <init-param>
            <param-name>contextConfigLocation</param-name>
            <param-value>classpath:springmvc.xml</param-value>
        </init-param>
        <load-on-startup>1</load-on-startup>
    </servlet>
    <servlet-mapping>
        <servlet-name>springmvc</servlet-name>
        <url-pattern>*.do</url-pattern>
    </servlet-mapping>
</web-app>
4、写Controller
package test;

import javax.servlet.http.HttpServletRequest;
import javax.servlet.http.HttpServletResponse;

import org.springframework.web.servlet.ModelAndView;
import org.springframework.web.servlet.mvc.Controller;

public class ControllerHello implements Controller{

    public ModelAndView handleRequest(HttpServletRequest arg0, HttpServletResponse arg1) throws Exception {
        System.out.println("handleRequest()");
        return new ModelAndView("hello");
    }

}
5、写一个JSP
<%@ page language="java" contentType="text/html; charset=utf-8"
        pageEncoding="utf-8"%>
<!DOCTYPE html PUBLIC "-//W3C//DTD HTML 4.01 Transitional//EN" "http://www.w3.org/TR/html4/loose.dtd">
<html>
<head>
    <meta http-equiv="Content-Type" content="text/html; charset=utf-8">
    <title>Insert title here</title>
</head>
<body>
    <h2>Hello SpringMVC!</h2>
</body>
</html>
6、再次配置spring.xml
<?xml version="1.0" encoding="UTF-8"?>
<beans xmlns="http://www.springframework.org/schema/beans" xmlns:xsi="http://www.w3.org/2001/XMLSchema-instance"
    xmlns:context="http://www.springframework.org/schema/context" xmlns:util="http://www.springframework.org/schema/util"
    xmlns:jee="http://www.springframework.org/schema/jee" xmlns:tx="http://www.springframework.org/schema/tx"
    xmlns:jpa="http://www.springframework.org/schema/data/jpa" xmlns:mvc="http://www.springframework.org/schema/mvc"
    xsi:schemaLocation="
        http://www.springframework.org/schema/beans http://www.springframework.org/schema/beans/spring-beans-3.2.xsd
        http://www.springframework.org/schema/context http://www.springframework.org/schema/context/spring-context-3.2.xsd
        http://www.springframework.org/schema/util http://www.springframework.org/schema/util/spring-util-3.2.xsd
        http://www.springframework.org/schema/jee http://www.springframework.org/schema/jee/spring-jee-3.2.xsd
        http://www.springframework.org/schema/tx http://www.springframework.org/schema/tx/spring-tx-3.2.xsd
        http://www.springframework.org/schema/data/jpa http://www.springframework.org/schema/data/jpa/spring-jpa-1.3.xsd
        http://www.springframework.org/schema/mvc http://www.springframework.org/schema/mvc/spring-mvc-3.2.xsd">
    <!--  配置HandlerMapping -->
    <bean class="org.springframework.web.servlet.handler.SimpleUrlHandlerMapping">
        <property name="mappings">
            <props>
                <prop key="/hello.do">helloController</prop>
            </props>
        </property>
    </bean>
    <!-- HelloController -->
    <!-- 配置处理器 -->
    <bean id="helloController" class="test.ControllerHello">
    </bean>
    <!-- ViewResovler -->
    <!-- 配置试图解析器 -->
    <bean class="org.springframework.web.servlet.view.InternalResourceViewResolver">
        <property name="prefix" value="./WEB-INF/"></property>
        <property name="suffix" value=".jsp"></property>
    </bean>
</beans>将springhello部署到tongcat服务器,然后在浏览器中输入http://localhost:8089/hellospring/hello.do 访问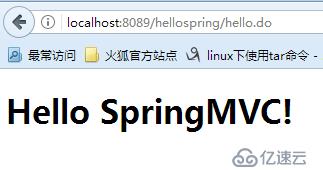
免责声明:本站发布的内容(图片、视频和文字)以原创、转载和分享为主,文章观点不代表本网站立场,如果涉及侵权请联系站长邮箱:is@yisu.com进行举报,并提供相关证据,一经查实,将立刻删除涉嫌侵权内容。


