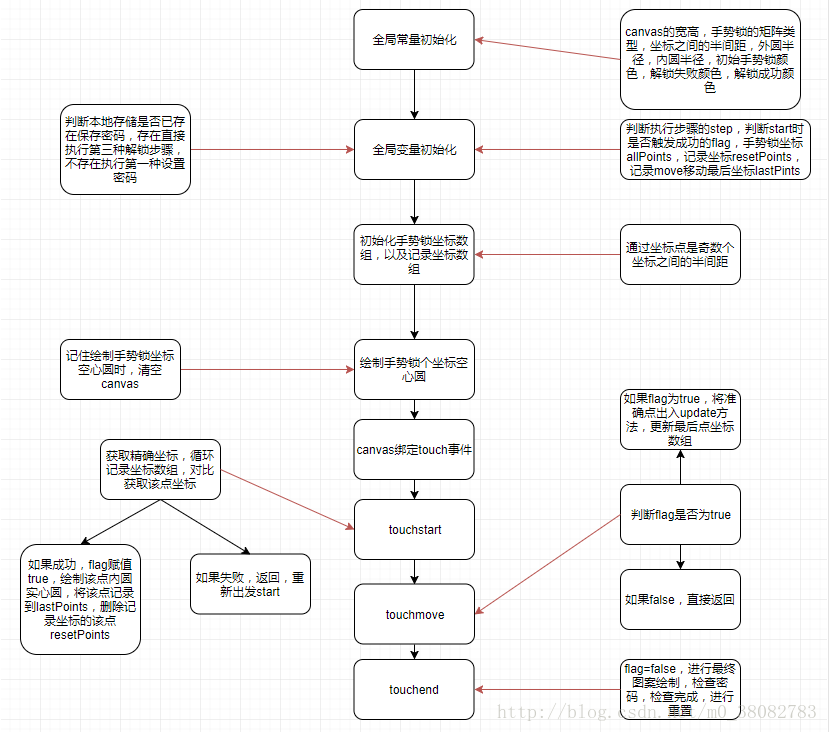
设计思路流程图
1、全局常量
constructor(page,opts){
  // 初始化全局常量数据
  this.page = page;
  this.width = opts.width || 300;
  this.height = opts.height || 300;
  this.canvasId = opts.canvasId || 'lock';
  this.type = opts.type || 3;
  this.cleColor = opts.cleColor || 'rgba(0,136,204,1)';
  this.size = this.width / this.type / 2;//坐标点之间的半间距
  this.R = this.size / 2;//外圆半径
  this.r = this.size / 4;//內圆半径
  // 判断是否在缓存中存在密码,如果存在,直接进行第二步骤:解码,如果不存在,进行初始化,设置密码
  this.pswObj = wx.getStorageSync('password') ? {
   step: 2,
   password: JSON.parse(wx.getStorageSync('password'))
  } : { step: 0 };
  // 启动手势锁初始化
  this.init();
 }
2、全局变量
init(){
  const _this = this;
  // 定义全局变量,标记start,手势锁的每个坐标的中心点数组,记录选中数组
  _this.flag = false;
  _this.locationArr = [];
  _this.lastPoint = [];
  _this.restPoint = [];
  // 设置canvas的宽高
  _this.page.setData({
   width : _this.width,
   height : _this.height
  });
  this.ctx = wx.createCanvasContext(this.canvasId, this);
  // 初始化中心坐标数组
  this.location();
  // 初始化绘制图形圆
  this.drawPo();
  // 初始化绑定事件
  this.bindEvent();
 }
3、初始化坐标数组locationArr 和restPoint
location(){
  // 计算坐标的x,y坐标,同时记录当前位置代表的数
  let count = 0,arr = [],arr0 = [];
  for(let i = 0; i < this.type; i++){
   for(let j = 0 ; j < this.type; j++){
    count++;
    arr.push({
     x: this.size * ((j + 1) * 2 - 1),//奇数个坐标间半间距
     y: this.size * ((i + 1) * 2 - 1),//奇数个坐标间半间距
     count: count//每个坐标代表的数
    });
    arr0.push({
     x: this.size * ((j + 1) * 2 - 1),//奇数个坐标间半间距
     y: this.size * ((i + 1) * 2 - 1),//奇数个坐标间半间距
     count: count//每个坐标代表的数
    });
   }
  }
  this.locationArr = arr;
  this.restPoint = arr0;
 }
4、绘制手势锁矩阵
绘制圆函数(bool值判断当前绘制的是空心还是实心)
drawCle(x, y, r, bool){
  // 设置边框颜色。
  bool ? this.ctx.setStrokeStyle(this.cleColor) : this.ctx.setFillStyle(this.cleColor);; // 注意用set
  // 设置线条的宽度。
  this.ctx.setLineWidth(2); // 注意用set
  // 开始创建一个路径,需要调用fill或者stroke才会使用路径进行填充或描边。
  this.ctx.beginPath();
  // 画一条弧线。
  this.ctx.arc(x, y, r, 0, Math.PI * 2, true);
  // 关闭一个路径
  this.ctx.closePath();
  // 画出当前路径的边框。默认颜色色为黑色。
  bool ? this.ctx.stroke():this.ctx.fill();
  // 将之前在绘图上下文中的描述(路径、变形、样式)画到 canvas 中。
  this.ctx.draw(true);
 }
矩阵绘制
drawPo(){
  // 绘制空心圆,绘制之前,清空canvas,防止重复绘制
  this.ctx.clearRect(0, 0, this.width, this.height);
  this.locationArr.forEach(current => {
   this.drawCle(current.x, current.y, this.R, true);
  });
 }
5、触发move时线的绘制函数
drawLine(po) {// 解锁轨迹
  this.ctx.beginPath();
  // 线宽
  this.ctx.lineWidth = 3;
  // 起始点
  this.ctx.moveTo(this.lastPoint[0].x, this.lastPoint[0].y);
  // 中间转换的点
  for (var i = 1; i < this.lastPoint.length; i++) {
   this.ctx.lineTo(this.lastPoint[i].x, this.lastPoint[i].y);
  }
  // 正在移动选择的点
  if (po) { this.ctx.lineTo(po.x, po.y);}
  this.ctx.stroke();
  this.ctx.closePath();
  this.ctx.draw(true);
 }
6、获取当前位置的坐标点函数
getPosition(e) { // 获取touch点相对于canvas的坐标
 return {
  x: e.touches[0].x,
  y: e.touches[0].y
 };
}
7、触发touchstart事件处理
_this.page.onTouchStart = function(e){
 let po = _this.getPosition(e);//获取当前准确坐标
 for (let [key,val] of _this.locationArr.entries()){//循环对比最近的坐标
  if (Math.abs(val.x - po.x) < _this.r && Math.abs(val.y - po.y) < _this.r){
   _this.flag = true;//进入判断,触发touchstart事件成功
   _this.drawCle(val.x, val.y, _this.r, false);//绘制该点的实心内圆
   _this.lastPoint.push(val);//记录该点坐标到lastPoint
   _this.restPoint.splice(key,1);//删除记录数组restPoint的该点坐标
   break;//找到坐标,跳出循环
  }
 }
}
8、触发touchmove事件处理
_this.page.onTouchMove = function (e) {
 _this.flag && _this.updata(_this.getPosition(e));
}
判断是否触发touchstart,如果触发,执行updata函数。
更新最后点坐标函数
updata(po){
  //清空canvas
  this.ctx.clearRect(0, 0, this.width, this.height);
  //重新绘制矩阵
  for (let val of this.locationArr) {
   this.drawCle(val.x, val.y, this.R, true);
  }
  //绘制已记录坐标的实心圆
  for (let val of this.lastPoint) {
   this.drawCle(val.x, val.y, this.r ,false);
  }
  //绘制解锁路线
  this.drawLine(po);
  //找到移动中的还未落点的精确坐标
  for (let [key, val] of this.restPoint.entries()) {
   if (Math.abs(po.x - val.x) < this.r && Math.abs(po.y - val.y) < this.r) {
    this.drawCle(val.x, val.y, this.r, false);
    this.lastPoint.push(val);
    this.restPoint.splice(key, 1);
    break;
   }
  }
 }
9、触发touchend事件处理
_this.page.onTouchEnd = function (e) {
 if(_this.flag){
  _this.flag = false;
  _this.endData();
  _this.checkPassword(_this.lastPoint);
  setTimeout(function () {
   _this.reset();
  }, 500);
 }
}
通过流程图,可以更加清楚的认识到做一个功能需要创建的变量和函数,流程步骤更加清楚,当然也需要制作的过程进行优化。建议制作一些大的功能的时候,如果流程不清楚,最好绘制流程图,思路清晰,开发更快,考虑更周全。
总结
以上所述是小编给大家介绍的微信小程序实现之手势锁详解,希望对大家有所帮助,如果大家有任何疑问请给我留言,小编会及时回复大家的。在此也非常感谢大家对亿速云网站的支持!
免责声明:本站发布的内容(图片、视频和文字)以原创、转载和分享为主,文章观点不代表本网站立场,如果涉及侵权请联系站长邮箱:is@yisu.com进行举报,并提供相关证据,一经查实,将立刻删除涉嫌侵权内容。


