实现MySQL读写分离
部署集群基础环境
1 实现MySQL读写分离
1.1 问题
本案例要求配置2台MySQL服务器+1台代理服务器,实现MySQL代理的读写分离:
用户只需要访问MySQL代理服务器,而实际的SQL查询、写入操作交给后台的2台MySQL服务器来完成
其中Master服务器允许SQL查询、写入,Slave服务器只允许SQL查询
1.2 方案
使用4台RHEL 7.2虚拟机,如图-1所示。其中192.168.4.10、192.168.4.20分别作为MySQL主、从服务器,是整个服务的后端;另一台192.168.4.100作为MySQL代理服务器,是直接面向客户的服务前端;客户机192.168.4.120用作访问测试。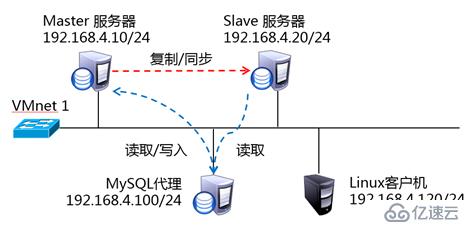
图-1
对比两种方式的读写分离效果——
MySQL主从复制:客户机访问Master服务器来写数据库,客户机访问Slave服务器来读数据库。这种情况下,需要客户端自行区分向何处写、从何处读。
MySQL主从复制+代理:客户机访问Proxy服务器,读、写请求交给Proxy识别,如果是写数据库操作则交给Master,如果是读数据库操作则交给Slave处理,具体由分配策略控制。这种情况下,无需客户端区分读、写目标,而是由Proxy服务器代劳了,从而降低了客户端程序的复杂度。
其中MySQL主、从复制结构的搭建参考前面的课程,这里不再赘述。
1.3 步骤
实现此案例需要按照如下步骤进行。
步骤一:部署mysql-proxy代理服务器
1)安装mariadb官方提供的maxscale软件包
[root@bogon ~]# rpm -ivh maxscale-2.1.2-1.rhel.7.x86_64.rpm 修改配置文件:
[root@pxysvr pub]# [root@bogon ~]# grep -E -v '^#' /etc/maxscale.cnf
[maxscale]
threads=1
[server1]  #指定ip地址对应的名字
type=server
address=192.168.4.10  #主数据库服务器ip地址
port=3306
protocol=MySQLBackend
[server2] #指定ip地址对应的名字
type=server
address=192.168.4.20  #从数据库服务器ip地址
port=3306
protocol=MySQLBackend
[MySQL Monitor] #指定要监控的主机 和监控时连接的用户
type=monitor
module=mysqlmon
servers=server1, server2 #前边定义的主机名
user=scalemon    # 用户名
passwd=111111    # 密码
monitor_interval=10000
#[Read-Only Service]
#type=service
#router=readconnroute
#servers=server1
#user=myuser
#passwd=mypwd
#router_options=slave
[Read-Write Service] #定义服务器列表
type=service
router=readwritesplit
servers=server1, server2 #前边定义的主机名
user=maxscale    # 用户名
passwd=111111   # 密码
max_slave_connections=100%
[MaxAdmin Service]
type=service
router=cli
#[Read-Only Listener]
#type=listener
#service=Read-Only Service
#protocol=MySQLClient
#port=4008
[Read-Write Listener]
type=listener
service=Read-Write Service
protocol=MySQLClient
port=4006
[MaxAdmin Listener]
type=listener
service=MaxAdmin Service
protocol=maxscaled
socket=default
[root@bogon ~]#
分别在主、从数据库服务器上添加授权用户(只在主服务器授权即可 从服务器会自动同步):
[root@pxysvr pub]# mysql> grant replication slave, replication client on *.* to scalemon@'%'  identified by “111111”;  //创建监控用户
mysql> grant select on mysql.* to maxscale@'%' identified by “111111”;  //创建路由用户
mysql> grant all  on *.*  to  student@'%' identified by “111111”;
//创建客户端访问用户
2)启动maxscale服务
[root@bogon ~]# maxscale --config=/etc/maxscale.cnf
[root@bogon ~]# netstat -utnalp | grep maxscale
tcp        0      0 192.168.4.100:58960     192.168.4.10:3306      ESTABLISHED 19081/maxscale
tcp        0      0 192.168.4.100:43508     192.168.4.20:3306      ESTABLISHED 19081/maxscale
tcp6       0      0 :::4006                 :::*                    LISTEN      19081/maxscale
[root@bogon ~]# kill -9 19081        //通过杀进程的方式停止服务
步骤二:测试配置
1)在客户端192.168.4.120上使用上边授权用户student 连接代理服务器192.168.4.100:
[root@bogon ~]# mysql -h292.168.4.100 -P4006 -ustudent  -p111111
MySQL [(none)]> select  @@hostname; //显示当前访问的主机
+----------------+
| @@hostname      |
+----------------+
| slave20         |   //显示的是从服务器的主机名
+----------------+
Query OK, 0 rows affected (0.00 sec)
MySQL [(none)]> insert  into bbsdb.a values(111);//插入新纪录
客户端当前访问的是从数据库服务器,仍然能够插入纪录。表示成功。
2 部署集群基础环境
2.1 问题
本案例要求为MySQL集群准备基础环境,完成以下任务操作:
数据库授权
部署MySQL双主多从结构
配置本机hosts解析记录
2.2 方案
使用4台RHEL 6虚拟机,如图-1所示。其中192.168.4.10、192.168.4.11作为MySQL双主服务器,192.168.4.12、192.168.4.13作为主服务器的从服务器。
图-1
2.3 步骤
实现此案例需要按照如下步骤进行。
步骤一:准备环境
[root@master1 ~]# cat /etc/hosts
127.0.0.1   localhost localhost.localdomain localhost4 localhost4.localdomain4
::1         localhost localhost.localdomain localhost6 localhost6.localdomain6
192.168.4.10     master1         master1.tarena.com
192.168.4.11     master2         master2.tarena.com
192.168.4.12     slave1            slave1.tarena.com
192.168.4.13     slave2            slave2.tarena.com
192.168.4.100   master1         master1.tarena.com
[root@master1 ~]# ping -c 2 master1
PING master1 (192.168.4.10) 56(84) bytes of data.
64 bytes from master1 (192.168.4.10): icmp_seq=1 ttl=64 time=0.378 ms
64 bytes from master1 (192.168.4.10): icmp_seq=2 ttl=64 time=0.396 ms
--- master1 ping statistics ---
2 packets transmitted, 2 received, 0% packet loss, time 1001ms
rtt min/avg/max/mdev = 0.378/0.387/0.396/0.009 ms
[root@master1 ~]#
步骤二:部署数据库主机
1)安装启动数据库(4台数据库主机master1,master2,slave1,slave2执行以下操作)
[root@master1 ~]# tar xvf MySQL-5.6.15-1.el6.x86_64.rpm-bundle.tar    //解压软件包
.. ..
[root@master1 ~]# rpm -Uvh MySQL-*.rpm                                //安装MySQL
.. ..
[root@master1 ~]# service mysql start
Starting MySQL.                                            [确定]
2)初始化配置数据库(4台数据库主机master1,master2,slave1,slave2执行以下操作)
[root@master1 ~]# cat /root/.mysql_secret         //查看随机生成密码
# The random password set for the root user at Thu May  7 22:15:47 2015 (local time): wW1BNAjD
[root@master1 ~]# mysql -uroot -pwW1BNAjD        //使用随机生成密码登陆
Warning: Using a password on the command line interface can be insecure.
Welcome to the MySQL monitor.  Commands end with ; or \g.
Your MySQL connection id is 1
Server version: 5.6.15
Copyright (c) 2000, 2013, Oracle and/or its affiliates. All rights reserved.
Oracle is a registered trademark of Oracle Corporation and/or its
affiliates. Other names may be trademarks of their respective
owners.
Type 'help;' or '\h' for help. Type '\c' to clear the current input statement.
mysql> set password=password("pwd123");          //修改数据库root密码
Query OK, 0 rows affected (0.49 sec)
mysql> exit
Bye
[root@master1 ~]#
步骤三:部署双主多从结构
1)数据库授权(4台数据库主机master1,master2,slave1,slave2执行以下操作)
部署主从同步只需要授权一个主从同步用户即可,但是我们要部署MySQL-MMM架构,所以在这里我们将MySQL-MMM所需用户一并进行授权设置。再授权一个测试用户,在架构搭建完成时测试使用。
[root@master1 ~]# mysql -uroot -ppwd123
Warning: Using a password on the command line interface can be insecure.
Welcome to the MySQL monitor.  Commands end with ; or \g.
Your MySQL connection id is 2
Server version: 5.6.15 MySQL Community Server (GPL)
Copyright (c) 2000, 2013, Oracle and/or its affiliates. All rights reserved.
Oracle is a registered trademark of Oracle Corporation and/or its
affiliates. Other names may be trademarks of their respective
owners.
Type 'help;' or '\h' for help. Type '\c' to clear the current input statement.
数据库授权部分为了方便试验我们直接允许所有地址访问了,真实环境需谨慎
mysql> grant   replication  slave  on  *.*  to  slaveuser@"%" identified by  "pwd123";                                //主从同步授权
Query OK, 0 rows affected (0.00 sec)
mysql> grant  replication  client  on *.*  to  monitor@"%" identified by "monitor";                                         //MMM所需架构用户授权
Query OK, 0 rows affected (0.06 sec)
mysql> grant  replication client,process,super   on *.*  to  agent@"%" identified by "agent";                                 //MMM所需架构用户授权
Query OK, 0 rows affected (0.00 sec)
mysql> grant  all  on *.*  to  root@"%" identified by "pwd123";  //测试用户授权
Query OK, 0 rows affected (0.00 sec)
mysql>
2)开启主数据库binlog日志、设置server_id(master1,master2)
master1设置:
[root@master1 ~]# cat /etc/my.cnf
[mysqld]
datadir=/var/lib/mysql
socket=/var/lib/mysql/mysql.sock
user=mysql
server_id=10                        //设置server_id,该值集群中不可以重复
log-bin                            //开启bin-log日志
# Disabling symbolic-links is recommended to prevent assorted security risks
symbolic-links=0
[mysqld_safe]
log-error=/var/log/mysqld.log
pid-file=/var/run/mysqld/mysqld.pid
[root@master1 ~]# service mysql restart                //重启MySQL服务
Shutting down MySQL..                                      [确定]
Starting MySQL..                                           [确定]
[root@master1 ~]# ls /var/lib/mysql/master1-bin*        //查看binlog日志是否生成
/var/lib/mysql/master1-bin.000001  /var/lib/mysql/master1-bin.index
[root@master1 ~]#
master2设置:
[root@master2 ~]# cat /etc/my.cnf
[mysqld]
datadir=/var/lib/mysql
socket=/var/lib/mysql/mysql.sock
user=mysql
server_id=11
log-bin
# Disabling symbolic-links is recommended to prevent assorted security risks
symbolic-links=0
[mysqld_safe]
log-error=/var/log/mysqld.log
pid-file=/var/run/mysqld/mysqld.pid
[root@master2 ~]# service mysql restart
Shutting down MySQL..                                      [确定]
Starting MySQL.                                            [确定]
[root@master2 ~]# ls /var/lib/mysql/master2-bin.*
/var/lib/mysql/master2-bin.000001  /var/lib/mysql/master2-bin.index
3)从库设置server_id
slave1设置:
[root@slave1 ~]# cat /etc/my.cnf
[mysqld]
datadir=/var/lib/mysql
socket=/var/lib/mysql/mysql.sock
user=mysql
server_id=12
# Disabling symbolic-links is recommended to prevent assorted security risks
symbolic-links=0
[mysqld_safe]
log-error=/var/log/mysqld.log
pid-file=/var/run/mysqld/mysqld.pid
[root@slave1 ~]# service mysql restart
Shutting down MySQL..                                      [确定]
Starting MySQL..                                           [确定]
[root@slave1 ~]#
slave2设置:
[root@slave2 ~]# cat /etc/my.cnf
[mysqld]
datadir=/var/lib/mysql
socket=/var/lib/mysql/mysql.sock
user=mysql
server_id=13
# Disabling symbolic-links is recommended to prevent assorted security risks
symbolic-links=0
[mysqld_safe]
log-error=/var/log/mysqld.log
pid-file=/var/run/mysqld/mysqld.pid
[root@slave2 ~]# service mysql restart
Shutting down MySQL..                                      [确定]
Starting MySQL.                                            [确定]
[root@slave2 ~]#
4)配置主从从从关系
配置master2、slave1、slave2成为master1的从服务器
查看master1服务器binlong日志使用节点信息:
[root@master1 ~]# mysql -uroot -ppwd123
.. ..
mysql> show master status\G
*************************** 1. row ***************************
             File: master1-bin.000001
         Position: 120
     Binlog_Do_DB:
 Binlog_Ignore_DB:
Executed_Gtid_Set:
1 row in set (0.00 sec)
mysql>
设置master2为master1从:
[root@master2 ~]# mysql -uroot -ppwd123
.. ..
mysql> change  master  to                         //设置主服务器信息
    -> master_host="192.168.4.10",                //设置主服务器IP地址
    -> master_user="slaveuser",                //设置主从同步用户
    -> master_password="pwd123",                //设置主从同步密码
    -> master_log_file="master1-bin.000001",    //设置主库binlog日志名称
    -> master_log_pos=120;                        //设置主从binlog日志使用节点
Query OK, 0 rows affected, 2 warnings (0.06 sec)
mysql> start slave;                            //启动同步进程
Query OK, 0 rows affected (0.00 sec)
mysql> show slave status\G                        //查看主从是否成功
.. ..
启动同步进程后查看IO节点和SQL节点是否为Yes如果均为Yes表示主从正常。
             Slave_IO_Running: Yes                //IO节点正常
            Slave_SQL_Running: Yes                //SQL节点正常
.. ..
mysql>
设置slave1为master1从:
[root@slave1 ~]# mysql -uroot -ppwd123
.. ..
mysql> change  master  to
    -> master_host="192.168.4.10",
    -> master_user="slaveuser",
    -> master_password="pwd123",
    -> master_log_file="master1-bin.000001",
    -> master_log_pos=120;
Query OK, 0 rows affected, 2 warnings (0.12 sec)
mysql> start slave;
Query OK, 0 rows affected (0.16 sec)
mysql> show slave status\G
.. ..
             Slave_IO_Running: Yes                //IO节点正常
            Slave_SQL_Running: Yes                //SQL节点正常
.. ..
mysql>
设置slave2为master1从:
[root@slave2 ~]# mysql -uroot -ppwd123
.. ..
mysql> change  master  to
    -> master_host="192.168.4.10",
    -> master_user="slaveuser",
    -> master_password="pwd123",
    -> master_log_file="master1-bin.000001",
    -> master_log_pos=120;
Query OK, 0 rows affected, 2 warnings (0.13 sec)
mysql> start slave;
Query OK, 0 rows affected (0.27 sec)
mysql> show slave status\G
.. ..
             Slave_IO_Running: Yes                //IO节点正常
            Slave_SQL_Running: Yes                //SQL节点正常
.. ..
mysql>
5)配置主主从从关系,将master1配置为master2的从
查看master2的binlog使用信息:
[root@master2 ~]# mysql -uroot -ppwd123
.. ..
mysql> show master status\G
*************************** 1. row ***************************
             File: master2-bin.000001
         Position: 120
     Binlog_Do_DB:
 Binlog_Ignore_DB:
Executed_Gtid_Set:
1 row in set (0.00 sec)
mysql>
设置master1成为master2的从:
[root@master1 ~]# mysql -uroot -ppwd123
.. ..
mysql> change  master  to
    -> master_host="192.168.4.11",
    -> master_user="slaveuser",
    -> master_password="pwd123",
    -> master_log_file="master2-bin.000001",
    -> master_log_pos=120;
Query OK, 0 rows affected, 2 warnings (0.31 sec)
mysql> start slave;
Query OK, 0 rows affected (0.27 sec)
mysql> show slave status\G
.. ..
             Slave_IO_Running: Yes                //IO节点正常
            Slave_SQL_Running: Yes                //SQL节点正常
.. ..
mysql>
6)测试主从架构是否成功
master1更新数据,查看其它主机是否同步:
[root@master1 ~]# mysql -uroot -ppwd123
.. ..
mysql> show databases;
+--------------------+
| Database           |
+--------------------+
| information_schema |
| mysql              |
| performance_schema |
| test               |
+--------------------+
4 rows in set (0.00 sec)
mysql> create database tarena;
Query OK, 1 row affected (0.06 sec)
mysql> show databases;
+--------------------+
| Database           |
+--------------------+
| information_schema |
| mysql              |
| performance_schema |
| tarena             |
| test               |
+--------------------+
5 rows in set (0.00 sec)
mysql>
master2主机查看:
[root@master2 ~]# mysql -uroot -ppwd123 -e "show databases"
Warning: Using a password on the command line interface can be insecure.
+--------------------+
| Database           |
+--------------------+
| information_schema |
| mysql              |
| performance_schema |
| tarena             |
| test               |
+--------------------+
[root@master2 ~]#
slave1主机查看:
[root@slave1 ~]# mysql -uroot -ppwd123 -e "show databases"
Warning: Using a password on the command line interface can be insecure.
+--------------------+
| Database           |
+--------------------+
| information_schema |
| mysql              |
| performance_schema |
| tarena             |
| test               |
+--------------------+
[root@slave1 ~]#
slave2主机查看:
[root@slave2 ~]# mysql -uroot -ppwd123 -e "show databases"
Warning: Using a password on the command line interface can be insecure.
+--------------------+
| Database           |
+--------------------+
| information_schema |
| mysql              |
| performance_schema |
| tarena             |
| test               |
+--------------------+
[root@slave2 ~]#免责声明:本站发布的内容(图片、视频和文字)以原创、转载和分享为主,文章观点不代表本网站立场,如果涉及侵权请联系站长邮箱:is@yisu.com进行举报,并提供相关证据,一经查实,将立刻删除涉嫌侵权内容。


