本篇文章给大家主要讲的是关于一键实现MySQL5.6.16二进制源码安装的内容,感兴趣的话就一起来看看这篇文章吧,相信看完一键实现MySQL5.6.16二进制源码安装对大家多少有点参考价值吧。
[root@localhost ~]# cat /etc/redhat-release
CentOS Linux release 7.4.1708 (Core)
[root@localhost ~]# uname -rm
10.0-693.el7.x86_64 x86_64
[root@localhost ~]#
检查selinux
[root@localhost ~]# sestatus -v
SELinux status:                 disabled
[root@localhost ~]#
或者使用使用getenforce检查
[root@localhost ~]# getenforce
Disabled
临时关闭selinux
[root@localhost ~]# setenforce 0
setenforce: SELinux is disabled
[root@localhost ~]#
永久关闭,需要修改SELinux的配置文件/etc/selinux/config
[root@localhost ~]# vim /etc/selinux/config
This file controls the state of SELinux on the system.
SELINUX= can take one of these three values:
enforcing - SELinux security policy is enforced.
permissive - SELinux prints warnings instead of enforcing.
disabled - No SELinux policy is loaded.
SELINUX=disabled
SELINUXTYPE= can take one of three two values:
targeted - Targeted processes are protected,
minimum - Modification of targeted policy. Only selected processes are protected.
mls - Multi Level Security protection.
SELINUXTYPE=targeted
防火墙设置
查看当前防火墙状态,已经关闭,而且开机不自启动
[root@localhost ~]# systemctl status firewalld.service
● firewalld.service - firewalld - dynamic firewall daemon
   Loaded: loaded (/usr/lib/systemd/system/firewalld.service; disabled; vendor preset: enabled)
   Active: inactive (dead)
     Docs: man:firewalld(1)
临时关闭
[root@localhost ~]# systemctl stop firewalld.service
永久关闭,开机不启动
[root@localhost ~]# systemctl disable firewalld.service
[root@localhost soft]# free -m
total        used        free      shared  buff/cache   available
Mem:           1823         294        1163           9         366        1339
Swap:          2047           0        2047
[root@localhost ~]# df -hT
Filesystem              Type      Size  Used Avail Use% Mounted on
/dev/mapper/centos-root xfs        17G  5.0G   13G  29% /
devtmpfs                devtmpfs  897M     0  897M   0% /dev
tmpfs                   tmpfs     912M     0  912M   0% /dev/shm
tmpfs                   tmpfs     912M  9.1M  903M   1% /run
tmpfs                   tmpfs     912M     0  912M   0% /sys/fs/cgroup
/dev/sda1               xfs      1014M  179M  836M  18% /boot
tmpfs                   tmpfs     183M   12K  183M   1% /run/user/42
tmpfs                   tmpfs     183M     0  183M   0% /run/user/0
[root@localhost ~]# ulimit -a
core file size          (blocks, -c) 0
data seg size           (kbytes, -d) unlimited
scheduling priority             (-e) 0
file size               (blocks, -f) unlimited
pending signals                 (-i) 7168
max locked memory       (kbytes, -l) 64
max memory size         (kbytes, -m) unlimited
open files                      (-n) 1024
pipe size            (512 bytes, -p) 8
POSIX message queues     (bytes, -q) 819200
real-time priority              (-r) 0
stack size              (kbytes, -s) 8192
cpu time               (seconds, -t) unlimited
max user processes              (-u) 7168
virtual memory          (kbytes, -v) unlimited
file locks                      (-x) unlimited
(1)软件版本:5.6.16
(2)安装方式:二进制方式 方便、灵活、管理数据和配置文件便捷
其他安装方式:rpm安装、yum安装
(3)硬件需求:虚拟机内存大小:最少2G
磁盘最少:40G
(4)系统环境:Centos6/7 Redhat 64位
安装包管理在/opt/目录下创建/opt/soft,在官网下载mysql安装包,通过secureCRT或者xshell并上传安装包到此目录。
[root@localhost ~]# ll /opt/soft/
total 297656
rw-r--r-- 1 root root      3222 Mar 22 16:59 my.cnf
rw-r--r-- 1 root root 304788904 Mar 13 20:30 mysql-5.6.16-linux-glibc2.5-x86_64.tar.gz
rw-r--r-- 1 root root      2032 May 11 23:35 mysql_install_binary5.6.16.sh
MySQL下载地址这里给出5.6.40,跟本次的5.6.16的大版本一致。
https://cdn.mysql.com//Downloads/MySQL-5.6/mysql-5.6.40-linux-glibc2.12-x86_64.tar.gz
如下是MySQL下载页面,可以选择需要的版本
https://dev.mysql.com/downloads/mysql/
=>创建家目录:(basedir),并授权
/usr/local
解压mysql安装包到家目录 改名称(隐藏版本号)
[root@localhost soft]# tar -zxvf mysql-5.6.16-linux-glibc2.5-x86_64.tar.gz -C /usr/local/
[root@localhost soft]# ll -d /usr/local/mysql*
lrwxrwxrwx  1 root root  46 May 15 09:09 /usr/local/mysql -> /usr/local/mysql-5.6.16-linux-glibc2.5-x86_64/
drwxr-xr-x 13 root root 213 May 15 09:06 /usr/local/mysql-5.6.16-linux-glibc2.5-x86_64
[root@localhost soft]#
授权mysql家目录给mysql用户
[root@localhost soft]# id mysql
uid=27(mysql) gid=27(mysql) groups=27(mysql)
如果没有MySQL用户,可以创建mysql用户授权并查看
[root@localhost soft]# chown -R mysql:mysql /usr/local/mysql
[root@localhost soft]# ll -d /usr/local/mysql
lrwxrwxrwx 1 mysql mysql 46 May 15 09:09 /usr/local/mysql -> /usr/local/mysql-5.6.16-linux-glibc2.5-x86_64/
2曲=>创建数据目录(datadir),并授权
/data/mysql/
授权数据目录给mysql用户
[root@localhost soft]# mkdir -p /data/mysql
[root@localhost soft]# ll -ld /data/mysql/
drwxr-xr-x 2 root root 6 May 15 09:13 /data/mysql/
[root@localhost soft]# chown -R mysql:mysql /data/mysql/
[root@localhost soft]# ll -ld /data/mysql/
drwxr-xr-x 2 mysql mysql 6 May 15 09:13 /data/mysql/
3曲=>配置文件 /etc/my.cnf(安装阶段暂时不需要细看配置文件)
使用已经配置好的
问题:如果修改了/etc/my.cnf文件,只需要重启MySQL服务,然后会加载修改后的my.cnf配置文件。
my.cnf如下
[root@localhost soft]# vim /etc/my.cnf
[client]
port = 3306
socket = /tmp/mysql.sock
[mysql]
prompt="\u@db \R:\m:\s [\d]> "
no-auto-rehash
[mysqld]
user = mysql
port = 3306
basedir = /usr/local/mysql
datadir = /data/mysql/
socket = /tmp/mysql.sock
character-set-server = utf8mb4
skip_name_resolve = 1
open_files_limit    = 65535
back_log = 1024
max_connections = 512
max_connect_errors = 1000000
table_open_cache = 1024
table_definition_cache = 1024
table_open_cache_instances = 64
thread_stack = 512K
external-locking = FALSE
max_allowed_packet = 32M
sort_buffer_size = 4M
join_buffer_size = 4M
thread_cache_size = 768
"/etc/my.cnf" [dos] 115L, 3222C                                                                                                    1,1           Top
[client]
port = 3306
socket = /tmp/mysql.sock
[mysql]
prompt="\u@db \R:\m:\s [\d]> "
no-auto-rehash
[mysqld]
user = mysql
port = 3306
basedir = /usr/local/mysql
datadir = /data/mysql/
socket = /tmp/mysql.sock
character-set-server = utf8mb4
skip_name_resolve = 1
open_files_limit    = 65535
back_log = 1024
max_connections = 512
max_connect_errors = 1000000
table_open_cache = 1024
table_definition_cache = 1024
table_open_cache_instances = 64
thread_stack = 512K
external-locking = FALSE
max_allowed_packet = 32M
sort_buffer_size = 4M
join_buffer_size = 4M
thread_cache_size = 768
query_cache_size = 0
query_cache_type = 0
interactive_timeout = 600
wait_timeout = 600
tmp_table_size = 32M
max_heap_table_size = 32M
slow_query_log = 1
slow_query_log_file = /data/mysql/slow.log
log-error = /data/mysql/error.log
long_query_time = 0.5
server-id = 3306100
log-bin = /data/mysql/mysql-binlog
sync_binlog = 1
binlog_cache_size = 4M
max_binlog_cache_size = 128M
max_binlog_size = 128M
expire_logs_days = 7
master_info_repository = TABLE
relay_log_info_repository = TABLE
gtid_mode = on
enforce_gtid_consistency = 1
log_slave_updates
binlog_format = row
relay_log_recovery = 1
relay-log-purge = 1
key_buffer_size = 32M
read_buffer_size = 8M
read_rnd_buffer_size = 4M
bulk_insert_buffer_size = 64M
lock_wait_timeout = 3600
explicit_defaults_for_timestamp = 1
innodb_thread_concurrency = 0
innodb_sync_spin_loops = 100
innodb_spin_wait_delay = 30
transaction_isolation = REPEATABLE-READ
innodb_buffer_pool_size = 1024M
innodb_buffer_pool_instances = 8
innodb_buffer_pool_load_at_startup = 1
innodb_buffer_pool_dump_at_shutdown = 1
innodb_data_file_path = ibdata1:1G:autoextend
innodb_flush_log_at_trx_commit = 1
innodb_log_buffer_size = 32M
innodb_log_file_size = 2G
innodb_log_files_in_group = 2
innodb_io_capacity = 2000
innodb_io_capacity_max = 4000
innodb_flush_neighbors = 0
innodb_write_io_threads = 8
innodb_read_io_threads = 8
innodb_purge_threads = 4
innodb_page_cleaners = 4
innodb_open_files = 65535
innodb_max_dirty_pages_pct = 50
innodb_flush_method = O_DIRECT
innodb_lru_scan_depth = 4000
innodb_checksum_algorithm = crc32
innodb_lock_wait_timeout = 10
innodb_rollback_on_timeout = 1
innodb_print_all_deadlocks = 1
innodb_file_per_table = 1
innodb_online_alter_log_max_size = 4G
internal_tmp_disk_storage_engine = InnoDB
innodb_stats_on_metadata = 0
innodb_status_file = 1
innodb_status_output = 0
innodb_status_output_locks = 0
performance_schema
performance_schema = 1
performance_schema_instrument = '%=on'
innodb monitor
innodb_monitor_enable="module_innodb"
innodb_monitor_enable="module_server"
innodb_monitor_enable="module_dml"
innodb_monitor_enable="module_ddl"
innodb_monitor_enable="module_trx"
innodb_monitor_enable="module_os"
innodb_monitor_enable="module_purge"
innodb_monitor_enable="module_log"
innodb_monitor_enable="module_lock"
innodb_monitor_enable="module_buffer"
innodb_monitor_enable="module_index"
innodb_monitor_enable="module_ibuf_system"
innodb_monitor_enable="module_buffer_page"
innodb_monitor_enable="module_adaptive_hash"
[mysqldump]
quick
max_allowed_packet = 32M
(1)初始化MySQL(切换到mysql家目录scripts目录)
./mysql_install_db --basedir=/usr/local/mysql --datadir=/mysql/data --defaults-/etc/my.cnf --user=mysql
-user=mysql 这样初始化完成后,初始化生成的文件的权限都是mysql用户,所以一定加--user=mysql参数。否则初始化完成后还需要单独授权生成的文件。
初始化完成后,会有两个OK提示,就成功完成mysql的初始化。此时查看/data/mysql下的文件,同时查看所有文件的权限是mysql
[root@localhost mysql]# cd /usr/local/mysql/scripts/
[root@localhost scripts]# ./mysql_install_db   --basedir=/usr/local/mysql --datadir=/data/mysql --defaults-/etc/my.cnf --user=mysql
Installing MySQL system tables...

查看日志
[root@localhost ~]# less /data/mysql/error.log |grep ERROR
05-15 09:18:07 4131 [ERROR] /usr/local/mysql/bin/mysqld: unknown option '--defaults-/etc/my.cnf'
05-15 09:18:07 4131 [ERROR] Aborting

粗心大意,把配置文件那边写错了。修改后继续
[root@localhost scripts]# ./mysql_install_db   --basedir=/usr/local/mysql --datadir=/data/mysql --defaults-file=/etc/my.cnf --user=mysql
**Installing MySQL system tables...OK

**Filling help tables...OK**

To start mysqld at boot time you have to copy
support-files/mysql.server to the right place for your system

PLEASE REMEMBER TO SET A PASSWORD FOR THE MySQL root USER !
To do so, start the server, then issue the following commands:

**/usr/local/mysql/bin/mysqladmin -u root password 'new-password'
/usr/local/mysql/bin/mysqladmin -u root -h localhost.localdomain password 'new-password'**

Alternatively you can run:

**/usr/local/mysql/bin/mysql_secure_installation**

which will also give you the option of removing the test
databases and anonymous user created by default.  This is
strongly recommended for production servers.

See the manual for more instructions.

**You can start the MySQL daemon with:**
**
cd . ; /usr/local/mysql/bin/mysqld_safe &**

You can test the MySQL daemon with mysql-test-run.pl

cd mysql-test ; perl mysql-test-run.pl

Please report any problems at http://bugs.mysql.com/

The latest information about MySQL is available on the web at

http://www.mysql.com

Support MySQL by buying support/licenses at http://shop.mysql.com

WARNING: Found existing config file /usr/local/mysql/my.cnf on the system.
Because this file might be in use, it was not replaced,
but was used in bootstrap (unless you used --defaults-file)
and when you later start the server.
The new default config file was created as /usr/local/mysql/my-new.cnf,
please compare it with your file and take the changes you need.

WARNING: Default config file /etc/my.cnf exists on the system
This file will be read by default by the MySQL server
If you do not want to use this, either remove it, or use the
-defaults-file argument to mysqld_safe when starting the server

[root@localhost ~]#   /usr/local/mysql/bin/mysqld_safe  &
[1] 5771
[root@localhost ~]# 180515 09:28:48 mysqld_safe Logging to '/data/mysql/error.log'.
09:28:48 mysqld_safe Starting mysqld daemon with databases from /data/mysql/
09:28:50 mysqld_safe mysqld from pid file /data/mysql//localhost.localdomain.pid ended

[1]+  Done                    /usr/local/mysql/bin/mysqld_safe
[root@localhost ~]# ps -ef|grep 3306
root       7094   3559  0 09:29 pts/2    00:00:00 grep --color=auto 3306
启动出错,查看日志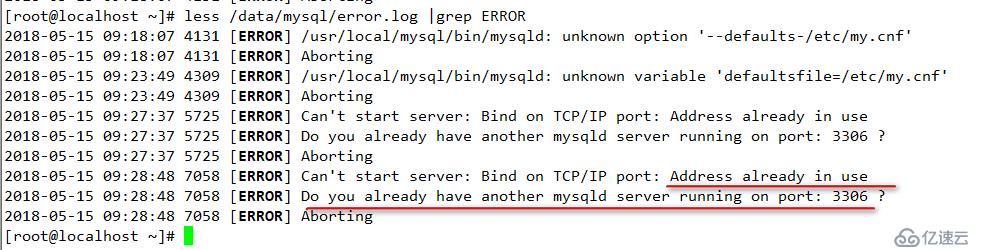
日志显示,3306端口正在使用,查看端口情况
[root@localhost ~]# netstat -nltp|grep mysql
tcp        0      0 0.0.0.0:3306            0.0.0.0:*               LISTEN      1373/mysqld
[root@localhost ~]# kill -9  1373
[root@localhost ~]#
此时查看mysql以及端口3306
[root@localhost ~]# netstat -nltp|grep mysql
[root@localhost ~]# netstat -nltp|grep 3306
再次启动MySQL云服务器
[root@localhost ~]# /usr/local/mysql/bin/mysqld_safe &
[1] 10033
[root@localhost ~]#
[root@localhost ~]# 180515 09:38:52 mysqld_safe Logging to '/data/mysql/error.log'.
180515 09:38:52 mysqld_safe Starting mysqld daemon with databases from /data/mysql/
启动成功如下
[root@localhost ~]# ps -ef|grep mysql
root      10033   3559  0 09:38 pts/2    00:00:00 /bin/sh /usr/local/mysql/bin/mysqld_safe
mysql     11320  10033  3 09:38 pts/2    00:00:00 /usr/local/mysql/bin/mysqld --basedir=/usr/local/mysql --datadir=/data/mysql/ --plugin-dir=/usr/local/mysql/lib/plugin --user=mysql --log-error=/data/mysql/error.log --open-files-limit=65535 --pid-file=/data/mysql//localhost.localdomain.pid --socket=/tmp/mysql.sock --port=3306
root      11355   3559  0 09:39 pts/2    00:00:00 grep --color=auto mysql
[root@localhost ~]# ps -ef|grep 3306
mysql     11320  10033  3 09:38 pts/2    00:00:00 /usr/local/mysql/bin/mysqld --basedir=/usr/local/mysql --datadir=/data/mysql/ --plugin-dir=/usr/local/mysql/lib/plugin --user=mysql --log-error=/data/mysql/error.log --open-files-limit=65535 --pid-file=/data/mysql//localhost.localdomain.pid --socket=/tmp/mysql.sock --port=3306
root      11357   3559  0 09:39 pts/2    00:00:00 grep --color=auto 3306
[root@localhost ~]#
登录MySQL云服务器,默认没有密码
[root@localhost ~]# mysql
Welcome to the MariaDB monitor.  Commands end with ; or \g.
Your MySQL connection id is 1
Server version: 5.6.16-log MySQL Community Server (GPL)

Copyright (c) 2000, 2017, Oracle, MariaDB Corporation Ab and others.

Type 'help;' or '\h' for help. Type '\c' to clear the current input statement.

root@db 09:39:  [(none)]>
(1)密码设置:目前root用户没有密码,那么设置root用户密码
 root@db 09:42:  [(none)]> use mysql;
Database changed
root@db 09:42:  [mysql]> update user set password=password('123456') where user='root';
Query OK, 4 rows affected (0.00 sec)
Rows matched: 4  Changed: 4  Warnings: 0
root@db 09:42:  [mysql]> flush privileges;
Query OK, 0 rows affected (0.00 sec)
测试修改后密码
//使用原来空密码登录,提示密码错误
[root@localhost ~]# mysql
ERROR 1045 (28000): Access denied for user 'root'@'localhost' (using password: NO)
//使用新密码登录,成功。
[root@localhost ~]# mysql -uroot -p123456
Welcome to the MariaDB monitor.  Commands end with ; or \g.
Your MySQL connection id is 4
Server version: 5.6.16-log MySQL Community Server (GPL)
Copyright (c) 2000, 2017, Oracle, MariaDB Corporation Ab and others.
Type 'help;' or '\h' for help. Type '\c' to clear the current input statement.
root@db 09:47:  [(none)]>
(2)mysql远程登录用户设置,安装完数据库后mysql数据库用户的管理。 只保留一个 localhost root
root@db 09:42:  [mysql]> use mysql
Database changed
root@db 09:43:  [mysql]> select host,user,password from user;
+-----------------------+------+-------------------------------------------+
| host                  | user | password                                  |
+-----------------------+------+-------------------------------------------+
| localhost             | root | *6BB4837EB74329105EE4568DDA7DC67ED2CA2AD9 |
| localhost.localdomain | root | *6BB4837EB74329105EE4568DDA7DC67ED2CA2AD9 |
| 127.0.0.1             | root | *6BB4837EB74329105EE4568DDA7DC67ED2CA2AD9 |
| ::1                   | root | *6BB4837EB74329105EE4568DDA7DC67ED2CA2AD9 |
null
| localhost             |      |                                           |
| localhost.localdomain |      |                                           |
+-----------------------+------+-------------------------------------------+
6 rows in set (0.00 sec)

root@db 09:43:  [mysql]>  delete from user where host!='localhost' or user!='root';
Query OK, 5 rows affected (0.01 sec)

root@db 09:44:  [mysql]> select host,user,password from user;
+-----------+------+-------------------------------------------+
| host      | user | password                                  |
+-----------+------+-------------------------------------------+
| localhost | root | *6BB4837EB74329105EE4568DDA7DC67ED2CA2AD9 |
+-----------+------+-------------------------------------------+
1 row in set (0.00 sec)

root@db 09:44:  [mysql]>
(1)我这里提前配置好了MySQL的环境变量
环境变量如下,环境变量修改
echo "export PATH=$PATH:/usr/local/mysql/bin" >> /etc/profile
source /etc/profile
(2)可以通过msyql自带的脚本,启动mysql
[root@localhost ~]# cp /usr/local/mysql/support-files/mysql.server /etc/init.d/mysqld
[root@localhost ~]# ll -ld /etc/init.d/mysqld
-rwxr-xr-x 1 root root 10880 May 15 09:34 /etc/init.d/mysqld
[root@localhost ~]# /etc/init.d/mysqld status
 SUCCESS! MySQL running (11320)
我们刚刚启动了MySQL 因此现在看到的状态是正在运行。
(3)加入开机自启动
[root@localhost ~]# chkconfig --add mysqld
[root@localhost ~]# chkconfig --list mysqld
Note: This output shows SysV services only and does not include native
      systemd services. SysV configuration data might be overridden by native
      systemd configuration.
null
      If you want to list systemd services use 'systemctl list-unit-files'.
      To see services enabled on particular target use
      'systemctl list-dependencies [target]'.
mysqld          0:off   1:off   2:on    3:on    4:on    5:on    6:off
如上使用了centos6的命令添加开机自动开启服务的命令,可以使用7版本新的命令。
查看系统当前默认启动项目的方法
[root@localhost ~]# systemctl list-unit-files
以上步骤,通过shell脚本实现,这里,把MySQL二进制包,MySQL安装shell,配置文件都放在/opt/soft目录下
[root@localhost ~]# ll /opt/soft/
total 297656
rw-r--r-- 1 root root      3222 Mar 22 16:59 my.cnf
rw-r--r-- 1 root root 304788904 Mar 13 20:30 mysql-5.6.16-linux-glibc2.5-x86_64.tar.gz
rw-r--r-- 1 root root      2032 May 11 23:35 mysql_install_binary5.6.16.sh
脚本如下
#!/bin/sh
#测试系统:Centos6.5 Centos7.4
#脚本使用前,提前准备好二进制安装包,创建/opt/soft放在/opt/soft下 配置文件放在/etc/my.cnf
#脚本不足:没有对预定好的mysql家目录 /usr/local/mysql和mysql数据目录/data/mysql以及/etc/my.cnf做判断,默认是这两个目录不存在或者目录是没有内容的,如果有内容可能会有警告
#对对应变量进行赋值
group=mysql
user=mysql
basedir=/usr/local/mysql/
datadir=/data/mysql/
mysql_package="mysql-5.6.16-linux-glibc2.5-x86_64"

#准备开始
echo "Installing :" $mysql_package

#--用户创建--
#匹配该文件中以$group变量值开头的内容
#创建组,如果组存在就直接执行如下命令
#--egrep在文件中查找指定模式
#--^表示匹配的字符必须在最前边 字符$与^类似,匹配最末的字符.

egrep "^$group" /etc/group >& /dev/null
if [ $? -ne 0 ]
then
    groupadd $group
fi

#创建用户,如果用户存在就直接执行如下命令
egrep "^$user" /etc/passwd >& /dev/null
if [ $? -ne 0 ]
then
    useradd $user -g $group -p 123456 -s /sbin/nologin -M
fi
#第一曲:解压二进制安装包
tar -zxvf /opt/soft/$mysql_package.tar.gz -C /usr/local

#重命名 隐藏版本号
cd /usr/local/
mv $mysql_package mysql

#第二曲:创建数据目录
mkdir -p $datadir

#授权--授权mysql家目录basedir和mysql数据目录datadir
cd /usr/local/mysql
chown -R $group:$user $basedir
mkdir -p $datadir
chown -R $group:$user $datadir
#第三曲:配置文件(提前准备好)
cp /opt/soft/my.cnf /etc/
#一步走:mysql初始化
cd $basedir/scripts/
./mysql_install_db --user=$user --basedir=$basedir --datadir=$datadir --defaults-file=/etc/my.cnf
#加入开机自启动
cp $basedir/support-files/mysql.server /etc/rc.d/init.d/mysqld
chkconfig --add mysqld
#环境变量修改
echo "export PATH=$PATH:$basedir/bin" >> /etc/profile
source /etc/profile

#启动mysql服务
/etc/init.d/mysqld start
#启动结果
echo $mysql_package "install success."
#登陆mysql
mysql```

脚本根据如上的安装步骤写的,这里,在另外一台云服务器上通过该脚本一键部署安装MySQL
如下
[root@localhost ~]# cd /opt/soft/
[root@localhost soft]# ll
total 297660
-rw-r--r--. 1 root root 3222 Apr 12 10:16 my.cnf
-rw-r--r--. 1 root root 304788904 Mar 13 20:30 mysql-5.6.16-linux-glibc2.5-x86_64.tar.gz
-rw-r--r--. 1 root root 1908 Apr 12 11:55 mysql_install_binary5.6.16.sh
-rw-r--r--. 1 root root 1904 Apr 12 11:57 mysql_install_binary5.6.33.sh
[root@localhost soft]#
[root@localhost soft]# sh mysql_install_binary5.6.16
Installing MySQL system tables...OK
Filling help tables...OK
安装成功,启动失败。
WARNING: Default config file /etc/my.cnf exists on the system
This file will be read by default by the MySQL server
If you do not want to use this, either remove it, or use the
--defaults-file argument to mysqld_safe when starting the server
Starting MySQL.................. ERROR! The server quit without updating PID file (/data/mysql//localhost.localdomain.pid).
mysql-5.6.16-linux-glibc2.5-x86_64 install success.
ERROR 2002 (HY000): Can't connect to local MySQL server through socket '/tmp/mysql.sock' (2)
查看日志
[root@localhost soft]# cat /data/mysql/error.log |grep ERROR
2018-05-15 11:28:23 8163 [ERROR] Can't start server: Bind on TCP/IP port: Address already in use
2018-05-15 11:28:23 8163 [ERROR] Do you already have another mysqld server running on port: 3306 ?
2018-05-15 11:28:23 8163 [ERROR] Aborting
`和上面手动安装错误一样,kill掉占用3306的线程`
[root@localhost soft]# netstat -nltp|grep 3306
tcp6 0 0 :::3306 :::* LISTEN 3066/mysqld
[root@localhost soft]# kill -9 3066
[root@localhost soft]# netstat -nltp|grep 3306
再次启动MySQL
[root@localhost soft]# /etc/init.d/mysqld start
Starting MySQL.................. SUCCESS!
[root@localhost soft]# mysql
Welcome to the MySQL monitor. Commands end with ; or \g.
Your MySQL connection id is 1
Server version: 5.6.16-log MySQL Community Server (GPL)
Copyright (c) 2000, 2014, Oracle and/or its affiliates. All rights reserved.
Oracle is a registered trademark of Oracle Corporation and/or its
affiliates. Other names may be trademarks of their respective
owners.
Type 'help;' or '\h' for help. Type '\c' to clear the current input statement.
null
root@db 11:37: [(none)]>
启动成功,到此,MySQL二进制安装部署,一键安装完成。由于时间有限,难免有错误,请大家给与指正。希望对各位学习有帮助。
以上关于一键实现MySQL5.6.16二进制源码安装详细内容,对大家有帮助吗?如果想要了解更多相关,可以继续关注我们的行业资讯板块。
免责声明:本站发布的内容(图片、视频和文字)以原创、转载和分享为主,文章观点不代表本网站立场,如果涉及侵权请联系站长邮箱:is@yisu.com进行举报,并提供相关证据,一经查实,将立刻删除涉嫌侵权内容。


