其与web server的接口支持三种形式,分别为cgi, module方式, fastcgi方式。而对于nginx而言,只支持cgi和fastcgi两种接口方式与php进行连接!
本节将以源码安装php,启动php-fpm服务(fastcgi接口)与nginx进行连接。
关于nginx的配置请看前面章节的有关介绍!
1、安装依赖开发包
# yum install -y libxml2-devel bzip2-devel libcurl-devel libmcrypt-devel
2、×××
地址:http://php.net/downloads.php 下载所需版本,这里使用php-5.5.27.tar.bz2。
也可以使用我的安装文件,已存在百度云盘->请看文章开头。
1、配置
--prefix 指定安装目录
--with-mysql=MYSQL_DIR 安装mysql模块 指定其安装路径
--with-openssl 安装openssl模块
--enable-fpm 支持fpm,对于采用fastcgi方式,此模块必须开启
--enable-sockets 支持socket,对于采用fastcgi方式,此模块必须开启
--enable-sysvshm 支持System V shared memory
--with-mysqli=MYSQL_CONFIG_PATH 安装mysqli模块
--with-config-file=CONFIG_DIR 指定php配置文件安装路径
--with-config-file-scan-dir=CONFIG_DIR 指定配置文件的扫描路径,就是除主配置文件php.ini的其他配置文件路径
--with-mysqlnd=share,mysqlnd 支持mysqlnd
--with-enable-mbstring --with-freetype-dir --with-jpeg-dir --with-png-dir --with-zlib-dir --with-libxml-dir ...
安装php相关的一些扩展文件
配置如下
# ./configure --prefix=/usr/local/php --with-mysql=/usr/local/mysql --with-openssl --enable-fpm --enable-sockets --enable-sysvshm --with-mysqli=/usr/local/mysql/bin/mysql_config --enable-mbstring --with-freetype-dir --with-jpeg-dir --with-png-dir --with-zlib-dir --with-libxml-dir=/usr --enable-xml --with-mhash --with-mcrypt --with-config-file-path=/etc --with-config-file-scan-dir=/etc/php.d --with-bz2 --with-curl --with-mysql=share,mysqlnd
2、编译安装
# make
# make install
3、准备配置文件
# cp php.ini-production /etc/php.ini
4、开机启动php-fpm
配置sysv启动脚本,添加到服务列表
# cp sapi/fpm/init.d.php-fpm /etc/rc.d/init.d/php-fpm
# chmod +x /etc/rc.d/init.d/php-fpm
# chkconfig --add php-fpm
# chkconfig php on
5、添加php-fpm服务配置脚本
# cp /usr/local/php/etc/php-fpm.conf.default /usr/local/php/etc/php-fpm.conf
6、启动服务
# service php-fpm start
# ps -ef | grep php-fpm // 可以看到系统已启动多个php-fpm进程,说明php-fpm服务已启动成功
1、编辑nginx.conf
server段配置修改如下,为nginx添加脚本解析功能
location / {
root html;
index index.html index.htm index.php;
}
#error_page 404 /404.html;
# redirect server error pages to the static page /50x.html
#
error_page 500 502 503 504 /50x.html;
location = /50x.html {
root html;
}
# proxy the PHP scripts to Apache listening on 127.0.0.1:80
#
#location ~ \.php$ {
# proxy_pass http://127.0.0.1;
#}
# pass the PHP scripts to FastCGI server listening on 127.0.0.1:9000
#
location ~ \.php$ {
root html;
fastcgi_pass 127.0.0.1:9000;
fastcgi_index index.php;
fastcgi_param SCRIPT_FILENAME /scripts$fastcgi_script_name;
include fastcgi_params;
}
2、修改/etc/nginx/fastcgi_params
fastcgi_param QUERY_STRING $query_string;
fastcgi_param REQUEST_METHOD $request_method;
fastcgi_param CONTENT_TYPE $content_type;
fastcgi_param CONTENT_LENGTH $content_length;
fastcgi_param SCRIPT_FILENAME $document_root$fastcgi_script_name;
fastcgi_param SCRIPT_NAME $fastcgi_script_name;
fastcgi_param REQUEST_URI $request_uri;
fastcgi_param DOCUMENT_URI $document_uri;
fastcgi_param DOCUMENT_ROOT $document_root;
... ...
重新定义fastcgi_param参数SCRIPT_FILENAME
3、nginx重启
# service nginx restart
4、测试访问
添加编辑/usr/local/nginx/index.php
<?php
phpinfo();
?>
浏览器访问 http://域名/index.php,如下图
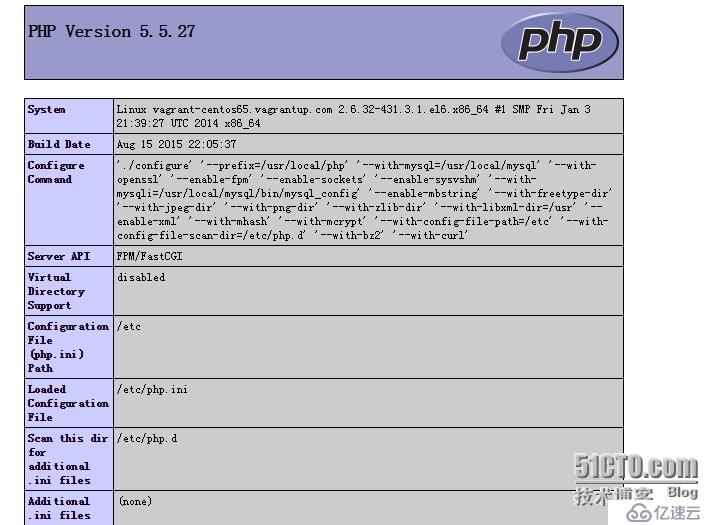
综合以上,完成php的安装,启用php-fpm服务器并与nginx进行整合,测试完成!
免责声明:本站发布的内容(图片、视频和文字)以原创、转载和分享为主,文章观点不代表本网站立场,如果涉及侵权请联系站长邮箱:is@yisu.com进行举报,并提供相关证据,一经查实,将立刻删除涉嫌侵权内容。


