今天小编给大家分享一下Quarkus怎么搭建debug环境的相关知识点,内容详细,逻辑清晰,相信大部分人都还太了解这方面的知识,所以分享这篇文章给大家参考一下,希望大家阅读完这篇文章后有所收获,下面我们一起来了解一下吧。
下面介绍三种创建Quarkus项目的方式
1、创建maven工程,这个不多赘述,是个java程序员都会的
2、添加Quarkus依赖,下面贴出基本的依赖
<properties>
        <quarkus-plugin.version>1.6.0.Final</quarkus-plugin.version>
        <quarkus.platform.version>1.6.0.Final</quarkus.platform.version>
        <surefire-plugin.version>2.22.1</surefire-plugin.version>
        <compiler-plugin.version>3.8.0</compiler-plugin.version>
        <project.build.sourceEncoding>UTF-8</project.build.sourceEncoding>
        <project.reporting.outputEncoding>UTF-8</project.reporting.outputEncoding>
    </properties>
    <dependencyManagement>
        <dependencies>
            <dependency>
                <groupId>io.quarkus</groupId>
                <artifactId>quarkus-bom</artifactId>
                <version>${quarkus.platform.version}</version>
                <scope>import</scope>
                <type>pom</type>
            </dependency>
        </dependencies>
    </dependencyManagement>
    <dependencies>
        <dependency>
            <groupId>io.quarkus</groupId>
            <artifactId>quarkus-resteasy-jsonb</artifactId>
        </dependency>
        <!-- Testing: -->
        <dependency>
            <groupId>io.quarkus</groupId>
            <artifactId>quarkus-junit5</artifactId>
            <scope>test</scope>
        </dependency>
        <dependency>
            <groupId>io.rest-assured</groupId>
            <artifactId>rest-assured</artifactId>
            <scope>test</scope>
        </dependency>
    </dependencies>
    <build>
        <plugins>
            <plugin>
                <groupId>org.apache.maven.plugins</groupId>
                <artifactId>maven-compiler-plugin</artifactId>
                <version>${compiler-plugin.version}</version>
                <configuration>
                    <source>1.8</source>
                    <target>1.8</target>
                    <!-- the parameters=true option is critical so that RESTEasy works fine -->
                    <parameters>true</parameters>
                </configuration>
            </plugin>
            <plugin>
                <!-- you need this specific version to integrate with the other build helpers -->
                <artifactId>maven-surefire-plugin</artifactId>
                <version>${surefire-plugin.version}</version>
                <configuration>
                    <systemPropertyVariables>
                        <java.util.logging.manager>org.jboss.logmanager.LogManager</java.util.logging.manager>
                        <maven.home>${maven.home}</maven.home>
                    </systemPropertyVariables>
                </configuration>
            </plugin>
            <plugin>
                <!-- This is what injects the magic Quarkus bytecode -->
                <groupId>io.quarkus</groupId>
                <artifactId>quarkus-maven-plugin</artifactId>
                <version>${quarkus-plugin.version}</version>
                <executions>
                    <execution>
                        <goals>
                            <goal>build</goal>
                        </goals>
                    </execution>
                </executions>
            </plugin>
        </plugins>
</build>用法和spring的https://start.spring.io/一样。填好你的maven基础信息,选好依赖就可以下载工程了
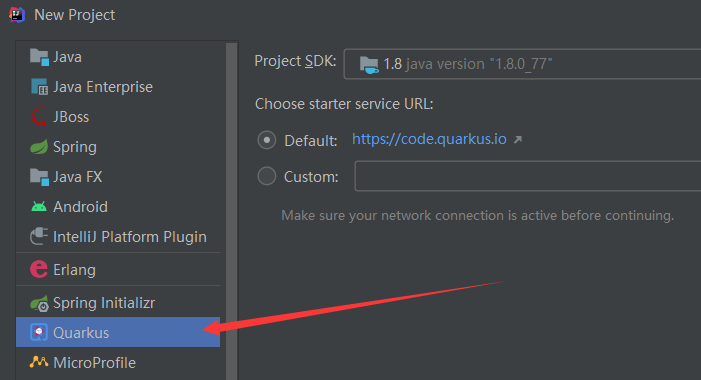
IDEA里已经支持创建Quarkus项目了,和spring boot的原理一样,也是基于https://code.quarkus.io/来的,所以操作的方式和网页上一样,如:
@Produces(MediaType.TEXT_PLAIN)
@Path("/hello")
public class HelloResource {
    @GET
    @Path("/{name}")
    public String hello(@PathParam("name") String name) {
        return "hello" + name;
    }
}
Quarkus基于标准的jax-rs规范来写web的,当然,它也扩展了spring web的@Controller的方式,这个后面会介绍
1、通过运行 mvn quarkus:dev,可以启动应用,启动应用后,会发现打印了:
Listening for transport dt_socket at address: 5005
说明开启了5005调试端口,在IDEA中,可以通过
run-》Attach to process
来直接连接这个端口进行调试
2、可以新建一个main方法,直接debug模式启动,来进行运行和调试,如:
@QuarkusMain
public class Main {
    public static void main(String ... args) {
        Quarkus.run(args);
    }
}
以上就是“Quarkus怎么搭建debug环境”这篇文章的所有内容,感谢各位的阅读!相信大家阅读完这篇文章都有很大的收获,小编每天都会为大家更新不同的知识,如果还想学习更多的知识,请关注亿速云行业资讯频道。
免责声明:本站发布的内容(图片、视频和文字)以原创、转载和分享为主,文章观点不代表本网站立场,如果涉及侵权请联系站长邮箱:is@yisu.com进行举报,并提供相关证据,一经查实,将立刻删除涉嫌侵权内容。


