这篇文章主要介绍了wxpython自定义下拉列表框过程图解,文中通过示例代码介绍的非常详细,对大家的学习或者工作具有一定的参考学习价值,需要的朋友可以参考下
自定义wxpython下拉列表框,支持修改边框颜色,按钮图标的动态变换
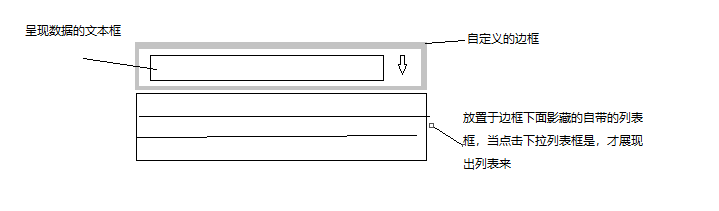
原理同前两片文章一样,使用了两个wx.staticText做边框,一个文本框来显示下拉列表的数据,和一个图片按钮,实现下拉的标志,和一个自带的列表框,
影藏该列表框,不要原来的样式,这里只需要使用它的展示列表的数据功能
自定义列表框的代码:
class MyComBox:
  """自定义下拉列表框"""
  def __init__(self,parent,pos,size=(200,35),choices=[],readOnly=False,borderColor='#EAEAEA',borderSize=1):
    self.defaultfontSize = 10
    self.defaultBorderColor = '#EAEAEA'
    self.defaultFontColor = 'black'

    self.textCtrl,self.combox,self.background,self.arrow_button = self.__CreateComBox(parent,pos,size,
                                             choices,readOnly,borderColor,borderSize)
  def __CreateComBox(self,parent,pos,size,list,readOnly,borderColor,borderSize):
    #创建边框
    border = wx.StaticText(parent,-1,"",pos=pos,size=size)
    border.SetBackgroundColour(borderColor)
    bg = wx.StaticText(border,-1,"",size=((size[0]-borderSize*2),(size[1]-borderSize*2)),pos=(borderSize,borderSize))
    style = wx.TE_READONLY | wx.NO_BORDER

    #创建数据展示框
    self.textCtrl = wx.TextCtrl(bg,-1,size=((size[0]-30),(self.defaultfontSize*2)),
                  pos=(5,(size[1]-2*self.defaultfontSize-borderSize*2)/2),style= style)
    self.textCtrl.SetBackgroundColour('white')
    #点击文本框显示数据
    if not readOnly:
      self.textCtrl.Bind(wx.EVT_LEFT_DOWN,self.__OnClick)

    #创建下拉点击按钮
    bmp = wx.Image("xia.jpg",wx.BITMAP_TYPE_ANY).ConvertToBitmap()
    arrow_button = wx.BitmapButton(bg,-1,bmp,size = (20,size[1]),pos=(size[0]-22,0),style =wx.NO_BORDER)

    #构建列表框,展示列表的数据
    self.chooseBox = wx.ComboBox(parent,-1,value="",size=(size[0],-1),pos = (pos[0],pos[1]+10),choices=list,style=wx.TE_READONLY)
    self.chooseBox.Hide()
    self.chooseBox.Bind(wx.EVT_COMBOBOX_CLOSEUP,self.__GetValue)

    #设置显示下列列表按钮
    arrow_button.SetBackgroundColour('white')
    font = wx.Font(self.defaultfontSize,wx.DEFAULT,wx.NORMAL,wx.NORMAL,False,'微软雅黑')
    self.textCtrl.SetFont(font)

    #设置只读情况的样式
    if readOnly:
      bg.SetBackgroundColour('rgb(240,240,240)')
      self.textCtrl.SetBackgroundColour('rgb(240,240,240)')
      arrow_button.SetBackgroundColour('rgb(240,240,240)')
    else:
     # bg.SetBackgroundColour(self.textCtrl.GetBackgroundColour())
      arrow_button.Bind(wx.EVT_BUTTON,self.__OnClick)

    return self.textCtrl,self.chooseBox,border,arrow_button

  def __GetValue(self,event):
    if self.chooseBox.GetValue()!='':
      self.textCtrl.SetValue(self.chooseBox.GetValue())
      self.chooseBox.Hide()
      bmp = wx.Image("xia.jpg",wx.BITMAP_TYPE_ANY).ConvertToBitmap()
      self.arrow_button.SetBitmap(bmp)
    if self.chooseBox.GetValue()!='请选择':
      self.textCtrl.SetForegroundColour(self.defaultFontColor)


  def __OnClick(self,event):
    self.chooseBox.Show()
    self.chooseBox.Popup()
    bmp = wx.Image("shang.jpg", wx.BITMAP_TYPE_ANY).ConvertToBitmap()
    self.arrow_button.SetBitmap(bmp)

  def GetValue(self):
    return self.textCtrl.GetValue()

  def SetValue(self,value):
    if not value:
      value = u'请选择'
    self.textCtrl.SetValue(value)
    self.combox.SetValue(value)


  def SetList(self,list):
    """设置下拉列表中的数据"""
    self.combox.SetItems(list)

  def SetBorderColor(self,color):
    self.background.SetBackgroundColour(color)


  def SetFont(self,font):
    self.textCtrl.SetFont(font)

  def SetForegroundColour(self,color):
    self.textCtrl.SetForegroundColour(color)

  def Bind(self, event, handler, source=None, id=wx.ID_ANY, id2=wx.ID_ANY):
    self.textCtrl.Bind(event,handler)
图片:, ,这个需要下载下去,或者自己找漂亮的图片
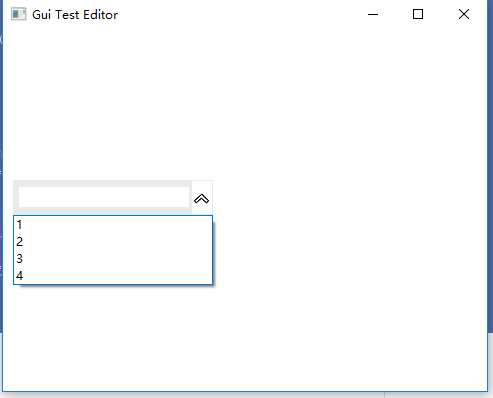
测试代码:
# coding:utf-8
import wx

from wxpython import Mywxpython

app = wx.App()
frame = wx.Frame(None, title="Gui Test Editor", pos=(1000, 200), size=(500, 400))

panel = wx.Panel(frame)
panel.SetBackgroundColour('white')
# path_text = wx.TextCtrl(panel, size=(260, 36))
#
# my_text = Mywxpython.MyText(panel,pos=(10, 50),size=(260,36))
# my_text1 = Mywxpython.MyText(panel,pos=(10, 100),size=(260,36),readOnly=True)
# my_text.SetBorderColor('red')
list = ['1','2','3','4']
#wx.ComboBox(panel,-1,value="",size=(80,-1),pos = (100,110),choices=list,style=wx.TE_READONLY)

#my_button = Mywxpython.MyButton(panel,title="点我",pos=(10, 150))
combox = Mywxpython.MyComBox(panel,choices=['1','2','3','4'],pos=(10, 150))
#combox .SetValue("请选择")
frame.Show()
app.MainLoop()
结果图:
按钮又有点丑,需要自己定义,搞两个好看得图标,
以上就是本文的全部内容,希望对大家的学习有所帮助,也希望大家多多支持亿速云。
免责声明:本站发布的内容(图片、视频和文字)以原创、转载和分享为主,文章观点不代表本网站立场,如果涉及侵权请联系站长邮箱:is@yisu.com进行举报,并提供相关证据,一经查实,将立刻删除涉嫌侵权内容。


