这篇文章主要讲解了如何实现angular组件间传值测试,内容清晰明了,对此有兴趣的小伙伴可以学习一下,相信大家阅读完之后会有帮助。
前言
我们知道angular组件间通讯有多种方法,其中最常用的一种方法就是借助于 @Input 和 @Output 进行通讯。具体如何通讯请参考angular组件间通讯,本文不再赘述,我们来讲讲关于此方法如何进行单元测试。
创建假组件
我们单元测试父组件与子组件的的交互是否符合我们的要求,我们在父组件进行测试,就需要模拟一个假的子组件出来,这样排除其他因素对测试的影响。
比如现在我在分页组件里写了一个每页大小选择组件,现在要测试一下组件间交互。现在分页组件就是我们的父组件,每页大小组件就是我们的子组件。我们现在需要去模拟一个假的子组件出来。我们先模拟一个假模块出来。
我们的子组件在core模块里,我们在core模块下创造一个core-testing模拟模块。再在core-testing模块下创造一个core组件,因为我们是一个模拟模块,我们只需要ts文件即可。
@Component({
 selector: 'app-size',
 template: `
 <p>
  size-select works!
 </p>
 `,
 styles: []
})
export class SizeComponent implements OnInit {
 constructor() {
 }

 ngOnInit() {
 }
}
为了我们可以在父组件的测试文件中得到模拟的子组件,我们还需要一个controller,在core-testing文件夹下创建一个core-testing-controller.ts文件。CoreTestingController类继承TestingController。
export class CoreTestingController extends TestingController {
}
同时在我们的core-testing.module里声明CoreTestingController为提供者
providers: [
 CoreTestingController
 ]
此时我们的目录树
core-testing git:(134) ✗ tree
.
├── core-testing-controller.ts
├── core-testing.module.ts
├── page
│ └── page.component.ts
└── size
└── size.component.ts
因为我们是模拟的子组件,所以我们应该添加子组件的@Input 和 @Output,同时在构造函数里把这个模拟的子组件添加到CoreTestingController里。
export class SizeComponent implements OnInit {
 @Input() size: number;

 @Output() onChangeSize = new EventEmitter<number>();

 constructor(private controller: CoreTestingController) {
 this.controller.addUnit(this);
 }
}
此时我们的准备工作就完成了。
单元测试
首先我们引入假组件并声明提供者
import {CoreTestingController} from '../core-testing/core-testing-controller';
import {SizeComponent} from '../core-testing/size/size.component';

beforeEach(async(() => {
 TestBed.configureTestingModule({
  declarations: [ PageComponent, SizeComponent ],
  imports: [FormsModule],
  providers: [
  CoreTestingController
  ]
 })
 .compileComponents();
 }));
我你们这里引入的是我们创造的假的SizeComponent,因为我们父组件与子组件在同一个模块里,所以我们直接引入SizeComponent就可以。
此时我们父组件想要子组件时就会使用假的子组件。
我们先断言@Input,我们断言父组件的值与我们假的子组件值相等
it('选择每页大小', () => {
 const controller = TestBed.get(CoreTestingController) as CoreTestingController;
 const sizeComponent = controller.get(SizeComponent) as SizeComponent;
 expect(sizeComponent.size).toBe(component.size);
 });
我们这里的get方法就对应的我们之前的构造函数的addUnit方法,具体参考TestingController类定义的方法。
然后我们再断言子组件向父组件@Output也没有问题,我们先spyon父组件接收子组件值的方法,然后定义一个变量并传给父组件,然后断言父组件接收到的值与子组件传的值相同。
spyOn(component, 'onSizeSelected');
const emitSize = 4;
sizeComponent.onChangeSize.emit(emitSize);
expect(component.onSizeSelected).toHaveBeenCalledWith(4);
这时我们就达到了我们测试的目的。
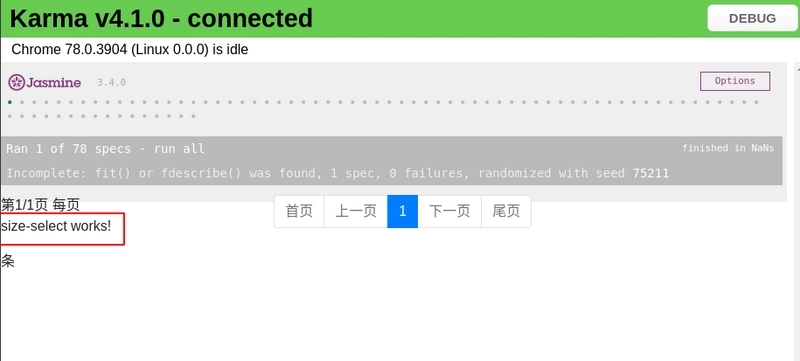
我们启动测试,发现我们本来的选择下拉框变成了文字,这就是我们假的子组件的效果。
看完上述内容,是不是对如何实现angular组件间传值测试有进一步的了解,如果还想学习更多内容,欢迎关注亿速云行业资讯频道。
免责声明:本站发布的内容(图片、视频和文字)以原创、转载和分享为主,文章观点不代表本网站立场,如果涉及侵权请联系站长邮箱:is@yisu.com进行举报,并提供相关证据,一经查实,将立刻删除涉嫌侵权内容。


