Remote Sync ----- 远程同步,支持本地复制,或者与其他SSH 、rsync主机同步,功能类似于scp,但是要比scp丰富。
官方网站:http://rsync.samba.org1、可以镜像保存整个目录树和文件系统。
2、可以很容易做到保持原来文件的权限、时间、软硬链接等等,无须特殊权限即可安装。
3、快速:第一次同步时 rsync 会复制全部内容,但在下一次只传输修改过的文件。rsync 在传输数据的过程中可以实行压缩及解压缩操作,因此可以使用更少的带宽。
4、安全:可以使用scp、ssh等方式来传输文件,当然也可以通过直接的socket连接。
5、支持匿名传输,以方便进行网站镜像。
rsync 是系统内核自带的,rpm - q rsync查看包 ,无需额外安装.如果是最小化安装的话,使用 yum安装一下即可1.修改rsyncd.conf配置文件
[root@server ~]# vim /etc/rsyncd.conf
#7、8、9行,
uid = nobody
gid = nobody
use chroot = yes

#11行,
pid file = /var/run/rsyncd.pid

#16行,
dont compress   = *.gz *.tgz *.zip *.z *.Z *.rpm *.deb *.bz2

#追加端口号
port 873

#追加日志文件路径
log file = /var/log/rsyncd.log

#追加授权访问地址段
hosts allow = 192.168.142.0/24

#添加共享模块
#模块名称
[wwwroot]

#源共享目录路径
path = /var/www/html

#网站说明
comment = www.bdqn.cn

#是否只读
read only = yes

#认证用户名
auth users = backuper

#认证用户密码文件路径
secrets file = /etc/rsyncd_users.db
2.创建认证用户密码文件
[root@server ~]# vim /etc/rsyncd_users.db
#写入认证用户名与密码
backuper:abc123
3.授权仅属主的最大权限
[root@server ~]# chmod 600 /etc/rsyncd_users.db4.安装HTTP的服务
[root@server ~]# yum install httpd -y5.创建共享内容
[root@server ~]# cd /var/www/html
[root@server html]# echo "this is test web" > index.html
6.开启服务
[root@server html]# rsync --daemon7.查看服务状态
[root@server html]# netstat -ntap | grep rsync
tcp        0      0 0.0.0.0:873             0.0.0.0:*               LISTEN      60268/rsync
tcp6       0      0 :::873                  :::*                    LISTEN      60268/rsync
8.关闭防火墙及安全功能
[root@server html]# systemctl stop firewalld.service
[root@server html]# setenforce 01.关闭防火墙及安全功能
[root@localhost ~]# systemctl stop firewalld.service
[root@localhost ~]# setenforce 0
2.安装http服务
[root@localhost ~]# yum install httpd -y3.客户发起端配置方式
#配置源方式一,用户名@主机地址::共享模块名
[root@localhost ~]# rsync -avz backuper@192.168.142.153::wwwroot /var/www/html
Password: #输入用户密码
receiving incremental file list
./
index.html

sent 83 bytes  received 172 bytes  72.86 bytes/sec
total size is 17  speedup is 0.07

#查看共享到的内容
[root@localhost ~]# cat /var/www/html/index.html
this is test web
#配置源方式二,rsync://用户名@主机地址/共享模块名
[root@localhost ~]# rsync -avz rsync://backuper@192.168.142.153/wwwroot /var/www/html
Password:
receiving incremental file list
./
index.html
sent 83 bytes received 172 bytes 56.67 bytes/sec
total size is 17 speedup is 0.07
#查看共享到的内容
[root@localhost ~]# cat /var/www/html/index.html
this is test web4.创建免交互密码文件
[root@localhost ~]# vim /etc/server.pass
abc123

[root@localhost ~]# chmod 600 /etc/server.pass

#免交互配置源方式
[root@localhost ~]# rsync -avz --delete --password-file=/etc/server.pass backuper@192.168.142.153::wwwroot /var/www/html
receiving incremental file list
./
index.html

sent 83 bytes  received 172 bytes  510.00 bytes/sec
total size is 17  speedup is 0.07

#查看共享到的内容
[root@localhost ~]# cat /var/www/html/index.html
this is test web1.定期同步的不足:
执行备份的时间固定,延迟明细,实时性差;
当同步源长期不变化时,密集的定期任务是不必要的
2.实时同步的优点:
一旦同步源出现变化,立即启用备份;
只要同步源不变化,则不执行备份Inotify 是一个 Linux特性,它监控文件系统操作,比如读取、写入和创建。Inotify 反应灵敏,用法非常简单,并且比 cron 任务的繁忙轮询高效得多。
从版本 2.6.13 开始提供;
可以监控文件系统的变化情况,并作出通知响应;
辅助软件:inotify-tools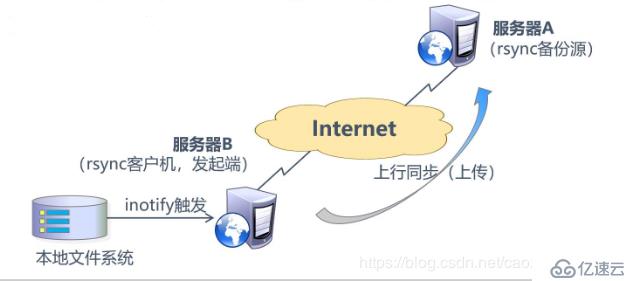
1.配置rsync源服务器,修改rsyncd.conf配置文件
[root@server ~]# vim /etc/rsyncd.conf
#关闭只读
read only = no
2.调整客户端的inotify内核参数
[root@client ~]# vim /etc/sysctl.conf
#监控队列大小
fs.inotify.max_queued_events = 16384

#最多监控实例数
fs.inotify.max_user_instances = 1024

#每个实例最多监控文件数
fs.inotify.max_user_watches = 1048576
3.生效内核参数
[root@client ~]# sysctl -p
fs.inotify.max_queued_events = 16384
fs.inotify.max_user_instances = 1024
fs.inotify.max_user_watches = 1048576
4.安装编译环境
[root@client ~]# yum install -y gcc gcc-c++ make5.远程获取资源包
[root@client ~]# mount.cifs //192.168.142.1/inotify /mnt
[root@sclient ~]# cd /mnt
[root@client mnt]# ls
inotify-tools-3.14.tar.gz
6.解压资源包
[root@client mnt]# tar zxvf inotify-tools-3.14.tar.gz -C /opt7.配置inotify
[root@client mnt]# cd /opt/inotify-tools-3.14/
[root@client inotify-tools-3.14]# ./configure
8.编译安装
[root@client inotify-tools-3.14]# make && make install9.安装inotify-tools辅助工具
[root@client inotify-tools-3.14]# inotifywait -mrq -e modify,create,move,delete /var/www/html/

#-m表示持续进行监控,-r表示递归监控所有子对象,-q表示简化输出信息,-e表示要监控哪些时间类型
10.重开一个终端登录,增删文件
#创建文件
[root@client html]# touch abc
[root@client html]# ls
abc  index.html

#删除文件
[root@client html]# rm -rf abc
[root@client html]# ls
index.html
11.返回监控端,验证同步效果
[root@client inotify-tools-3.14]# inotifywait -mrq -e modify,create,move,delete /var/www/html/
/var/www/html/ CREATE abc       #创建记录
/var/www/html/ DELETE abc       #删除记录
12.通过inotifywait触发rsync同步操作脚本
vim inotify.sh
#!/bin/bash
INOTIFY_CMD="inotifywait -mrq -e modify,create,attrib,move,delete /var/www/html/"
RSYNCLCMD="rsyne -azH --delete --password-file=/etc/server.pass /var/www/htm1/ backuper@192.168.142.153::wwwroot/"
$INOTIFY_CMD | while read DIRECTORY EVENT FILE
#读取输出的监控记录
do
if [ $(pgrep rsync | wc -l) -le 0 ] ; then
#若rsync为执行,则立即启动
$RSYNC_CMD
fi
done
13.源端于客户端都需要html目录最高授权
[root@server www]# chmod 777 html/
[root@client www]# chmod 777 html/
14.执行脚本
[root@client opt]# source inotify.sh15.重开终端,并切入共享目录
[root@client opt]# cd /var/www/html/16.写入新的内容
[root@client html]# echo "this is my update" > test.txt**1.回到源端查看同步数据包**
[root@server html]# ls
index.html test.txt2.查看同步数据
[root@server html]# cat test.txt
this is my update免责声明:本站发布的内容(图片、视频和文字)以原创、转载和分享为主,文章观点不代表本网站立场,如果涉及侵权请联系站长邮箱:is@yisu.com进行举报,并提供相关证据,一经查实,将立刻删除涉嫌侵权内容。


