小编给大家分享一下Vue怎么实现多标签选择器,相信大部分人都还不怎么了解,因此分享这篇文章给大家参考一下,希望大家阅读完这篇文章后大有收获,下面让我们一起去了解一下吧!
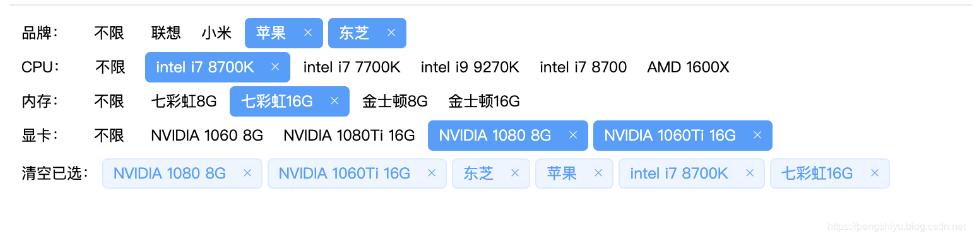
实现效果
实现代码
<html lang="en">

<head>
 <title>Document</title>

 <!-- 引入本地组件库 -->
 <link rel="stylesheet" href="static/element-ui/index.css" >
 <script src="static/element-ui/vue.js"></script>
 <script src="static/element-ui/index.js"></script>

 <!-- 引入CDN样式 -->
 <!-- <link rel="stylesheet" href="https://unpkg.com/element-ui/lib/theme-chalk/index.css" > -->
 <!-- <script src="https://cdn.jsdelivr.net/npm/vue/dist/vue.js"></script> -->
 <!-- <script src="https://unpkg.com/element-ui/lib/index.js"></script> -->

 <style>
  .not-active {
   display: inline-block;
   font-size: 12px;
   margin: 5px 8px;
  }

  span {
   margin: 0 2px;
  }
 </style>
</head>

<body>

 <div id="app">
  <!-- 待选标签 -->
  <div v-for='(category, categoryIndex) in categories' :key="category.id">
   <!-- 分类 -->
   <span class="not-active">{{category.name}}:</span>

   <template>
    <span v-if="category.count"class="not-active" @click="clearCategory(category, categoryIndex)"> 不限</span>
    <my-tag v-else>不限</my-tag>
   </template>

   <!-- 标签 -->
   <template v-for='(child, childIndex) in category.children'>
    <my-tag v-if="child.active" :closable='true' @click-child='clickChild(category, categoryIndex, child, childIndex)'>
     {{ child.name }}
    </my-tag>
    <span v-else class="not-active" @click='clickChild(category, categoryIndex, child, childIndex)'>{{ child.name }}</span>
   </template>
  </div>

  <!-- 已选标签 -->
  <div v-if='conditions.length'>
   <span class="not-active" @click="clearCondition">清空已选:<span>

   <el-tag
   v-for='(condition, index) in conditions'
   :key="condition.id"
   type="primary"
   :closable="true"
   size="small"
   :disable-transitions="true"
   @close='removeCondition(condition, index)'
   @click='removeCondition(condition, index)'>
    {{condition.name}}
   </el-tag>
  </div>
 </div>

 <script src="./data.js"></script>

 <script>
  // 简单封装一个公用组件
  Vue.component('my-tag', {
   template: "<el-tag v-bind='$attrs' v-on='$listeners' effect='dark' size='small' :disable-transitions='true' @click='clickChild' @close='clickChild'><slot></slot></el-tag>",

   methods: {
    clickChild() {
     this.$emit("click-child")
    }
   }
  });

  var app = new Vue({
   el: '#app',
   data() {
    return {
     categories, // 分类标签,可从外部加载配置
     conditions: [] // 已选条件
    }
   },

   watch: {
    // 监听条件变化,按照请求接口拼装请求参数
    conditions(val){
     let selectedCondition = {};

     for(let categorie of this.categories){
      let selected_list = [];
      for(let child of categorie.children){
       if(child.active){
        selected_list.push(child.name);
       }
      }
      selectedCondition[categorie.name] = selected_list.join("|")
     }
     console.log(selectedCondition);
    }
   },

   methods: {
    // 处理标签点击事件,未选中则选中,已选中则取消选中
    clickChild(category, categoryIndex, child, childIndex) {
     let uid = `${categoryIndex}-${childIndex}`
     child.uid = uid;
     console.log(uid)

     // 取消选择
     if (child.active === true) {
      category.count--;
      child.active = false;
      this.conditions.forEach((conditionChild, index) => {
       if (conditionChild.uid === child.uid) {
        this.conditions.splice(index, 1);
       }
      });
     // 选择
     } else {
      category.count++;
      child.active = true;
      this.conditions.push(child);
     }
    },

    // 清除已选整个类别标签
    clearCategory(category, categoryIndex) {
     category.count = 0;

     // 可选列表均为未选中状态
     category.children.forEach(child => {
      child.active = false;
     })

     // 清空该类已选元素
     for (let index = this.conditions.length - 1; index >= 0; index--) {
      const conditionChild = this.conditions[index];
      if (conditionChild.uid.startsWith(categoryIndex)) {
       this.conditions.splice(index, 1);
      }
     }
    },

    // 移除一个条件
    removeCondition(condition, index) {
     let categoryIndex = condition.uid.split("-")[0];
     this.categories[categoryIndex].count --;

     this.conditions.splice(index, 1)
     condition.active = false;
    },

    // 清空所有条件
    clearCondition() {
     for(let i = this.conditions.length-1; i >=0 ; i--){
      this.removeCondition(this.conditions[i], i);
     }
    }
   }
  });
 </script>

</body>

</html>
标签筛选的数据格式
data.js
var categories = [{
 name: '品牌',
 count: 0,
 children: [{
  name: '联想',
 }, {
  name: '小米',

 }, {
  name: '苹果',

 }, {
  name: '东芝',

 }]
}, {
 name: 'CPU',
 count: 0,
 children: [{
  name: 'intel i7 8700K',

 }, {
  name: 'intel i7 7700K',

 }, {
  name: 'intel i9 9270K',

 }, {
  name: 'intel i7 8700',

 }, {
  name: 'AMD 1600X',


 }]
}, {
 name: '内存',
 count: 0,
 children: [{
  name: '七彩虹8G',

 }, {
  name: '七彩虹16G',

 }, {
  name: '金士顿8G',

 }, {
  name: '金士顿16G',

 }]
}, {
 name: '显卡',
 count: 0,
 children: [{
  name: 'NVIDIA 1060 8G',

 }, {
  name: 'NVIDIA 1080Ti 16G',

 }, {
  name: 'NVIDIA 1080 8G',

 }, {
  name: 'NVIDIA 1060Ti 16G',

 }]
}]
以上是“Vue怎么实现多标签选择器”这篇文章的所有内容,感谢各位的阅读!相信大家都有了一定的了解,希望分享的内容对大家有所帮助,如果还想学习更多知识,欢迎关注亿速云行业资讯频道!
免责声明:本站发布的内容(图片、视频和文字)以原创、转载和分享为主,文章观点不代表本网站立场,如果涉及侵权请联系站长邮箱:is@yisu.com进行举报,并提供相关证据,一经查实,将立刻删除涉嫌侵权内容。


