本篇文章给大家分享的是有关利用zrender.js怎么绘制一个体温单,小编觉得挺实用的,因此分享给大家学习,希望大家阅读完这篇文章后可以有所收获,话不多说,跟着小编一起来看看吧。
以下为模拟数据
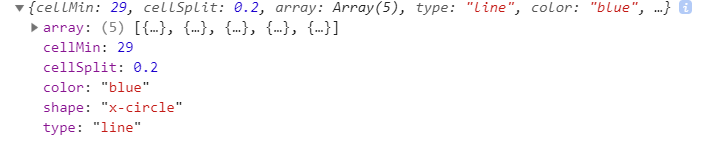
[{"time":19,"text":"入\n院\n19\n时\n11\n分","position":42,"cellMin":29.0,"cellSplit":0.2,"type":"text","color":"red","shape":null},{"time":22,"text":"手\n术","position":42,"cellMin":29.0,"cellSplit":0.2,"type":"text","color":"red","shape":null},{"time":129,"text":"手\n术","position":42,"cellMin":29.0,"cellSplit":0.2,"type":"text","color":"red","shape":null},{"cellMin":29.0,"cellSplit":0.2,"y":30.0,"type":"baseline","color":"#000","shape":null},{"cellMin":29.0,"cellSplit":0.2,"y":31.0,"type":"baseline","color":"#000","shape":null},{"cellMin":29.0,"cellSplit":0.2,"y":32.0,"type":"baseline","color":"#000","shape":null},{"cellMin":29.0,"cellSplit":0.2,"y":33.0,"type":"baseline","color":"#000","shape":null},{"cellMin":29.0,"cellSplit":0.2,"y":34.0,"type":"baseline","color":"#000","shape":null},{"cellMin":29.0,"cellSplit":0.2,"y":35.0,"type":"baseline","color":"#000","shape":null},{"cellMin":29.0,"cellSplit":0.2,"y":36.0,"type":"baseline","color":"#000","shape":null},{"cellMin":29.0,"cellSplit":0.2,"y":37.0,"type":"baseline","color":"#000","shape":null},{"cellMin":29.0,"cellSplit":0.2,"y":38.0,"type":"baseline","color":"#000","shape":null},{"cellMin":28.0,"cellSplit":0.2,"y":39.0,"type":"baseline","color":"red","shape":null},{"cellMin":29.0,"cellSplit":0.2,"y":40.0,"type":"baseline","color":"#000","shape":null},{"cellMin":29.0,"cellSplit":0.2,"y":41.0,"type":"baseline","color":"#000","shape":null},{"cellMin":29.0,"cellSplit":0.2,"y":42.0,"type":"baseline","color":"#000","shape":null},{"cellMin":29.0,"cellSplit":0.2,"array":[{"time":19,"tips":"体温37.1","value":"37.1","shape":"x","Break":"false","type":"temperature","extraArr":[],"others":[]},{"time":21,"tips":"体温36.9","value":"36.9","shape":"x","Break":"false","type":"temperature","extraArr":[],"others":[]},{"time":30,"tips":"体温36.5","value":"36.5","shape":"x","Break":"false","type":"temperature","extraArr":[],"others":[]},{"time":38,"tips":"体温36.6","value":"36.6","shape":"x","Break":"false","type":"temperature","extraArr":[],"others":[]},{"time":54,"tips":"体温36.7","value":"36.7","shape":"x","Break":"false","type":"temperature","extraArr":[],"others":[]}],"type":"line","color":"blue","shape":"x-circle"},{"cellMin":-10.0,"cellSplit":2.0,"array":[{"time":19,"shape":"empty-circle","tips":"呼吸20","value":"20","Break":"false"},{"time":21,"shape":"empty-circle","tips":"呼吸20","value":"20","Break":"false"},{"time":30,"shape":"empty-circle","tips":"呼吸19","value":"19","Break":"false"},{"time":38,"shape":"empty-circle","tips":"呼吸18","value":"18","Break":"false"},{"time":54,"shape":"empty-circle","tips":"呼吸19","value":"19","Break":"false"}],"type":"line","color":"black","shape":"empty-circle"},{"cellMin":-2.0,"cellSplit":1.0,"array":[{"time":19,"tips":"疼痛7","value":"7","Break":"false","type":"pain","extraArr":[{"extra":"3","extraColor":"red","extraTips":"疼痛评价3"}],"others":[]},{"time":23,"tips":"疼痛3","value":"3","Break":"false","type":"pain","extraArr":[],"others":[]},{"time":27,"tips":"疼痛3","value":"3","Break":"false","type":"pain","extraArr":[],"others":[]},{"time":33,"tips":"疼痛3","value":"3","Break":"false","type":"pain","extraArr":[],"others":[]},{"time":39,"tips":"疼痛3","value":"3","Break":"false","type":"pain","extraArr":[{"extra":"3","extraColor":"red","extraTips":"疼痛评价3"}],"others":[]},{"time":44,"tips":"疼痛3","value":"3","Break":"false","type":"pain","extraArr":[],"others":[]},{"time":51,"tips":"疼痛3","value":"3","Break":"false","type":"pain","extraArr":[],"others":[]},{"time":58,"tips":"疼痛3","value":"3","Break":"false","type":"pain","extraArr":[{"extra":"3","extraColor":"red","extraTips":"疼痛评价3"}],"others":[]}],"type":"line","color":"red","shape":"empty-circle"},{"bgColor":"rgba(255,0,0,0.7)","cellMin":30.0,"cellSplit":2.0,"array":[{"time":19,"v1":69,"v1Tips":"心率69","v2":69,"v2Tips":"脉搏69","Break":"false"},{"time":21,"v1":70,"v1Tips":"心率70","v2":70,"v2Tips":"脉搏70","Break":"false"},{"time":30,"v1":83,"v1Tips":"心率83","v2":83,"v2Tips":"脉搏83","Break":"false"},{"time":38,"v1":78,"v1Tips":"心率78","v2":78,"v2Tips":"脉搏78","Break":"false"},{"time":54,"v1":77,"v1Tips":"心率77","v2":77,"v2Tips":"脉搏77","Break":"false"}],"type":"area","color":"red","shape":null},{"text":null,"y":"28","cellMin":-10.0,"cellSplit":2.0,"array":[],"type":"tag","color":"black","shape":null},{"text":null,"y":null,"cellMin":30.0,"cellSplit":2.0,"array":[],"type":"tag","color":"black","shape":null}]首先创建filterData方法 用于过滤数据 text文本 line线段 area圆 tag暂时用不到 今天说的是折线所以创建zrLine 方法
filterData(){
const data = chartData
data.forEach(el => {
switch (el.type) {
case "text":
// this.zrText(el)
break;
case "line":
this.zrLine(el)
break;
case "area":
this.zrPolyline(el)
break;
case "tag":
this.zrTag(el)
break;
default:
break;
}
});
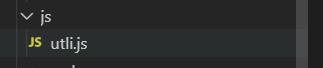
}我们在新增一个文件夹创建utli.js这个文件夹的作用为我们把创建线创建圆的公共方法写在这个js文件里
utli.js 我们先说 createLine createCircle
createLine 需要传5个参数分别为开始点的横纵坐标 结束点的横纵坐标 还有线的样式
createCircle 需要传4个参数分别为 圆点的横纵坐标 圆的半径 和样式
addHover 也需要 这时我们需要在init 方法里添加一段代码(上一章创建的初始化方法) 这段代码为创建一个div到时我们鼠标移到圆上会弹出文本信息的时候回用到
var div = document.createElement("div")
   div.classList.add("tips")
   document.getElementById("main").append(div)
utli.js
//线段
export const createLine = (x1,y1,x2,y2,style)=>{
return new zrender.Line({
shape:{
x1:x1,
y1:y1,
x2:x2,
y2:y2
},
style:style,
});
};
// cx 横坐标 cy纵坐标 r半径 空心圆
export const createCircle = (cx,cy,r,style)=>{
return new zrender.Circle({
shape:{
cx:cx,
cy:cy,
r:r
},
style:style,
zlevel:4
})
}
//添加horver事件 el 元素对象 config 一些配置项 x x轴坐标 y y轴坐标 shapeOn鼠标移入一些属性配置 shapeOn鼠标移出一些属性配置 shape配置项看官网
export const addHover = (el,config,x,y,shapeOn,shapeOut) => {
const domTips = document.getElementsByClassName("tips")
el.on('mouseover',function(){
domTips[0].innerHTML = config.tips
domTips[0].setAttribute("style",`position:absolute;top:${y-13}px;left:${x}px;display:block;font-size:10px;background-color:rgba(0,0,0,.7);padding:3px;border-radius:3px;color:#fff`)
el.animateTo({
shape:shapeOn
},100,0)
}).on('mouseout',function () {
domTips[0].setAttribute("style",`display:none`)
el.animateTo({
shape:shapeOut
},100,0)
})
}
//多边形
export const createPolygon = (points,style) => {
return new zrender.Polyline({
shape:{
points:points,
},
style:style
})
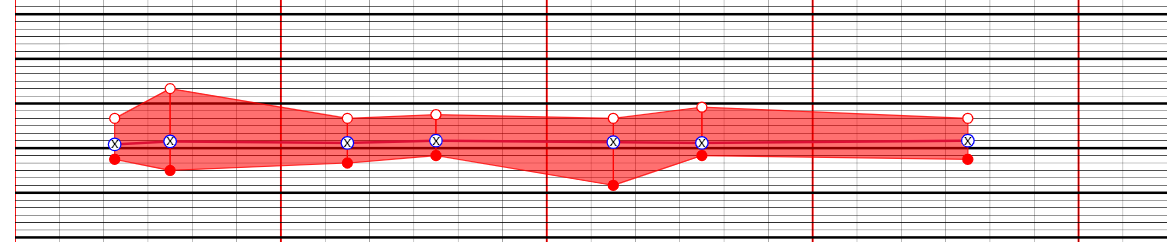
}zrLine方法里的第一段代码 判断这个折线拐点是需要空心圆还是实心圆还是其他的形状 都通过shape决定 color为圆的边框颜色填充色为白色 先定义一个style变量到时好实现自定义
var style = {}
   switch (data.shape) {
    case "x-circle":
     style = {
      stroke:data.color,
      fill:"#fff",
      text:"x",
     }
     break;
    case "empty-circle":
     style = {
      stroke:data.color,
      fill:"#fff",
      text:"",
     }
     break;

    default:
     break;
   }
这里需要在添加2个方法
getX
//获取X坐标 data当前时间点
  getX(data){
   let XShareOne = this.XShareOne()
   return data * XShareOne
  },
transformY
//转换y轴坐标点为正确坐标点 因为y轴坐标是顶点为0递增的 所有用总高度减去原来坐标的高度剩下的高度就是正确坐标点
  //i代表一个格子代表几个高度
  transformY(data,i){
   let YHeight = this.YShareOne()

   //计算出剩余高度
   let surplusHeight = this.canavsHeight - (YHeight/i) * data
   return surplusHeight
  },
这段代码意思是先把数据遍历出来 在通过time属性计算出x坐标 value值计算出y坐标 x轴左边基本是以time为基本来计算的 y轴坐标可能会随数据变化而有所改变 Break属性为是否断线 如果需要断线就位true
data.array.forEach((el,i) =>{
    if (i > 0) {
     let XShareOne = this.XShareOne()
     let firstX = this.getX(data.array[i-1].time)
     let firstY = this.transformY(data.array[i-1].value,1)
     let x = this.getX(data.array[i].time)
     let y = this.transformY(data.array[i].value,1)
     if (data.array[i-1].Break == "false") {
      let line = createLine(firstX,firstY,x,y,{
        stroke:"#af2377",
        lineWidth:2,
      })
      this.zr.add(line)
     }
    }
    if (el.extraArr && el.extraArr.length > 0) {
      el.extraArr.forEach((item,a) => {
       let x = this.getX(el.time)
       let y = this.transformY(el.value,1)
       let lastY = this.transformY(item.extra,1)
       let dottedLine = createLine(x,y,x,lastY,{
         stroke:"#af2377",
         lineWidth:2,
         lineDash:[2,2]
       })
       this.zr.add(dottedLine)
       el.extraArr.forEach((item,a) => {
        let getY = this.transformY(item.extra,1)
        let Circle = createCircle(x,getY,5,{
         stroke:item.extraColor,
         fill:"#fff",
        })
        this.zr.add(Circle)
        addHover(Circle,{
          tips:item.extraTips,
        },x,getY,{
          r:8,
         },{
          r:5,
        })
       })
      })
     }
    let getX = this.getX(el.time)
    let getY = this.transformY(el.value,1)
    let Circle = createCircle(getX,getY,5,style)
    this.zr.add(Circle)
    addHover(Circle,el,getX,getY,{
      r:8,
     },{
       r:5,
    })
   })
这步完成折线图应该就画好了
下次我们将阴影的画法
以上就是利用zrender.js怎么绘制一个体温单,小编相信有部分知识点可能是我们日常工作会见到或用到的。希望你能通过这篇文章学到更多知识。更多详情敬请关注亿速云行业资讯频道。
免责声明:本站发布的内容(图片、视频和文字)以原创、转载和分享为主,文章观点不代表本网站立场,如果涉及侵权请联系站长邮箱:is@yisu.com进行举报,并提供相关证据,一经查实,将立刻删除涉嫌侵权内容。


