前言:
SSH远程管理
1.配置OpenSSH服务端
2.使用SSH客户端程序
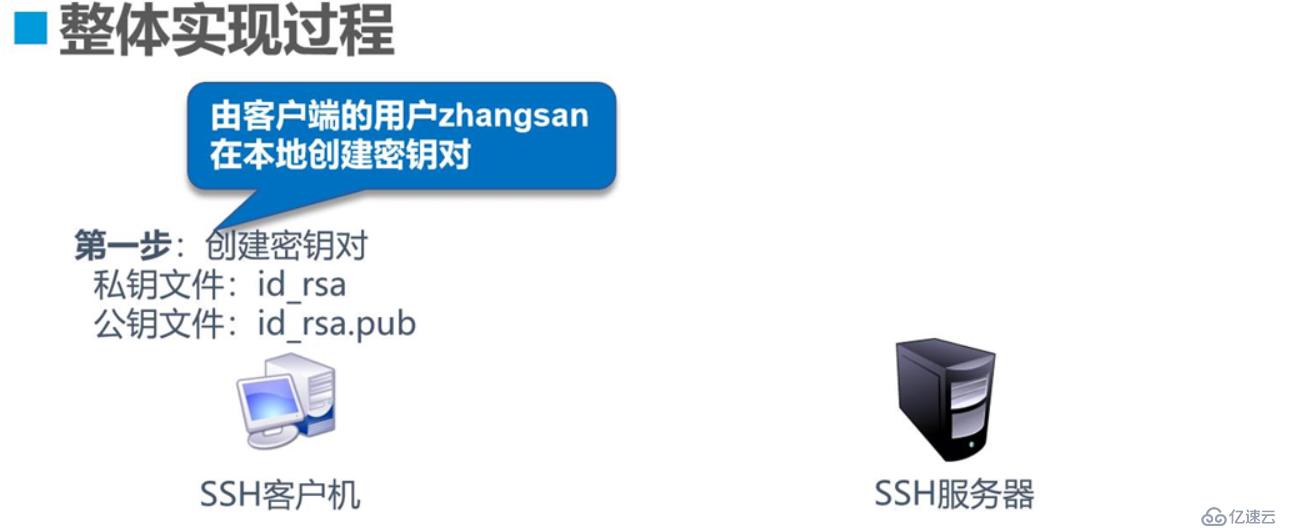
3.密钥对验证的SSH体系
TCP Wrappers概述 (针对程序的管理机制)
1.TCP Wrappers 概述
2.TCP Wrappers访问策略
第二种远程访问:telnet 也是远程访问,是不会经过加密的明文传输,可以用抓包工具直接获取其中的消息 23 tcp 端口;而ssh 是典型的密文访问
因此tlelent 主要应用于局域网;ssh皆可
第三种远程访问是远程桌面,3389端口号,带有图形化访问
例:mstsc命令 windows 中的远程桌面访问形式
通过远程访问的用户必须给其设置密码
vnc软件可以跨微软系统和linux系统之间连接
teamviewer软件 手机连接电脑
被远程方可以手动关闭拒绝远程
ssh_config 是针对客户端的
shhd_config是服务端
[root@localhost ~]# vim /etc/ssh/sshd_config
......
#Port 22    '端口号(可以修改)'
#ListenAddress 0.0.0.0      '监听地址'
Protocol 2      '版本'
#UseDNS no      'DNS反向解析 否'
AllowUsers 白名单 :仅允许登陆
DenyUsers 黑名单 :仅拒绝登陆
[root@localhost ~]# vim /etc/ssh/sshd_config

#LoginGraceTime 2m      '登录时间2min 超过2min自动注销'
#PermitRootLogin yes    '允许root登陆 是 前面有#符号注释则不可以使用'
#StrictModes yes        '严格遵循标准模式 是'
#MaxAuthTries 6     '最大尝试登陆次数为 6'
#MaxSessions 10     '最大创建会话为 10'
PermitEmptPasswords no      '允许空密码登陆 否'
······
AllowUsers jerry admin@61.23.24.25
'白名单,只允许以下用从指定终端登录,用户与用户之间用空格隔开'
AllowUsers的权限比DenyUsers的权限大,AllowsUsers不要与DenyUsers同时用
密钥对的方式需要自己去创建
密钥对里面包含公钥和私钥,合在一起叫密钥对
公钥给对方,私钥自己保留,这种方式叫做非对称密钥 rsa 相当于虎符
des 或aex或3des模式 是对称密钥,相当于门钥匙
[root@localhost ~]# vim /etc/ssh/sshd_config
······
#PubkeyAuthentication yes '密钥对验证开启 是'
#PasswordAuthentication yes '身份密码验证 是'
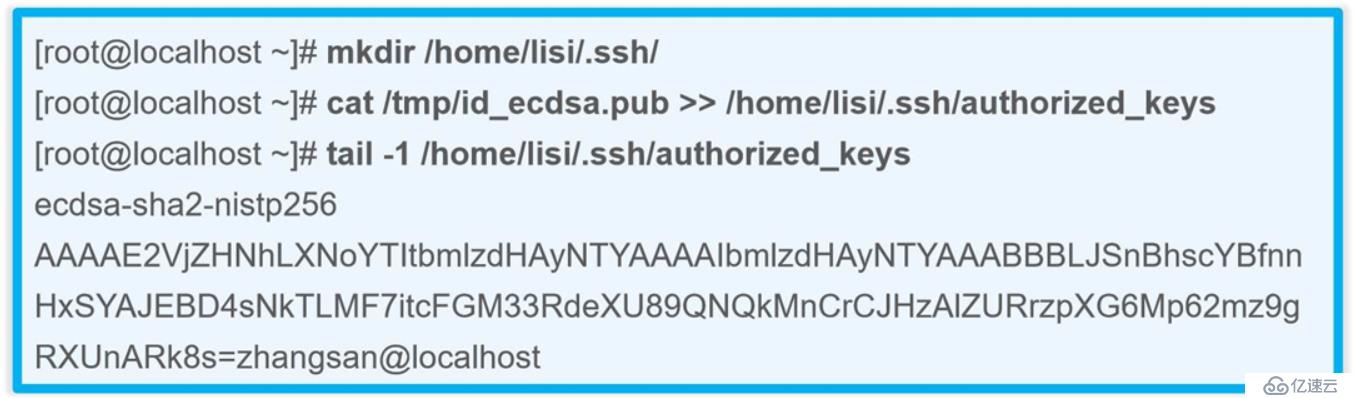
AuthorizedKeysFile .ssh/authorized_keys '密钥对公钥库文件路径'启用密码密码验证、密钥对验证、指定公钥库位置
ssh user@host
ssh 被连接的主机的本地用户名@主机名
选项 -p 即 指定端口号
scp user@host:file 1 file2
复制目标主机下面的file文件到自己的file2下
scp file1 user@host:file2
复制自己的file1下的文件到目标主机的file1下
sftp user@host
进入到目标主机的sftp模式
test01 的ip地址为192.168.139.128
test02的ip地址为192.168.139.129
[root@test01 ~]# cd /etc/ssh    '切换到/etc/ssh目录下'
[root@test01 ssh]# ls
moduli       ssh_host_ecdsa_key      ssh_host_ed25519_key.pub
ssh_config   ssh_host_ecdsa_key.pub  ssh_host_rsa_key
sshd_config  ssh_host_ed25519_key    ssh_host_rsa_key.pub
[root@test01 ssh]# vim sshd_config  '编辑服务端配置文件'

    # semanage port -a -t ssh_port_t -p tcp #PORTNUMBER
 16 #
 17 Port 22 '端口号22,去掉#启用'
 18 #AddressFamily any
 19 #ListenAddress 0.0.0.0
 20 #ListenAddress ::
 21
 22 HostKey /etc/ssh/ssh_host_rsa_key
 23 #HostKey /etc/ssh/ssh_host_dsa_key
 24 HostKey /etc/ssh/ssh_host_ecdsa_key
 25 HostKey /etc/ssh/ssh_host_ed25519_key
 26
[root@test01 ssh]# systemctl restart sshd   '重启sshd服务'
[root@test02 ~]# ssh root@192.168.139.128   '连接开启远程服务的主机,以root身份登陆'
The authenticity of host '192.168.139.128 (192.168.139.128)' can't be established.
ECDSA'指密钥对' key fingerprint is SHA256:dXWxtS2ShXQgfb7R672V7+l3i7rGqHBbIB5MTcFnAws.
ECDSA'指密钥对' key fingerprint is MD5:59:fb:20:f0:28:96:5e:14:90:82:63:c9:ae:67:d6:e9.
Are you sure you want to continue connecting (yes/no)? yes
Warning: Permanently added '192.168.139.128' (ECDSA) to the list of known hosts.
root@192.168.139.128's password:
Last login: Wed Nov 20 17:13:57 2019
[root@test01 ~]#    '注意主机名,此时已经远程登陆成功'
[root@test01 ~]# ifconfig       '查看自身的i网卡(此时已经远程到test01上)'
ens33: flags=4163<UP,BROADCAST,RUNNING,MULTICAST>  mtu 1500
        inet 192.168.139.128  netmask 255.255.255.0  broadcast 192.168.139.255
[root@test01 ~]# exit       '退出'
logout
Connection to 192.168.139.128 closed.
[root@test02 ~]# ifconfig       '查看自身的主机名,test02的主机名'
ens33: flags=4163<UP,BROADCAST,RUNNING,MULTICAST>  mtu 1500
        inet 192.168.139.129  netmask 255.255.255.0  broadcast 192.168.139.255

[root@test02 ~]# ssh gsy@192.168.139.128    ''用gsy的身份去登陆,也可以
gsy@192.168.139.128's password:
Last login: Wed Nov 20 18:07:37 2019
[gsy@test01 ~]$ exit    '退出'
logout
Connection to 192.168.139.128 closed.
远程连接目标主机时,使用root或普通用户都可以
[root@test01 ssh]# vim /etc/ssh/sshd_config '配置28的sshd的服务端配置文件'

 38 PermitRootLogin no  '第38行取消注释符,root登陆否'

[root@test01 ssh]# systemctl restart sshd   '重启ssh服务以生效配置'
[root@test02 ~]# ssh root@192.168.139.128 '去连28,使用root身份,'
The authenticity of host '192.168.139.128 (192.168.139.128)' can't be established.
ECDSA key fingerprint is SHA256:dXWxtS2ShXQgfb7R672V7+l3i7rGqHBbIB5MTcFnAws.
ECDSA key fingerprint is MD5:59:fb:20:f0:28:96:5e:14:90:82:63:c9:ae:67:d6:e9.
Are you sure you want to continue connecting (yes/no)? yes
Warning: Permanently added '192.168.139.128' (ECDSA) to the list of known hosts.
root@192.168.139.128's password:
Permission denied, please try again. '拒绝权限,请重试'
root@192.168.139.128's password:
[root@test02 ~]#
[root@test02 ~]# ssh gsy@192.168.139.128 '使用gsy身份去连接,没问题'
gsy@192.168.139.128's password:
Last login: Wed Nov 20 18:08:14 2019 from 192.168.139.129
[gsy@test01 ~]$
[gsy@test01 ~]$ su - root '然后su切换到root'
Password:
Last login: Wed Nov 20 18:30:29 CST 2019 on pts/5
Last failed login: Wed Nov 20 18:32:37 CST 2019 on pts/5
There was 1 failed login attempt since the last successful login.
[root@test01 ~]# '成功'
permission denied 权限拒绝
为了不让普通用户与root之间随意切换,可以在服务端28 配置pam.d/su,启用pam.d/su后,不在wheel组内的用户无法
 [root@test01 ssh]# vim /etc/pam.d/su   '编辑对应的配置文件'

 6 auth           required        pam_wheel.so use_uid  '取消注释,启用pam.d的su功能'

[root@test01 ssh]# useradd lisi     '新创建用户lisi,该用户不在wheel组内'
[root@test01 ssh]# passwd lisi
Changing password for user lisi.
New password:
BAD PASSWORD: The password is shorter than 8 characters
Retype new password:
passwd: all authentication tokens updated successfully.
[root@test02 ~]# ssh lisi@192.168.139.128 '用29去链接28'
lisi@192.168.139.128's password:
[lisi@test02 ~]$ 'lisi登陆成功'
[lisi@test02 ~]$ su - root 'su 切换root'
密码:
su: 拒绝权限 '失败'[root@test01 ssh]# vim /etc/ssh/sshd_config '给28配置sshd_config'
21 AllowUsers gsy '手动添加白名单,即只允许gsy登陆'
[root@test01 ssh]# systemctl restart sshd '重启sshd服务'
[root@test02 ~]# ssh gsy@192.168.139.128    '以gsy身份,29远程28'
gsy@192.168.139.128's password:
Last failed login: Wed Nov 20 18:51:43 CST 2019 from 192.168.139.129 on ssh:notty
There was 1 failed login attempt since the last successful login.
Last login: Wed Nov 20 18:48:54 2019 from 192.168.139.128
[gsy@test01 ~]$ logout  '登陆成功,然后退出'
Connection to 192.168.139.128 closed.
[root@test02 ~]# ssh root@192.168.139.128       '以root身份29去远程28'
root@192.168.139.128's password:    '输入密码'
Permission denied, please try again.        '权限拒绝,请重试'
root@192.168.139.128's password:
Permission denied, please try again.
[root@test01 ssh]# vim /etc/hosts   '此时在28,以hosts文件为实验'

test01  192.168.139.128 '增加内容'
test02  192.168.139.129 '增加内容'
[root@test01 ssh]# vim /etc/ssh/sshd_config '去配置sshd'
#AllowUsers gsy         '取消白名单,即所有人都可登录'
PermitRootLogin no  '注释掉远程root登陆 否'

[root@test01 ssh]# systemctl restart sshd   '重启sshd服务'
[root@test02 ~]# ssh root@192.168.139.128   '以root身份29去远程28'
root@192.168.139.128's password:
Last failed login: Wed Nov 20 19:05:55 CST 2019 from 192.168.139.129 on ssh:notty
There were 8 failed login attempts since the last successful login.
Last login: Wed Nov 20 18:41:42 2019    '登陆成功'
[root@test01 ssh]# scp /etc/hosts root@192.168.139.129:etc/hosts
'此时在28上,scp复制 本地 /etc/hosts文件 到29:/etc/hosts'
The authenticity of host '192.168.139.129 (192.168.139.129)' can't be established.
ECDSA key fingerprint is SHA256:+uy+1TNy69jB97B7+AoYqhNEaBi42DuOYb0oE4pJ8s0.
ECDSA key fingerprint is MD5:00:78:0c:c1:c2:7b:01:45:7c:31:c2:3b:53:4d:5c:10.
Are you sure you want to continue connecting (yes/no)? yes  '询问是否连接,选择是'
Warning: Permanently added '192.168.139.129' (ECDSA) to the list of known hosts.
root@192.168.139.129's password:
hosts                                     100%  204    87.9KB/s   00:00    '显示进度'
[root@test01 ssh]#
[root@test01 ssh]# ssh root@192.168.139.129     '以root身份28远程29'
root@192.168.139.129's password:
Last login: Wed Nov 20 19:18:41 2019 from 192.168.139.129
[root@test02 ~]# cat /etc/hosts     '查看29下的/etc/hosts文件'
127.0.0.1   localhost localhost.localdomain localhost4 localhost4.localdomain4
::1         localhost localhost.localdomain localhost6 localhost6.localdomain6
test01  192.168.139.128
test02  192.168.139.129
[root@test02 ~]# logout     '注销登陆'
Connection to 192.168.139.129 closed.
[root@test01 ssh]# cd /opt/
[root@test01 opt]# ls
rh
[root@test01 opt]# touch abc.txt    '在本地创建空文件'
[root@test01 opt]# scp /opt/abc.txt root@192.168.139.129:/home/
'把本地的/opt/abc.txt文件 以root身份 复制到192.168.139.129主机的/home/目录下'
root@192.168.139.129's password:    '密码确认'
abc.txt                                   100%    0     0.0KB/s   00:00
[root@test01 opt]#
[root@test02 ~]# cd /home
[root@test02 home]# ls
abc.txt  gsy
[root@test02 home]# vim /etc/ssh/sshd_config    '修改sshd_config服务端配置'
Port 22     '开启接口'
[root@test02 home]# systemctl restart sshd  '重启'
[root@test02 home]# mkdir abc
[root@test01 opt]# scp /opt/abc.txt gsy@192.168.139.129:/home/abc/
gsy@192.168.139.129's password:
scp: /home/abc//abc.txt: Permission denied  '复制失败'
[root@test02 home]# ls -al
total 0
drwxr-xr-x.  4 root root  43 Nov 20 19:32 .
dr-xr-xr-x. 17 root root 224 Oct 24 15:42 ..
'drwxr-xr-x.  2 root root   6 Nov 20 19:32 abc  '权限不够'
-rw-r--r--.  1 root root   0 Nov 20 19:22 abc.txt
drwx------.  3 gsy  gsy   78 Oct 24 15:36 gsy
[root@test02 home]# chmod 777 abc
[root@test02 home]# ls -al
total 0
drwxr-xr-x.  4 root root  43 Nov 20 19:32 .
dr-xr-xr-x. 17 root root 224 Oct 24 15:42 ..
'drwxrwxrwx.  2 root root   6 Nov 20 19:32 abc
-rw-r--r--.  1 root root   0 Nov 20 19:22 abc.txt
drwx------.  3 gsy  gsy   78 Oct 24 15:36 gsy
[root@test02 home]#
[root@test01 opt]# scp /opt/abc.txt gsy@192.168.139.129:/home/abc/
'重试'
gsy@192.168.139.129's password:     '可以了'
abc.txt                                   100%    0     0.0KB/s   00:00
然后到29主机上查看验证
[root@test02 home]# ls -al abc
total 0
drwxrwxrwx. 2 root root 21 Nov 20 19:38 .
drwxr-xr-x. 4 root root 43 Nov 20 19:32 ..
'-rw-r--r--. 1 gsy  gsy   0 Nov 20 19:38 abc.txt
以什么用户传过去的,就会以该用户的属主写入
[root@test01 opt]# scp root@192.168.139.129:/home/gsy.txt /opt
'在28上,从29主机上以root身份去复制/home/gsy.txt文件 到/opt下'
root@192.168.139.129's password:
gsy.txt                     '成功'       100%    4     1.4KB/s   00:00
[root@test01 opt]# ls -l
total 4
-rw-r--r--. 1 root root 0 Nov 20 19:21 abc.txt
'-rw-r--r--. 1 root root 4 Nov 20 19:46 gsy.txt'
drwxr-xr-x. 2 root root 6 Mar 26  2015 rh
[root@test01 opt]# cat gsy.txt
gsy
[root@test01 opt]#
想要ssh远程其他,就需要吧其他的的权限放开
[root@test01 ~]# sftp root@192.168.139.129      'ftp上下载方式连接29'
root@192.168.139.129's password:
Connected to 192.168.139.129.
sftp>
sftp> ls -a
.                        ..                       .ICEauthority
.Xauthority              .bash_history            .bash_logout
.bash_profile            .bashrc                  .cache
.config                  .cshrc                   .dbus
.esd_auth                .local                   .mozilla
.ssh                     .tcshrc                  .viminfo
anaconda-ks.cfg          initial-setup-ks.cfg     下载
公共                   图片                   文档
桌面                   模板                   视频
音乐
sftp> cd /opt
sftp> ls
rh
sftp> mkdir aaa
sftp> ls
aaa  rh
sftp> rm -rf aaa
rm: Invalid flag -r
sftp>
ls
aaa  rh
sftp>
sftp>  help
Available commands:
bye                                Quit sftp
cd path                            Change remote directory to 'path'
chgrp grp path                     Change group of file 'path' to 'grp'
chmod mode path                    Change permissions of file 'path' to 'mode'
chown own path                     Change owner of file 'path' to 'own'
df [-hi] [path]                    Display statistics for current directory or
                                   filesystem containing 'path'
exit                               Quit sftp
get [-afPpRr] remote [local]       Download file
reget [-fPpRr] remote [local]      Resume download file
reput [-fPpRr] [local] remote      Resume upload file
help                               Display this help text
lcd path                           Change local directory to 'path'
lls [ls-options [path]]            Display local directory listing
lmkdir path                        Create local directory
ln [-s] oldpath newpath            Link remote file (-s for symlink)
lpwd                               Print local working directory
ls [-1afhlnrSt] [path]             Display remote directory listing
lumask umask                       Set local umask to 'umask'
mkdir path                         Create remote directory
progress                           Toggle display of progress meter
put [-afPpRr] local [remote]       Upload file
pwd                                Display remote working directory
quit                               Quit sftp
rename oldpath newpath             Rename remote file
rm path                            Delete remote file
rmdir path                         Remove remote directory
symlink oldpath newpath            Symlink remote file
version                            Show SFTP version
!command                           Execute 'command' in local shell
!                                  Escape to local shell
?                                  Synonym for help
sftp> rmdir aaa
sftp> ls
rh
sftp>
在sftp模式下,命令跟linux的命令有些不一样


[root@test02 ~]# ssh-keygen rsa     ‘创建密钥对的选项’
Too many arguments.
usage: ssh-keygen [-q] [-b bits] [-t dsa | ecdsa | ed25519 | rsa | rsa1]
                  [-N new_passphrase] [-C comment] [-f output_keyfile]
       ssh-keygen -p [-P old_passphrase] [-N new_passphrase] [-f keyfile]
       ssh-keygen -i [-m key_format] [-f input_keyfile]
       ssh-keygen -e [-m key_format] [-f input_keyfile]
       ssh-keygen -y [-f input_keyfile]
       ssh-keygen -c [-P passphrase] [-C comment] [-f keyfile]
       ssh-keygen -l [-v] [-E fingerprint_hash] [-f input_keyfile]
       ssh-keygen -B [-f input_keyfile]
       ssh-keygen -D pkcs11
       ssh-keygen -F hostname [-f known_hosts_file] [-l]
       ssh-keygen -H [-f known_hosts_file]
       ssh-keygen -R hostname [-f known_hosts_file]
       ssh-keygen -r hostname [-f input_keyfile] [-g]
       ssh-keygen -G output_file [-v] [-b bits] [-M memory] [-S start_point]
       ssh-keygen -T output_file -f input_file [-v] [-a rounds] [-J num_lines]
                  [-j start_line] [-K checkpt] [-W generator]
       ssh-keygen -s ca_key -I certificate_identity [-h] [-n principals]
                  [-O option] [-V validity_interval] [-z serial_number] file ...
       ssh-keygen -L [-f input_keyfile]
       ssh-keygen -A
       ssh-keygen -k -f krl_file [-u] [-s ca_public] [-z version_number]
                  file ...
       ssh-keygen -Q -f krl_file file ...
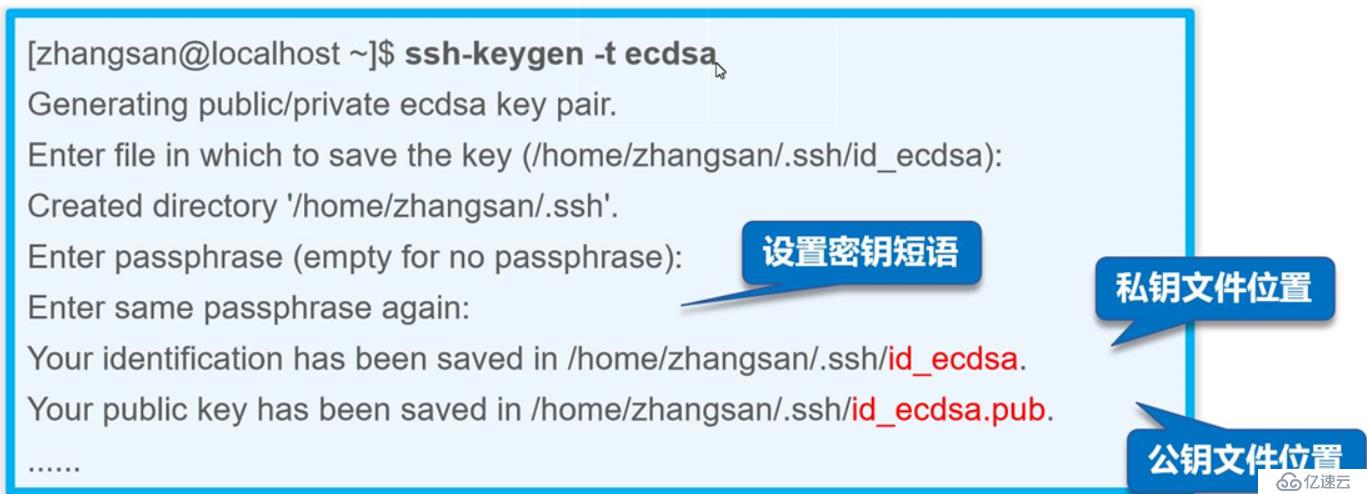
[root@test02 ~]# ssh-keygen -t rsa      '创建密钥对 -t '
Generating public/private rsa key pair.
Enter file in which to save the key (/root/.ssh/id_rsa):
Enter passphrase (empty for no passphrase):
Enter same passphrase again:
Your identification has been saved in /root/.ssh/id_rsa.
Your public key has been saved in /root/.ssh/id_rsa.pub.
The key fingerprint is:
SHA256:ZL4EmtVT8fXoCPScBgL7bldPv380zK93PQnA9kmORF8 root@test02
The key's randomart image is:
+---[RSA 2048]----+
|      ... =.  .  |
|       o + * o E |
|      + = + B o .|
|     + * . B =   |
|    o   S o O *  |
|       o . o B =.|
|        + .   o.*|
|       . .     oB|
|              .+*|
+----[SHA256]-----+
[root@test02 ~]# ls -a
.                .bash_logout   .dbus                 .ssh         图片
..               .bash_profile  .esd_auth             .tcshrc      文档
123123           .bashrc        .ICEauthority         .viminfo     桌面
123123.pub       .cache         initial-setup-ks.cfg  .Xauthority  模板
anaconda-ks.cfg  .config        .local                下载         视频
.bash_history    .cshrc         .mozilla              公共         音乐

[root@test02 ~]# cd .ssh
[root@test02 .ssh]# ls
id_rsa  id_rsa.pub  known_hosts
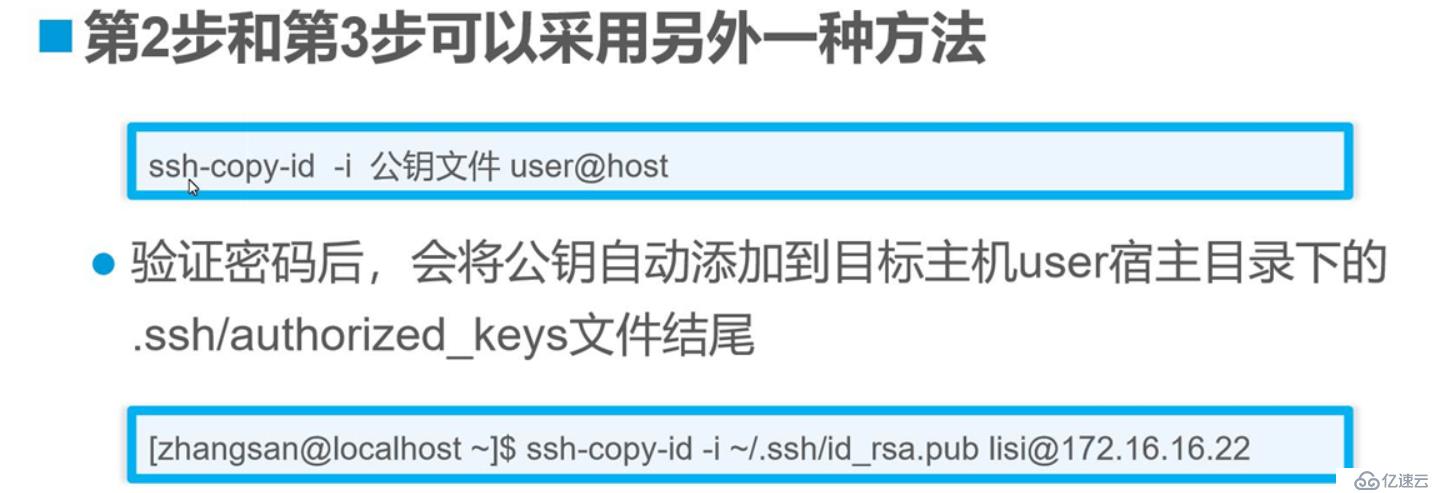
[root@test02 .ssh]# ssh-copy-id -i id_rsa.pub gsy@192.168.139.128
'复制密钥对的公钥复制到28服务端,以gsy身份'
/usr/bin/ssh-copy-id: INFO: Source of key(s) to be installed: "id_rsa.pub"
/usr/bin/ssh-copy-id: INFO: attempting to log in with the new key(s), to filter out any that are already installed
/usr/bin/ssh-copy-id: INFO: 1 key(s) remain to be installed -- if you are prompted now it is to install the new keys
gsy@192.168.139.128's password:     '输入密码'

Number of key(s) added: 1

Now try logging into the machine, with:   "ssh 'gsy@192.168.139.128'"
and check to make sure that only the key(s) you wanted were added.
[root@test01 ~]# cd /home/gsy
[root@test01 gsy]# ls
下载  公共  图片  文档  桌面  模板  视频  音乐
[root@test01 gsy]# ls -a
.              .bash_logout   .cache     .ICEauthority  .ssh  图片  模板
..             .bash_profile  .config    .local         下载  文档  视频
.bash_history  .bashrc        .esd_auth  .mozilla       公共  桌面  音乐
[root@test01 gsy]# cd .ssh
[root@test01 .ssh]# ls      '验证是否成功复制到28服务端'
authorized_keys
[root@test02 ~]# ssh gsy@192.168.139.128    '再次远程登陆服务端28'
Enter passphrase for key '/root/.ssh/id_rsa':   '输入之前输入的密码'
Last failed login: Wed Nov 20 20:17:55 CST 2019 from 192.168.139.129 on ssh:notty
There was 1 failed login attempt since the last successful login.
Last login: Wed Nov 20 18:51:51 2019 from 192.168.139.129
[gsy@test01 ~]$     '登陆成功'
[gsy@test01 ~]$ exit
logout
Connection to 192.168.139.128 closed.
[root@test02 ~]# ls -a
.                .bash_logout   .dbus                 .ssh         图片
..               .bash_profile  .esd_auth             .tcshrc      文档
123123           .bashrc        .ICEauthority         .viminfo     桌面
123123.pub       .cache         initial-setup-ks.cfg  .Xauthority  模板
anaconda-ks.cfg  .config        .local                下载         视频
.bash_history    .cshrc         .mozilla              公共         音乐
[root@test02 ~]# ls -a .ssh
.  ..  id_rsa  id_rsa.pub  known_hosts
[root@test02 ~]# ssh-agent bash     '创建自动代理功能'
[root@test02 ~]# ssh-add    '免交互'
Enter passphrase for /root/.ssh/id_rsa:     '输入密码确认'
Identity added: /root/.ssh/id_rsa (/root/.ssh/id_rsa)
[root@test02 ~]#
[root@test02 ~]# ssh gsy@192.168.139.128    '再次以gsy身份去登陆28服务端'
Last login: Wed Nov 20 21:33:22 2019 from 192.168.139.130   '网络被切换,客户机IP地址改变'
ssh-agent bash 创建自动代理功能
ssh-add 免交互
可以用于在shelle脚本远程

其中,ssh就是能够被它管控的服务
[root@test01 .ssh]# ldd `which sshd`
        linux-vdso.so.1 =>  (0x00007ffd5eb16000)
        libfipscheck.so.1 => /lib64/libfipscheck.so.1 (0x00007f4e20f2b000)
        libwrap.so.0 => /lib64/libwrap.so.0 (0x00007f4e20d20000)
        libaudit.so.1 => /lib64/libaudit.so.1 (0x00007f4e20af7000)
        libpam.so.0 => /lib64/libpam.so.0 (0x00007f4e208e8000)
        libselinux.so.1 => /lib64/libselinux.so.1 (0x00007f4e206c1000)
        libsystemd.so.0 => /lib64/libsystemd.so.0 (0x00007f4e20698000)
        libcrypto.so.10 => /lib64/libcrypto.so.10 (0x00007f4e20237000)
        libdl.so.2 => /lib64/libdl.so.2 (0x00007f4e20033000)
        libldap-2.4.so.2 => /lib64/libldap-2.4.so.2 (0x00007f4e1fdde000)
        liblber-2.4.so.2 => /lib64/liblber-2.4.so.2 (0x00007f4e1fbcf000)
        libutil.so.1 => /lib64/libutil.so.1 (0x00007f4e1f9cc000)
        libz.so.1 => /lib64/libz.so.1 (0x00007f4e1f75000)
        libcrypt.so.1 => /lib64/libcrypt.so.1 (0x00007f4e1f57e000)
        libresolv.so.2 => /lib64/libresolv.so.2 (0x00007f4e1f364000)
        libgssapi_krb5.so.2 => /lib64/libgssapi_krb5.so.2 (0x00007f4e1f116000)
        libkrb5.so.3 => /lib64/libkrb5.so.3 (0x00007f4e1ee2e000)
        libk5crypto.so.3 => /lib64/libk5crypto.so.3 (0x00007f4e1ebfb000)
        libcom_err.so.2 => /lib64/libcom_err.so.2 (0x00007f4e1e9f6000)
        libc.so.6 => /lib64/libc.so.6 (0x00007f4e1e633000)
        libnsl.so.1 => /lib64/libnsl.so.1 (0x00007f4e1e41a000)
        libcap-ng.so.0 => /lib64/libcap-ng.so.0 (0x00007f4e1e213000)
        libpcre.so.1 => /lib64/libpcre.so.1 (0x00007f4e1dfb1000)
        /lib64/ld-linux-x86-64.so.2 (0x0000562f68c55000)
        libcap.so.2 => /lib64/libcap.so.2 (0x00007f4e1ddac000)
        libm.so.6 => /lib64/libm.so.6 (0x00007f4e1daa9000)
        librt.so.1 => /lib64/librt.so.1 (0x00007f4e1d8a1000)
        liblzma.so.5 => /lib64/liblzma.so.5 (0x00007f4e1d67b000)
        libgcrypt.so.11 => /lib64/libgcrypt.so.11 (0x00007f4e1d3f9000)
        libgpg-error.so.0 => /lib64/libgpg-error.so.0 (0x00007f4e1d1f4000)
        libdw.so.1 => /lib64/libdw.so.1 (0x00007f4e1cfad000)
        libgcc_s.so.1 => /lib64/libgcc_s.so.1 (0x00007f4e1cd96000)
        libpthread.so.0 => /lib64/libpthread.so.0 (0x00007f4e1cb7a000)
        libsasl2.so.3 => /lib64/libsasl2.so.3 (0x00007f4e1c95d000)
        libssl3.so => /lib64/libssl3.so (0x00007f4e1c710000)
        libsmime3.so => /lib64/libsmime3.so (0x00007f4e1c4e9000)
        libnss3.so => /lib64/libnss3.so (0x00007f4e1c1bf000)
        libnssutil3.so => /lib64/libnssutil3.so (0x00007f4e1bf91000)
        libplds4.so => /lib64/libplds4.so (0x00007f4e1bd8d000)
        libplc4.so => /lib64/libplc4.so (0x00007f4e1bb88000)
        libnspr4.so => /lib64/libnspr4.so (0x00007f4e1b949000)
        libfreebl3.so => /lib64/libfreebl3.so (0x00007f4e1b746000)
        libkrb5support.so.0 => /lib64/libkrb5support.so.0 (0x00007f4e1b537000)
        libkeyutils.so.1 => /lib64/libkeyutils.so.1 (0x00007f4e1b333000)
        libattr.so.1 => /lib64/libattr.so.1 (0x00007f4e1b12d000)
        libelf.so.1 => /lib64/libelf.so.1 (0x00007f4e1af15000)
        libbz2.so.1 => /lib64/libbz2.so.1 (0x00007f4e1ad04000)
查询功能模块 `后面接命令
[root@localhost ~]# echo "sshd:61.63.65.67,192.168.2.*" > /etc/hosts.allow
[root@localhost ~]# vi /etc/hosts.allow
sshd:61.63.65.67,192.168.2.*

[root@localhost ~]# echo "sshd:ALL" > /etc/hosts.deny
[root@localhost ~]# vi /etc/hosts.deny
sshd:ALL

[root@localhost ~]#
优先读取allow,然后再度deny
如果只想禁止某些主机登陆,则只做黑名单,白名单不写
ssh 22端口
服务端配置文件 /etc/ssh/sshd_config
Port 22     '端口号'
ListenAddress 192.168.155.155   '监听地址'
Protocol 2      '版本号'
UserDNS no      'DNS反向解析,否'
LoginGraceTime  2m      '登陆时间 2m'
PermitRootLogin no      '允许root登陆 否'
MaxAuthTries 6          '最大尝试登陆次数 6 次'
PermitEmptyPasswords no     '禁止空密码'
AllowUsers gsy  lisi@192.168.88.88
'只允许gsy登陆,lisi从192.168.88.88登陆,别人都不行'
PasswordAuthentication yes  '需要密码验证 是'
PubkeyAuthentication yes    '开启密钥对验证 是'
AuthorizedKeyFile .ssh/authorized_keys '密钥对文件位置'ssh 用户名@ip地址 -p 指定端口号
scp 要复制的文件 复制到的目标位置
scp 用户名@ipdizhi:源文件路径 目标路径
sftp 用户名@ip地址
ssh-keygen -t rsa(或dsa算法) 创建密钥对
ssh-copy -i 公钥文件路径 用户名@目标ip地址
ssh-copy -i ~/.ssh/id_rsa.pub gsy@192.168.88.88
ssh-agent bash 创建自动代理功能
ssh-add 免交互
ldd ·which sshd·
访问控制策略的配置文件
/etc/hosts.allow
/etc/hosts.deny
如果做黑名单,白名单可以不写
免责声明:本站发布的内容(图片、视频和文字)以原创、转载和分享为主,文章观点不代表本网站立场,如果涉及侵权请联系站长邮箱:is@yisu.com进行举报,并提供相关证据,一经查实,将立刻删除涉嫌侵权内容。


