еҹәдәҺVueеҰӮдҪ•е®һзҺ°е•Ҷе“Ғдё»еӣҫж”ҫеӨ§й•ңеҠҹиғҪ
иҝҷзҜҮж–Үз« дё»иҰҒд»Ӣз»ҚеҹәдәҺVueеҰӮдҪ•е®һзҺ°е•Ҷе“Ғдё»еӣҫж”ҫеӨ§й•ңеҠҹиғҪпјҢж–Үдёӯд»Ӣз»Қзҡ„йқһеёёиҜҰз»ҶпјҢе…·жңүдёҖе®ҡзҡ„еҸӮиҖғд»·еҖјпјҢж„ҹе…ҙи¶Јзҡ„е°Ҹдјҷдјҙ们дёҖе®ҡиҰҒзңӢе®ҢпјҒ
е®һзҺ°еҺҹзҗҶ
ж”ҫеӨ§й•ңзҡ„еҺҹзҗҶз”ЁдёҖеҸҘиҜқжҰӮжӢ¬пјҢе°ұжҳҜж №жҚ®е°ҸеӣҫдёҠзҡ„йј ж ҮдҪҚзҪ®еҺ»е®ҡдҪҚеӨ§еӣҫгҖӮ
еӣҫ1 еҺҹзҗҶеӣҫпјҲд»Ҙ2еҖҚж”ҫеӨ§дёәдҫӢпјү
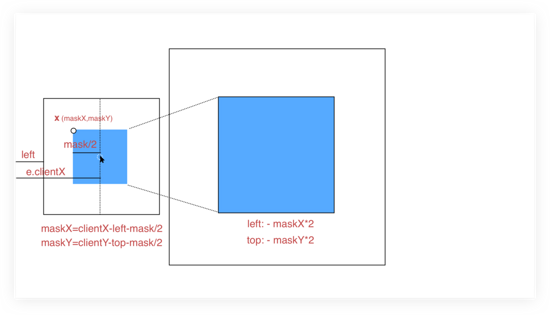
зӣёдҝЎеҺҹзҗҶеӣҫе·Із»Ҹз”»зҡ„еҫҲжҳҺзҷҪдәҶпјҢ еӣҫдёӯпјҢе·Ұдҫ§жЎҶжҳҜе°ҸеӣҫжЎҶпјҢе…¶и“қиүІеҢәеҹҹдёәеӣҫзүҮйҒ®зҪ©еұӮпјҲйңҖж”ҫеӨ§еҢәеҹҹпјүпјҢеҸідҫ§жЎҶжҳҜж•ҙдёӘеӨ§еӣҫзӣ®еүҚжүҖеңЁеҢәеҹҹпјҢе…¶и“қиүІеҢәеҹҹжҳҜж”ҫеӨ§еҢәеҹҹпјҢи®ҫзҪ®и¶…еҮәйҡҗи—ҸпјҢе°ұе®һзҺ°дәҶж”ҫеӨ§йҒ®зҪ©еҢәеҹҹзҡ„ж•ҲжһңгҖӮ
жҳҫ然пјҢдёӨеқ—и“қиүІеҢәеҹҹеӯҳеңЁзқҖжҹҗз§ҚеҜ№еә”е…ізі»пјҢеҚійҒ®зҪ©зҡ„е·ҰдёҠи§’дҪҚзҪ®пјҲзӣёеҜ№дәҺе°ҸеӣҫпјҢд»ҘдёӢз§° X еқҗж Үпјүе’Ңж”ҫеӨ§еҢәеҹҹпјҲзӣёеҜ№дәҺеӨ§еӣҫпјүзҡ„е·ҰдёҠи§’дҪҚзҪ®жҳҜжҲҗжҜ”дҫӢзҡ„пјҢеҚіж”ҫеӨ§еҖҚж•°гҖӮи®Ўз®—еҮә X еқҗж ҮеҗҺпјҢйҖӮеҪ“и°ғж•ҙиғҢжҷҜеӣҫзҡ„дҪҚзҪ®пјҢдҪҝеӨ§еӣҫеҗ‘еҸҚж–№еҗ‘移еҠЁ scale еҖҚзҡ„ X еқҗж ҮеҚіеҸҜгҖӮ
X еқҗж ҮдёәпјҲmaskXпјҢmaskYпјүпјҢд»Ҙи®Ўз®— maskX дёәдҫӢпјҡ
йј ж Ү移еҠЁдёӯдјҡдә§з”ҹ e.clientX пјҢж ҮиҜҶйј ж ҮдёҺжөҸи§ҲеҷЁе·Ұдҫ§зҡ„и·қзҰ»пјҢе°ҸеӣҫдёҺжөҸи§ҲеҷЁе·Ұдҫ§зҡ„и·қзҰ»жҳҜ left пјҢз”ұдәҺйҒ®зҪ©е§Ӣз»ҲжҳҜдёҖдёӘд»Ҙйј ж Үдёәдёӯеҝғзҡ„жӯЈж–№еҪўпјҢжүҖд»Ҙпјҡ
maskX = e.clientX - left - mask/2
еҗҢзҗҶпјҢ
maskY = e.clientY - top - mask/2
еӨ§еӣҫзҡ„еҜ№еә”ж ·ејҸи®ҫзҪ®дёәпјҡ
{
 left: - maskX * scale + 'px';
 top: - maskY * scale + 'px';
}ж•Ҳжһңжј”зӨә
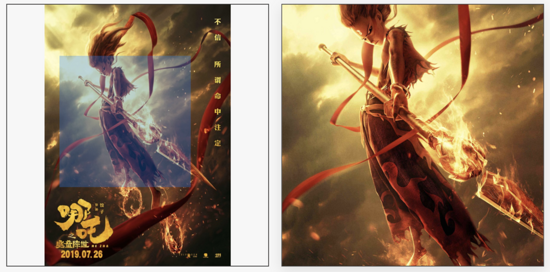
еӣҫ2 й•ҝеӣҫеұ•зӨә
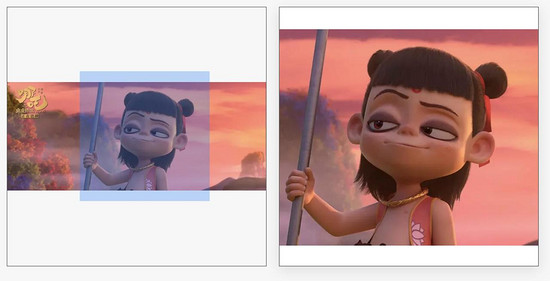
еӣҫ3 е®Ҫеӣҫеұ•зӨә
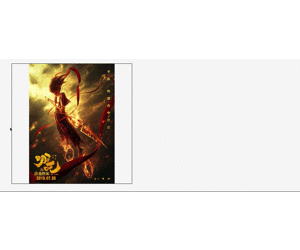
еӣҫ4 дёӨеҖҚж”ҫеӨ§ж•Ҳжһңеӣҫ
еӣҫ5 еӣӣеҖҚж”ҫеӨ§ж•Ҳжһңеӣҫ
ж ёеҝғд»Јз Ғ
HTML
дёҖиҲ¬ж”ҫеӨ§й•ңе®һзҺ°зҡ„жҳҜ 1:1 зӯүе®Ҫзӯүй«ҳзҡ„жӯЈж–№еҪўеӣҫзүҮпјҢиҝҷйҮҢе…је®№дәҶе…¶д»–жҜ”дҫӢзҡ„еӣҫзүҮпјҢи®ҫзҪ®еӣҫзүҮдёәеһӮзӣҙеұ…дёӯеҜ№йҪҗпјҢеҢ…жӢ¬е°ҸеӣҫпјҢеӨ§еӣҫгҖӮеҰӮжһңе°ҸеӣҫдёҚеӨҹе……ж»Ўж•ҙдёӘе°ҸеӣҫжЎҶпјҢдҪҷз•ҷдёӢзҡ„з©әзҷҪйғЁеҲҶд№ҹеҸҜд»Ҙжңүж”ҫеӨ§ж•ҲжһңпјҢеҸӘдёҚиҝҮж”ҫеӨ§з»“жһңдҫқ然жҳҜз©әзҷҪгҖӮ иҝҷж ·еҸӘйңҖи®Ўз®—иғҢжҷҜеӣҫзҡ„移еҠЁи·қзҰ»пјҢдёҚз”ЁиҝҮеӨҡзҡ„е…іжіЁеӣҫзүҮе®ҡдҪҚй—®йўҳгҖӮ
<template>
<div class="magnifier">
<!-- е°Ҹеӣҫ -->
<div class="small-box" @mouseover="handOver" @mousemove="handMove" @mouseout="handOut">
<img class="smallPic" :src="`${src}?x-oss-process=image/resize,l_836`" />
<div class="magnifier-zoom"
v-show="showMask"
:style="{
background: configs.maskColor,
height: configs.maskWidth + 'px',
width: configs.maskHeight + 'px',
opacity: configs.maskOpacity,
transform: transformMask
}"
></div>
</div>
<!-- еӨ§еӣҫ, жіЁж„ҸиҜҜе·® -->
<div class="magnifier-layer"
v-show="showMagnifier"
:style="{
width: configs.width + 'px',
height: configs.height + 'px',
left: configs.width + 20 + 'px'
}"
>
<div class="big-box"
:style="{
width: bigWidth + 'px',
height: bigHeight + 'px',
left: moveLeft,
top: moveTop
}"
>
<div class="big-box-img"
:style="{
width: bigWidth - 2 + 'px',
height: bigHeight - 2 + 'px'
}"
>
<img
:src="bigSrc"
:style="{
maxWidth: bigWidth - 2 + 'px',
maxHeight: bigHeight -2 + 'px'
}"
/>
</div>
</div>
</div>
</div>
</template>JS
иҝҷйҮҢдё»иҰҒжңүдёүдёӘдәӢ件еҮҪж•°гҖӮ
handOverпјҡйј ж Үиҝӣе…ҘеҲ°е°ҸеӣҫжЎҶдёҠзҡ„дәӢ件пјҢжӯӨж—¶жҳҫзӨәйҒ®зҪ©е’Ңж”ҫеӨ§еҢәеҹҹпјҢ并计算е°ҸеӣҫжЎҶзҡ„дҪҚзҪ®дҝЎжҒҜгҖӮ
handOver() {
// и®Ўз®—е°ҸеӣҫжЎҶеңЁжөҸи§ҲеҷЁдёӯзҡ„дҪҚзҪ®
this.imgObj = this.$el.getElementsByClassName('small-box')[0];
this.imgRectNow = this.imgObj.getBoundingClientRect();
this.showMagnifier = true;
this.showMask = true;
}handMoveпјҡйј ж ҮеңЁе°ҸеӣҫдёҠзҡ„移еҠЁдәӢ件пјҢжӯӨдәӢ件еҸ‘з”ҹеңЁ handOver д№ӢеҗҺпјҢи®Ўз®—ж•°жҚ®пјҢ移еҠЁйҒ®зҪ©д»ҘеҸҠиғҢжҷҜеӣҫпјӣ
handMove(e) {
// и®Ўз®—еҲқе§Ӣзҡ„йҒ®зҪ©е·ҰдёҠи§’зҡ„еқҗж Ү
let objX = e.clientX - this.imgRectNow.left;
let objY = e.clientY - this.imgRectNow.top;
// и®Ўз®—еҲқе§Ӣзҡ„йҒ®зҪ©е·ҰдёҠи§’зҡ„еқҗж Ү
let maskX = objX - this.configs.maskWidth / 2;
let maskY = objY - this.configs.maskHeight / 2;
// еҲӨж–ӯжҳҜеҗҰи¶…еҮәз•Ңйҷҗ,并зә жӯЈ
maskY = maskY < 0 ? 0 : maskY;
maskX = maskX < 0 ? 0 : maskX;
if(maskY + this.configs.maskHeight >= this.imgRectNow.height) {
maskY = this.imgRectNow.height - this.configs.maskHeight;
}
if(maskX + this.configs.maskWidth >= this.imgRectNow.width) {
maskX = this.imgRectNow.width - this.configs.maskWidth;
}
// йҒ®зҪ©з§»еҠЁ
this.transformMask = `translate(${maskX}px, ${maskY}px)`;
// иғҢжҷҜеӣҫ移еҠЁ
this.moveLeft = - maskX * this.configs.scale + "px";
this.moveTop = - maskY * this.configs.scale + "px";
}handOutпјҡйј ж ҮзҰ»ејҖе°ҸеӣҫдәӢ件пјҢжӯӨж—¶ж— ж”ҫеӨ§й•ңж•ҲжһңпјҢйҡҗи—ҸйҒ®зҪ©е’Ңж”ҫеӨ§еҢәеҹҹгҖӮ
handOut() {
 this.showMagnifier = false;
 this.showMask = false;
}д»ҘдёҠдёүдёӘдәӢ件еҹәжң¬дёҠе°ұе®һзҺ°дәҶеӣҫзүҮзҡ„ж”ҫеӨ§й•ңеҠҹиғҪгҖӮ
дҪҶд»”з»ҶзңӢпјҢдҪ дјҡеҸ‘зҺ°жҜҸ次移е…Ҙе°ҸеӣҫжЎҶйғҪдјҡи§ҰеҸ‘дёҖж¬Ў handOver дәӢ件пјҢ并且计算дёҖж¬Ўе°ҸеӣҫжЎҶ DOM пјҲimgObjпјү гҖӮ
дёәдәҶдјҳеҢ–жӯӨй—®йўҳпјҢеҸҜд»Ҙз”Ё init ж ҮиҜҶжҳҜеҗҰжҳҜйЎөйқўеҠ иҪҪеҗҺйҰ–ж¬Ўи§ҰеҸ‘ handOver дәӢ件пјҢеҰӮжһңжҳҜеҲқе§ӢеҢ–е°ұи®Ўз®—imgObj дҝЎжҒҜпјҢеҗҰеҲҷдёҚи®Ўз®—гҖӮ
handOver() {
if (!this.init) {
this.init = true;
// еҺҹ handOver дәӢ件
...
}
this.showMagnifier = true;
this.showMask = true;
},еңЁжөӢиҜ•зҡ„иҝҮзЁӢдёӯпјҢеҸ‘зҺ°йЎөйқўж»ҡеҠЁеҗҺпјҢдјҡеҮәзҺ°йҒ®зҪ©е®ҡдҪҚй”ҷиҜҜзҡ„жғ…еҶөпјҢеҺҹжқҘжҳҜеӣ дёәеҲқе§ӢеҢ–ж—¶пјҢжҲ‘们еӣәе®ҡжӯ»дәҶе°ҸеӣҫжЎҶзҡ„дҪҚзҪ®дҝЎжҒҜпјҲеӯҳж”ҫеңЁ this.imgRectNow пјүпјҢеҜјиҮҙ handMove дәӢ件дёӯзҡ„移еҠЁж•°жҚ®и®Ўз®—й”ҷиҜҜгҖӮ
и§ЈеҶіиҝҷдёӘй—®йўҳжңүдёӨз§Қж–№жЎҲпјҡ
иҝҷйҮҢйҖүжӢ©дәҶ第дәҢз§ҚгҖӮ
handMove(e) {
// еҠЁжҖҒиҺ·еҸ–е°Ҹеӣҫзҡ„дҪҚзҪ®пјҲжҲ–иҖ…зӣ‘еҗ¬ scroll пјү
let imgRectNow = this.imgObj.getBoundingClientRect();
let objX = e.clientX - imgRectNow.left;
let objY = e.clientY - imgRectNow.top;
// еҺҹ handMove дәӢ件еү©дҪҷеҶ…е®№
...
},з»јеҗҲд»ҘдёҠпјҢжҲ‘们已з»Ҹе®һзҺ°дәҶдёҖдёӘе®ҢзҫҺзҡ„еӣҫзүҮж”ҫеӨ§й•ңеҠҹиғҪгҖӮжңҖз»Ҳзҡ„ js еҰӮдёӢжүҖзӨәпјҡ
data() {
return {
imgObj: {},
moveLeft: 0,
moveTop: 0,
transformMask:`translate(0px, 0px)`,
showMagnifier:false,
showMask:false,
init: false,
};
},
computed: {
bigWidth(){
return this.configs.scale * this.configs.width;
},
bigHeight(){
return this.configs.scale * this.configs.height;
}
},
methods: {
handMove(e) {
// еҠЁжҖҒиҺ·еҸ–е°Ҹеӣҫзҡ„дҪҚзҪ®пјҲжҲ–иҖ…зӣ‘еҗ¬ scroll пјү
let imgRectNow = this.imgObj.getBoundingClientRect();
let objX = e.clientX - imgRectNow.left;
let objY = e.clientY - imgRectNow.top;
// и®Ўз®—еҲқе§Ӣзҡ„йҒ®зҪ©е·ҰдёҠи§’зҡ„еқҗж Ү
let maskX = objX - this.configs.maskWidth / 2;
let maskY = objY - this.configs.maskHeight / 2;
// еҲӨж–ӯжҳҜеҗҰи¶…еҮәз•Ңйҷҗ,并зә жӯЈ
maskY = maskY < 0 ? 0 : maskY;
maskX = maskX < 0 ? 0 : maskX;
if(maskY + this.configs.maskHeight >= imgRectNow.height) {
maskY = imgRectNow.height - this.configs.maskHeight;
}
if(maskX + this.configs.maskWidth >= imgRectNow.width) {
maskX = imgRectNow.width - this.configs.maskWidth;
}
// йҒ®зҪ©з§»еҠЁ
this.transformMask = `translate(${maskX}px, ${maskY}px)`;
// иғҢжҷҜеӣҫ移еҠЁ
this.moveLeft = - maskX * this.configs.scale + "px";
this.moveTop = - maskY * this.configs.scale + "px";
},
handOut() {
this.showMagnifier = false;
this.showMask = false;
},
handOver() {
if (!this.init) {
this.init = true;
this.imgObj = this.$el.getElementsByClassName('small-box')[0];
}
this.showMagnifier = true;
this.showMask = true;
}
}дҪҝз”Ёж–№жі•
жң¬зӨәдҫӢдёӯзҡ„еӣәе®ҡеҸӮж•°пјҡе°ҸеӣҫжЎҶпјҡ420 * 420 гҖӮ
зЁӢеәҸеҸҜжҺҘеҸ—еҸӮж•°пјҡ
// е°Ҹеӣҫең°еқҖ
src: {
type: String,
},
// еӨ§еӣҫең°еқҖ
bigSrc: {
type: String,
},
// й…ҚзҪ®йЎ№
configs: {
type: Object,
default() {
return {
width:420,//ж”ҫеӨ§еҢәеҹҹ
height:420,//ж”ҫеӨ§еҢәеҹҹ
maskWidth:210,//йҒ®зҪ©
maskHeight:210,//йҒ®зҪ©
maskColor:'rgba(25,122,255,0.5)',//йҒ®зҪ©ж ·ејҸ
maskOpacity:0.6,
scale:2,//ж”ҫеӨ§жҜ”дҫӢ
};
}
}ж–Үдёӯеӣҫ 2 жҳҜдёҖеј й•ҝеӣҫпјҢе°Ҹеӣҫзҡ„жңҖеӨ§иҫ№дёҚи¶…иҝҮ 836pxпјҲдәҢеҖҚеӣҫпјү пјҢеӨ§еӣҫдёәдәҶи§Ҷи§үж•ҲжһңпјҢеҲҶиҫЁзҺҮе°ҪйҮҸй«ҳзӮ№пјҢзЁӢеәҸдјҡж №жҚ®й…ҚзҪ®йЎ№иҮӘеҠЁи®ҫзҪ®еҜ№еә”зҡ„ height , width пјҢй•ҝеӣҫдёҺе®Ҫеӣҫзҡ„ж•ҲжһңеҜ№жҜ”еҸҜеҸӮиҖғеӣҫ3гҖӮ
й…ҚзҪ®йЎ№еҸҜж №жҚ®еә”з”ЁеңәжҷҜиҮӘиЎҢи®ҫзҪ®пјҢжң¬ж–ҮзӨәдҫӢзҡ„й…ҚзҪ®йЎ№жҳҜ 2 еҖҚж”ҫеӨ§пјҢж•ҲжһңеҸҜеҸӮиҖғеӣҫ 4пјҢеӣӣеҖҚж”ҫеӨ§ж•ҲжһңеҸҜеҸӮиҖғеӣҫ 5гҖӮ
д»ҘдёҠжҳҜвҖңеҹәдәҺVueеҰӮдҪ•е®һзҺ°е•Ҷе“Ғдё»еӣҫж”ҫеӨ§й•ңеҠҹиғҪвҖқиҝҷзҜҮж–Үз« зҡ„жүҖжңүеҶ…е®№пјҢж„ҹи°ўеҗ„дҪҚзҡ„йҳ…иҜ»пјҒеёҢжңӣеҲҶдә«зҡ„еҶ…е®№еҜ№еӨ§е®¶жңүеё®еҠ©пјҢжӣҙеӨҡзӣёе…ізҹҘиҜҶпјҢж¬ўиҝҺе…іжіЁдәҝйҖҹдә‘иЎҢдёҡиө„и®Ҝйў‘йҒ“пјҒ


