这篇文章主要介绍如何使用NestJS开发Node.js应用,文中介绍的非常详细,具有一定的参考价值,感兴趣的小伙伴们一定要看完!
NestJS 最早在 2017.1 月立项,2017.5 发布第一个正式版本,它是一个基于 Express,使用 TypeScript 开发的后端框架。设计之初,主要用来解决开发 Node.js 应用时的架构问题,灵感来源于 Angular。
组件容器
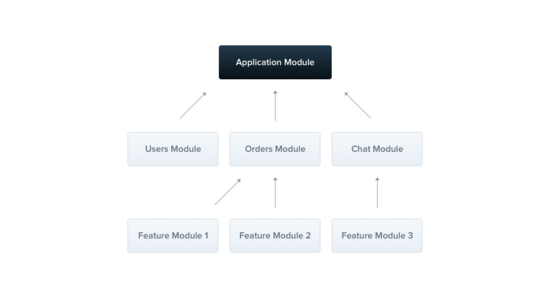
NestJS 采用组件容器的方式,每个组件与其他组件解耦,当一个组件依赖于另一组件时,需要指定节点的依赖关系才能使用:
import { Module } from '@nestjs/common';
import { CatsController } from './cats.controller';
import { CatsService } from './cats.service';
import { OtherModule } from '../OtherModule';

@Module({
 imports: [OtherModule],
 controllers: [CatsController],
 providers: [CatsService],
})
export class CatsModule {}
依赖注入(DI)
与 Angular 相似,同是使用依赖注入的设计模式开发
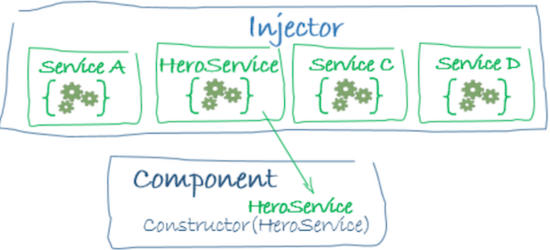
当使用某个对象时,DI 容器已经帮你创建,无需手动实例化,来达到解耦目的:
// 创建一个服务
@Inject()
export class TestService {
 public find() {
 return 'hello world';
 }
}

// 创建一个 controller
@Controller()
export class TestController {
 controller(
 private readonly testService: TestService
 ) {}

 @Get()
 public findInfo() {
 return this.testService.find()
 }
}
为了能让 TestController 使用 TestService 服务,只需要在创建 module 时,作为 provider 写入即可:
@Module({
 controllers: [TestController],
 providers: [TestService],
})
export class TestModule {}
当然,你可以把任意一个带 @Inject() 的类,注入到 module 中,供此 module 的 Controller 或者 Service 使用。
背后的实现基于 Decorator + Reflect Metadata,详情可以查看深入理解 TypeScript - Reflect Metadata 。
细粒化的 Middleware
在使用 Express 时,我们会使用各种各样的中间件,譬如日志服务、超时拦截,权限验证等。在 NestJS 中,Middleware 功能被划分为 Middleware、Filters、Pipes、Grards、Interceptors。
例如使用 Filters,来捕获处理应用中抛出的错误:
@Catch()
export class AllExceptionsFilter implements ExceptionFilter {
 catch(exception: any, host: ArgumentsHost) {
 const ctx = host.switchToHttp();
 const response = ctx.getResponse();
 const request = ctx.getRequest();
 const status = exception.getStatus();

 // 一些其他做的事情,如使用日志

 response
  .status(status)
  .json({
  statusCode: status,
  timestamp: new Date().toISOString(),
  path: request.url,
  });
 }
}
使用 interceptor,拦截 response 数据,使得返回数据格式是 { data: T } 的形式:
import { Injectable, NestInterceptor, ExecutionContext } from '@nestjs/common';
import { Observable } from 'rxjs';
import { map } from 'rxjs/operators';

export interface Response<T> {
 data: T;
}

@Injectable()
export class TransformInterceptor<T>
 implements NestInterceptor<T, Response<T>> {
 intercept(
 context: ExecutionContext,
 call$: Observable<T>,
 ): Observable<Response<T>> {
 return call$.pipe(map(data => ({ data })));
 }
}
使用 Guards,当不具有 'admin' 角色时,返回 401:
import { ReflectMetadata } from '@nestjs/common';
export const Roles = (...roles: string[]) => ReflectMetadata('roles', roles);

@Post()
@Roles('admin')
async create(@Body() createCatDto: CreateCatDto) {
 this.catsService.create(createCatDto);
}
数据验证
得益于class-validator 与class-transformer 对传入参数的验证变的非常简单:
// 创建 Dto
export class ContentDto {
 @IsString()
 text: string
}

@Controller()
export class TestController {
 controller(
 private readonly testService: TestService
 ) {}

 @Get()
 public findInfo(
 @Param() param: ContentDto  // 使用
 ) {
 return this.testService.find()
 }
}
当所传入参数 text 不是 string 时,会出现 400 的错误。
GraphQL
GraphQL 由 facebook 开发,被认为是革命性的 API 工具,因为它可以让客户端在请求中指定希望得到的数据,而不像传统的 REST 那样只能在后端预定义。
NestJS 对 Apollo server 进行了一层包装,使得能在 NestJS 中更方便使用。
在 Express 中使用 Apollo server 时:
const express = require('express');
const { ApolloServer, gql } = require('apollo-server-express');

// Construct a schema, using GraphQL schema language
const typeDefs = gql`
 type Query {
 hello: String
 }
`;

// Provide resolver functions for your schema fields
const resolvers = {
 Query: {
 hello: () => 'Hello world!',
 },
};

const server = new ApolloServer({ typeDefs, resolvers });

const app = express();
server.applyMiddleware({ app });

const port = 4000;

app.listen({ port }, () =>
 console.log(`Server ready at http://localhost:${port}${server.graphqlPath}`),
);
在 NestJS 中使用它:
// test.graphql
type Query {
 hello: string;
}


// test.resolver.ts
@Resolver()
export class {
 @Query()
 public hello() {
 return 'Hello wolrd';
 }
}
使用 Decorator 的方式,看起来也更 TypeScript 。
以上是“如何使用NestJS开发Node.js应用”这篇文章的所有内容,感谢各位的阅读!希望分享的内容对大家有帮助,更多相关知识,欢迎关注亿速云行业资讯频道!
免责声明:本站发布的内容(图片、视频和文字)以原创、转载和分享为主,文章观点不代表本网站立场,如果涉及侵权请联系站长邮箱:is@yisu.com进行举报,并提供相关证据,一经查实,将立刻删除涉嫌侵权内容。


