这篇文章主要介绍Vue2.0怎么实现移动端图片上传功能,文中介绍的非常详细,具有一定的参考价值,感兴趣的小伙伴们一定要看完!
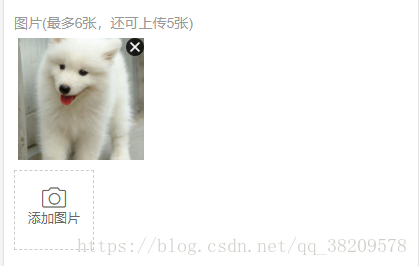
效果图如下:
1.DOM代码
1.1input标签
由于我们是通过input标签的方式进行图片上传的,但是input标签的样式有点丑,所以我们隐藏该样式display: none
<input @change="fileChange($event)" type="file" id="upload_file" multiple />
1.2添加图片按钮
如果需要用到此方法,只需要在你的上传按钮的地方调用@click=”chooseType”即可,其他部分代码为样式布局仅供参考。
 <div class="add" @click="chooseType">
 <div class="add-image" align="center">
  <i class="icon-camera"></i> //按钮中的图片是一个icon字体图标
  <p class="font13">添加图片</p>
 </div>
</div>
1.3图片预览区域
如果需要用到此方法,只需要在你的预览区域进行v-for循环输出上传的图片集合即可。
<div class="add-img" v-show="imgList.length">
 <p class="font14">图片(最多6张,还可上传<span v-text="6-imgList.length"></span>张)</p>
 <ul class="img-list">
  <li v-for="(url,index) in imgList">
   <img class="del" src="../../assets/img/home/btn_clean.png" @click.stop="delImg(index)"/>
   //del删除样式,icon字体图标需要自己找哦
   <img :src="url.file.src">
  </li>
 </ul>
</div>
1.4图片预览区域-拓展(1.3为简单运用,如果有时间后续会将完整的案例上传)
如果需要用到此方法,只需要在你的预览区域进行v-for循环输出上传的图片集合即可。本案例还运用的Y-DUI的lightbox组件,如有需要请参照图片预览的调用方式。此处,也调用了vue的懒加载和css背景图自适应的方法。
<div class="add-img" v-show="imgList.length">
 <p class="font14">图片(最多6张,还可上传<span v-text="6-imgList.length"></span>张)</p>
 <ul class="img-list">
  <li v-for="(url,index) in imgList">
   <img class="del" src="../../assets/img/home/btn_clean.png" @click.stop="delImg(index)"/>
   <yd-lightbox>
    <div class="app-bg">
     <yd-lightbox-img class="app-bg" :original="url.file.src" v-lazy:background-image="{src: url.file.src, error: require('../../assets/img/common/img_placeholder400.png'), loading: require('../../assets/img/common/img_placeholder400.png')}"></yd-lightbox-img>
    </div>
   </yd-lightbox>
  </li>
 </ul>
</div>
2.JS代码块
tips:此处的提示弹窗调用的Y-DUI的提示框,可以改成自己的提示框。
<script>
 export default {
  name: "Feedback",
  data() {
   return {
    showFace: false,
    imgList: [],
    size: 0,
    limit:6, //限制图片上传的数量
    tempImgs:[]
   }
  },
  methods: {
   chooseType() {
    document.getElementById('upload_file').click();
   },
   fileChange(el) {
    if (!el.target.files[0].size) return;
    this.fileList(el.target);
    el.target.value = ''
   },
   fileList(fileList) {
    let files = fileList.files;
    for (let i = 0; i < files.length; i++) {
     //判断是否为文件夹
     if (files[i].type != '') {
      this.fileAdd(files[i]);
     } else {
      //文件夹处理
      this.folders(fileList.items[i]);
     }
    }
   },
   //文件夹处理
   folders(files) {
    let _this = this;
    //判断是否为原生file
    if (files.kind) {
     files = files.webkitGetAsEntry();
    }
    files.createReader().readEntries(function (file) {
     for (let i = 0; i < file.length; i++) {
      if (file[i].isFile) {
       _this.foldersAdd(file[i]);
      } else {
       _this.folders(file[i]);
      }
     }
    });
   },
   foldersAdd(entry) {
    let _this = this;
    entry.file(function (file) {
     _this.fileAdd(file)
    })
   },
   fileAdd(file) {
    if (this.limit !== undefined) this.limit--;
    if (this.limit !== undefined && this.limit < 0) return;
    //总大小
    this.size = this.size + file.size;
    //判断是否为图片文件
    if (file.type.indexOf('image') == -1) {
     this.$dialog.toast({mes: '请选择图片文件'});
    } else {
     let reader = new FileReader();
     let image = new Image();
     let _this = this;
     reader.readAsDataURL(file);
     reader.onload = function () {
      file.src = this.result;
      image.onload = function(){
       let width = image.width;
       let height = image.height;
       file.width = width;
       file.height = height;
       _this.imgList.push({
        file
       });
       console.log( _this.imgList);
      };
      image.src= file.src;
     }
    }
   },
   delImg(index) {
    this.size = this.size - this.imgList[index].file.size;//总大小
    this.imgList.splice(index, 1);
    if (this.limit !== undefined) this.limit = 6-this.imgList.length;
   },
   displayImg() {
   }
  }
 }
</script>
3.CSS样式代码块,仅供参考
太太懒了,没有一一区分
 .app-bg >>>img{
  width: 100%;
  height: 100%;
  -webkit-transform: scale(1.03);
  -moz-transform: scale(1.03);
  -ms-transform: scale(1.03);
  -o-transform: scale(1.03);
  transform: scale(1.03);
 }
 textarea {
  padding: 10px;
 }
 .text-length {
  font-size: 14px;
  z-index: 999;
  width: 100%;
  text-align: right;
  margin-bottom: 10px;
  color: #e4e4e4;
 }
 .warning {
  color: #fe9900;
 }
 .add-img {
  width: 100%;
  padding: 10px;
 }
 .add-img p {
  color: #999;
 }
 .mui-content {
  padding-bottom: 60px;
 }
 .mui-content .idea {
  margin-top: 8px;
  background-color: #FFFFFF;
 }
 .good-item {
  text-align: center;
  width: 33%;
  max-width: 100%;
  overflow: hidden;
  padding-right: 10px;
  padding-bottom: 10px;
  float: left;
 }
 .good-item span {
  font-size: 15px;
  height: 30px;
  line-height: 30px;
  border-radius: 50px;
  display: block;
  width: 100%;
  color: #333;
  overflow: hidden;
  white-space: nowrap;
  text-overflow: ellipsis;
  border: 1px solid #CCCCCC;
 }
 .mui-table {
  padding-top: 10px;
  color: #333;
  padding-left: calc(0.5% + 10px);
 }
 .h-line-behind {
  line-height: 40px;
  padding-left: 10px;
 }
 .question {
  border: 0;
  margin-bottom: 10px;
 }
 .add {
  display: inline-block;
  margin-bottom: 20px;
 }
 .add-image {
  padding-top: 15px;
  margin-left: 10px;
  width: 80px;
  top: 20px;
  height: 80px;
  border: 1px dashed rgba(0, 0, 0, .2);
 }
 .add-image .icon-camera {
  font-size: 24px;
 }
 .good-item .choose {
  color: #fff;
  background-color: #87582E;
  color: #FFF;
  border: 0;
 }
 .mui-btn-block {
  border: 0;
  border-radius: 0;
  background-color: #87582E;
  color: #fff;
  margin-bottom: 0;
  bottom: 0;
 }
 .mui-buttom {
  position: fixed;
  width: 100%;
  bottom: 0;
  z-index: 999;
 }
 /*九宫格*/
 .img-list {
  overflow: hidden;
 }
 .img-list > li {
  float: left;
  width: 32%;
  text-align: center;
  padding-top: 31%;
  margin-left: 1%;
  margin-top: 1%;
  position: relative;
 }
 .img-list > li > div {
  position: absolute;
  left: 0;
  top: 0;
  width: 100%;
  height: 100%;
  overflow: hidden;
 }
 .img-list > li > div .app-bg {
  width: 100%;
  height: 100%;
 }
 .mui-fullscreen {
  z-index: 9999;
 }
 .del {
  position: absolute;
  width: 18px;
  top: 0;
  right: 0;
  z-index: 999
 }
以上是“Vue2.0怎么实现移动端图片上传功能”这篇文章的所有内容,感谢各位的阅读!希望分享的内容对大家有帮助,更多相关知识,欢迎关注亿速云行业资讯频道!
免责声明:本站发布的内容(图片、视频和文字)以原创、转载和分享为主,文章观点不代表本网站立场,如果涉及侵权请联系站长邮箱:is@yisu.com进行举报,并提供相关证据,一经查实,将立刻删除涉嫌侵权内容。


