Webpack是目前基于React和Redux开发的应用的主要打包工具。我想使用Angular 2或其他框架开发的应用也有很多在使用Webpack。
本节流程如图:
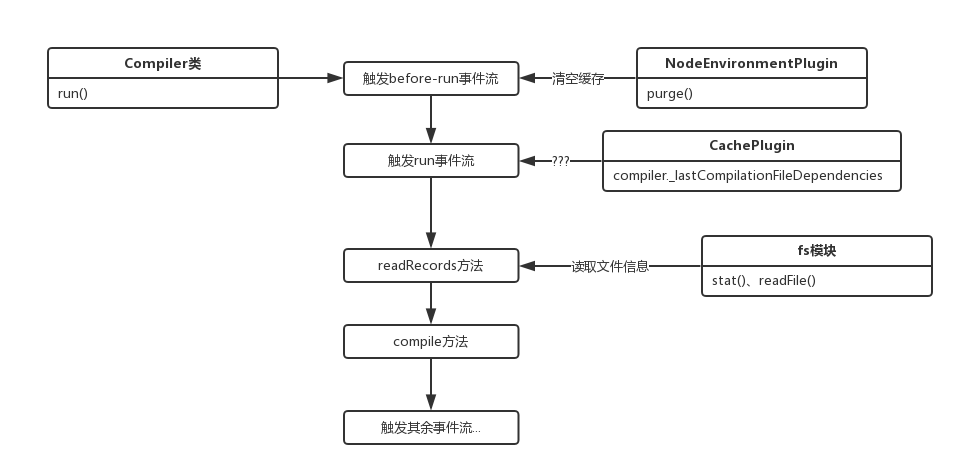
现在正式进入打包流程,起步方法为run:
Compiler.prototype.run = (callback) => {
  const startTime = Date.now();
  const onCompiled = (err, compilation) => { /**/ };
  this.applyPluginsAsync("before-run", this, err => {
    if (err) return callback(err);
    this.applyPluginsAsync("run", this, err => {
      if (err) return callback(err);
      this.readRecords(err => {
        if (err) return callback(err);
        this.compile(onCompiled);
      });
    });
  });
}
为什么不介绍compiler对象?因为构造函数中并没有一个初始化的方法,只是普通的变量声明,没啥好讲的。
在run方法中,首先是调用了tapable的applyPluginsAsync执行了before-run事件流,该事件流的定义地点如下:
// NodeEnvironmentPlugin
compiler.plugin("before-run", (compiler, callback) => {
  if (compiler.inputFileSystem === inputFileSystem)
    inputFileSystem.purge();
  callback();
});
在对compiler对象的文件系统方法的挂载插件中,注入了before-run这个事件流,这里首先看一下applyPluginsAsync(做了小幅度的修改以适应webpack源码):
// tapable
Tapable.prototype.applyPluginsAsync = (name, ...args, callback) => {
  var plugins = this._plugins[name];
  if (!plugins || plugins.length === 0) return callback();
  var i = 0;
  var _this = this;
  // args为[args,next函数]
  args.push(copyProperties(callback, function next(err) {
    // 事件流出错或者全部执行完后调用回调函数
    if (err) return callback(err);
    i++;
    if (i >= plugins.length) {
      return callback();
    }
    // 执行下一个事件
    plugins[i].apply(_this, args);
  }));
  // 执行第一个事件
  plugins[0].apply(this, args);
};
当时在第八节没有讲这个系列的事件流触发方式,这里简单说下:
1、copyProperties用于对象属性的拷贝,类似于Object.assign,然而在这里传入的是两个函数,一点用都没有!!!!!(当时没写讲解就是因为一直卡在这个对象拷贝方法在这里有什么毛用)
2、在webpack中,args为一个this,指向compiler的上下文
3、注入该事件流的事件必须要执行callback方法(如上例),此时执行的并不是外部的callback,而是next函数
4、有两种情况下会执行外部callback,中途出错或者所有事件流执行完毕
这样就很明白了,注入before-run中的函数形参的意义如下:
// before-run
// compiler => this
// callback => next
(compiler, callback) => {
  if (compiler.inputFileSystem === inputFileSystem)
    inputFileSystem.purge();
  callback();
}
由于before-run中只有一个事件,所以在调用内部callback的next方法后,会由于i大于事件长度而直接调用外部callback。
这里的purge方法之前见过,这里复习下内容:
// NodeEnvironmentPlugin
compiler.inputFileSystem = new CachedInputFileSystem(new NodeJsInputFileSystem(), 60000);
// CachedInputFileSystem
CachedInputFileSystem.prototype.purge = function(what) {
  this._statStorage.purge(what);
  this._readdirStorage.purge(what);
  this._readFileStorage.purge(what);
  this._readlinkStorage.purge(what);
  this._readJsonStorage.purge(what);
};
// CachedInputFileSystem => Storage
Storage.prototype.purge = function(what) {
  if (!what) {
    this.count = 0;
    clearInterval(this.interval);
    this.nextTick = null;
    this.data.clear();
    this.levels.forEach(function(level) {
      level.clear();
    });
  } else if (typeof what === "string") { /**/ } else { /**/ }
};
一句话概括就是:清除所有打包中缓存的数据。
由于假设是第一次,所以这里并没有什么实际操作,接着调用外部callback,用同样的方式触发了run事件流。
run事件流也只有一个方法,来源于CachePlugin插件:
Compiler.plugin("run", (compiler, callback) => {
  // 这个属性我暂时也不知道是啥 反正直接callback了
  if (!compiler._lastCompilationFileDependencies) return callback();
  const fs = compiler.inputFileSystem;
  const fileTs = compiler.fileTimestamps = {};
  asyncLib.forEach(compiler._lastCompilationFileDependencies, (file, callback) => {
    // ...
  }, err => {
    // ...
  });
});
在第一次触发run事件流时,那个属性是undefined,所以会直接跳过,因为我是边看源码边解析,所以也不知道是啥,哈哈。
接下来下一个callback是这个:
this.readRecords(err => {
  if (err) return callback(err);
  this.compile(onCompiled);
});
这是另一个原型方法,源码如下:
Compiler.prototype.readRecords = (callback) => {
  // 这个属性也没有
  if (!this.recordsInputPath) {
    this.records = {};
    return callback();
  }
  this.inputFileSystem.stat(this.recordsInputPath, err => {
    // ...
  });
}
这里第一次也会跳过并直接callback,看源码大概是传入一个路径并读取里面的文件信息缓存到records中。
这下连跳两步,直接进入原型方法compile中,预览一下这个函数:
Compiler.prototype.compile = (callback) => {
  const params = this.newCompilationParams();
  // 依次触发事件流
  this.applyPluginsAsync("before-compile", params, err => {
    if (err) return callback(err);
    this.applyPlugins("compile", params);
    const compilation = this.newCompilation(params);
    this.applyPluginsParallel("make", compilation, err => {
      if (err) return callback(err);
      compilation.finish();
      compilation.seal(err => {
        if (err) return callback(err);
        this.applyPluginsAsync("after-compile", compilation, err => {
          if (err) return callback(err);
          return callback(null, compilation);
        });
      });
    });
  });
}
编译打包的核心流程已经一览无遗,方法中依次触发了before-compile、compile、make、after-compile事件流,最后调用了回调函数。
总结
以上所述是小编给大家介绍的webpack源码之compile流程-入口函数run,希望对大家有所帮助,如果大家有任何疑问请给我留言,小编会及时回复大家的。在此也非常感谢大家对亿速云网站的支持!
免责声明:本站发布的内容(图片、视频和文字)以原创、转载和分享为主,文章观点不代表本网站立场,如果涉及侵权请联系站长邮箱:is@yisu.com进行举报,并提供相关证据,一经查实,将立刻删除涉嫌侵权内容。


