本文主要讲解如何从照片库选择一张照片后将其裁剪成圆形头像并显示,类似于微信头像那种模式。
本文的方法也适用于当时拍照获取的图像,方法类似,所以不再赘述。
本文主要是在iOS 10环境下使用,此时如果要使用使用系统照片库、照相机等功能需要授权,授权方法如下:
右键点击工程目录中的“Info.plist文件——>Open As ——>Source Code”,打开复制以下你在应用中使用的隐私权限设置(描述自己修改):
  <key>NSVideoSubscriberAccountUsageDescription</key>
  <string></string>
  <key>NSBluetoothPeripheralUsageDescription</key>
  <string>蓝牙权限</string>
  <key>NSSpeechRecognitionUsageDescription</key>
  <string>语音识别权限</string>
  <key>NSSiriUsageDescription</key>
  <string>Siri权限</string>
  <key>NSRemindersUsageDescription</key>
  <string></string>
  <key>NSPhotoLibraryUsageDescription</key>
  <string>相册权限</string>
  <key>kTCCServiceMediaLibrary</key>
  <string></string>
  <key>NSMotionUsageDescription</key>
  <string>运动权限</string>
  <key>NSMicrophoneUsageDescription</key>
  <string>麦克风权限</string>
  <key>NSAppleMusicUsageDescription</key>
  <string>音乐权限</string>
  <key>NSLocationWhenInUseUsageDescription</key>
  <string>地理位置权限</string>
  <key>NSLocationUsageDescription</key>
  <string>地理位置权限</string>
  <key>NSLocationAlwaysUsageDescription</key>
  <string>地理位置权限</string>
  <key>NSHomeKitUsageDescription</key>
  <string></string>
  <key>NSHealthUpdateUsageDescription</key>
  <string>健康权限</string>
  <key>NSHealthShareUsageDescription</key>
  <string>健康权限</string>
  <key>NSContactsUsageDescription</key>
  <string>通讯录权限</string>
  <key>NSCameraUsageDescription</key>
  <string>摄像头权限</string>
  <key>NSCalendarsUsageDescription</key>
  <string>日历权限</string>
下面,正式进入本文要实现的功能的代码编写。
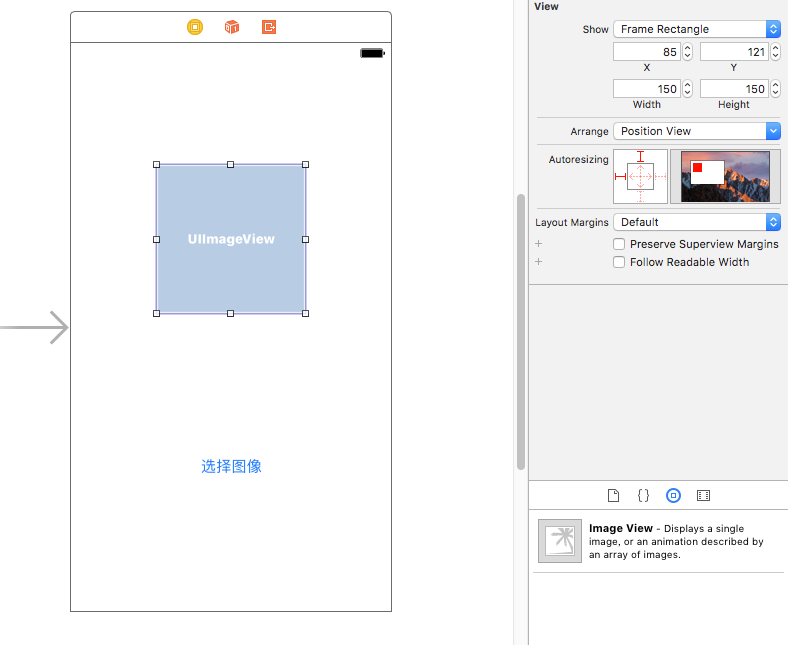
1. 使用Xcode的storyboard创建一个button和一个imageView
创建后的效果如下图1所示。其中,imageView的尺寸影响最终显示的效果尺寸,请根据实际情况设置。
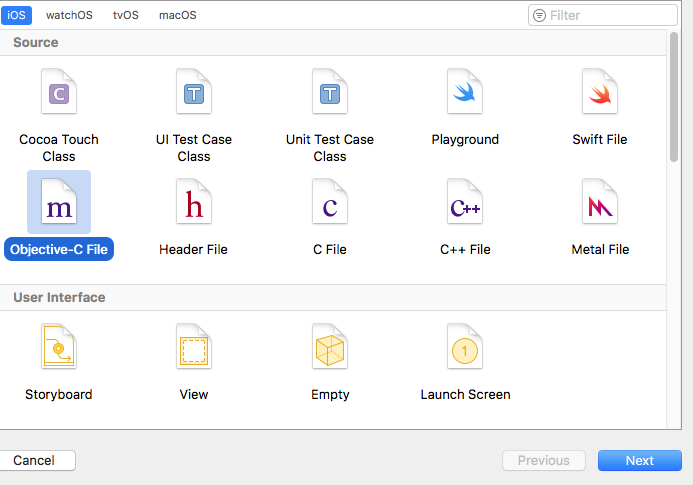
2. 创建一个UIImage的类别(Category)
创建新文件,选择“Objective-C File”,如下图2所示:
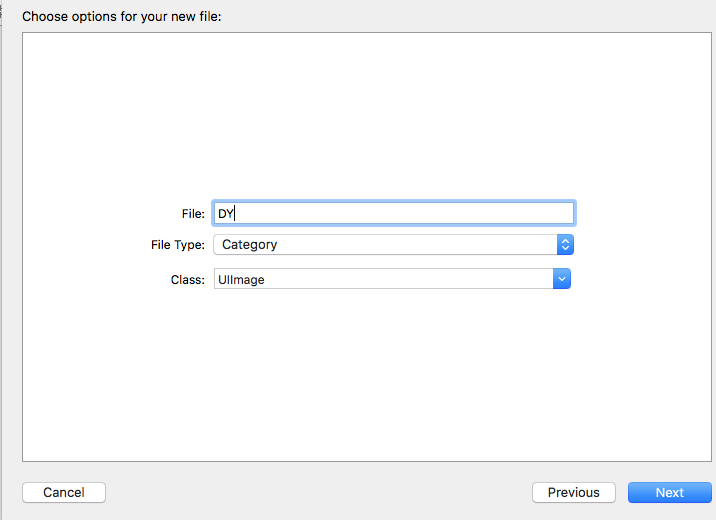
在弹出的如图3所示的对话框中,“File”写入类别的名称(本例中是DY),“File Type”选择Category,“Class”选择UIImage。然后点击“Next”按钮,将新文件保存。
3. 编写类别中的代码
UIImage+DY.h文件中
#import <UIKit/UIKit.h>

@interface UIImage (DY)

+ (instancetype)circleOldImage:(UIImage *)originalImage borderWidth:(CGFloat)borderWidth borderColor:(UIColor *)borderColor;

@end
UIImage+DY.m文件中
#import "UIImage+DY.h"

@implementation UIImage (DY)

+ (instancetype)circleOldImage:(UIImage *)originalImage borderWidth:(CGFloat)borderWidth borderColor:(UIColor *)borderColor
{
  // 1.加载原图
  UIImage *oldImage = originalImage;

  // 2.开启上下文
  CGFloat imageW = oldImage.size.width + 2 * borderWidth;
  CGFloat imageH = oldImage.size.height + 2 * borderWidth;
  CGSize imageSize = CGSizeMake(imageW, imageH);
  UIGraphicsBeginImageContextWithOptions(imageSize, NO, 0.0);

  // 3.取得当前的上下文
  CGContextRef ctx = UIGraphicsGetCurrentContext();

  // 4.画边框(大圆)
  [borderColor set];
  CGFloat bigRadius = imageW * 0.5; // 大圆半径
  CGFloat centerX = bigRadius; // 圆心
  CGFloat centerY = bigRadius;
  CGContextAddArc(ctx, centerX, centerY, bigRadius, 0, M_PI * 2, 0);
  CGContextFillPath(ctx); // 画圆

  // 5.小圆
  CGFloat smallRadius = bigRadius - borderWidth;
  CGContextAddArc(ctx, centerX, centerY, smallRadius, 0, M_PI * 2, 0);
  // 裁剪(后面画的东西才会受裁剪的影响)
  CGContextClip(ctx);

  // 6.画图
  [oldImage drawInRect:CGRectMake(borderWidth, borderWidth, oldImage.size.width, oldImage.size.height)];

  // 7.取图
  UIImage *newImage = UIGraphicsGetImageFromCurrentImageContext();

  // 8.结束上下文
  UIGraphicsEndImageContext();

  return newImage;
}


@end
+(instancetype)circleOldImage:(UIImage )originalImage borderWidth:(CGFloat)borderWidth borderColor:(UIColor )borderColor方法的说明:
4. 实现裁剪成圆形图像并显示
ViewController.h文件
#import <UIKit/UIKit.h>
#import "UIImage+DY.h" //加载类别

@interface ViewController : UIViewController<UINavigationControllerDelegate, UIImagePickerControllerDelegate> //一定要添加这两个Delegate


@property (strong, nonatomic) UIImagePickerController *imagePickerController;

- (IBAction)btnPressed:(id)sender;

@property (strong, nonatomic) IBOutlet UIImageView *ablumImageView;


@end
ViewController.m文件
#import "ViewController.h"

@interface ViewController ()

@end

@implementation ViewController

- (void)viewDidLoad {
  [super viewDidLoad];
  // Do any additional setup after loading the view, typically from a nib.
}


- (void)didReceiveMemoryWarning {
  [super didReceiveMemoryWarning];
  // Dispose of any resources that can be recreated.
}


- (IBAction)btnPressed:(id)sender {

  if([UIImagePickerController isSourceTypeAvailable: UIImagePickerControllerSourceTypePhotoLibrary]) {

    //首先判断是否支持照片库,这个方法中的参数要和_imagePickerController.sourceType的值保持一致

    //如果支持

    _imagePickerController = [[UIImagePickerController alloc]init];

    _imagePickerController.view.backgroundColor = [UIColor orangeColor];
    _imagePickerController.sourceType = UIImagePickerControllerSourceTypePhotoLibrary;
    _imagePickerController.delegate = self;
    _imagePickerController.allowsEditing = YES; //该参数默认是NO,建议设置为YES,否则裁剪成圆形图片的方法将获取到的是椭圆形的图片,与你的预想大相径庭

    [self presentViewController:_imagePickerController animated:YES completion:nil];

  }


}


- (void)imagePickerController:(UIImagePickerController *)picker didFinishPickingMediaWithInfo:(NSDictionary *)info {

  _ablumImageView.image = [UIImage circleOldImage:[info objectForKey:UIImagePickerControllerEditedImage] borderWidth:30.0f borderColor:[UIColor orangeColor]];
  //该方法中Info的Key值“UIImagePickerControllerEditedImage”表示的是选择裁剪后的图片,如果使用这个Key值,则_imagePickerController.allowsEditing的值需要设置为YES。

  //如果_imagePickerController.allowsEditing的值设置的NO,则这个Key的值应该设置为UIImagePickerControllerOriginalImage

  /*
  info中的Key的值有如下几个:

  NSString *const UIImagePickerControllerMediaType ;指定用户选择的媒体类型(文章最后进行扩展)
NSString *const UIImagePickerControllerOriginalImage ;原始图片
NSString *const UIImagePickerControllerEditedImage ;修改后的图片
NSString *const UIImagePickerControllerCropRect ;裁剪尺寸
NSString *const UIImagePickerControllerMediaURL ;媒体的URL
NSString *const UIImagePickerControllerReferenceURL ;原件的URL
NSString *const UIImagePickerControllerMediaMetadata;当来数据来源是照相机的时候这个值才有效

  */


  [self dismissViewControllerAnimated:YES completion:nil];

}
- (void)imagePickerControllerDidCancel:(UIImagePickerController *)picker{


  [self dismissViewControllerAnimated:YES completion:nil];

}

@end
以上就是本文的全部内容,希望对大家的学习有所帮助,也希望大家多多支持亿速云。
免责声明:本站发布的内容(图片、视频和文字)以原创、转载和分享为主,文章观点不代表本网站立场,如果涉及侵权请联系站长邮箱:is@yisu.com进行举报,并提供相关证据,一经查实,将立刻删除涉嫌侵权内容。


