小编给大家分享一下intellij IDEA如何配置springboot,相信大部分人都还不怎么了解,因此分享这篇文章给大家参考一下,希望大家阅读完这篇文章后大有收获,下面让我们一起去了解一下吧!
IntelliJ IDEA 简介
IDEA 全称 IntelliJ IDEA,是java语言开发的集成环境,IntelliJ在业界被公认为最好的java开发工具之一,尤其在智能代码助手、代码自动提示、重构、J2EE支持、各类版本工具(git、svn、github等)、JUnit、CVS整合、代码分析、 创新的GUI设计等方面的功能可以说是超常的。IDEA是JetBrains公司的产品,这家公司总部位于捷克共和国的首都布拉格,开发人员以严谨著称的东欧程序员为主。它的旗舰版本还支持HTML,CSS,PHP,MySQL,Python等。免费版只支持Java等少数语言。
Spring Boot是由Pivotal团队提供的全新框架,其设计目的是用来简化新Spring应用的初始搭建以及开发过程。该框架使用了特定的方式来进行配置,从而使开发人员不再需要定义样板化的配置。通过这种方式,Boot致力于在蓬勃发展的快速应用开发领域(rapid application development)成为领导者。
使用spring boot有什么好处
其实就是简单、快速、方便!平时如果我们需要搭建一个spring web项目的时候需要怎么做呢?
1)配置web.xml,加载spring和spring mvc
2)配置数据库连接、配置spring事务
3)配置加载配置文件的读取,开启注解
4)配置日志文件
下面给大家介绍intellij IDEA配置springboot的步骤,具体流程如下所示:
1.创建一个springboot项目:
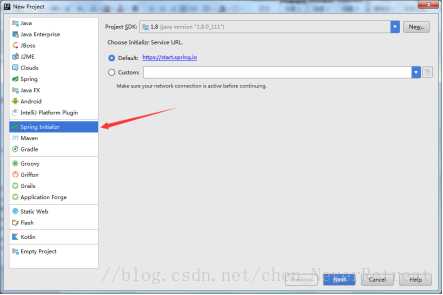
2.创建项目的文件结构以及jdk的版本

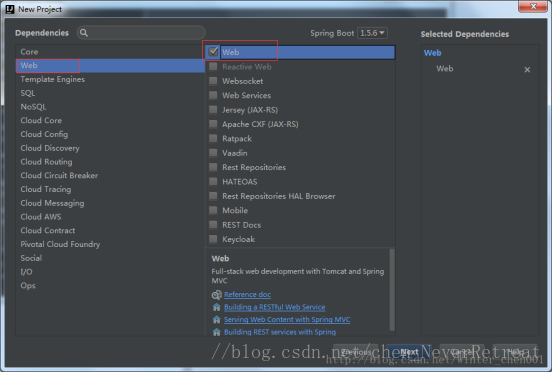
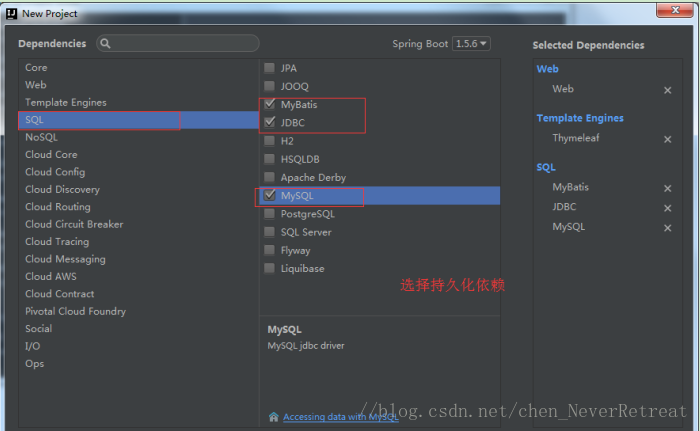
3. 选择项目所需要的依赖
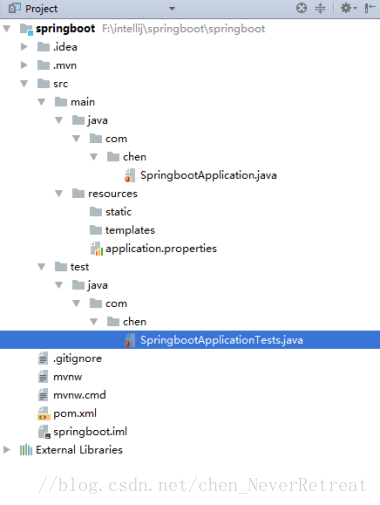
4、文件结构
5、项目不使用application.properties文件 而使用更加简洁的application.yml文件:
将原有的resource文件夹下的application.properties文件删除,创建一个新的application.yml配置文件,
文件的内容如下:
server:
 port: 8080
spring:
  datasource:
    name: test
    url: jdbc:mysql://127.0.0.1:3306/depot
    username: root
    password: root
    # 使用druid数据源
    type: com.alibaba.druid.pool.DruidDataSource
    driver-class-name: com.mysql.jdbc.Driver
    filters: stat
    maxActive: 20
    initialSize: 1
    maxWait: 60000
    minIdle: 1
    timeBetweenEvictionRunsMillis: 60000
    minEvictableIdleTimeMillis: 300000
    validationQuery: select 'x'
    testWhileIdle: true
    testOnBorrow: false
    testOnReturn: false
    poolPreparedStatements: true
    maxOpenPreparedStatements: 20
mybatis:
 mapper-locations: classpath:mapping/*.xml
 type-aliases-package: com.winter.model
#pagehelper分页插件
pagehelper:
  helperDialect: mysql
  reasonable: true
  supportMethodsArguments: true
  params: count=countSql
6、使用mybatis generator 自动生成代码
generatorConfig.xml配置文件内容如下:
<?xml version="1.0" encoding="UTF-8"?>
<!DOCTYPE generatorConfiguration
    PUBLIC "-//mybatis.org//DTD MyBatis Generator Configuration 1.0//EN"
    "http://mybatis.org/dtd/mybatis-generator-config_1_0.dtd">
<generatorConfiguration>
  <!-- 数据库驱动:选择你的本地硬盘上面的数据库驱动包-->
  <classPathEntry location="E:\1记\java\jar文件\mysql-connector-java-5.1.7-bin (1).jar"/>
  <context id="DB2Tables" targetRuntime="MyBatis3">
    <commentGenerator>
      <property name="suppressDate" value="true"/>
      <!-- 是否去除自动生成的注释 true:是 : false:否 -->
      <property name="suppressAllComments" value="true"/>
    </commentGenerator>
    <!--数据库链接URL,用户名、密码 -->
    <jdbcConnection driverClass="com.mysql.jdbc.Driver" connectionURL="jdbc:mysql://127.0.0.1/mytest" userId="root" password="123456">
    </jdbcConnection>
    <javaTypeResolver>
      <property name="forceBigDecimals" value="false"/>
    </javaTypeResolver>
    <!-- 生成模型的包名和位置-->
    <javaModelGenerator targetPackage="com.chen.model" targetProject="src/main/java">
      <property name="enableSubPackages" value="true"/>
      <property name="trimStrings" value="true"/>
    </javaModelGenerator>
    <!-- 生成映射文件的包名和位置-->
    <sqlMapGenerator targetPackage="mapping" targetProject="src/main/resources">
      <property name="enableSubPackages" value="true"/>
    </sqlMapGenerator>
    <!-- 生成DAO的包名和位置-->
    <javaClientGenerator type="XMLMAPPER" targetPackage="com.chen.mapper" targetProject="src/main/java">
      <property name="enableSubPackages" value="true"/>
    </javaClientGenerator>
    <!-- 要生成的表 tableName是数据库中的表名或视图名 domainObjectName是实体类名-->
    <table tableName="t_user" domainObjectName="User" enableCountByExample="false" enableUpdateByExample="false" enableDeleteByExample="false" enableSelectByExample="false" selectByExampleQueryId="false"></table>
  </context>
</generatorConfiguration>
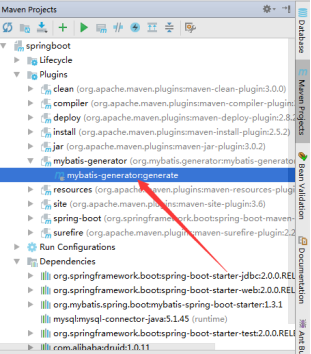
点击

SpringBoot项目在IntelliJ IDEA中实现热部署
spring-boot-devtools是一个为开发者服务的一个模块,其中最重要的功能就是自动应用代码更改到最新的App上面去。
原理是在发现代码有更改之后,重新启动应用,但是速度比手动停止后再启动更快。
其深层原理是使用了两个ClassLoader,一个Classloader加载那些不会改变的类(第三方Jar包),另一个ClassLoader加载会更改的类,称为restart ClassLoader
,这样在有代码更改的时候,原来的restart ClassLoader被丢弃,重新创建一个restart ClassLoader,由于需要加载的类相比较少,所以实现了较快的重启时间。
即devtools会监听classpath下的文件变动,并且会立即重启应用(发生在保存时机)
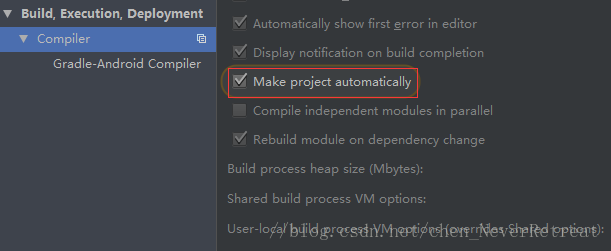
一、开启idea自动make功能
1、CTRL + SHIFT + A --> 查找make project automatically --> 选中
2、CTRL + SHIFT + A --> 查找Registry --> 找到并勾选compiler.automake.allow.when.app.running

最后重启idea
一、使用spring-boot-1.3开始有的热部署功能
1、加maven依赖
<dependency>
  <groupId>org.springframework.boot</groupId>
  <artifactId>spring-boot-devtools</artifactId>
<optional>true</optional></dependency>
2、开启热部署
<build>
  <plugins>
    <plugin>
      <groupId>org.springframework.boot</groupId>
      <artifactId>spring-boot-maven-plugin</artifactId>
      <configuration>
        <fork>true</fork>//该配置必须
      </configuration>
    </plugin>
  </plugins>
</build>
以上是“intellij IDEA如何配置springboot”这篇文章的所有内容,感谢各位的阅读!相信大家都有了一定的了解,希望分享的内容对大家有所帮助,如果还想学习更多知识,欢迎关注亿速云行业资讯频道!
免责声明:本站发布的内容(图片、视频和文字)以原创、转载和分享为主,文章观点不代表本网站立场,如果涉及侵权请联系站长邮箱:is@yisu.com进行举报,并提供相关证据,一经查实,将立刻删除涉嫌侵权内容。


