这篇文章给大家分享的是有关Spring解密之XML解析与Bean注册的示例分析的内容。小编觉得挺实用的,因此分享给大家做个参考,一起跟随小编过来看看吧。
引言
Spring是一个开源的设计层面框架,解决了业务逻辑层和其他各层的松耦合问题,将面向接口的编程思想贯穿整个系统应用,同时它也是Java工作中必备技能之一…
由于记录的是Spring源码分析的过程,详细用法就不一一赘述了
核心代码
<dependency>
 <groupId>org.springframework</groupId>
 <artifactId>spring-context</artifactId>
 <version>5.0.2.RELEASE</version>
</dependency>
用法
public class Application {
 public static void main(String[] args) {
 BeanDefinitionRegistry beanFactory = new DefaultListableBeanFactory();
 XmlBeanDefinitionReader reader = new XmlBeanDefinitionReader(beanFactory);
 ClassPathResource resource = new ClassPathResource("bean.xml");
 //整个资源加载的切入点。
 reader.loadBeanDefinitions(resource);
 }
}
解密
DefaultListableBeanFactory 是 Spring 注册及加载 bean 的默认实现,整个Spring Ioc模板中它可以称得上始祖。
跟踪DefaultListableBeanFactory,可以发现如下代码块,该设计的目的是什么?
public AbstractAutowireCapableBeanFactory() {
 super();
 ignoreDependencyInterface(BeanNameAware.class);
 ignoreDependencyInterface(BeanFactoryAware.class);
 ignoreDependencyInterface(BeanClassLoaderAware.class);
}
举例来说,当 A 中有属性 B 时,那么 Spring 在获取属性 A 时,如果发现属性 B 未实例化则会自动实例化属性 B,这也是Spring中提供的一个重要特性,在某些情况下 B 不会被初始化,比如实现了 BeanNameAware 接口。
Spring中是这样介绍的:自动装配时忽略给定的依赖接口,比如通过其他方式解析Application上下文注册依赖,类似于 BeanFactory 通过 BeanFactoryAware 进行的注入或者 ApplicationContext 通过 ApplicationContextAware 进行的注入。
资源管理
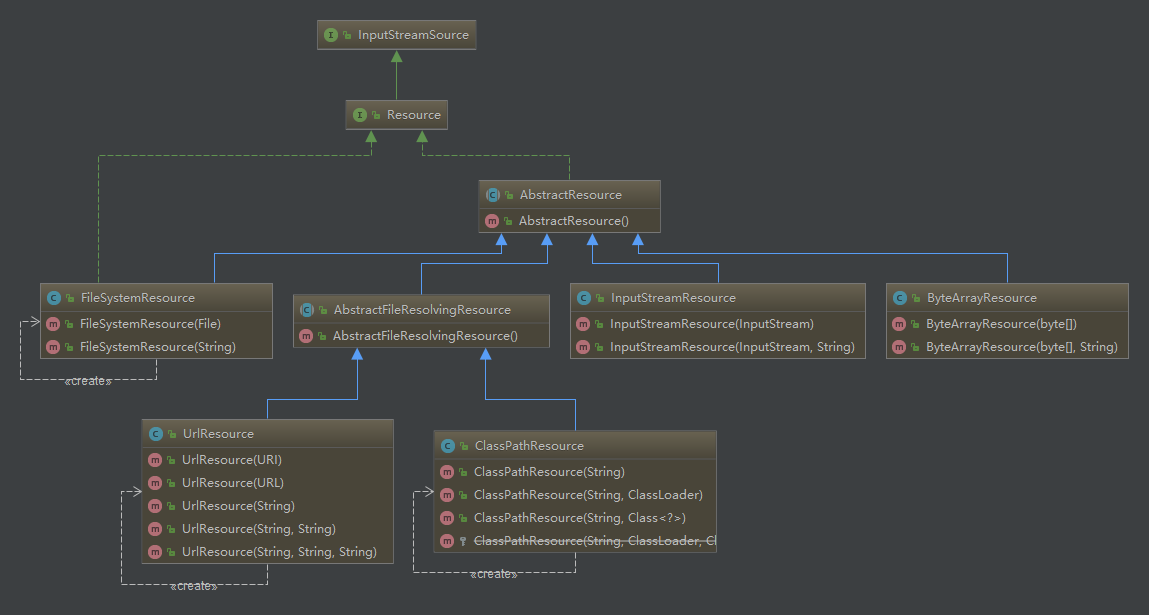
通过 Resource 接口来实现对 File、URL、Classpath 等资源的管理,Resource 负责对配置文件进行读取,即将配置文件封装为 Resource,然后交给 XmlBeanDefinitionReader 来处理。
XML 解析
XmlBeanDefinitionReader 是 Spring 资源文件读取、解析、注册的实现,要重点关注该类。
跟踪reader.loadBeanDefinitions(resource); ,我们可以见到如下核心代码(剔除注释和抛出异常)
public int loadBeanDefinitions(EncodedResource encodedResource) throws BeanDefinitionStoreException {
 try {
 InputStream inputStream = encodedResource.getResource().getInputStream();
 try {
 InputSource inputSource = new InputSource(inputStream);
 if (encodedResource.getEncoding() != null) {
 inputSource.setEncoding(encodedResource.getEncoding());
 }
 return doLoadBeanDefinitions(inputSource, encodedResource.getResource());
 }
 finally {
 inputStream.close();
 }
 }
}
上文代码首先对 Resource 做了一次编码操作,目的就是担心 XML 存在编码问题
仔细观察InputSource inputSource = new InputSource(inputStream); ,它的包名居然是org.xml.sax,所以我们可以得出Spring采用的是SAX解析,使用 InputSource 来决定如何读取 XML 文件。
最后将准备的数据通过参数传入到真正核心处理部分 doLoadBeanDefinitions(inputSource, encodedResource.getResource())
获取 Document
1.doLoadBeanDefinitions(inputSource, encodedResource.getResource()); ,省略若干catch和注释
protected int doLoadBeanDefinitions(InputSource inputSource, Resource resource)
 throws BeanDefinitionStoreException {
 try {
 Document doc = doLoadDocument(inputSource, resource);
 return registerBeanDefinitions(doc, resource);
 }
}2.doLoadDocument(inputSource, resource);
protected Document doLoadDocument(InputSource inputSource, Resource resource) throws Exception {
 return this.documentLoader.loadDocument(inputSource, getEntityResolver(), this.errorHandler,
 getValidationModeForResource(resource), isNamespaceAware());
}
首先通过 getValidationModeForResource 获取 XML 文件的验证模式(DTD 或者 XSD),可以自己设置验证方式,默认是开启 VALIDATION_AUTO 即自动获取验证模式的,通过 InputStream 读取 XML 文件,检查是否包含 DOCTYPE 单词,包含的话就是 DTD,否则返回 XSD。
常见的 XML 文件验证模式有:
public class XmlValidationModeDetector {
 /**
 * Indicates that DTD validation should be used (we found a "DOCTYPE" declaration).
 */
 public static final int VALIDATION_DTD = 2;
 /**
 * Indicates that XSD validation should be used (found no "DOCTYPE" declaration).
 */
 public static final int VALIDATION_XSD = 3;
 public int detectValidationMode(InputStream inputStream) throws IOException {
 }
}
在 this.documentLoader.loadDocument 方法中涉及到一个 EntityResolver 参数
public Document loadDocument(InputSource inputSource, EntityResolver entityResolver,
 ErrorHandler errorHandler, int validationMode, boolean namespaceAware) throws Exception {
}
何为 EntityResolver ? 官方解释: 如果 SAX 应用程序需要实现自定义处理外部实体,则必须实现此接口,并使用 setEntityResolver 方法向SAX 驱动器注册一个实例。也就是说,对于解析一个 xml,sax 首先会读取该 xml 文档上的声明,根据声明去寻找相应的 DTD 定义,以便对文档的进行验证,默认的寻找规则,(即:网络下载,通过 XML 声明的 DTD URI地址来下载 DTD的定义),并进行认证,下载的过程是一个漫长的过程,而且当网络不可用时,这里会报错,就是因为相应的 dtd 没找到。
EntityResolver 的作用是项目本身就可以提供一个如何寻找 DTD 声明的方法,即由程序来实现寻找 DTD 的过程,这样就避免了通过网络来寻找相应的声明。
3.EntityResolver 接受两个参数:
public abstract InputSource resolveEntity (String publicId,String systemId)
 throws SAXException, IOException;
3.1 定义bean.xml文件,内容如下(XSD模式)
<?xml version="1.0" encoding="UTF-8"?>
<beans xmlns="http://www.springframework.org/schema/beans"
 xmlns:xsi="http://www.w3.org/2001/XMLSchema-instance" xsi:schemaLocation="http://www.springframework.org/schema/beans
http://www.springframework.org/schema/beans/spring-beans.xsd">
</beans>
解析到如下两个参数:
publicId: null
systemId: http://www.springframework.org/schema/beans/spring-beans.xsd
3.2 定义bean.xml文件,内容如下(DTD模式)
<?xml version="1.0" encoding="UTF-8"?>
<!DOCTYPE beans PUBLIC "-//SPRING//DTD BEAN 2.0//EN"
 "http://www.springframework.org/dtd/spring-beans.dtd">
<beans>
</beans>
解析到如下两个参数:
publicId: -//SPRING//DTD BEAN 2.0//EN
systemId: http://www.springframework.org/dtd/spring-beans.dtd
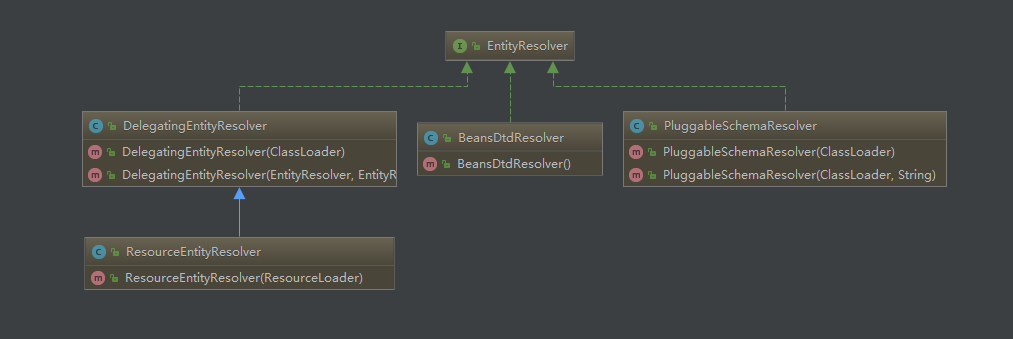
3.3 Spring 使用 DelegatingEntityResolver 来解析 EntityResolver
public class DelegatingEntityResolver {
 @Override
 @Nullable
 public InputSource resolveEntity(String publicId, @Nullable String systemId) throws SAXException, IOException {
 if (systemId != null) {
 if (systemId.endsWith(DTD_SUFFIX)) {
 return this.dtdResolver.resolveEntity(publicId, systemId);
 }
 else if (systemId.endsWith(XSD_SUFFIX)) {
 return this.schemaResolver.resolveEntity(publicId, systemId);
 }
 }
 return null;
 }
}
我们可以看到针对不同的模式,采用了不同的解析器
DTD: 采用 BeansDtdResolver 解析,直接截取 systemId 最后的 *.dtd(如:spring-beans.dtd),然后去当前路径下寻找
XSD: 采用 PluggableSchemaResolver 解析,默认加载 META-INF/Spring.schemas 文件下与 systemId 所对应的 XSD 文件
注册 Bean
看完解析XML校验后,继续跟踪代码,看 Spring 是如何根据 Document 注册 Bean 信息
public class XmlBeanDefinitionReader {
 public int registerBeanDefinitions(Document doc, Resource resource) throws BeanDefinitionStoreException {
 // 创建DocumentReader
 BeanDefinitionDocumentReader documentReader = createBeanDefinitionDocumentReader();
 // 记录统计前的 BeanDefinition 数
 int countBefore = getRegistry().getBeanDefinitionCount();
 // 注册 BeanDefinition
 documentReader.registerBeanDefinitions(doc, createReaderContext(resource));
 // 记录本次加载 BeanDefinition 的个数
 return getRegistry().getBeanDefinitionCount() - countBefore;
 }
}
注册 Bean 的时候首先使用一个 BeanDefinitionParserDelegate 类来判断是否是默认命名空间,实现是通过判断 namespace uri 是否和默认的 uri 相等:
public class BeanDefinitionParserDelegate {
 public static final String BEANS_NAMESPACE_URI = "http://www.springframework.org/schema/beans";
 public boolean isDefaultNamespace(@Nullable String namespaceUri) {
 return (!StringUtils.hasLength(namespaceUri) || BEANS_NAMESPACE_URI.equals(namespaceUri));
 }
}
跟踪 documentReader.registerBeanDefinitions(doc, createReaderContext(resource)); ,其中 doc 是通过前面代码块中 loadDocument 转换出来的,这个方法主要目的就是提取出 root 节点(beans)
public class DefaultBeanDefinitionDocumentReader {
 @Override
 public void registerBeanDefinitions(Document doc, XmlReaderContext readerContext) {
 this.readerContext = readerContext;
 logger.debug("Loading bean definitions");
 Element root = doc.getDocumentElement();
 doRegisterBeanDefinitions(root);
 }
}
跟踪 doRegisterBeanDefinitions(root) ,我们将看到如下处理流程
protected void doRegisterBeanDefinitions(Element root) {
 // ...
 String profileSpec = root.getAttribute(PROFILE_ATTRIBUTE);
 // ...
 // 空实现
 preProcessXml(root);
 parseBeanDefinitions(root, this.delegate);
 // 空实现
 postProcessXml(root);
 this.delegate = parent;
}
首先对 profile 解析(比较常见的玩法就是不同 profile 初始化的 bean 对象不同,实现多环境)
接下来的解析使用了模板方法模式,其中 preProcessXml 和 postProcessXml 都是空方法,为的就是方便之后的子类在解析前后进行一些处理。只需要覆写这两个方法即可。
解析并注册 BeanDefinition,该部分代码比较简单
public class DefaultBeanDefinitionDocumentReader {
 /**
 * 解析 root 节点下的其它节点 import", "alias", "bean".
 * @param root节点名称
 */
 protected void parseBeanDefinitions(Element root, BeanDefinitionParserDelegate delegate) {
 if (delegate.isDefaultNamespace(root)) {
 NodeList nl = root.getChildNodes();
 for (int i = 0; i < nl.getLength(); i++) {
 Node node = nl.item(i);
 if (node instanceof Element) {
 Element ele = (Element) node;
 if (delegate.isDefaultNamespace(ele)) {
 parseDefaultElement(ele, delegate);
 }
 else {
 delegate.parseCustomElement(ele);
 }
 }
 }
 }
 else {
 delegate.parseCustomElement(root);
 }
 }
 private void parseDefaultElement(Element ele, BeanDefinitionParserDelegate delegate) {
 if (delegate.nodeNameEquals(ele, IMPORT_ELEMENT)) {
 importBeanDefinitionResource(ele);
 }
 else if (delegate.nodeNameEquals(ele, ALIAS_ELEMENT)) {
 processAliasRegistration(ele);
 }
 else if (delegate.nodeNameEquals(ele, BEAN_ELEMENT)) {
 processBeanDefinition(ele, delegate);
 }
 else if (delegate.nodeNameEquals(ele, NESTED_BEANS_ELEMENT)) {
 // recurse
 doRegisterBeanDefinitions(ele);
 }
 }
 /**
 * 处理 Bean 标签,然后将其注册到注册表中去
 */
 protected void processBeanDefinition(Element ele, BeanDefinitionParserDelegate delegate) {
 BeanDefinitionHolder bdHolder = delegate.parseBeanDefinitionElement(ele);
 if (bdHolder != null) {
 bdHolder = delegate.decorateBeanDefinitionIfRequired(ele, bdHolder);
 try {
 // Register the final decorated instance.
 BeanDefinitionReaderUtils.registerBeanDefinition(bdHolder, getReaderContext().getRegistry());
 }
 catch (BeanDefinitionStoreException ex) {
 getReaderContext().error("Failed to register bean definition with name '" +
 bdHolder.getBeanName() + "'", ele, ex);
 }
 // Send registration event.
 getReaderContext().fireComponentRegistered(new BeanComponentDefinition(bdHolder));
 }
 }
}
委托 BeanDefinitionParserDelegate 类的 parseBeanDefinitionElement 方法进行元素解析,返回 BeanDefinitionHolder 类型的实例 bdHolder(包含了配置文件的各个属性class、name、id、alias等)
当返回的 bdHolder 不为空的情况下,若默认标签的子节点存在自定义属性,则再次对自定义标签进行解析
解析完毕后,委托 BeanDefinitionReaderUtils.registerBeanDefinition();对 bdHolder 进行注册
发送注册事件,告知相关监听 Bean 已经注册成功了
感谢各位的阅读!关于“Spring解密之XML解析与Bean注册的示例分析”这篇文章就分享到这里了,希望以上内容可以对大家有一定的帮助,让大家可以学到更多知识,如果觉得文章不错,可以把它分享出去让更多的人看到吧!
免责声明:本站发布的内容(图片、视频和文字)以原创、转载和分享为主,文章观点不代表本网站立场,如果涉及侵权请联系站长邮箱:is@yisu.com进行举报,并提供相关证据,一经查实,将立刻删除涉嫌侵权内容。


