小编给大家分享一下利用IDEA搭建SpringBoot项目整合mybatis实现简单登录功能的方法,希望大家阅读完这篇文章后大所收获,下面让我们一起去探讨吧!
利用闲余时间想自己搭建一个springboot+mybatis的项目,提升一下自己对项目的了解,毕竟自己还是一个小白,在这里为自己创建项目的过程做一个记录,以便以后回忆。同时将搭建中遇到的问题也在这里做记录。如有遇到同样问题的同学,希望能给你一下借鉴。
springboot的优势之一就是快速搭建项目,省去了自己导入jar包和配置xml的时间,使用非常方便。
一,搭建项目:
1、打开IDEA,点击File→New→Project...,如图1所示
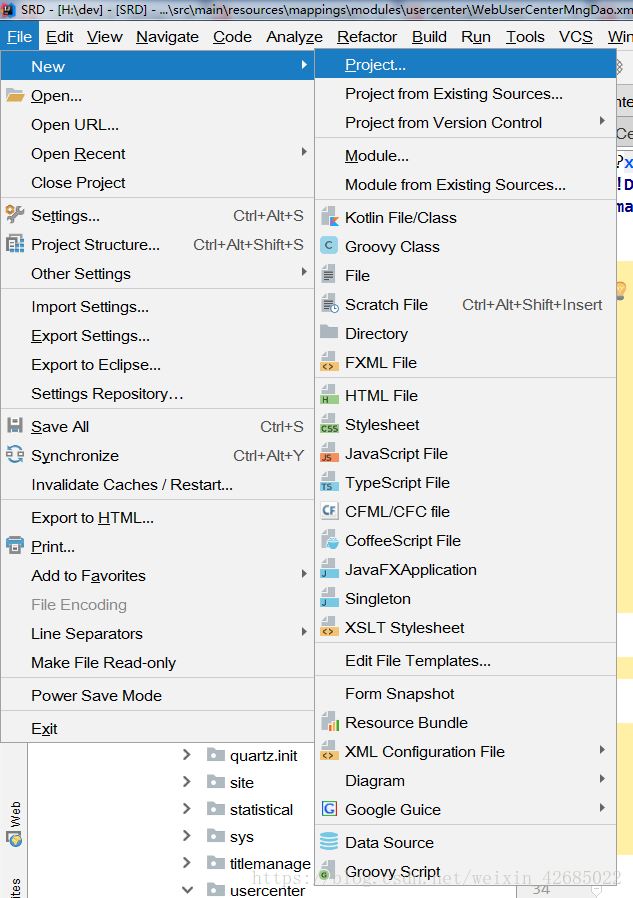
图1 搭建项目
2、当我们选择project...后,会看见如图2所示的页面,选择Spring Initializr,点击NEXT即可。
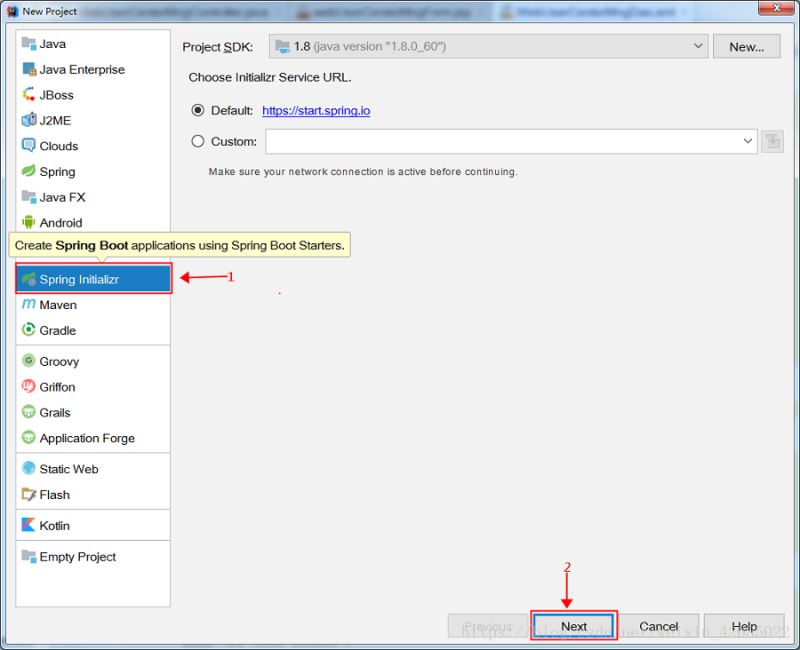
图2 搭建项目
3、接下来将看到如图3所示的页面,在这个页面中我只是修改了名称。然后点击NEXT进行下一步。

图3 搭建项目
4、当我点击NEXT时,却出现如图4所示的错误,这由于创建时因为Artifact的命名为大小写混合,将大写改为小写即可正常创建。

图4 搭建项目 (注意名称大小写问题)
5、接下来我们修改上面的错误,我将springbootTest1→springboottest1,然后进行下一步。会看见如图5所示的页面。 在当前页面中我们一次选择左侧的Web、Template Engines、SQL。然后在中间部分选择我们需要的选项,最终选择结果如最右侧所示。然后点击NEXT,进行下一步。
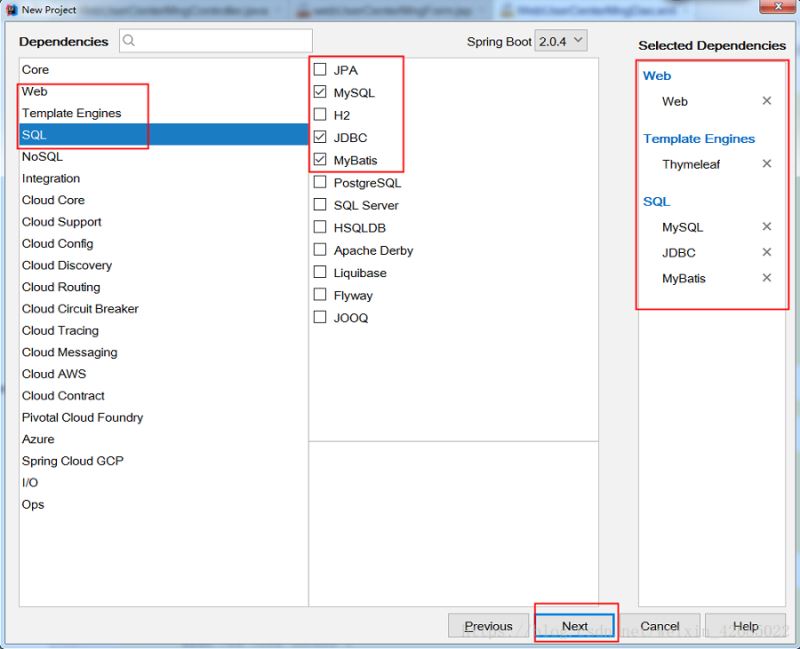
图5 搭建项目(选择需要的内容)
6、如图6所示,进人创建项目的最后一个页面,在这里我们可以修改项目保存的位置。确认自己输入的内容,点击Fiish即可完成项目的创建。
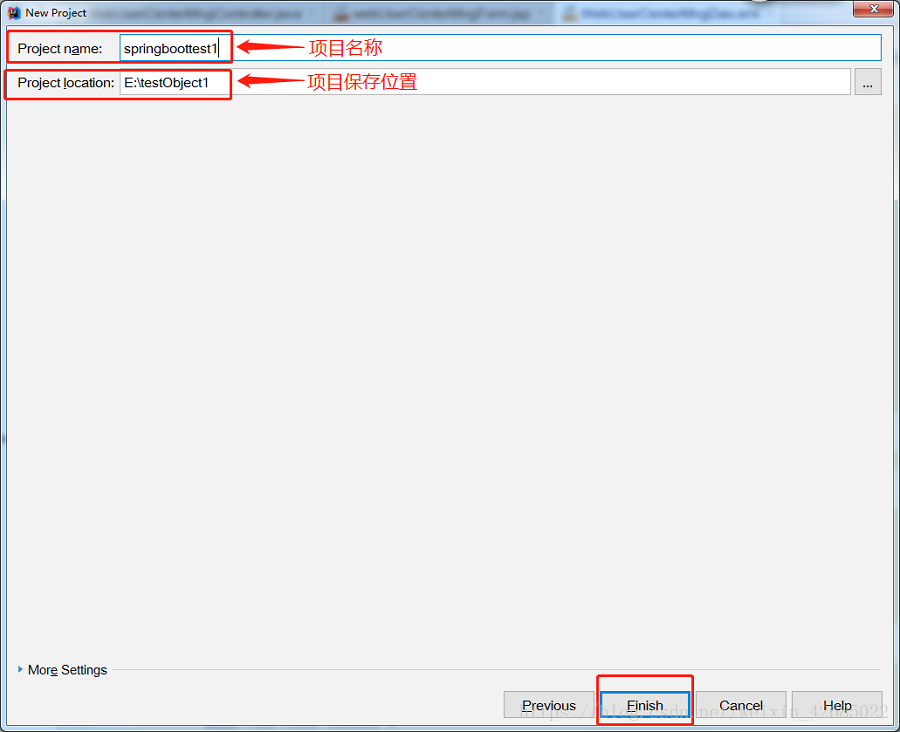
图6 搭建项目(可以修改文件路径)
7、点击Finish后,出现如图7所示页面,我们选择New Window即可,即在新的IDEA中打开我们新建的项目。
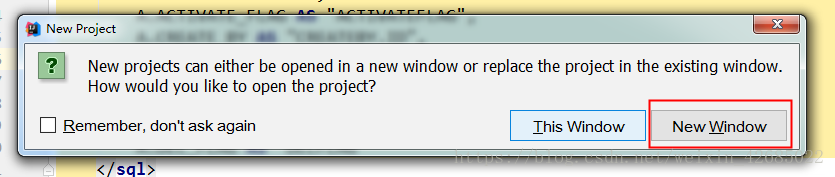
图7 打开项目
二、启动项目、添加配置文件等
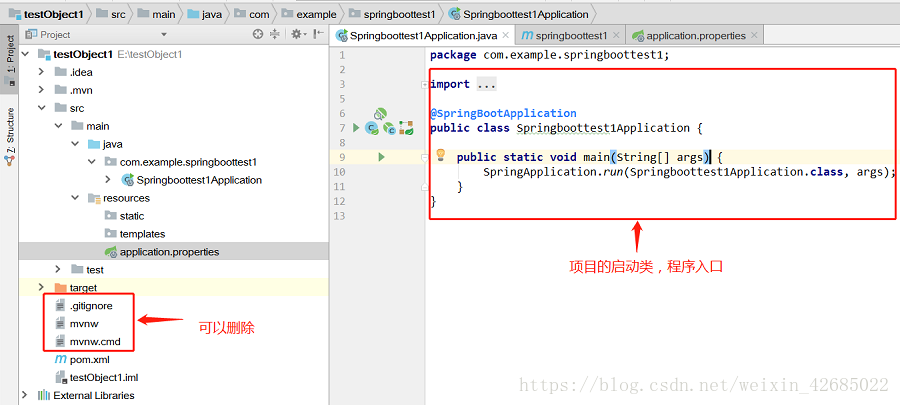
1、打开新项目后,我们可以观察一下左侧的项目结构。如图8所示。
生成的项目中,resources文件夹下,static文件夹下存放静态文件,比如css、js、html和图片等 。
templates下存放html文件,controller默认访问该文件夹下的html文件。
这个在application.properties配置文件中是可以修改的。
下面为项目生成的pom.xml文件:
<?xml version="1.0" encoding="UTF-8"?> <project xmlns="http://maven.apache.org/POM/4.0.0" xmlns:xsi="http://www.w3.org/2001/XMLSchema-instance" xsi:schemaLocation="http://maven.apache.org/POM/4.0.0 http://maven.apache.org/xsd/maven-4.0.0.xsd"> <modelVersion>4.0.0</modelVersion> <groupId>com.example</groupId> <artifactId>springboottest1</artifactId> <version>0.0.1-SNAPSHOT</version> <packaging>jar</packaging> <name>springboottest1</name> <description>Demo project for Spring Boot</description> <parent> <groupId>org.springframework.boot</groupId> <artifactId>spring-boot-starter-parent</artifactId> <version>2.0.4.RELEASE</version> <relativePath/> <!-- lookup parent from repository --> </parent> <properties> <project.build.sourceEncoding>UTF-8</project.build.sourceEncoding> <project.reporting.outputEncoding>UTF-8</project.reporting.outputEncoding> <java.version>1.8</java.version> </properties> <dependencies> <dependency> <groupId>org.springframework.boot</groupId> <artifactId>spring-boot-starter-jdbc</artifactId> </dependency> <dependency> <groupId>org.springframework.boot</groupId> <artifactId>spring-boot-starter-thymeleaf</artifactId> </dependency> <dependency> <groupId>org.springframework.boot</groupId> <artifactId>spring-boot-starter-web</artifactId> </dependency> <dependency> <groupId>org.mybatis.spring.boot</groupId> <artifactId>mybatis-spring-boot-starter</artifactId> <version>1.3.2</version> </dependency> <dependency> <groupId>mysql</groupId> <artifactId>mysql-connector-java</artifactId> <scope>runtime</scope> </dependency> <dependency> <groupId>org.springframework.boot</groupId> <artifactId>spring-boot-starter-test</artifactId> <scope>test</scope> </dependency> </dependencies> <build> <plugins> <plugin> <groupId>org.springframework.boot</groupId> <artifactId>spring-boot-maven-plugin</artifactId> </plugin> </plugins> </build> </project>
图8 项目文件结构
2、了解项目的文件结构后,我们尝试着启动项目。我们发现项目启动过程中出现错误,错误信息如图9所示。
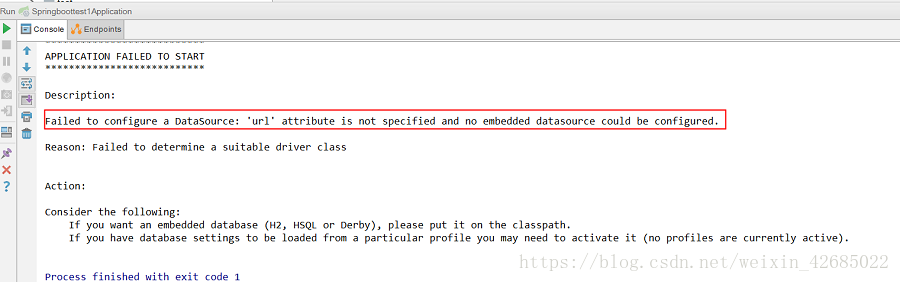
图9 项目启动报错
这是因为我们创建Spring Boot项目时,在选择组件时添加了mysql、mybatis,但现在还没有配置数据库,导致项目启动报错。
我们需要在项目的application.properties文件中配置数据信息。如图10所示,是我自己配置的数据库,具体情况根据自己数据库的设置配置。
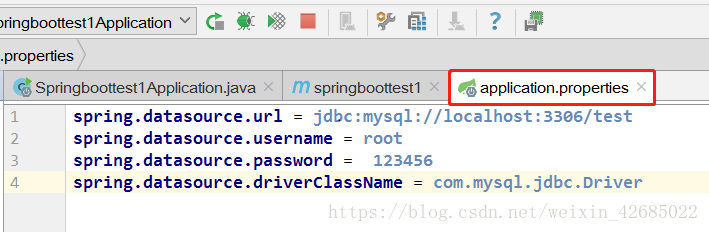
图10 数据库配置
数据库采用MySQL数据库,下面是数据库的设计,只有几个简单的字段。如图11所示。

图11 数据库设计
这里也可以不使用application.properties文件,采用更加简洁的application.yml文件。将resource文件夹下原有的application.properties文件删除,创建application.yml配置文件(备注:其实SpringBoot底层会把application.yml文件解析为application.properties), 文件的内容如下(此处只配置最基本的):
server:
 port: 8080

spring:
 datasource:
 name: test
 url: jdbc:mysql://127.0.0.1:3306/test
 username: root
 password: 123456
 driver-class-name: com.mysql.jdbc.Driver
接下来再次尝试重新启动项目。发现项目可以正常启动了。可以打开浏览器访问http://localhost:8080/,访问结果如图12所示。证明项目正常启动了。
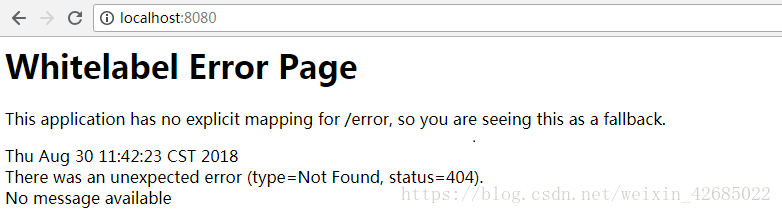
图12 访问结果
三、项目整合mybatis
1、在application.yml文件中添加mybatis。
server:
 port: 8080

spring:
 datasource:
 name: test
 url: jdbc:mysql://127.0.0.1:3306/test
 username: root
 password: 123456
 driver-class-name: com.mysql.jdbc.Driver

mybatis:
 mapper-locations: classpath:mapper/*.xml #注意:一定要对应mapper映射xml文件的所在路径
 type-aliases-package: com.example.springboottest1.entity # 注意:对应实体类的路径
2、在pom.xml中添加 mybatis generator 自动生成代码插件。
<build>
		<plugins>
			<plugin>
				<groupId>org.springframework.boot</groupId>
				<artifactId>spring-boot-maven-plugin</artifactId>
			</plugin>
			<!-- mybatis generator 自动生成代码插件 -->
			<plugin>
				<groupId>org.mybatis.generator</groupId>
				<artifactId>mybatis-generator-maven-plugin</artifactId>
				<version>1.3.1</version>
				<configuration>
					<configurationFile>${basedir}/src/main/resources/generator/generatorConfig.xml</configurationFile>
					<overwrite>true</overwrite>
					<verbose>true</verbose>
				</configuration>
			</plugin>
		</plugins>
</build>3、在resource文件夹下创建generator文件夹,并在文件夹中创建generatorConfig.xml文件。文件内容如下所示:
<?xml version="1.0" encoding="UTF-8"?> <!DOCTYPE generatorConfiguration PUBLIC "-//mybatis.org//DTD MyBatis Generator Configuration 1.0//EN" "http://mybatis.org/dtd/mybatis-generator-config_1_0.dtd"> <generatorConfiguration> <!-- 数据库驱动:选择你的本地硬盘上面的数据库驱动包--> <classPathEntry location="C:\Program Files (x86)\MySQL\Connector.J 5.1\mysql-connector-java-5.1.36-bin.jar"/> <context id="DB2Tables" targetRuntime="MyBatis3"> <commentGenerator> <property name="suppressDate" value="true"/> <!-- 是否去除自动生成的注释 true:是 : false:否 --> <property name="suppressAllComments" value="false"/> </commentGenerator> <!--数据库连接驱动类,URL,用户名、密码 --> <jdbcConnection driverClass="com.mysql.jdbc.Driver" connectionURL="jdbc:mysql://127.0.0.1/test" userId="root" password="123456"> </jdbcConnection> <javaTypeResolver> <property name="forceBigDecimals" value="false"/> </javaTypeResolver> <!-- 生成(实体)模型的包名和位置--> <javaModelGenerator targetPackage="com.example.springboottest1.entity" targetProject="src"> <property name="enableSubPackages" value="true"/> <property name="trimStrings" value="true"/> </javaModelGenerator> <!-- 生成XML映射文件的包名和位置--> <sqlMapGenerator targetPackage="resources.mapper" targetProject="src"> <property name="enableSubPackages" value="true"/> </sqlMapGenerator> <!-- 生成DAO接口的包名和位置--> <javaClientGenerator type="XMLMAPPER" targetPackage="com.example.springboottest1.mapper" targetProject="src"> <property name="enableSubPackages" value="true"/> </javaClientGenerator> <!-- 要生成的表 tableName是数据库中的表名或视图名 domainObjectName是实体类名--> <table tableName="user" domainObjectName="user" enableCountByExample="false" enableUpdateByExample="false" enableDeleteByExample="false" enableSelectByExample="false" selectByExampleQueryId="false"></table> </context> </generatorConfiguration>
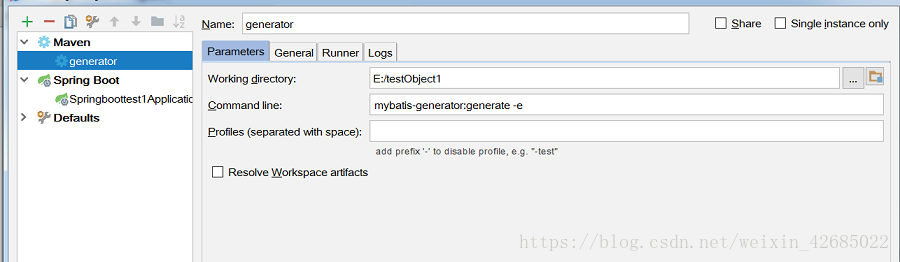
4、所有文件创建完成后,还需要进行简单的配置。Run→Edit Configurations...,然后选择maven,配置Command line。
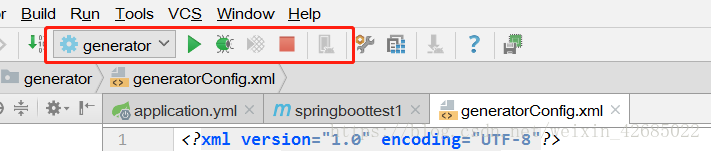
5、所用文件创建完成,并配置好相关设置,重新启动项目,启动后运行generator。通过控制台可以看见代码是否生成成功,或失败的原因。如果代码生成成功,可以在项目文件夹中看见生成的项目。
这个过程共生成三个文件,一个实体类,dao,还有sql语句。
5.1、生成的实体类entity:
5.2、生
package com.example.springboottest1.entity;

public class user {
 /**
 * This field was generated by MyBatis Generator.
 * This field corresponds to the database column user.id
 *
 * @mbggenerated
 */
 private Integer id;

 /**
 * This field was generated by MyBatis Generator.
 * This field corresponds to the database column user.username
 *
 * @mbggenerated
 */
 private String username;

 /**
 * This field was generated by MyBatis Generator.
 * This field corresponds to the database column user.password
 *
 * @mbggenerated
 */
 private String password;

 /**
 * This field was generated by MyBatis Generator.
 * This field corresponds to the database column user.age
 *
 * @mbggenerated
 */
 private Integer age;

 /**
 * This method was generated by MyBatis Generator.
 * This method returns the value of the database column user.id
 *
 * @return the value of user.id
 *
 * @mbggenerated
 */
 public Integer getId() {
 return id;
 }

 /**
 * This method was generated by MyBatis Generator.
 * This method sets the value of the database column user.id
 *
 * @param id the value for user.id
 *
 * @mbggenerated
 */
 public void setId(Integer id) {
 this.id = id;
 }

 /**
 * This method was generated by MyBatis Generator.
 * This method returns the value of the database column user.username
 *
 * @return the value of user.username
 *
 * @mbggenerated
 */
 public String getUsername() {
 return username;
 }

 /**
 * This method was generated by MyBatis Generator.
 * This method sets the value of the database column user.username
 *
 * @param username the value for user.username
 *
 * @mbggenerated
 */
 public void setUsername(String username) {
 this.username = username == null ? null : username.trim();
 }

 /**
 * This method was generated by MyBatis Generator.
 * This method returns the value of the database column user.password
 *
 * @return the value of user.password
 *
 * @mbggenerated
 */
 public String getPassword() {
 return password;
 }

 /**
 * This method was generated by MyBatis Generator.
 * This method sets the value of the database column user.password
 *
 * @param password the value for user.password
 *
 * @mbggenerated
 */
 public void setPassword(String password) {
 this.password = password == null ? null : password.trim();
 }

 /**
 * This method was generated by MyBatis Generator.
 * This method returns the value of the database column user.age
 *
 * @return the value of user.age
 *
 * @mbggenerated
 */
 public Integer getAge() {
 return age;
 }

 /**
 * This method was generated by MyBatis Generator.
 * This method sets the value of the database column user.age
 *
 * @param age the value for user.age
 *
 * @mbggenerated
 */
 public void setAge(Integer age) {
 this.age = age;
 }
}
成的Dao:
package com.example.springboottest1.mapper;

import com.example.springboottest1.entity.user;

public interface userMapper {
 /**
 * This method was generated by MyBatis Generator.
 * This method corresponds to the database table user
 *
 * @mbggenerated
 */
 int deleteByPrimaryKey(Integer id);

 /**
 * This method was generated by MyBatis Generator.
 * This method corresponds to the database table user
 *
 * @mbggenerated
 */
 int insert(user record);

 /**
 * This method was generated by MyBatis Generator.
 * This method corresponds to the database table user
 *
 * @mbggenerated
 */
 int insertSelective(user record);

 /**
 * This method was generated by MyBatis Generator.
 * This method corresponds to the database table user
 *
 * @mbggenerated
 */
 user selectByPrimaryKey(Integer id);

 /**
 * This method was generated by MyBatis Generator.
 * This method corresponds to the database table user
 *
 * @mbggenerated
 */
 int updateByPrimaryKeySelective(user record);

 /**
 * This method was generated by MyBatis Generator.
 * This method corresponds to the database table user
 *
 * @mbggenerated
 */
 int updateByPrimaryKey(user record);
}
5.3、生成的SQL语句(其中一些没有用的注释被我删掉了):
<?xml version="1.0" encoding="UTF-8" ?>
<!DOCTYPE mapper PUBLIC "-//mybatis.org//DTD Mapper 3.0//EN" "http://mybatis.org/dtd/mybatis-3-mapper.dtd" >
<mapper namespace="com.example.springboottest1.mapper.userMapper" >
<resultMap id="BaseResultMap" type="com.example.springboottest1.entity.user" >
<!--
WARNING - @mbggenerated
This element is automatically generated by MyBatis Generator, do not modify.
-->
<id column="id" property="id" jdbcType="INTEGER" />
<result column="username" property="username" jdbcType="VARCHAR" />
<result column="password" property="password" jdbcType="VARCHAR" />
<result column="age" property="age" jdbcType="INTEGER" />
</resultMap>
<sql id="Base_Column_List" >
id,
username,
password,
age
</sql>
<select id="selectByPrimaryKey" resultMap="BaseResultMap" parameterType="java.lang.Integer" >
select
<include refid="Base_Column_List" />
from user
where id = #{id,jdbcType=INTEGER}
</select>
<delete id="deleteByPrimaryKey" parameterType="java.lang.Integer" >
delete from user
where id = #{id,jdbcType=INTEGER}
</delete>
<insert id="insert" parameterType="com.example.springboottest1.entity.user" >
insert into user (id, username, password, age)
values (
#{id,jdbcType=INTEGER},
#{username,jdbcType=VARCHAR},
#{password,jdbcType=VARCHAR},
#{age,jdbcType=INTEGER})
</insert>
<insert id="insertSelective" parameterType="com.example.springboottest1.entity.user" >
insert into user
<trim prefix="(" suffix=")" suffixOverrides="," >
<if test="id != null" >
id,
</if>
<if test="username != null" >
username,
</if>
<if test="password != null" >
password,
</if>
<if test="age != null" >
age,
</if>
</trim>
<trim prefix="values (" suffix=")" suffixOverrides="," >
<if test="id != null" >
#{id,jdbcType=INTEGER},
</if>
<if test="username != null" >
#{username,jdbcType=VARCHAR},
</if>
<if test="password != null" >
#{password,jdbcType=VARCHAR},
</if>
<if test="age != null" >
#{age,jdbcType=INTEGER},
</if>
</trim>
</insert>
<update id="updateByPrimaryKeySelective" parameterType="com.example.springboottest1.entity.user" >
update user
<set >
<if test="username != null" >
username = #{username,jdbcType=VARCHAR},
</if>
<if test="password != null" >
password = #{password,jdbcType=VARCHAR},
</if>
<if test="age != null" >
age = #{age,jdbcType=INTEGER},
</if>
</set>
where id = #{id,jdbcType=INTEGER}
</update>
<update id="updateByPrimaryKey" parameterType="com.example.springboottest1.entity.user" >
update user
set username = #{username,jdbcType=VARCHAR},
password = #{password,jdbcType=VARCHAR},
age = #{age,jdbcType=INTEGER}
where id = #{id,jdbcType=INTEGER}
</update>
</mapper>四、测试访问
做好以上的准备以后,可以简单的写一个小页面,试着访问一下。
同时这个时候可以自己了解一下@Controller与@RestController的区别,以及@ResponseBody的用法。
1、比如写一个简单的HTML页面,HelloWord.html。
<!DOCTYPE html>
<html lang="en">
<head>
 <meta charset="UTF-8">
 <title>HelloWord</title>
</head>
<body>
<h2>hello springboot!!!</h2>
</body>
</html>
2、访问页面的controller。helloController.java
package com.example.springboottest1.controller;

import org.springframework.stereotype.Controller;
import org.springframework.web.bind.annotation.RequestMapping;

@Controller
@RequestMapping(value = {"/hello"})
public class helloController {

 @RequestMapping(value = {"/springboot"})
 public String hello(){
 return "HelloWord";
 }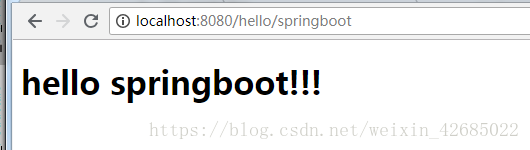
}3、重新启动项目,访问http://localhost:8080/hello/springboot,访问的结果如下所示。
五、编写用户登录过程代码
1、编写简单的登录页面与注册页面
(1)登录页面 userLogin.html
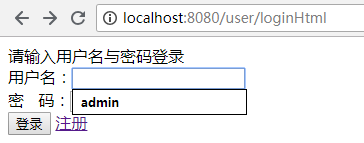
<!DOCTYPE html> <html lang="en"> <head> <meta charset="UTF-8"> <title>用户登录</title> </head> <body> 请输入用户名与密码登录 <form action="/user/userLogin" method="post"> 用户名:<input type="text" name="username" /><br> 密 码:<input type="password" name="password" /><br> <input type="submit" value="登录" /> <a href="/user/registerpage" target="_blank">注册</a> </form> </body> </html>
页面效果:
(2)注册页面 register.html
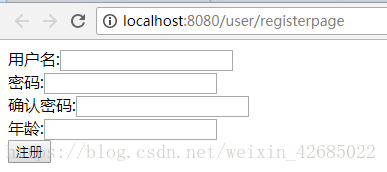
<!DOCTYPE html>
<html lang="en">
<head>
 <meta charset="UTF-8">
 <title>注册</title>
</head>
<body>
<form action="/user/uregister" method="post">
 用户名:<input type="text" name="username" /></br>
 密码:<input type="password" name="password" /></br>
 确认密码:<input type="password" name="password2" /></br>
 年龄:<input type="text" name="age" /></br>
 <input type="submit" value="注册">
</form>
</body>
</html>
页面效果:
(3)登录成功页面 index.html
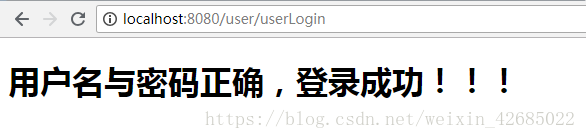
<!DOCTYPE html>
<html lang="en">
<head>
 <meta charset="UTF-8">
 <title>登录成功</title>
</head>
<body>
<h2>用户名与密码正确,登录成功!!!</h2>

</body>
</html>
页面效果:
(4)登录失败页面 loginError.html
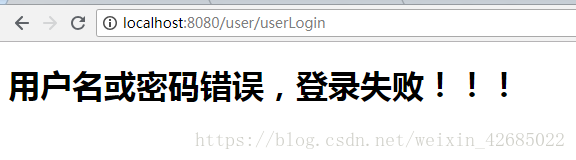
<!DOCTYPE html>
<html lang="en">
<head>
 <meta charset="UTF-8">
 <title>登录失败</title>
</head>
<body>
<h2>用户名或密码错误,登录失败!!!</h2>
</body>
</html>
页面效果:
2、对于写代码的顺序,我是从xml(sql语句)开始写,然后Dao,Service,最后写Controller。下面为我的部分代码。(开始生成的代码没有用到的部分被我删除掉了)
(1)xml(sql语句) userMapper.xml
<?xml version="1.0" encoding="UTF-8" ?>
<!DOCTYPE mapper PUBLIC "-//mybatis.org//DTD Mapper 3.0//EN" "http://mybatis.org/dtd/mybatis-3-mapper.dtd" >
<mapper namespace="com.example.springboottest1.mapper.userMapper" >
<!--用户登录验证-->
<select id="userlogin" parameterType="user" resultType="User">
SELECT id,username,password,age FROM user WHERE username = #{username} AND password = #{password}
</select>
<!--新用户注册 方式1-->
<insert id="adduser" parameterType="user" useGeneratedKeys="true" keyProperty="id">
INSERT INTO user (username,password,age) VALUES (#{username},#{password},#{age})
</insert>
<!--新用户注册 方式2-->
<insert id="adduser1" parameterType="user">
INSERT INTO user (id,username,password,age) VALUES (UUID(),#{username},#{password},#{age})
</insert>
</mapper>(2)Dao层 userMapper.java
package com.example.springboottest1.mapper;

import com.example.springboottest1.entity.User;
import org.apache.ibatis.annotations.Mapper;
import org.apache.ibatis.annotations.Param;
import org.springframework.stereotype.Component;

import java.util.Map;

@Mapper
@Component
public interface userMapper {

 //用户登录
 User userlogin(@Param("username") String username,@Param("password") String password);

 //注册新用户(方式1)
 int adduser(@Param("username") String username, @Param("password") String password, @Param("age") int age);

 //注册新用户(方式2)
 int adduser1(@Param("username") String username, @Param("password") String password, @Param("age") int age);
}
(3)Servicr层 UserLoginService.java
package com.example.springboottest1.service;

import com.example.springboottest1.entity.User;
import com.example.springboottest1.mapper.userMapper;
import org.springframework.beans.factory.annotation.Autowired;
import org.springframework.stereotype.Service;

import java.util.Map;

@Service
public class UserLoginService {

 /**
 * 注入dao
 */
 @Autowired
 private userMapper usermapper;

 //用户登录
 public User userLogin(String username,String password){
 User user = usermapper.userlogin(username,password);
 return user;
 }

 //注册新用户
 public int adduser(String username,String password,int age){


 return usermapper.adduser(username,password,age);
 //return usermapper.adduser1(username,password,age); //对应sql语句中的第二种注册方式
 }
}
(4)Controller层 UserLoginController.java
package com.example.springboottest1.controller;

import com.example.springboottest1.entity.User;
import com.example.springboottest1.service.UserLoginService;
import org.springframework.beans.factory.annotation.Autowired;
import org.springframework.stereotype.Controller;
import org.springframework.web.bind.annotation.RequestBody;
import org.springframework.web.bind.annotation.RequestMapping;
import org.springframework.web.bind.annotation.RequestParam;
import org.springframework.web.bind.annotation.ResponseBody;

import javax.servlet.http.HttpServletRequest;

@Controller
@RequestMapping(value = {"/user"})
public class UserLoginController {

 /**
 * 注入service
 */
 @Autowired
 private UserLoginService userLoginService;

 /**
 * 跳转到用户登录页面
 * @return 登录页面
 */
 @RequestMapping(value = {"/loginHtml"})
 public String loginHtml(){
 return "userLogin";
 }

 /**
 * 跳转到用户注册页面
 * @return 注册页面
 */
 @RequestMapping(value = {"/registerpage"})
 public String registerpage(){
 return "register";
 }

 /**
 * 获取用户名与密码,用户登录
 * @return 登录成功页面
 */
 @RequestMapping(value = {"/userLogin"})
 public String userLogin(@RequestParam("username") String username, @RequestParam("password") String password, HttpServletRequest request){

 User user = userLoginService.userLogin(username,password);

 if(user != null){       //登录成功
  request.getSession().setAttribute("session_user",user); //将用户信息放入session
  return "index";
 }
 return "loginError";
 }

 /**
 * 注册新用户
 * @return 注册结果
 */
 @ResponseBody
 @RequestMapping(value = {"/uregister"})
 public String addUser(@RequestParam("username") String username,
    @RequestParam("password") String password,
    @RequestParam("password2") String password2,
    @RequestParam("age") int age){

 if(!password.equals(password2)){

  return "两次密码不相同,注册失败!!";
 }else {
  int res = userLoginService.adduser(username,password,age);
  if(res == 0){
  return "注册失败!";
  }else {
  return "注册成功!";
  }
 }

 }
}
看完了这篇文章,相信你对利用IDEA搭建SpringBoot项目整合mybatis实现简单登录功能的方法有了一定的了解,想了解更多相关知识,欢迎关注亿速云行业资讯频道,感谢各位的阅读!
免责声明:本站发布的内容(图片、视频和文字)以原创、转载和分享为主,文章观点不代表本网站立场,如果涉及侵权请联系站长邮箱:is@yisu.com进行举报,并提供相关证据,一经查实,将立刻删除涉嫌侵权内容。


