深入浅析SpringMVC零XML配置的实现原理?针对这个问题,这篇文章详细介绍了相对应的分析和解答,希望可以帮助更多想解决这个问题的小伙伴找到更简单易行的方法。
先来看一下原始的web.xml配置:
<!DOCTYPE web-app PUBLIC
 "-//Sun Microsystems, Inc.//DTD Web Application 2.3//EN"
 "http://java.sun.com/dtd/web-app_2_3.dtd" >

<web-app>
 <context-param>
  <param-name>contextConfigLocation</param-name>
  <param-value>
   <!--加载spring配置-->
   classpath:spring.xml
  </param-value>
 </context-param>
 <context-param>
  <param-name>webAppRootKey</param-name>
  <param-value>ServicePlatform.root</param-value>
 </context-param>

 <listener>
  <listener-class>org.springframework.web.context.ContextLoaderListener</listener-class>
  <!--<listener-class>org.springframework.web.context.request.RequestContextListener</listener-class>-->
 </listener>

 <servlet>
  <servlet-name>spring-dispatcher</servlet-name>
  <servlet-class>org.springframework.web.servlet.DispatcherServlet</servlet-class>
  <init-param>
   <!--springmvc的配置文件-->
   <param-name>contextConfigLocation</param-name>
   <param-value>classpath:spring-dispatcher.xml</param-value>
  </init-param>
  <load-on-startup>0</load-on-startup>
 </servlet>
 <servlet-mapping>
  <servlet-name>spring-dispatcher</servlet-name>
  <url-pattern>/</url-pattern>
 </servlet-mapping>
</web-app>
这里各个配置的作用简单说下,context-param是加载我们主的sping.xml配置,比如一些bean的配置和开启注解扫描等;listener是配置监听器,Tomcat启动会触发监听器调用;servlet则是配置我们自定义的Servlet实现,比如DispatcherServlet。还有其它很多配置就不一一说明了,在这里主要看到记住context-param和servlet配置,这是SpringIOC父子容器的体现。
在之前的I文章中讲过IOC容器是以父子关系组织的,但估计大部分人都不能理解,除了看到复杂的继承体系,并没有看到父容器作用的体现,稍后来分析。
了解了配置,我们就需要思考如何替换掉这些繁琐的配置。实际上Tomcat提供了一个规范,有一个ServletContainerInitializer接口:
public interface ServletContainerInitializer {
void onStartup(Set<Class<?>> var1, ServletContext var2) throws ServletException;
}Tomcat启动时会调用该接口实现类的onStartup方法,这个方法有两个参数,第二个不用说,主要是第一个参数什么?从哪里来?另外我们自定义的实现类又怎么让Tomcat调用呢?
首先解答最后一个问题,这里也是利用SPI来实现的,因此我们实现了该接口后,还需要在META-INF.services下配置。其次,这里传入的第一个参数也是我们自定义的扩展接口的实现类,我们可以通过我们自定义的接口实现很多需要在启动时做的事,比如加载Servlet,但是Tomcat又是怎么知道我们自定义的接口是哪个呢?
这就需要用到@HandlesTypes注解,该注解就是标注在ServletContainerInitializer的实现类上,其值就是我们扩展的接口,这样Tomcat就知道需要传入哪个接口实现类到这个onStartup方法了。
来看一个简单的实现:
@HandlesTypes(LoadServlet.class)
public class MyServletContainerInitializer implements ServletContainerInitializer {
@Override
public void onStartup(Set<Class<?>> set, ServletContext servletContext) throws ServletException {
Iterator var4;
if (set != null) {
var4 = set.iterator();
while (var4.hasNext()) {
Class<?> clazz = (Class<?>) var4.next();
if (!clazz.isInterface() && !Modifier.isAbstract(clazz.getModifiers()) && LoadServlet.class.isAssignableFrom(clazz)) {
try {
((LoadServlet) clazz.newInstance()).loadOnstarp(servletContext);
} catch (Exception e) {
e.printStackTrace();
}
}
}
}
}
}
public interface LoadServlet {
void loadOnstarp(ServletContext servletContext);
}
public class LoadServletImpl implements LoadServlet {
@Override
public void loadOnstarp(ServletContext servletContext) {
ServletRegistration.Dynamic initServlet = servletContext.addServlet("initServlet", "org.springframework.web.servlet.DispatcherServlet");
initServlet.setLoadOnStartup(1);
initServlet.addMapping("/init");
}
}这就是Tomcat给我们提供的规范,通过这个规范我们就能实现Spring的零xml配置启动,直接来看Spring是如何做的。根据上面所说我们可以在spring-web工程下找到META-INF/services/javax.servlet.ServletContainerInitializer配置:
@HandlesTypes(WebApplicationInitializer.class)
public class SpringServletContainerInitializer implements ServletContainerInitializer {
@Override
public void onStartup(@Nullable Set<Class<?>> webAppInitializerClasses, ServletContext servletContext)
throws ServletException {
List<WebApplicationInitializer> initializers = new LinkedList<>();
if (webAppInitializerClasses != null) {
for (Class<?> waiClass : webAppInitializerClasses) {
// Be defensive: Some servlet containers provide us with invalid classes,
// no matter what @HandlesTypes says...
if (!waiClass.isInterface() && !Modifier.isAbstract(waiClass.getModifiers()) &&
WebApplicationInitializer.class.isAssignableFrom(waiClass)) {
try {
initializers.add((WebApplicationInitializer)
ReflectionUtils.accessibleConstructor(waiClass).newInstance());
}
catch (Throwable ex) {
throw new ServletException("Failed to instantiate WebApplicationInitializer class", ex);
}
}
}
}
if (initializers.isEmpty()) {
servletContext.log("No Spring WebApplicationInitializer types detected on classpath");
return;
}
servletContext.log(initializers.size() + " Spring WebApplicationInitializers detected on classpath");
AnnotationAwareOrderComparator.sort(initializers);
for (WebApplicationInitializer initializer : initializers) {
initializer.onStartup(servletContext);
}
}
}核心的实现就是WebApplicationInitializer,先看看其继承体系
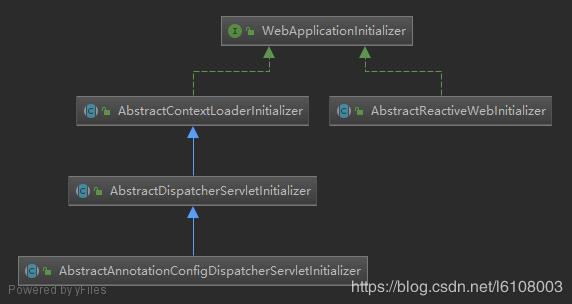
AbstractReactiveWebInitializer不用管,主要看另外一边,但是都是抽象类,也就是说真的实例也是由我们自己实现,但需要我们实现什么呢?我们一般直接继承AbstractAnnotationConfigDispatcherServletInitializer类,有四个抽象方法需要我们实现:
//父容器
@Override
protected Class<?>[] getRootConfigClasses() {
return new Class<?>[]{SpringContainer.class};
}
//SpringMVC配置子容器
@Override
protected Class<?>[] getServletConfigClasses() {
return new Class<?>[]{MvcContainer.class};
}
//获取DispatcherServlet的映射信息
@Override
protected String[] getServletMappings() {
return new String[]{"/"};
}
// filter配置
@Override
protected Filter[] getServletFilters() {
MyFilter myFilter = new MyFilter();
CorsFilter corsFilter = new CorsFilter();
return new Filter[]{myFilter,corsFilter};
}这里主要注意getRootConfigClasses和getServletConfigClasses方法,分别加载父、子容器:
@ComponentScan(value = "com.dark",excludeFilters = {
    @ComponentScan.Filter(type = FilterType.ANNOTATION,classes = {Controller.class})
})
public class SpringContainer {
}

@ComponentScan(value = "com.dark",includeFilters = {
    @ComponentScan.Filter(type = FilterType.ANNOTATION,classes = {Controller.class})
},useDefaultFilters = false)
public class MvcContainer {
}
看到这两个类上的注解应该不陌生了吧,父容器扫描装载了所有不带@Controller注解的类,子容器则相反,但需要对象时首先从当前容器中找,如果没有则从父容器中获取,为什么要这么设计呢?
直接放到一个容器中不行么?先思考下, 稍后解答。回到onStartup方法中,直接回调用到AbstractDispatcherServletInitializer类:
 public void onStartup(ServletContext servletContext) throws ServletException {
 super.onStartup(servletContext);
 //注册DispatcherServlet
 registerDispatcherServlet(servletContext);
 }
先是调用父类:
 public void onStartup(ServletContext servletContext) throws ServletException {
 registerContextLoaderListener(servletContext);
 }

 protected void registerContextLoaderListener(ServletContext servletContext) {

 //创建spring上下文,注册了SpringContainer
 WebApplicationContext rootAppContext = createRootApplicationContext();
 if (rootAppContext != null) {
  //创建监听器
  ContextLoaderListener listener = new ContextLoaderListener(rootAppContext);
  listener.setContextInitializers(getRootApplicationContextInitializers());
  servletContext.addListener(listener);
 }
 }
然后调用createRootApplicationContext创建父容器:
protected WebApplicationContext createRootApplicationContext() {
Class<?>[] configClasses = getRootConfigClasses();
if (!ObjectUtils.isEmpty(configClasses)) {
AnnotationConfigWebApplicationContext context = new AnnotationConfigWebApplicationContext();
context.register(configClasses);
return context;
}
else {
return null;
}
}可以看到就是创建了一个AnnotationConfigWebApplicationContext对象,并将我们的配置类SpringContainer注册了进去。接着创建Tomcat启动加载监听器ContextLoaderListener,该监听器有一个contextInitialized方法,会在Tomcat启动时调用。
 public void contextInitialized(ServletContextEvent event) {
 initWebApplicationContext(event.getServletContext());
 }

 */
 public WebApplicationContext initWebApplicationContext(ServletContext servletContext) {
 long startTime = System.currentTimeMillis();
 try {
  // Store context in local instance variable, to guarantee that
  // it is available on ServletContext shutdown.
  if (this.context == null) {
  this.context = createWebApplicationContext(servletContext);
  }
  if (this.context instanceof ConfigurableWebApplicationContext) {
  ConfigurableWebApplicationContext cwac = (ConfigurableWebApplicationContext) this.context;
  if (!cwac.isActive()) {
   // The context has not yet been refreshed -> provide services such as
   // setting the parent context, setting the application context id, etc
   if (cwac.getParent() == null) {
   // The context instance was injected without an explicit parent ->
   // determine parent for root web application context, if any.
   ApplicationContext parent = loadParentContext(servletContext);
   cwac.setParent(parent);
   }
   configureAndRefreshWebApplicationContext(cwac, servletContext);
  }
  }
  servletContext.setAttribute(WebApplicationContext.ROOT_WEB_APPLICATION_CONTEXT_ATTRIBUTE, this.context);

  ClassLoader ccl = Thread.currentThread().getContextClassLoader();
  if (ccl == ContextLoader.class.getClassLoader()) {
  currentContext = this.context;
  }
  else if (ccl != null) {
  currentContextPerThread.put(ccl, this.context);
  }

  return this.context;
 }
 }
可以看到就是去初始化容器,这个和之前分析xml解析是一样的,主要注意这里封装了ServletContext对象,并将父容器设置到了该对象中。
父容器创建完成后自然就是子容器的创建,来到registerDispatcherServlet方法:
protected void registerDispatcherServlet(ServletContext servletContext) {
String servletName = getServletName();
Assert.hasLength(servletName, "getServletName() must not return null or empty");
//创建springmvc的上下文,注册了MvcContainer类
WebApplicationContext servletAppContext = createServletApplicationContext();
Assert.notNull(servletAppContext, "createServletApplicationContext() must not return null");
//创建DispatcherServlet
FrameworkServlet dispatcherServlet = createDispatcherServlet(servletAppContext);
Assert.notNull(dispatcherServlet, "createDispatcherServlet(WebApplicationContext) must not return null");
dispatcherServlet.setContextInitializers(getServletApplicationContextInitializers());
ServletRegistration.Dynamic registration = servletContext.addServlet(servletName, dispatcherServlet);
if (registration == null) {
throw new IllegalStateException("Failed to register servlet with name '" + servletName + "'. " +
"Check if there is another servlet registered under the same name.");
}
/*
* 如果该元素的值为负数或者没有设置,则容器会当Servlet被请求时再加载。
如果值为正整数或者0时,表示容器在应用启动时就加载并初始化这个servlet,
值越小,servlet的优先级越高,就越先被加载
* */
registration.setLoadOnStartup(1);
registration.addMapping(getServletMappings());
registration.setAsyncSupported(isAsyncSupported());
Filter[] filters = getServletFilters();
if (!ObjectUtils.isEmpty(filters)) {
for (Filter filter : filters) {
registerServletFilter(servletContext, filter);
}
}
customizeRegistration(registration);
}
protected WebApplicationContext createServletApplicationContext() {
AnnotationConfigWebApplicationContext context = new AnnotationConfigWebApplicationContext();
Class<?>[] configClasses = getServletConfigClasses();
if (!ObjectUtils.isEmpty(configClasses)) {
context.register(configClasses);
}
return context;
}这里也是创建了一个AnnotationConfigWebApplicationContext对象,不同的只是这里注册的配置类就是我们的Servlet配置了。然后创建了DispatcherServlet对象,并将上下文对象设置了进去。
看到这你可能会疑惑,既然父子容器创建的都是相同类的对象,何来的父子容器之说?
别急,这个在初始化该上文时就明白了。但是这里的初始化入口在哪呢?没有看到任何监听器的创建和调用。
实际上这里的上下文对象初始化是在Servlet初始化时实现的,即init方法,直接来到HttpServletBean的init方法(分析SpringMVC源码时讲过):
 public final void init() throws ServletException {
 ...省略

 // Let subclasses do whatever initialization they like.
 initServletBean();
 }

 protected final void initServletBean() throws ServletException {
 try {
  this.webApplicationContext = initWebApplicationContext();
  initFrameworkServlet();
 }
 }

 protected WebApplicationContext initWebApplicationContext() {
 //这里会从servletContext中获取到父容器,就是通过监听器加载的容器
 WebApplicationContext rootContext =
  WebApplicationContextUtils.getWebApplicationContext(getServletContext());
 WebApplicationContext wac = null;

 if (this.webApplicationContext != null) {
  // A context instance was injected at construction time -> use it
  wac = this.webApplicationContext;
  if (wac instanceof ConfigurableWebApplicationContext) {
  ConfigurableWebApplicationContext cwac = (ConfigurableWebApplicationContext) wac;
  if (!cwac.isActive()) {
   if (cwac.getParent() == null) {
   cwac.setParent(rootContext);
   }
   //容器加载
   configureAndRefreshWebApplicationContext(cwac);
  }
  }
 }
 if (wac == null) {
  wac = findWebApplicationContext();
 }
 if (wac == null) {
  wac = createWebApplicationContext(rootContext);
 }

 if (!this.refreshEventReceived) {
  synchronized (this.onRefreshMonitor) {
  onRefresh(wac);
  }
 }

 if (this.publishContext) {
  // Publish the context as a servlet context attribute.
  String attrName = getServletContextAttributeName();
  getServletContext().setAttribute(attrName, wac);
 }

 return wac;
 }
关于深入浅析SpringMVC零XML配置的实现原理问题的解答就分享到这里了,希望以上内容可以对大家有一定的帮助,如果你还有很多疑惑没有解开,可以关注亿速云行业资讯频道了解更多相关知识。
免责声明:本站发布的内容(图片、视频和文字)以原创、转载和分享为主,文章观点不代表本网站立场,如果涉及侵权请联系站长邮箱:is@yisu.com进行举报,并提供相关证据,一经查实,将立刻删除涉嫌侵权内容。


