本篇文章给大家分享的是有关在Java项目中使用JFrame进行美化窗体,小编觉得挺实用的,因此分享给大家学习,希望大家阅读完这篇文章后可以有所收获,话不多说,跟着小编一起来看看吧。
JFrame默认的窗体比较土,可以通过一定的美化,让窗体表现的比较漂亮,具体要根据设计的设计图进行美化;
JFrame美化的大致思路:先将JFrame去除默认美化效果,实现JWindow效果,然后再JWindow基础上对窗体的各项内容自定义设置与美化,大多用到插入背景图片、添加各种鼠标事件、弹窗与输入框等圆角等各种美化;
下面是一个登录窗体的美化代码,以后再有对窗体美化的可以参照一下代码进行美化:
1、Login实体类代码:
package com;

import java.awt.Color;
import java.awt.EventQueue;
import java.awt.Font;
import java.awt.Image;
import java.awt.geom.RoundRectangle2D;
import java.io.File;

import javax.swing.ImageIcon;
import javax.swing.JFrame;
import javax.swing.JLayeredPane;
import javax.swing.JPanel;
import javax.swing.JRootPane;
import javax.swing.JLabel;

import com.alibaba.fastjson.JSON;
import com.model.Message;
import com.model.User;
import com.sun.awt.AWTUtilities;
import com.util.FileUtils;
import com.util.MyButton;
import com.util.MyLineBorder;
import com.util.VerifyCodeUtils;

import java.awt.event.MouseAdapter;
import java.awt.event.MouseEvent;
import javax.swing.JTextField;
import javax.swing.border.MatteBorder;
import javax.swing.JPasswordField;
import java.awt.event.FocusAdapter;
import java.awt.event.FocusEvent;
/**
 * 用户登录窗体(按照设计图片效果制作)
 * @author admin
 *
 */
public class Login1{

  private JFrame frame;//窗体
  private JTextField userNameField;//用户名输入框
  private JPasswordField passwordField;//密码输入框
  private JTextField verifyCodeField;//验证码输入框
  private String verifyCode;//验证码图片中的验证码值

  /**
   * Launch the application.
   */
  public static void main(String[] args) {
    EventQueue.invokeLater(new Runnable() {
      public void run() {
        try {
          Login1 window = new Login1();
          window.frame.setVisible(true);
        } catch (Exception e) {
          e.printStackTrace();
        }
      }
    });
  }
  /**
   * Create the application.
   */
  public Login1() {
    initialize();
  }
  /**
   * Initialize the contents of the frame.
   */
  private void initialize() {
    //将存储验证码文件夹下的所有验证码图片删除
    FileUtils.deleteAllFiles("./verifyCodeImg");
    //自定义圆角输入框边界线
    MyLineBorder myLineBorder = new MyLineBorder(new Color(192, 192, 192), 1 , true);
    //只显示输入框的下边框
    MatteBorder bottomBorder = new MatteBorder(0, 0, 1, 0, new Color(192, 192, 192));
    //设置JFrame禁用本地外观,使用下面自定义设置的外观;
    JFrame.setDefaultLookAndFeelDecorated(true);
    frame = new JFrame();
    frame.setBounds(0, 0, 300, 490);
    frame.setDefaultCloseOperation(JFrame.EXIT_ON_CLOSE);
    frame.getContentPane().setLayout(null);
    /**
     * 对窗体进行基本设置
     */
    //设置窗体在计算机窗口的中心部位显示
    frame.setLocationRelativeTo(frame.getOwner());
    // 去掉窗口的装饰
    frame.setUndecorated(true);
    //采用指定的窗口装饰风格
    frame.getRootPane().setWindowDecorationStyle(JRootPane.NONE);
    //设置窗体圆角,最后两个参数分别为圆角的宽度、高度数值,一般这两个数值都是一样的
    AWTUtilities.setWindowShape(frame,
        new RoundRectangle2D.Double(0.0D, 0.0D, frame.getWidth(), frame.getHeight(), 20.0D, 20.0D));
    //设置背景颜色,记住一定要修改frame.getContentPane()的颜色,因为我们看到的都是这个的颜色而并不是frame的颜色
    frame.getContentPane().setBackground(Color.white);
    /**
     * 插入顶部非凡汽车背景图片
     */
    //创建具有分层的JLayeredPane
    JLayeredPane layeredPane = new JLayeredPane();
    layeredPane.setBounds(0, -5, 300, 200);
    frame.getContentPane().add(layeredPane);
    // 创建图片对象
    ImageIcon img = new ImageIcon(Login1.class.getResource("/images/dingbu.jpg"));
    //设置图片在窗体中显示的宽度、高度
    img.setImage(img.getImage().getScaledInstance(300, 200,Image.SCALE_DEFAULT));

    JPanel panel = new JPanel();
    panel.setBounds(0, -5, 300, 200);
    layeredPane.add(panel, JLayeredPane.DEFAULT_LAYER);

    JLabel lblNewLabel = new JLabel("");
    panel.add(lblNewLabel);
    lblNewLabel.setIcon(img);
    /**
     * 插入窗体关闭的背景图片及功能
     */
    // 创建图片对象
    ImageIcon closeImg = new ImageIcon(Login1.class.getResource("/images/close.png"));
    //设置图片在窗体中显示的宽度、高度
    closeImg.setImage(closeImg.getImage().getScaledInstance(31, 31,Image.SCALE_DEFAULT));

    JPanel closePanel = new JPanel();
    closePanel.setBounds(269, -5, 31, 31);
    layeredPane.add(closePanel,JLayeredPane.MODAL_LAYER);

    JLabel closeLabel = new JLabel("");
    closePanel.add(closeLabel);
    closeLabel.setIcon(closeImg);
    closeLabel.addMouseListener(new MouseAdapter() {
      //鼠标点击关闭图片,实现关闭窗体的功能
      @Override
      public void mouseClicked(MouseEvent e) {
        //dispose();
        System.exit(0);//使用dispose();也可以关闭只是不是真正的关闭
      }
      //鼠标进入,换关闭的背景图片
      @Override
      public void mouseEntered(MouseEvent e) {
        // 创建图片对象
        ImageIcon closeImg1 = new ImageIcon(Login1.class.getResource("/images/mouse_close.png"));
        //设置图片在窗体中显示的宽度、高度
        closeImg1.setImage(closeImg1.getImage().getScaledInstance(31, 31,Image.SCALE_DEFAULT));
        closeLabel.setIcon(closeImg1);
      }
      //鼠标离开,换关闭的背景图片
      @Override
      public void mouseExited(MouseEvent e) {
        // 创建图片对象
        ImageIcon closeImg = new ImageIcon(Login1.class.getResource("/images/close.png"));
        //设置图片在窗体中显示的宽度、高度
        closeImg.setImage(closeImg.getImage().getScaledInstance(31, 31,Image.SCALE_DEFAULT));
        closeLabel.setIcon(closeImg);
      }
    });
    /**
     * 插入窗体最小化的背景图片及功能
     */
    // 创建图片对象
    ImageIcon minImg = new ImageIcon(Login1.class.getResource("/images/min.png"));
    //设置图片在窗体中显示的宽度、高度
    minImg.setImage(minImg.getImage().getScaledInstance(31, 31,Image.SCALE_DEFAULT));

    JPanel minPanel = new JPanel();
    minPanel.setBounds(237, -5, 31, 31);
    layeredPane.add(minPanel,JLayeredPane.MODAL_LAYER);

    JLabel minLabel = new JLabel("");
    minLabel.addMouseListener(new MouseAdapter() {
      //鼠标点击最小化图片,实现最小化窗体的功能
      @Override
      public void mouseClicked(MouseEvent e) {
        frame.setExtendedState(JFrame.ICONIFIED);//最小化窗体
      }
      //鼠标进入,换最小化的背景图片
      @Override
      public void mouseEntered(MouseEvent e) {
        // 创建图片对象
        ImageIcon minImg1 = new ImageIcon(Login1.class.getResource("/images/mouse_min.png"));
        //设置图片在窗体中显示的宽度、高度
        minImg1.setImage(minImg1.getImage().getScaledInstance(31, 31,Image.SCALE_DEFAULT));
        minLabel.setIcon(minImg1);
      }
      //鼠标离开,换最小化的背景图片
      @Override
      public void mouseExited(MouseEvent e) {
        // 创建图片对象
        ImageIcon minImg = new ImageIcon(Login1.class.getResource("/images/min.png"));
        //设置图片在窗体中显示的宽度、高度
        minImg.setImage(minImg.getImage().getScaledInstance(31, 31,Image.SCALE_DEFAULT));
        minLabel.setIcon(minImg);
      }
    });
    minPanel.add(minLabel);
    minLabel.setIcon(minImg);
    /**
     * 插入用户名输入框前面的图片
     */
    // 创建图片对象
    ImageIcon userNameImg = new ImageIcon(Login1.class.getResource("/images/user_name.png"));
    //设置图片在窗体中显示的宽度、高度
    userNameImg.setImage(userNameImg.getImage().getScaledInstance(40, 40,Image.SCALE_DEFAULT));

    JLabel userNameLabel = new JLabel("");
    userNameLabel.setBounds(0, 220, 40, 40);
    userNameLabel.setIcon(userNameImg);
    //默认获取光标
    userNameLabel.setFocusable(true);
    frame.getContentPane().add(userNameLabel);
    /**
     * 添加圆角的用户名输入框
     */
    userNameField = new JTextField();
    userNameField.setBounds(50, 220, 235, 50);
    userNameField.setBorder(bottomBorder);
    userNameField.setText(" 用户名");
    userNameField.setFont(new Font("微软雅黑", 0, 14));
    userNameField.setForeground(Color.GRAY);//默认设置输入框中的文字颜色为灰色
    userNameField.addFocusListener(new FocusAdapter() {
      //获取光标事件
      @Override
      public void focusGained(FocusEvent e) {
        //获取焦点时,输入框中内容是“用户名”,那么去掉输入框中显示的内容;
        if("用户名".equals((userNameField.getText().trim()))){
          userNameField.setText("");
          userNameField.setForeground(Color.black);//设置颜色为黑色
        }
      }
      //失去光标事件
      @Override
      public void focusLost(FocusEvent e) {
        //失去焦点时,如果输入框中去掉空格后的字符串为空串则显示用户名
        if("".equals((userNameField.getText().trim()))){
          userNameField.setText(" 用户名");
          userNameField.setFont(new Font("微软雅黑", 0, 14));
          userNameField.setForeground(Color.GRAY);//默认设置输入框中的文字颜色为灰色
        }
      }
    });
    frame.getContentPane().add(userNameField);
    userNameField.setColumns(10);
    /**
     * 插入密码输入框前面的图片
     */
    // 创建图片对象
    ImageIcon passwordImg = new ImageIcon(Login1.class.getResource("/images/password.png"));
    //设置图片在窗体中显示的宽度、高度
    passwordImg.setImage(passwordImg.getImage().getScaledInstance(40, 40,Image.SCALE_DEFAULT));

    JLabel passwordLabel = new JLabel("");
    passwordLabel.setBounds(0, 280, 40, 40);
    passwordLabel.setIcon(passwordImg);
    frame.getContentPane().add(passwordLabel);
    /**
     * 添加圆角的密码输入框
     */
    passwordField = new JPasswordField();
    passwordField.setBounds(50, 280, 235, 50);
    passwordField.setBorder(bottomBorder);
    passwordField.setText(" 密码");
    passwordField.setFont(new Font("微软雅黑", 0, 14));
    passwordField.setForeground(Color.GRAY);//默认设置输入框中的文字颜色为灰色
    passwordField.setEchoChar((char)0);//显示密码输入框中内容
    passwordField.addFocusListener(new FocusAdapter() {
      //获取光标事件
      @Override
      public void focusGained(FocusEvent e) {
        //获取焦点时,输入框中内容是“用户名”,那么去掉输入框中显示的内容;
        if("密码".equals((passwordField.getText().trim()))){
          passwordField.setText("");
          passwordField.setEchoChar('*');//显示密码输入框中内容
          passwordField.setForeground(Color.black);//设置颜色为黑色
        }
      }
      //失去光标事件
      @Override
      public void focusLost(FocusEvent e) {
        //失去焦点时,如果输入框中去掉空格后的字符串为空串则显示用户名
        if("".equals((passwordField.getText().trim()))){
          passwordField.setText(" 密码");
          passwordField.setFont(new Font("微软雅黑", 0, 14));
          passwordField.setForeground(Color.GRAY);//默认设置输入框中的文字颜色为灰色
          passwordField.setEchoChar((char)0);//显示密码输入框中内容
        }
      }
    });

    frame.getContentPane().add(passwordField);
    /**
     * 插入验证码输入框前面的图片
     */
    // 创建图片对象
    ImageIcon verifyCodeImg = new ImageIcon(Login1.class.getResource("/images/verify_code.png"));
    //设置图片在窗体中显示的宽度、高度
    verifyCodeImg.setImage(verifyCodeImg.getImage().getScaledInstance(40, 40,Image.SCALE_DEFAULT));

    JLabel verifyCodeLabel = new JLabel("");
    verifyCodeLabel.setBounds(0, 340, 40, 40);
    verifyCodeLabel.setIcon(verifyCodeImg);
    frame.getContentPane().add(verifyCodeLabel);
    /**
     * 添加圆角的验证码输入框
     */
    verifyCodeField = new JTextField();
    verifyCodeField.setBounds(50, 340, 135, 50);
    verifyCodeField.setBorder(bottomBorder);
    verifyCodeField.setText(" 验证码");
    verifyCodeField.setFont(new Font("微软雅黑", 0, 14));
    verifyCodeField.setForeground(Color.GRAY);//默认设置输入框中的文字颜色为灰色
    verifyCodeField.addFocusListener(new FocusAdapter() {
      //获取光标事件
      @Override
      public void focusGained(FocusEvent e) {
        //获取焦点时,输入框中内容是“用户名”,那么去掉输入框中显示的内容;
        if("验证码".equals((verifyCodeField.getText().trim()))){
          verifyCodeField.setText("");
          verifyCodeField.setForeground(Color.black);//设置颜色为黑色
        }
      }
      //失去光标事件
      @Override
      public void focusLost(FocusEvent e) {
        //失去焦点时,如果输入框中去掉空格后的字符串为空串则显示用户名
        if("".equals((verifyCodeField.getText().trim()))){
          verifyCodeField.setText(" 验证码");
          verifyCodeField.setFont(new Font("微软雅黑", 0, 14));
          verifyCodeField.setForeground(Color.GRAY);//默认设置输入框中的文字颜色为灰色
        }
      }
    });

    frame.getContentPane().add(verifyCodeField);
    verifyCodeField.setColumns(10);
    /**
     * 添加验证码图片
     */
    JLabel verifyCodeImgLabel = new JLabel("");
    verifyCodeImgLabel.setBounds(190, 340, 95, 50);
    verifyCodeImgLabel.setBorder(myLineBorder);
    frame.getContentPane().add(verifyCodeImgLabel);
    //生成一张验证码图片
    verifyCode = VerifyCodeUtils.createOneCodeImage();
    //将刚生成的验证码图片显示在窗体中去
    ImageIcon verifyCodeSourceImg = new ImageIcon("./verifyCodeImg/"+verifyCode+".jpg");// 创建图片对象
    //设置图片在窗体中显示的宽度、高度
    verifyCodeSourceImg.setImage(verifyCodeSourceImg.getImage().getScaledInstance(95, 50,Image.SCALE_DEFAULT));
    verifyCodeImgLabel.setIcon(verifyCodeSourceImg);
    //点击验证码图片,换一个新的验证码图片
    verifyCodeImgLabel.addMouseListener(new MouseAdapter() {
      @Override
      public void mouseClicked(MouseEvent e) {
        //删除上一次的验证码图片
        File file = new File("./src/verifyCodeImg/"+verifyCode+".jpg");
        if(file.exists()){
          file.delete();
        }
        //生成一张新的验证码图片
        verifyCode = VerifyCodeUtils.createOneCodeImage();
        ImageIcon verifyCodeSourceImg1 = new ImageIcon("./verifyCodeImg/"+verifyCode+".jpg");
        verifyCodeSourceImg1.setImage(verifyCodeSourceImg1.getImage().getScaledInstance(95, 50,Image.SCALE_DEFAULT));
        verifyCodeImgLabel.setIcon(verifyCodeSourceImg1);
      }
    });
    /**
     * 添加提示性信息的JLabel
     */
    JLabel reminderMessage = new JLabel("",JLabel.CENTER);
    reminderMessage.setBounds(15, 395, 270, 20);
    reminderMessage.setForeground(Color.red);
    reminderMessage.setFont(new Font("微软雅黑", 0, 12));
    frame.getContentPane().add(reminderMessage);
    /**
     * 添加圆角的提交按钮
     */
    MyButton myButton = new MyButton("安全登录", 0);
    myButton.setBounds(15, 420, 270, 50);
    frame.getContentPane().add(myButton);


    //设置窗体可见
    frame.setVisible(true);
  }
}
2、工具类FileUtils代码:
package com.util;
import java.io.File;

/**
 * 对文件操作的工具类
 * @author admin
 *
 */
public class FileUtils {

  /**
   * 删除指定文件夹下的所有文件,此文件夹内只有文件,没有任何文件夹
   */
  public static Boolean deleteAllFiles(String filePath){
    Boolean result = false;
    File file = new File(filePath);
    File temp = null;
    if(file.exists()){
      String [] tempList = file.list();
      for (String string : tempList) {
        temp = new File(filePath+"/"+string);
        if(temp.isFile()){
          temp.delete();
        }
      }
      tempList = file.list();
      if(tempList.length==0){
        result = true;
      }
    }
    return result;
  }

  public static void main(String[] args) {
    Boolean result = FileUtils.deleteAllFiles("./verifyCodeImg");
    System.out.println(result);
  }
}
3、工具类MyButton代码:
package com.util;

import java.awt.AlphaComposite;
import java.awt.Color;
import java.awt.Font;
import java.awt.GradientPaint;
import java.awt.Graphics;
import java.awt.Graphics2D;
import java.awt.Insets;
import java.awt.RenderingHints;
import java.awt.Shape;
import java.awt.event.MouseAdapter;
import java.awt.event.MouseEvent;
import java.awt.geom.RoundRectangle2D;
import javax.swing.JButton;
import javax.swing.JFrame;
/**
 * 自定义带有圆角的按钮工具类
 * @author admin
 *
 */
public class MyButton extends JButton {
  /* 决定圆角的弧度 */
  public static int radius = 4;
  public static Color COLOR1, COLOR2;
  public static int pink = 3, ashen = 2, sky = 1, stone = 0;
  /* 粉红 */
  public static Color pink1 = new Color(39, 121, 181);
  public static Color pink2 = new Color(39, 121, 181);
  /* 灰白 */
  public static Color ashen1 = new Color(39, 121, 181);
  public static Color ashen2 = new Color(39, 121, 181);
  /* 深宝石蓝 */
  public static Color stone1 = new Color(39, 121, 181);
  public static Color stone2 = new Color(39, 121, 181);
  /* 淡天蓝色 */
  public static Color sky1 = new Color(39, 121, 181);
  public static Color sky2 = new Color(39, 121, 181);
  /* 光标进入按钮判断 */
  private boolean hover;

  public MyButton() {
    this("", stone);
  }

  public MyButton(String name) {
    this(name, stone);
  }

  public MyButton(String name, int style) {
    super.setText(name);
    if (style == pink) {
      COLOR1 = pink1;
      COLOR2 = pink2;
    }
    if (style == ashen) {
      COLOR1 = ashen1;
      COLOR2 = ashen2;
    }
    if (style == stone) {
      COLOR1 = stone1;
      COLOR2 = stone2;
    }
    if (style == sky) {
      COLOR1 = sky1;
      COLOR2 = sky2;
    }
    paintcolor(COLOR1, COLOR2);
  }

  private void paintcolor(Color COLOR1, Color COLOR2) {
    setMargin(new Insets(0, 0, 0, 0));
    setFont(new Font("微软雅黑", 0, 14));
    setBorderPainted(false);
    setForeground(Color.white);
    setFocusPainted(false);
    setContentAreaFilled(false);
  }

  @Override
  protected void paintComponent(Graphics g) {
    Graphics2D g2d = (Graphics2D) g.create();
    int height = getHeight();
    int with = getWidth();
    float tran = 0.9F;
    /*if (!hover) { 鼠标离开/进入时的透明度改变量
      tran = 0.6F;
    }*/
    g2d.setRenderingHint(RenderingHints.KEY_ANTIALIASING, RenderingHints.VALUE_ANTIALIAS_ON);
    /* GradientPaint是颜色渐变类 */
    GradientPaint p1;
    GradientPaint p2;
    if (getModel().isPressed()) {
      p1 = new GradientPaint(0, 0, new Color(0, 0, 0), 0, height, new Color(100, 100, 100), true);
      p2 = new GradientPaint(0, 1, new Color(0, 0, 0, 50), 0, height, new Color(255, 255, 255, 100), true);
    } else {
      p1 = new GradientPaint(0, 0, new Color(100, 100, 100), 0, height, new Color(0, 0, 0), true);
      p2 = new GradientPaint(0, 1, new Color(255, 255, 255, 100), 0, height, new Color(0, 0, 0, 50), true);
    }
    g2d.setComposite(AlphaComposite.getInstance(AlphaComposite.SRC_OVER, tran));
    RoundRectangle2D.Float r2d = new RoundRectangle2D.Float(0, 0, with - 1, height - 1, radius, radius);
    // 最后两个参数数值越大,按钮越圆,以下同理
    Shape clip = g2d.getClip();
    g2d.clip(r2d);
    GradientPaint gp = new GradientPaint(0.0F, 0.0F, COLOR1, 0.0F, height / 2, COLOR2, true);
    g2d.setPaint(gp);
    g2d.fillRect(0, 0, with, height);
    g2d.setClip(clip);
    g2d.setPaint(p1);
    g2d.drawRoundRect(0, 0, with - 3, height - 3, radius, radius);
    g2d.setPaint(p2);
    g2d.drawRoundRect(1, 1, with - 3, height - 3, radius, radius);
    g2d.dispose();
    super.paintComponent(g);
  }

  public static void main(String args[]) {
    JFrame frm = new JFrame();
    MyButton but = new MyButton("圆角JButton", 0);
    frm.setLayout(null);
    frm.setBounds(800, 400, 500, 200);
    but.setBounds(30, 30, 200, 50);
    frm.add(but);
    frm.setDefaultCloseOperation(3);
    frm.setVisible(true);
  }
}
4、工具类MyLineBorder代码:
package com.util;

import java.awt.Color;
import java.awt.Component;
import java.awt.Graphics;
import java.awt.Graphics2D;
import java.awt.RenderingHints;
import javax.swing.border.LineBorder;

/**
 * 为创建圆角输入框自定义边框线条工具类
 * @author admin
 *
 */
public class MyLineBorder extends LineBorder{

  private static final long serialVersionUID = 1L;
  public MyLineBorder(Color color, int thickness, boolean roundedCorners) {
    super(color, thickness, roundedCorners);
  }

   public void paintBorder(Component c, Graphics g, int x, int y, int width, int height) {

     RenderingHints rh = new RenderingHints(RenderingHints.KEY_ANTIALIASING,
                        RenderingHints.VALUE_ANTIALIAS_ON);
     Color oldColor = g.getColor();
     Graphics2D g2 = (Graphics2D)g;
     int i;
     g2.setRenderingHints(rh);
     g2.setColor(lineColor);
     for(i = 0; i < thickness; i++) {
     if(!roundedCorners)
       g2.drawRect(x+i, y+i, width-i-i-1, height-i-i-1);
     else
       g2.drawRoundRect(x+i, y+i, width-i-i-1, height-i-i-1, 10, 10); //就是这一句 ,后两个参数控制圆角的大小
     }
     g2.setColor(oldColor);
  }
}
5、工具类VerifyCodeUtils代码:
package com.util;
import java.awt.Color;
import java.awt.Font;
import java.awt.Graphics;
import java.awt.Graphics2D;
import java.awt.RenderingHints;
import java.awt.geom.AffineTransform;
import java.awt.image.BufferedImage;
import java.io.File;
import java.io.FileOutputStream;
import java.io.IOException;
import java.io.OutputStream;
import java.util.Arrays;
import java.util.Random;
import javax.imageio.ImageIO;
/**
* 生成验证码图片的工具类
* @author admin
*
*/
public class VerifyCodeUtils {
// 使用到Algerian字体,系统里没有的话需要安装字体,字体只显示大写,去掉了1,0,i,o几个容易混淆的字符
public static final String VERIFY_CODES = "23456789ABCDEFGHJKLMNPQRSTUVWXYZ";
private static Random random = new Random();
/**
* 使用系统默认字符源生成验证码
*
* @param verifySize
* 验证码长度
* @return
*/
public static String generateVerifyCode(int verifySize) {
return generateVerifyCode(verifySize, VERIFY_CODES);
}
/**
* 使用指定源生成验证码
*
* @param verifySize
* 验证码长度
* @param sources
* 验证码字符源
* @return
*/
public static String generateVerifyCode(int verifySize, String sources) {
if (sources == null || sources.length() == 0) {
sources = VERIFY_CODES;
}
int codesLen = sources.length();
Random rand = new Random(System.currentTimeMillis());
StringBuilder verifyCode = new StringBuilder(verifySize);
for (int i = 0; i < verifySize; i++) {
verifyCode.append(sources.charAt(rand.nextInt(codesLen - 1)));
}
return verifyCode.toString();
}
/**
* 生成随机验证码文件,并返回验证码值
*
* @param w
* @param h
* @param outputFile
* @param verifySize
* @return
* @throws IOException
*/
public static String outputVerifyImage(int w, int h, File outputFile, int verifySize) throws IOException {
String verifyCode = generateVerifyCode(verifySize);
outputImage(w, h, outputFile, verifyCode);
return verifyCode;
}
/**
* 输出随机验证码图片流,并返回验证码值
*
* @param w
* @param h
* @param os
* @param verifySize
* @return
* @throws IOException
*/
public static String outputVerifyImage(int w, int h, OutputStream os, int verifySize) throws IOException {
String verifyCode = generateVerifyCode(verifySize);
outputImage(w, h, os, verifyCode);
return verifyCode;
}
/**
* 生成指定验证码图像文件
*
* @param w
* @param h
* @param outputFile
* @param code
* @throws IOException
*/
public static void outputImage(int w, int h, File outputFile, String code) throws IOException {
if (outputFile == null) {
return;
}
File dir = outputFile.getParentFile();
if (!dir.exists()) {
dir.mkdirs();
}
try {
outputFile.createNewFile();
FileOutputStream fos = new FileOutputStream(outputFile);
outputImage(w, h, fos, code);
fos.close();
} catch (IOException e) {
throw e;
}
}
/**
* 输出指定验证码图片流
*
* @param w
* @param h
* @param os
* @param code
* @throws IOException
*/
public static void outputImage(int w, int h, OutputStream os, String code) throws IOException {
int verifySize = code.length();
BufferedImage image = new BufferedImage(w, h, BufferedImage.TYPE_INT_RGB);
Random rand = new Random();
Graphics2D g2 = image.createGraphics();
g2.setRenderingHint(RenderingHints.KEY_ANTIALIASING, RenderingHints.VALUE_ANTIALIAS_ON);
Color[] colors = new Color[5];
Color[] colorSpaces = new Color[] { Color.WHITE, Color.CYAN, Color.GRAY, Color.LIGHT_GRAY, Color.MAGENTA,
Color.ORANGE, Color.PINK, Color.YELLOW };
float[] fractions = new float[colors.length];
for (int i = 0; i < colors.length; i++) {
colors[i] = colorSpaces[rand.nextInt(colorSpaces.length)];
fractions[i] = rand.nextFloat();
}
Arrays.sort(fractions);
g2.setColor(Color.GRAY);// 设置边框色
g2.fillRect(0, 0, w, h);
Color c = getRandColor(200, 250);
g2.setColor(c);// 设置背景色
g2.fillRect(0, 2, w, h - 4);
// 绘制干扰线
Random random = new Random();
g2.setColor(getRandColor(160, 200));// 设置线条的颜色
for (int i = 0; i < 20; i++) {
int x = random.nextInt(w - 1);
int y = random.nextInt(h - 1);
int xl = random.nextInt(6) + 1;
int yl = random.nextInt(12) + 1;
g2.drawLine(x, y, x + xl + 40, y + yl + 20);
}
// 添加噪点
float yawpRate = 0.05f;// 噪声率
int area = (int) (yawpRate * w * h);
for (int i = 0; i < area; i++) {
int x = random.nextInt(w);
int y = random.nextInt(h);
int rgb = getRandomIntColor();
image.setRGB(x, y, rgb);
}
shear(g2, w, h, c);// 使图片扭曲
g2.setColor(getRandColor(100, 160));
int fontSize = h - 4;
Font font = new Font("Algerian", Font.ITALIC, fontSize);
g2.setFont(font);
char[] chars = code.toCharArray();
for (int i = 0; i < verifySize; i++) {
AffineTransform affine = new AffineTransform();
affine.setToRotation(Math.PI / 4 * rand.nextDouble() * (rand.nextBoolean() ? 1 : -1),
(w / verifySize) * i + fontSize / 2, h / 2);
g2.setTransform(affine);
g2.drawChars(chars, i, 1, ((w - 10) / verifySize) * i + 5, h / 2 + fontSize / 2 - 10);
}
g2.dispose();
ImageIO.write(image, "jpg", os);
}
private static Color getRandColor(int fc, int bc) {
if (fc > 255)
fc = 255;
if (bc > 255)
bc = 255;
int r = fc + random.nextInt(bc - fc);
int g = fc + random.nextInt(bc - fc);
int b = fc + random.nextInt(bc - fc);
return new Color(r, g, b);
}
private static int getRandomIntColor() {
int[] rgb = getRandomRgb();
int color = 0;
for (int c : rgb) {
color = color << 8;
color = color | c;
}
return color;
}
private static int[] getRandomRgb() {
int[] rgb = new int[3];
for (int i = 0; i < 3; i++) {
rgb[i] = random.nextInt(255);
}
return rgb;
}
private static void shear(Graphics g, int w1, int h2, Color color) {
shearX(g, w1, h2, color);
shearY(g, w1, h2, color);
}
private static void shearX(Graphics g, int w1, int h2, Color color) {
int period = random.nextInt(2);
boolean borderGap = true;
int frames = 1;
int phase = random.nextInt(2);
for (int i = 0; i < h2; i++) {
double d = (double) (period >> 1)
* Math.sin((double) i / (double) period + (6.2831853071795862D * (double) phase) / (double) frames);
g.copyArea(0, i, w1, 1, (int) d, 0);
if (borderGap) {
g.setColor(color);
g.drawLine((int) d, i, 0, i);
g.drawLine((int) d + w1, i, w1, i);
}
}
}
private static void shearY(Graphics g, int w1, int h2, Color color) {
int period = random.nextInt(40) + 10; // 50;
boolean borderGap = true;
int frames = 20;
int phase = 7;
for (int i = 0; i < w1; i++) {
double d = (double) (period >> 1)
* Math.sin((double) i / (double) period + (6.2831853071795862D * (double) phase) / (double) frames);
g.copyArea(i, 0, 1, h2, 0, (int) d);
if (borderGap) {
g.setColor(color);
g.drawLine(i, (int) d, i, 0);
g.drawLine(i, (int) d + h2, i, h2);
}
}
}
//生成一张验证码图片,并保存到项目的verifyCodeImg文件夹下
public static String createOneCodeImage(){
String imgName = "";
try {
File dir = new File("./verifyCodeImg");
int w = 95, h = 50;
String verifyCode = generateVerifyCode(4);
File file = new File(dir, verifyCode + ".jpg");
outputImage(w, h, file, verifyCode);
imgName = verifyCode;
} catch (IOException e) {
imgName = "";
e.printStackTrace();
}finally{
return imgName;
}
}
public static void main(String[] args) throws IOException {
String codeImage = VerifyCodeUtils.createOneCodeImage();
System.out.println(codeImage);
}
}补充知识:Java Swing概述: JFrame窗体和JDialog窗体
GUI(图形用户界面)为程序员提供图形界面,它最初的设计目的死为了程序员构建一个通用的GUI,使其能够在所有的平台上运行,但是Java 1.0 中的基础类AWT(抽象窗口工具箱)并没有达到这个要求,于是Swing出现了,它是AWT组建的增强组建,但是它并不能完全替代AWT,这两种组件需要同时出现在一个图形用户界面中。
Swing组件
原来的AWT组件来自java.awt包,当含有AWT组件的java应用程序在不同的平台上执行时,每个平台的GUI组件的显示会有所不同,但是在不同的平台运行Swing开发的应用程序时,就可以统一GUI组件的显示风格,因为Swing组件允许编程人员在跨平台时指定统一的外观和风格。
Swing组件通常被称为“轻量级组件”,因为它完全由java语言编写,而Java时不依赖于操作系统的语言,它可在任何平台上运行;相反,依赖于本地平台的组件称为“重量级 组件”,如AWT组件就是依赖本地平台的窗口系统来决定组件的功能、外观和风格。Swing组件具有以下特点:
轻量级组件
可插入外观组件
Swing包
为了有效的使用Swing组件,必须了解Swing包的层次结构和继承关系,其中比较重要的是Component类、Container类和JComponent类。其中这几个类的继承关系如下:
javax.swing.JComponent 继承自:
javax.awt.Container类继承自:
javax.awt.Component继承自:
java.lang.Object类
在Swing组件中大多数GUI组件都是Component类的直接子类或者间接子类,JComponent类是Swing组件各种特性的存放位置,这些组件的特性包括设定组件边界,GUI组件自动滚动等。
在Swing组件中最重要的是父类Container类,而Container类有两个重要的子类,分别为java.awt.Window and java.awt.Frame, 除了以往的AWT类组件会继承这两个类之外,现在的Swing组件也扩展了这两个类。
常用窗体
窗体作为Swing应用程序中的组件的承载体,处于非常重要的位置。Swing中常用的窗体包括JFrame和JDialog。
JFrame窗体
JFrame窗体是一个容器,它是Swing程序中各个组件的载体,可以将JFrame看作是承载着血Swing组件的容器。在开发应用程序时,可以通过继承java.swing.JFrame类创建一个窗体。在这个窗体中添加组件,同时为组件设置事件。
由于该窗体继承了JFrame类,所以它拥有“最大化”、“最小化”、和“关闭”等按钮
下面将详细讲解JFrame窗体在java应用程序中的使用方法。
JFrame在程序中的语法如下:
JFrame jf = new JFrame(title);
Container container = jf.getContentPane();
参数含义如下:
jf:JFrame类对象
container: Container类的对象,可以使用JFrame对象调用getContentPane()方法获取。
Swing组件的窗体通常与组件和容器有关,所以JFrame对象创建完成后,需要调用getContentPane() 方法将窗体转换为容器,然后在容器中添加组件或者设置布局管理器。
通常这个容器用来包含和显示组件。如果需要将组件添加至容器,可以使用来自Container类的add方法进行设置。例如:
container.add(new Button("按钮"));
在容器中添加组件后,也可以使用Container类的remove() 方法将这些组件从容器中删除,例如:
container.remove(new Button("按钮"));
下面的实例实现了JFrame对象创建一个窗体,并在其中添加一个组件。
package com.xsh;
import java.awt.Color;
import java.awt.Container;
import javax.swing.JFrame;
import javax.swing.JLabel;
import javax.swing.SwingConstants;
import javax.swing.WindowConstants;

public class Example1 extends JFrame { //创建一个类继承JFrame类

 public void CreateJFrame(String title) { //定义一个CreateJFrame方法
 JFrame jf = new JFrame(title); //实例化一个JFrame对象
 Container container = jf.getContentPane(); //获取一个容器
 JLabel jl = new JLabel("这是一个JFrame窗体"); //创建一个JLabel标签
 jl.setHorizontalAlignment(SwingConstants.CENTER); //将标签位置设置为居中
 jl.setForeground(Color.white); //设置JLabel的颜色
 container.add(jl); //将标签添加到容器中
 container.setBackground(Color.RED); //设置容器背景颜色
 jf.setVisible(true); //是窗体可视
 jf.setSize(300, 150); //设置窗体大小
 jf.setDefaultCloseOperation(WindowConstants.EXIT_ON_CLOSE); //设置窗体关闭方式
 }
 public static void main(String[] args) {
 // TODO Auto-generated method stub
 new Example1().CreateJFrame("这是我创建的第一个JFrame窗体。"); //主方法中调用JFrame()方法
 }
}
其运行结果如下:
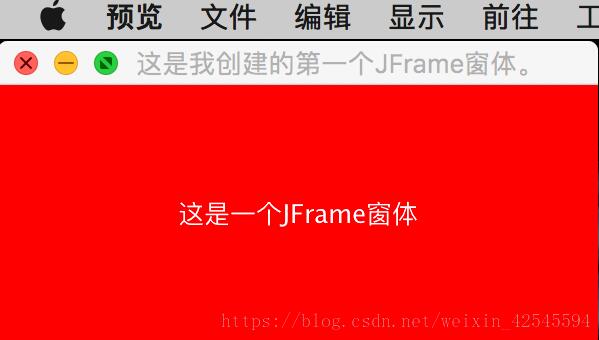
在上述例子中,Example1类继承了JFrame类,在CreateJFrame()方法中,实例化了JFrame对象。JFrame类的常用构造方法包括以下两种形式:
public JFrame().
Public JFrame(String title).
JFrame类中的两种构造方法分别为无参的构造方法和有参的构造方法。
第一种形式的构造方法可以创建一个初始不可见、没有标题的新窗体;
第二种形式的构造方法在实例化该JFrame对象时可以创建一个不可见但是具有标题的窗体。
可以使用JFrame对象调用show()方法使窗体可见,但是该方法已经被系版本的JDK中的setVisible(true)方法取代。
同时可以使用setSize(int i, int j)方法设置窗体大小,其中x与y变量分别代表窗体的宽和高
创建窗体以后,需要给窗体一个关闭方式,可以调用setDefaultCloseOPeration()方法关闭窗体。Java为窗体关闭提供了多种方式,
常用的有以下四种;
DO_NOTHING_ON_CLOSE
DISPOSE_ON_CLOSE)
HIDE_ON_CLOSE
EXIT_ON_CLOSE
JDialog
JDialog窗体是Swing组件中的对话框,它继承了AWT组件中java.awt.Dialog类。
JDialog窗体的功能是从另外一个窗体中弹出另外一个窗体,就像是在使用IE浏览器时弹出的确定对话框一样。JDialog窗体实质上就是另一种类型的窗体,它与JFrame窗体类似,在使用时也需要调用getCOntentPane()方法将窗体转换成容器,然后在容器中 设置窗体的特性。
在应用程序中创建JDialog窗体需要实例化JDialog类,通常使用以下几个JDialog类的构造方法。
public JDialog():创建一个没有标题和副窗体的对话框
public JDialog(Frame f):创建一个指定父窗体的对话框,但是对话框没有标题
public JDialog(Frame f, boolean model):创建一个指定类型的对话框,并指定父窗体,但该窗体没有指定标题。
public JDialog(Frame f, String title):创建一个指定标题和父窗体的对话框
public JDialog(Frame f, String title, boolean model):创建一个指定标题,父窗体和模式的对话框
下面来看一个实例:
package com.xsh;

import java.awt.Color;
import java.awt.Container;
import java.awt.event.ActionEvent;
import java.awt.event.ActionListener;

import javax.swing.JButton;
import javax.swing.JDialog;
import javax.swing.JFrame;
import javax.swing.JLabel;
import javax.swing.SwingConstants;
import javax.swing.WindowConstants;

class MyDialog extends JDialog{

 private static final long serialVersionUID = 1L;

 public MyDialog(MyFrame frame) {
 super(frame,"第一个JDialog窗体", true); //实例化一个JDialog类对象,指定对话框的父窗体、窗体标题和类型
 Container container = getContentPane(); //创建一个容器
 container.add(new JLabel("这是一个JDialog对话框")); //在容器中添加标签
 setBounds(100, 100, 200, 100); //设置容器的窗体大小,其中前两个值是设置对话框的位置,后两个值是设置对话框的大小
 }
}

public class MyFrame extends JFrame { //创建新类,继承自JFrame
 private static final long serialVersionUID = 1L;
 public static void main(String[] args) {
 // TODO Auto-generated method stub
 new MyFrame(); //实例化MyFrame对象
 }
 public MyFrame() {
 Container container = getContentPane(); //创建一个容器
 container.setLayout(null);
 JLabel jl = new JLabel("这是一个JFrame窗体"); //在窗体中设置标签
 jl.setHorizontalAlignment(SwingConstants.CENTER); //将标签的文字至于标签中间的位置
 container.add(jl); //将标签添加到容器中
 JButton jb = new JButton("弹出对话框"); //定义一个按钮
 jb.setBounds(10, 30, 100, 20); //设置按钮的大小
 jb.addActionListener(new ActionListener() { //为按钮添加点击事件

  @Override
  public void actionPerformed(ActionEvent e) {
  // TODO Auto-generated method stub
  new MyDialog(MyFrame.this).setVisible(true); //使MyDialog窗体可见
  //在点击事件中,完成了对话框的创建
  }
 });
 container.add(jb);
 container.setBackground(Color.white);
 setSize(200,200);
 setDefaultCloseOperation(WindowConstants.DISPOSE_ON_CLOSE);
 setVisible(true);
 }
}
在本实例中,为了使对话框父窗体弹出,定义了一个JFrame窗体,首先在该窗体中定义了一个按钮,然后为此按钮添加了一个点击事件。在点击事件中,我们使用了new MyJDialog().setVisible(true) 语句使对话框窗体可见,这样就实现了单机 按钮之后弹出 对话框的功能。
在MyDialog类中,由于它继承了JDialog类,所以可以在构造方法中使用super关键字调用JDialog构造方法。
在这里我们使用了 piublic JDialog(Frame f, String title, boolean model); 这种形式的构造方法,相应的设置了自定义的JFrame窗体以及对话框的标题和窗体类型。
以上就是在Java项目中使用JFrame进行美化窗体,小编相信有部分知识点可能是我们日常工作会见到或用到的。希望你能通过这篇文章学到更多知识。更多详情敬请关注亿速云行业资讯频道。
免责声明:本站发布的内容(图片、视频和文字)以原创、转载和分享为主,文章观点不代表本网站立场,如果涉及侵权请联系站长邮箱:is@yisu.com进行举报,并提供相关证据,一经查实,将立刻删除涉嫌侵权内容。


