本篇内容主要讲解“ASP.NET Web Api 2实现多文件打包并下载文件的方法”,感兴趣的朋友不妨来看看。本文介绍的方法操作简单快捷,实用性强。下面就让小编来带大家学习“ASP.NET Web Api 2实现多文件打包并下载文件的方法”吧!
最近由于工作和个人事务,站点也好久没更新了,但这并不影响我对.NET的热情。站点的更新工作还是得想办法抽时间来完成的。
今天利用中午的时间来写一篇关于Asp.Net Web Api下载文件的文章,之前我也写过类似的文章,请见:《ASP.NET(C#) Web Api通过文件流下载文件的实例》
本文以这篇文章的基础,提供了ByteArrayContent的下载以及在下载多个文件时实现在服务器对多文件进行压缩打包后下载的功能。
关于本文中实现的在服务器端用.NET压缩打包文件功能的过程中,使用到了一个第方类库:DotNetZip,具体的使用将在正文中涉及。好了,描述了这么多前言,下面我们进入本文示例的正文。
1.首先创建名为:WebApiDownload的Web Api 项目(C#);
2.接着新建一个空的控制器,命名为:DownloadController;
3.创建一些打包文件和存放临时文件的文件夹(downloads),具体请看本文最后提供的示例项目代码
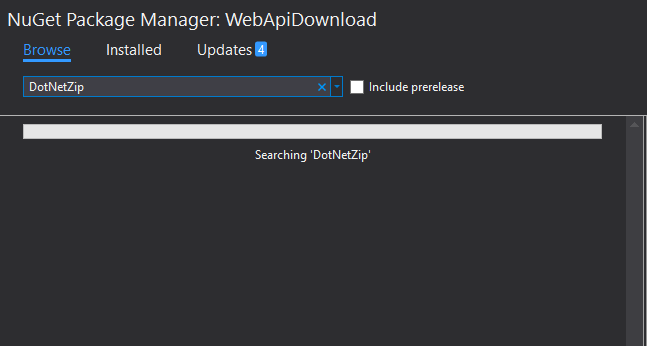
4.打开NuGet程序包管事器,搜索DotNetZip,如下图:

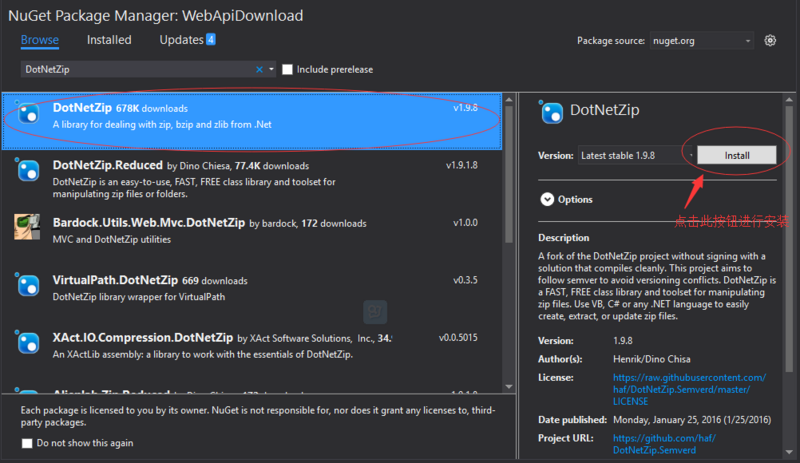
搜索到DotNetZip安装包后,进行安装,以便用于本项目将要实现多文件打包压缩的功能,如下图:

安装完成DotNetZip包后,我们就可以退出NuGet程序包管理器了,因为本项目为示例项目,不需再添加其他的包。
5.在Models文件夹下创建一个示例数据的类,名为:DemoData,其中的成员和实现如下:
using System.Collections.Generic;


namespace WebApiDownload.Models
{
 public class DemoData
 {
  public static readonly List<List<string>> Contacts = new List<List<string>>();
  public static readonly List<string> File1 = new List<string>
  {
   "f_1_test_1@example.com",
   "f_1_test_2@example.com",
   "f_1_test_3@example.com",
   "f_1_test_4@example.com",
   "f_1_test_5@example.com"
  };
  public static readonly List<string> File2 = new List<string>
  {
   "f_2_test_1@example.com",
   "f_2_test_2@example.com",
   "f_2_test_3@example.com",
   "f_2_test_4@example.com",
   "f_2_test_5@example.com"
  };
  public static readonly List<string> File3 = new List<string>
  {
   "f_3_test_1@example.com",
   "f_3_test_2@example.com",
   "f_3_test_3@example.com",
   "f_3_test_4@example.com",
   "f_3_test_5@example.com"
  };

  public static List<List<string>> GetMultiple
  {
   get
   {
    if (Contacts.Count <= 0)
    {
     Contacts.Add(File1);
     Contacts.Add(File2);
     Contacts.Add(File3);
    }
    return Contacts;
   }
  }
 }
}6.到这里,我们的准备工作基本做得差不多了,最后我们只需要在DownloadController控制器中实现两个Action,一个为:DownloadSingle(提供下载单个文件的功能),另一个为:DownloadZip(提供打包压缩多个文件并下载的功能)。具体的DownloadController完整代码如下:
using System.Linq;
using System.Net.Http;
using System.Text;
using System.Web.Http;
using Ionic.Zip;
using WebApiDownload.Models;
using System;
using System.IO;
using System.Net;
using System.Net.Http.Headers;
using System.Threading;
using System.Web;


namespace WebApiDownload.Controllers
{
 [RoutePrefix("download")]
 public class DownloadController : ApiController
 {
  [HttpGet, Route("single")]
  public HttpResponseMessage DownloadSingle()
  {
   var response = new HttpResponseMessage();
   //从List集合中获取byte[]
   var bytes = DemoData.File1.Select(x => x + "\n").SelectMany(x => Encoding.UTF8.GetBytes(x)).ToArray();
   try
   {
    var fileName = string.Format("download_single_{0}.txt", DateTime.Now.ToString("yyyyMMddHHmmss"));
    var content = new ByteArrayContent(bytes);
    response.Content = content;
    response.Content.Headers.ContentDisposition = new ContentDispositionHeaderValue("attachment")
    {
     FileName = fileName
    };
    response.Content.Headers.ContentType = new MediaTypeHeaderValue("application/octet-stream");
   }
   catch (Exception ex)
   {
    response.StatusCode = HttpStatusCode.InternalServerError;
    response.Content = new StringContent(ex.ToString());
   }
   return response;
  }
  [HttpGet, Route("zip")]
  public HttpResponseMessage DownloadZip()
  {
   var response = new HttpResponseMessage();
   try
   {
    var zipFileName = string.Format("download_compressed_{0}.zip", DateTime.Now.ToString("yyyyMMddHHmmss"));
    var downloadDir = HttpContext.Current.Server.MapPath($"~/downloads/download");
    var archive = $"{downloadDir}/{zipFileName}";
    var temp = HttpContext.Current.Server.MapPath("~/downloads/temp");

    // 清空临时文件夹中的所有临时文件
    Directory.EnumerateFiles(temp).ToList().ForEach(File.Delete);
    ClearDownloadDirectory(downloadDir);
    // 生成新的临时文件
    var counter = 1;
    foreach (var c in DemoData.GetMultiple)
    {
     var fileName = string.Format("each_file_{0}_{1}.txt", counter, DateTime.Now.ToString("yyyyMMddHHmmss"));
     if (c.Count <= 0)
     {
      continue;
     }
     var docPath = string.Format("{0}/{1}", temp, fileName);
     File.WriteAllLines(docPath, c, Encoding.UTF8);
     counter++;
    }
    Thread.Sleep(500);
    using (var zip = new ZipFile())
    {
     // Make zip file
     zip.AddDirectory(temp);
     zip.Save(archive);
    }
    response.Content = new StreamContent(new FileStream(archive, FileMode.Open, FileAccess.Read));
    response.Content.Headers.ContentDisposition = new ContentDispositionHeaderValue("attachment") { FileName = zipFileName };
    response.Content.Headers.ContentType = new MediaTypeHeaderValue("application/octet-stream");
   }
   catch (Exception ex)
   {
    response.StatusCode = HttpStatusCode.InternalServerError;
    response.Content = new StringContent(ex.ToString());
   }
   return response;
  }

  private void ClearDownloadDirectory(string directory)
  {
   var files = Directory.GetFiles(directory);
   foreach (var file in files)
   {
    try
    {
     File.Delete(file);
    }
    catch
    {
    }
   }
  }
 }
}
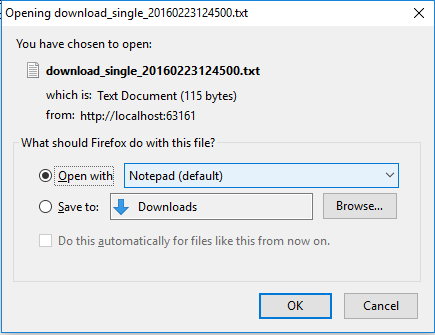
到此,本示例的实现代码部分就完成了,如果我们此时打开地址:http://localhost:63161/download/single,浏览器会弹出保存文件的提示窗口,如下:

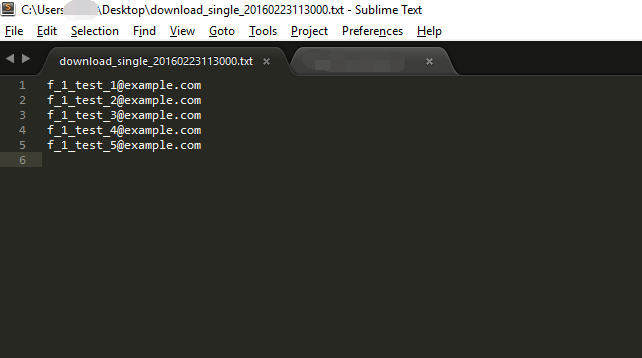
保存此文件后,打开它我们会看到我们的示例数据已被保存到本地了,如下:

同样的,下载压缩文件你只需要访问地址:localhost:63161/download/zip 即可,笔者就不再演示了。
最后,附上本示例项目的完整源代码,点击这里下载。
到此,相信大家对“ASP.NET Web Api 2实现多文件打包并下载文件的方法”有了更深的了解,不妨来实际操作一番吧!这里是亿速云网站,更多相关内容可以进入相关频道进行查询,关注我们,继续学习!
免责声明:本站发布的内容(图片、视频和文字)以原创、转载和分享为主,文章观点不代表本网站立场,如果涉及侵权请联系站长邮箱:is@yisu.com进行举报,并提供相关证据,一经查实,将立刻删除涉嫌侵权内容。