proxysql的作用
1.读写分离,server可以进行分读组和写组
2.动态指定某一个SQL进行cache
3.故障切换,依赖于他的配置动态加载,但是不能自动选主,需要依赖keepalived和MHA
4.配置动态更新
5.一个节点可以跑很多proxysql
6.percona公司的proxy
proxysql端口
监控的端口号:6633
管理端口号:6032
安装下载
[root@Darren1 tmp]# wget https://github.com/sysown/proxysql/releases/download/v1.4.0/proxysql-1.4.0-1-centos67.x86_64.rpm
[root@Darren1 tmp]# rpm -ivh proxysql-1.4.0-1-centos67.x86_64.rpm
[root@Darren1 tmp]# /etc/init.d/proxysql start
[root@Darren1 tmp]# ps -ef |grep proxy
root 50769 1 0 05:19 ? 00:00:00 proxysql -c /etc/proxysql.cnf -D /var/lib/proxysql
root 50770 50769 3 05:19 ? 00:00:00 proxysql -c /etc/proxysql.cnf -D /var/lib/proxysql
root 50798 50261 0 05:20 pts/3 00:00:00 grep proxy
#登陆:
[root@Darren1 proxysql]# mysql -u admin -padmin -h 127.0.0.1 -P6032 --prompt='Admin> '
Admin> show databases;
+-----+---------+-------------------------------+
| seq | name | file |
+-----+---------+-------------------------------+
| 0 | main | |
| 2 | disk | /var/lib/proxysql/proxysql.db |
| 3 | stats | |
| 4 | monitor | |
+-----+---------+-------------------------------+
多层配置系统
(1)允许自动更新配置
(2)大部分配置无需重启,在运行状态配置生效
(3)允许回滚错误的配置
三层结构图:
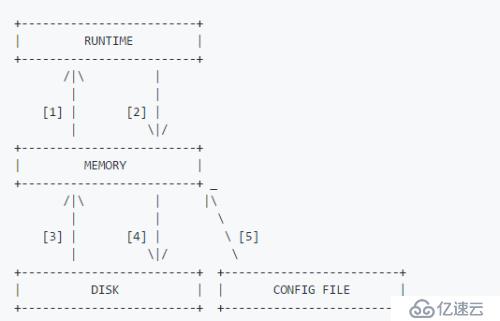
[1] LOAD MYSQL USERS FROM MEMORY / LOAD MYSQL USERS TO RUNTIME
loads MySQL users from the in-memory database to the runtime data structures
[2] SAVE MYSQL USERS TO MEMORY / SAVE MYSQL USERS FROM RUNTIME
persists the MySQL users from the runtime data structures to the in-memory database
[3] LOAD MYSQL USERS TO MEMORY / LOAD MYSQL USERS FROM DISK
loads MySQL users from the on-disk database to the in-memory database
[4] SAVE MYSQL USERS FROM MEMORY / SAVE MYSQL USERS TO DISK
persists the MySQL users from the in-memory database to the on-disk database
[5] LOAD MYSQL USERS FROM CONFIG
loads from the configuration file the users into the in-memory database
适用于表:
mysql_users mysql_servers
mysql_query_rules
mysql_variables
admin_variables
scheduler计划任务
scheduler是类似cron的任务调度计划,允许运行自定义脚本。
主要有两个表:
admin@127.0.0.1 [main]>SHOW TABLES LIKE '%scheduler%';
+-------------------+
| tables |
+-------------------+
| scheduler |
| runtime_scheduler |
+-------------------+
scheduler :可以用来设置调度计划
runtime_scheduler:只读,不能配置修改
admin@127.0.0.1 [main]> SHOW CREATE TABLE scheduler\G
*************************** 1. row ***************************
table: scheduler
Create Table: CREATE TABLE scheduler (
id INTEGER PRIMARY KEY AUTOINCREMENT NOT NULL,
active INT CHECK (active IN (0,1)) NOT NULL DEFAULT 1,
interval_ms INTEGER CHECK (interval_ms>=100 AND interval_ms<=100000000) NOT NULL,
filename VARCHAR NOT NULL,
arg1 VARCHAR,
arg2 VARCHAR,
arg3 VARCHAR,
arg4 VARCHAR,
arg5 VARCHAR,
comment VARCHAR NOT NULL DEFAULT '')
In details:
id : unique identifier of the scheduler job
active : if set to 1, the job is active. Otherwise is not
interval_ms : how often (in millisecond) the job will be started. Minimum interval_ms is 100 milliseconds
filename : full path of the executable to be executed
arg1 to arg5 : arguments (maximum 5) that can be passed to the job
comment : an free form text field to annotate the purpose of the job
用户配置 Users Configuration
定义一个新的用户:
admin@127.0.0.1 [main]>INSERT INTO mysql_users(username,password) VALUES ('user1','password1');
创建一个由hostgroup,schema的用户:
admin@127.0.0.1 [main]>INSERT INTO mysql_users(username,password,default_hostgroup,default_schema) VALUES ('user2','password2',10,'sbtest1');
修改user2用户的最大连接数为100个:
admin@127.0.0.1 [main]>UPDATE mysql_users SET max_connections=100 WHERE username='user2';
修改事务持久化:
admin@127.0.0.1 [main]> UPDATE mysql_users SET transaction_persistent=1 WHERE username='user2';
密码hash加密:
admin@127.0.0.1 [main]>load mysql users to runtime;
admin@127.0.0.1 [main]>save mysql users from runtime;
admin@127.0.0.1 [main]>save mysql users to disk;
服务配置 (server configuration )
1、往mysql_servers表中添加server时就为其划分好hostgroup_id(例如0表示写组,1表示读组)
2、往mysql_servers表中添加server时不区分hostgroup_id(例如全部设为0),然后通过mysql_replication_hostgroups表中的值,根据proxysql检测到的各server的read_only变量值来自动为后端server设置hostgroup_id
强烈推荐用第一种方式: 因为第一种是完全由我们控制的;而第二种假如我们误将读server的read_only属性设置为0,则proxysql会将其重新分配到写组,这绝对是不期望的。
(1)添加一个新的服务:
admin@127.0.0.1 [main]>insert into mysql_servers(hostgroup_id,hostname,max_connections) values(0,'192.168.91.23',1000);
admin@127.0.0.1 [main]>insert into mysql_servers(hostgroup_id,hostname,max_connections) values(1,'192.168.91.22',1000);
admin@127.0.0.1 [(none)]>select * from mysql_servers;
+--------------+---------------+------+--------+--------+-------------+-----------------+---------------------+---------+----------------+---------+
| hostgroup_id | hostname | port | status | weight | compression | max_connections | max_replication_lag | use_ssl | max_latency_ms | comment |
+--------------+---------------+------+--------+--------+-------------+-----------------+---------------------+---------+----------------+---------+
| 0 | 192.168.91.23 | 3306 | ONLINE | 1 | 0 | 1000 | 0 | 0 | 0 | |
| 1 | 192.168.91.22 | 3306 | ONLINE | 1 | 0 | 1000 | 0 | 0 | 0 | |
+--------------+---------------+------+--------+--------+-------------+-----------------+---------------------+---------+----------------+---------+
(2)修改限制连接数max_connections :
admin@127.0.0.1 [main]>UPDATE mysql_servers SET max_connections=10 WHERE hostname='192.168.91.23';
(3)修改权重值weight:
例如:一主两从的环境,设置不同的权重:
Admin> SELECT hostgroup_id,hostname,weight,max_replication_lag FROM mysql_servers;
+--------------+------------+--------+---------------------+
| hostgroup_id | hostname | weight | max_replication_lag |
+--------------+------------+--------+---------------------+
| 0 | 172.16.0.1 | 1000 | 30 |
| 1 | 172.16.0.2 | 1000 | 30 |
| 1 | 172.16.0.3 | 1000 | 30 |
| 1 | 172.16.0.1 | 1 | 30 |
+--------------+------------+--------+---------------------+
上面的情况,如果有读事物,99.95%将会发送给172.16.0.2和172.16.0.3主机上,0.05%会发送到172.16.0.1主机上,如果172.16.0.2和172.16.0.3变得不可用了,则所有的读会有172.16.0.1承担
(4)修改复制延时最大值max_replication_lag :
admin@127.0.0.1 [main]>UPDATE mysql_servers SET max_replication_lag=30 WHERE hostname='192.168.91.23';
(5)打开压缩,把compression设置为非0
admin@127.0.0.1 [main]>UPDATE mysql_servers SET compression=2 WHERE hostname='192.168.91.23';
(6)优雅的关闭一个服务:
把状态改变成 status = offline_soft.
admin@127.0.0.1 [main]>UPDATE mysql_servers SET status='OFFLINE_SOFT' WHERE hostname='192.168.91.23';
(7)删除一个服务delete即可
在proxysql连接msyql server
[root@Darren1 ~]# mysql -u admin -padmin -h 127.0.0.1 -P6032
#配置DB主机:
admin@127.0.0.1 [main]>insert into mysql_servers(hostgroup_id,hostname) values(0,'192.168.91.23');
admin@127.0.0.1 [main]>insert into mysql_servers(hostgroup_id,hostname) values(1,'192.168.91.22');
admin@127.0.0.1 [(none)]>select * from mysql_servers;
+--------------+---------------+------+--------+--------+-------------+-----------------+---------------------+---------+----------------+---------+
| hostgroup_id | hostname | port | status | weight | compression | max_connections | max_replication_lag | use_ssl | max_latency_ms | comment |
+--------------+---------------+------+--------+--------+-------------+-----------------+---------------------+---------+----------------+---------+
| 0 | 192.168.91.23 | 3306 | ONLINE | 1 | 0 | 1000 | 0 | 0 | 0 | |
| 1 | 192.168.91.22 | 3306 | ONLINE | 1 | 0 | 1000 | 0 | 0 | 0 | |
+--------------+---------------+------+--------+--------+-------------+-----------------+---------------------+---------+----------------+---------+
#在mysql主库上创建监控用户:
root@localhost [(none)]>create user monitor@'192.168.91.%' identified by 'monitor';
root@localhost [(none)]>grant all on *.* to monitor@'192.168.91.%';
#在proxysql中配置监控用户和密码:
admin@127.0.0.1 [(none)]>UPDATE global_variables SET variable_value='monitor' WHERE variable_name='mysql-monitor_username';
admin@127.0.0.1 [(none)]>UPDATE global_variables SET variable_value='monitor' WHERE variable_name='mysql-monitor_password';
#配置监控时间间隔:如mysql-monitor_connect_interval、 mysql-monitor_ping_interval、 mysql-monitor_read_only_interval:
admin@127.0.0.1 [(none)]>UPDATE global_variables SET variable_value='2000' WHERE variable_name IN ('mysql-monitor_connect_interval','mysql-monitor_ping_interval','mysql-monitor_read_only_interval');
admin@127.0.0.1 [(none)]>select * from global_variables where variable_name like 'mysql-monitor_%';
+-----------------------------------------------------+----------------+
| variable_name | variable_value |
+-----------------------------------------------------+----------------+
| mysql-monitor_enabled | true |
| mysql-monitor_connect_timeout | 600 |
| mysql-monitor_ping_max_failures | 3 |
| mysql-monitor_ping_timeout | 1000 |
| mysql-monitor_replication_lag_interval | 10000 |
| mysql-monitor_replication_lag_timeout | 1000 |
| mysql-monitor_groupreplication_healthcheck_interval | 5000 |
| mysql-monitor_groupreplication_healthcheck_timeout | 800 |
| mysql-monitor_username | monitor |
| mysql-monitor_password | monitor |
| mysql-monitor_query_interval | 60000 |
| mysql-monitor_query_timeout | 100 |
| mysql-monitor_slave_lag_when_null | 60 |
| mysql-monitor_wait_timeout | true |
| mysql-monitor_writer_is_also_reader | true |
| mysql-monitor_history | 600000 |
| mysql-monitor_connect_interval | 2000 |
| mysql-monitor_ping_interval | 2000 |
| mysql-monitor_read_only_interval | 2000 |
| mysql-monitor_read_only_timeout | 500 |
+-----------------------------------------------------+----------------+
admin@127.0.0.1 [(none)]>LOAD MYSQL VARIABLES TO RUNTIME;
admin@127.0.0.1 [(none)]>SAVE MYSQL VARIABLES TO DISK;
admin@127.0.0.1 [(none)]>show tables from monitor;
+------------------------------------+
| tables |
+------------------------------------+
| mysql_server_connect |
| mysql_server_connect_log |
| mysql_server_group_replication_log |
| mysql_server_ping |
| mysql_server_ping_log |
| mysql_server_read_only_log |
| mysql_server_replication_lag_log |
+------------------------------------+
admin@127.0.0.1 [(none)]>SELECT * FROM monitor.mysql_server_connect_log ORDER BY time_start_us DESC LIMIT 10;
+---------------+------+------------------+-------------------------+---------------+
| hostname | port | time_start_us | connect_success_time_us | connect_error |
+---------------+------+------------------+-------------------------+---------------+
| 192.168.91.23 | 3306 | 1495445436268761 | 1894 | NULL |
| 192.168.91.22 | 3306 | 1495445436267947 | 3301 | NULL |
| 192.168.91.23 | 3306 | 1495445434267631 | 601 | NULL |
| 192.168.91.22 | 3306 | 1495445434266684 | 1898 | NULL |
| 192.168.91.23 | 3306 | 1495445432267286 | 527 | NULL |
| 192.168.91.22 | 3306 | 1495445432266457 | 1646 | NULL |
+---------------+------+------------------+-------------------------+---------------+
admin@127.0.0.1 [(none)]>SELECT * FROM monitor.mysql_server_ping_log ORDER BY time_start_us DESC LIMIT 10;
+---------------+------+------------------+----------------------+------------+
| hostname | port | time_start_us | ping_success_time_us | ping_error |
+---------------+------+------------------+----------------------+------------+
| 192.168.91.23 | 3306 | 1495445542307107 | 147 | NULL |
| 192.168.91.22 | 3306 | 1495445542306299 | 504 | NULL |
| 192.168.91.23 | 3306 | 1495445540306625 | 173 | NULL |
| 192.168.91.22 | 3306 | 1495445540305786 | 596 | NULL |
| 192.168.91.23 | 3306 | 1495445538305981 | 165 | NULL |
+---------------+------+------------------+----------------------+------------+
admin@127.0.0.1 [(none)]>LOAD MYSQL SERVERS TO RUNTIME;
MySQL replication hostgroups
对应表 mysql_replication_hostgroups
表的作用:配置写组(比如1)和读组(比如2),ProxySQL会根据read_only参数把主机分配到对应的读组合写组中
如read_only=0 ,分配到hostgroup 1
如read_only=1 , 分配到 hostgroup 2
admin@127.0.0.1 [(none)]>INSERT INTO mysql_replication_hostgroups(writer_hostgroup,reader_hostgroup) VALUES (1,2);
admin@127.0.0.1 [(none)]>select * from mysql_replication_hostgroups;
+------------------+------------------+---------+
| writer_hostgroup | reader_hostgroup | comment |
+------------------+------------------+---------+
| 1 | 2 | NULL |
+------------------+------------------+---------+
#现在192.168.91.22是read_only=0,所以hostgroup_id=1:
admin@127.0.0.1 [(none)]>SELECT * FROM mysql_servers;
+--------------+---------------+------+--------+--------+-------------+-----------------+---------------------+---------+----------------+---------+
| hostgroup_id | hostname | port | status | weight | compression | max_connections | max_replication_lag | use_ssl | max_latency_ms | comment |
+--------------+---------------+------+--------+--------+-------------+-----------------+---------------------+---------+----------------+---------+
| 0 | 192.168.91.23 | 3306 | ONLINE | 1 | 0 | 1000 | 0 | 0 | 0 | |
| 1 | 192.168.91.22 | 3306 | ONLINE | 1 | 0 | 1000 | 0 | 0 | 0 | |
+--------------+---------------+------+--------+--------+-------------+-----------------+---------------------+---------+----------------+---------+
admin@127.0.0.1 [(none)]>load mysql servers to runtime;
root@localhost [(none)]>set global read_only=1;
admin@127.0.0.1 [(none)]>SELECT * FROM monitor.mysql_server_read_only_log ORDER BY time_start_us DESC LIMIT 10;
+---------------+------+------------------+-----------------+-----------+-------+
| hostname | port | time_start_us | success_time_us | read_only | error |
+---------------+------+------------------+-----------------+-----------+-------+
| 192.168.91.22 | 3306 | 1495449784913364 | 10240 | 1 | NULL |
| 192.168.91.22 | 3306 | 1495449782913147 | 3161 | 1 | NULL |
| 192.168.91.22 | 3306 | 1495449780912973 | 5600 | 1 | NULL |
| 192.168.91.22 | 3306 | 1495449778913003 | 8661 | 1 | NULL | |
+---------------+------+------------------+-----------------+-----------+-------+
#现在192.168.91.22是read_only=1,所以被分配到hostgroup_id=2:
admin@127.0.0.1 [(none)]>select * from mysql_servers;
+--------------+---------------+------+--------+--------+-------------+-----------------+---------------------+---------+----------------+---------+
| hostgroup_id | hostname | port | status | weight | compression | max_connections | max_replication_lag | use_ssl | max_latency_ms | comment |
+--------------+---------------+------+--------+--------+-------------+-----------------+---------------------+---------+----------------+---------+
| 0 | 192.168.91.23 | 3306 | ONLINE | 1 | 0 | 1000 | 0 | 0 | 0 | |
| 2 | 192.168.91.22 | 3306 | ONLINE | 1 | 0 | 1000 | 0 | 0 | 0 | |
+--------------+---------------+------+--------+--------+-------------+-----------------+---------------------+---------+----------------+---------+
admin@127.0.0.1 [(none)]>SAVE MYSQL SERVERS TO DISK;
admin@127.0.0.1 [(none)]>save mysql variables to disk;
mysql_users
admin>INSERT INTO mysql_users(username,password,default_hostgroup) VALUES ('user1','147258',0);
admin>INSERT INTO mysql_users(username,password,default_hostgroup) VALUES ('user2','147258',1);
admin>INSERT INTO mysql_users(username,password,default_hostgroup) VALUES ('user3','147258',2);
admin@127.0.0.1 [(none)]>load mysql users to runtime;
admin@127.0.0.1 [(none)]>save mysql users to disk;
#需要在数据库层面创建对应的用户名和密码才能登陆操作数据库:
root@localhost [(none)]>create user user1@'%' identified by '147258';
root@localhost [(none)]>grant all on *.* to user1@'%';
mysql -u user1 -p147258 -h 127.0.0.1 -P6033
user1@127.0.0.1 [testdb]>select @@hostname;
+------------+
| @@hostname |
+------------+
| Darren1 |
+------------+
#可以用sysbench做测试:
[root@Darren1 ~]# sysbench --time=20 --threads=4 --mysql-host=localhost --mysql-user=user1 --mysql-password='147258' --mysql-port=6033 --mysql-db=sbtest --tables=4 --table_size=1000 /home/mysql/sysbench-1.0.3/src/lua/oltp_read_write.lua prepare
[root@Darren1 ~]# sysbench --time=20 --threads=4 --mysql-host=localhost --mysql-user=user1 --mysql-password='147258' --mysql-port=6033 --mysql-db=sbtest --tables=4 --table_size=1000 /home/mysql/sysbench-1.0.3/src/lua/oltp_read_write.lua run
ProxySQL Statistics
ProxySQL可以通过stats库收集大量统计信息
admin@127.0.0.1 [(none)]>show tables from stats;
+-----------------------------------+
| tables |
+-----------------------------------+
| global_variables |
| stats_mysql_commands_counters |
| stats_mysql_connection_pool |
| stats_mysql_connection_pool_reset |
| stats_mysql_global |
| stats_mysql_processlist |
| stats_mysql_query_digest |
| stats_mysql_query_digest_reset |
| stats_mysql_query_rules |
| stats_mysql_users |
+-----------------------------------+
#stats.stats_mysql_connection_pool表:
admin@127.0.0.1 [(none)]>SELECT * FROM stats.stats_mysql_connection_pool;
+-----------+---------------+----------+--------+----------+----------+--------+---------+---------+-----------------+-----------------+------------+
| hostgroup | srv_host | srv_port | status | ConnUsed | ConnFree | ConnOK | ConnERR | Queries | Bytes_data_sent | Bytes_data_recv | Latency_us |
+-----------+---------------+----------+--------+----------+----------+--------+---------+---------+-----------------+-----------------+------------+
| 0 | 192.168.91.23 | 3306 | ONLINE | 0 | 0 | 0 | 22 | 0 | 0 | 0 | 168 |
| 2 | 192.168.91.22 | 3306 | ONLINE | 0 | 0 | 0 | 0 | 0 | 0 | 0 | 926 |
| 1 | 192.168.91.22 | 3306 | ONLINE | 0 | 0 | 0 | 176 | 0 | 0 | 0 | 926 |
+-----------+---------------+----------+--------+----------+----------+--------+---------+---------+-----------------+-----------------+------------+
#stats_mysql_commands_counters表:
作用:
returns detailed information about the type of statements executed, and the distribution of execution time!
#统计一些sql的操作:
admin@127.0.0.1 [(none)]>select * from stats_mysql_commands_counters;
+-------------------+---------------+-----------+-----------+-----------+---------+---------+----------+----------+-----------+-----------+--------+--------+---------+----------+
| Command | Total_Time_us | Total_cnt | cnt_100us | cnt_500us | cnt_1ms | cnt_5ms | cnt_10ms | cnt_50ms | cnt_100ms | cnt_500ms | cnt_1s | cnt_5s | cnt_10s | cnt_INFs |
+-------------------+---------------+-----------+-----------+-----------+---------+---------+----------+----------+-----------+-----------+--------+--------+---------+----------+
| ALTER_TABLE | 0 | 0 | 0 | 0 | 0 | 0 | 0 | 0 | 0 | 0 | 0 | 0 | 0 | 0 |
| ALTER_VIEW | 0 | 0 | 0 | 0 | 0 | 0 | 0 | 0 | 0 | 0 | 0 | 0 | 0 | 0 |
| ANALYZE_TABLE | 0 | 0 | 0 | 0 | 0 | 0 | 0 | 0 | 0 | 0 | 0 | 0 | 0 | 0 |
| BEGIN | 0 | 0 | 0 | 0 | 0 | 0 | 0 | 0 | 0 | 0 | 0 | 0 | 0 | 0 |
| CALL | 0 | 0 | 0 | 0 | 0 | 0 | 0 | 0 | 0 | 0 | 0 | 0 | 0 | 0 |
| CHANGE_MASTER | 0 | 0 | 0 | 0 | 0 | 0 | 0 | 0 | 0 | 0 | 0 | 0 | 0 | 0 |
| COMMIT | 0 | 0 | 0 | 0 | 0 | 0 | 0 | 0 | 0 | 0
...........
#stats_mysql_query_digest查看执行过的查询操作
admin@127.0.0.1 [(none)]>SELECT * FROM stats_mysql_query_digest ORDER BY sum_time DESC;
+-----------+--------------------+----------+--------------------+-----------------------------------+------------+------------+------------+----------+----------+----------+
| hostgroup | schemaname | username | digest | digest_text | count_star | first_seen | last_seen | sum_time | min_time | max_time |
+-----------+--------------------+----------+--------------------+-----------------------------------+------------+------------+------------+----------+----------+----------+
| 0 | information_schema | user1 | 0x1E092DAEFFBBF262 | select ? | 1 | 1495462584 | 1495462584 | 111316 | 111316 | 111316 |
| 0 | testdb | user1 | 0x3765930C7143F468 | select * from t1 | 1 | 1495462644 | 1495462644 | 101438 | 101438 | 101438 |
| 0 | information_schema | user1 | 0x99531AEFF718C501 | show tables | 2 | 1495462594 | 1495
.......
#查询表stats_mysql_query_digest_reset的作用就是把表stats_mysql_query_digest清空
admin@127.0.0.1 [(none)]>select * from stats_mysql_query_digest_reset;
admin@127.0.0.1 [(none)]>select * from stats_mysql_query_digest;
Empty set (0.00 sec)
路由规则(MySQL Query Rules)
表: mysql_query_rules
作用:控制读写分离
表中:apply=1 means that no further rules are checked if there is a match
#创建一个rule:表示SELECT * FROM t1$开头的SQL语句会通过hostgroup为0的主机执行:
admin@127.0.0.1 [(none)]>INSERT INTO mysql_query_rules (rule_id,active,username,match_digest,destination_hostgroup,apply) VALUES (10,1,'user1','^SELECT * FROM t1$',0,1);
admin@127.0.0.1 [(none)]>LOAD MYSQL QUERY RULES TO RUNTIME;
[root@Darren1 lua]# mysql -u user1 -p147258 -h 127.0.0.1 -P6033
user1@127.0.0.1 [testdb]>select * from t1;
#可以看到前面的select语句分配到hostgroup为0的服务器上:
admin@127.0.0.1 [(none)]>SELECT hostgroup hg, sum_time, count_star, digest_text FROM stats_mysql_query_digest ORDER BY sum_time DESC;
+----+----------+------------+------------------+
| hg | sum_time | count_star | digest_text |
+----+----------+------------+------------------+
| 0 | 716 | 1 | select * from t1 |
+----+----------+------------+------------------+
免责声明:本站发布的内容(图片、视频和文字)以原创、转载和分享为主,文章观点不代表本网站立场,如果涉及侵权请联系站长邮箱:is@yisu.com进行举报,并提供相关证据,一经查实,将立刻删除涉嫌侵权内容。


