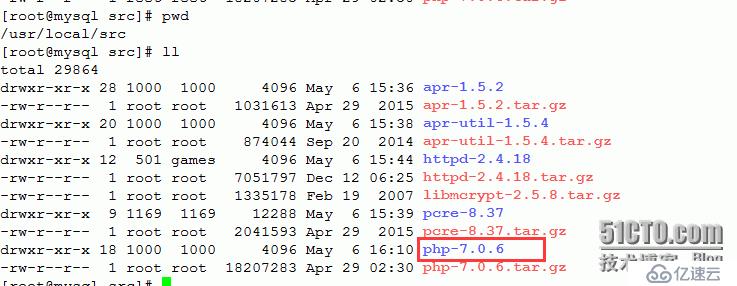
apache 2.4.18
先安装apr,apr-util,和pcre
# tar xvf apr-1.5.2.tar.gz
# cd apr-1.5.2
# ./configure --prefix=/usr/local/apr && make && make install
2、安装apr-util
# tar xvf apr-util-1.5.4.tar.bz2
# cd apr-util-1.5.4
# ./configure --prefix=/usr/local/apr-util --with-apr=/usr/local/apr && make && make install
3、安装pcre
# tar xvf pcre-8.37.tar.bz2
# cd pcre-8.37
# ./configure --prefix=/usr/local/pcre && make && make install
4.安装httpd
./configure \
--prefix=/usr/local/apache \
--enable-so \
--enable-ssl \
--enable-cgi \
--with-rewrite \
--with-zlib \
--with-pcre=/usr/local/pcre \
--with-apr=/usr/local/apr \
--with-apr-util=/usr/local/apr-util \
--enable-mpms-shared=all \
--with-mpm=prefork \
--enable-proxy \
--enable-proxy-http \
--enable-proxy-ajp \
--enable-proxy-balancer \
--enable-lbmethod-heartbeat \
--enable-heartbeat \
--enable-slotmem-shm \
--enable-slotmem-plain \
--enable-watchdog
上面比较重要的就是指定 几个路径,apr,apr-util,pcre
另外一个是,--with-mpm=prefork 以及--enable-so
5、添加PATH环境变量
# cat /etc/profile.d/apache.sh
# export PATH=$PATH:/usr/local/apache/bin
# . /etc/profile.d/apache.sh
6、编辑配置httpd.conf配置文件
# vim /usr/local/apache/conf/httpd.conf
#取消注释,否则启动会报下面的错误
LoadModule slotmem_shm_module modules/mod_slotmem_shm.so
error:
tailf /usr/local/apache/logs/error_log
[Thu Feb 04 10:36:40.825258 2016] [proxy_balancer:emerg] [pid 61695:tid 139808143390464] AH01177: Failed to lookup provider 'shm' for 'slotmem': is mod_slotmem_shm loaded??
[Thu Feb 04 10:36:40.825457 2016] [:emerg] [pid 61695:tid 139808143390464] AH00020: Configuration Failed, exiting
7、编写启动脚本,方便开机自启动
#!/bin/bash
#
# httpd        Startup script for the Apache HTTP Server
#
# chkconfig: - 85 15
# description: Apache is a World Wide Web server.  It is used to serve \
#       HTML files and CGI.
# processname: httpd
# config: /etc/httpd/conf/httpd.conf
# config: /etc/sysconfig/httpd
# pidfile: /var/run/httpd.pid
# Source function library.
. /etc/rc.d/init.d/functions
if [ -f /etc/sysconfig/httpd ]; then
        . /etc/sysconfig/httpd
fi
# Start httpd in the C locale by default.
HTTPD_LANG=${HTTPD_LANG-"C"}
# This will prevent initlog from swallowing up a pass-phrase prompt if
# mod_ssl needs a pass-phrase from the user.
INITLOG_ARGS=""
# Set HTTPD=/usr/sbin/httpd.worker in /etc/sysconfig/httpd to use a server
# with the thread-based "worker" MPM; BE WARNED that some modules may not
# work correctly with a thread-based MPM; notably PHP will refuse to start.
# Path to the apachectl script, server binary, and short-form for messages.
apachectl=/usr/local/apache/bin/apachectl
httpd=${HTTPD-/usr/local/apache/bin/httpd}
prog=httpd
pidfile=${PIDFILE-/var/run/httpd.pid}
lockfile=${LOCKFILE-/var/lock/subsys/httpd}
RETVAL=0
start() {
        echo -n $"Starting $prog: "
        LANG=$HTTPD_LANG daemon --pidfile=${pidfile} $httpd $OPTIONS
        RETVAL=$?
        echo
        [ $RETVAL = 0 ] && touch ${lockfile}
        return $RETVAL
}
stop() {
echo -n $"Stopping $prog: "
killproc -p ${pidfile} -d 10 $httpd
RETVAL=$?
echo
[ $RETVAL = 0 ] && rm -f ${lockfile} ${pidfile}
}
reload() {
    echo -n $"Reloading $prog: "
    if ! LANG=$HTTPD_LANG $httpd $OPTIONS -t >&/dev/null; then
        RETVAL=$?
        echo $"not reloading due to configuration syntax error"
        failure $"not reloading $httpd due to configuration syntax error"
    else
        killproc -p ${pidfile} $httpd -HUP
        RETVAL=$?
    fi
    echo
}
# See how we were called.
case "$1" in
  start)
start
;;
  stop)
stop
;;
  status)
        status -p ${pidfile} $httpd
RETVAL=$?
;;
  restart)
stop
start
;;
  condrestart)
if [ -f ${pidfile} ] ; then
stop
start
fi
;;
  reload)
        reload
;;
  graceful|help|configtest|fullstatus)
$apachectl $@
RETVAL=$?
;;
  *)
echo $"Usage: $prog {start|stop|restart|condrestart|reload|status|fullstatus|graceful|help|configtest}"
exit 1
esac
exit $RETVAL
重要的是指定这几个文件的路径就OK了,一定要是你安装的路径:
apachectl=/usr/local/apache/bin/apachectl
httpd=${HTTPD-/usr/local/apache/bin/httpd}
prog=httpd
pidfile=${PIDFILE-/var/run/httpd.pid}
8.httpd.pid文件
因为自启动脚本中httpd的pid配置在/var/run/httpd.pid下面,所以还需要修改httpd.conf的配置文件
vim /usr/local/apache/conf/httpd.conf
PidFile "/var/run/httpd.pid"
加完以后,在/var/run/httpd.pid建立一个这个文件,设置好读写权限。
然后重启pc,因为偶尔会有不重启,无法用service httpd stop关闭httpd进程。
重启一下就OK了。
httpd到这里结束了
记得检查httpd.conf里是否有这行:
LoadModule php7_module modules/libphp7.so
=====================================================================
PHP 7的安装:
安装openssl组件,否则会报 ssl too old故障
yum -y openssl-devel
2.安装其他必须组件
yum -y install libxml2 libxml2-devel openssl openssl-devel curl-devel libjpeg-devel libpng-devel freetype-devel libmcrypt-devel
3.编译
./configure \
--prefix=/usr/local/php7 \
--with-config-file-path=/usr/local/php7/etc \
--with-config-file-scan-dir=/usr/local/php7/etc/php.d \
--with-apxs2=/usr/local/apache/bin/apxs \
--with-mcrypt=/usr/include \
--enable-mysqlnd \
--with-mysqli \
--with-pdo-mysql \
--enable-fpm \
--with-gd \
--with-iconv \
--with-zlib \
--enable-xml \
--enable-shmop \
--enable-sysvsem \
--enable-inline-optimization \
--enable-mbregex \
--enable-exif \
--enable-mbstring \
--enable-ftp \
--enable-gd-native-ttf \
--with-openssl \
--enable-pcntl \
--enable-sockets \
--with-xmlrpc \
--enable-zip \
--enable-soap \
--without-pear \
--with-gettext \
--enable-session \
--with-curl \
--with-jpeg-dir \
--with-freetype-dir \
--enable-opcache \
--disable-fileinfo
比较重要的有这几个:
(1):必须加,记得检查/usr/local/apache/bin/有apxs这个文件
--with-apxs2=/usr/local/apache/bin/apxs \
(2):这几个根据程序员具体需求加上
--enable-exif \
--enable-mbstring \
--with-gd \
然后就是
make && make install了
4.配置文件
进入php源码的解压包:
cp php.ini-production /usr/local/php7/etc/php.ini  #在源文件目录下
cp sapi/fpm/init.d.php-fpm /etc/init.d/php-fpm   #在源文件目录下
cp /usr/local/php7/etc/php-fpm.conf.default /usr/local/php7/etc/php-fpm.conf
cp /usr/local/php7/etc/php-fpm.d/www.conf.default /usr/local/php7/etc/php-fpm.d/www.conf
5.添加系统变量:
echo -e '\nexport PATH=/usr/local/php7/bin:/usr/local/php7/sbin:$PATH\n' >> /etc/profile && source /etc/profile
设置PHP日志目录和php-fpm进程文件(php-fpm.sock)目录:
mkdir -p /var/log/php-fpm/ && mkdir -p /var/run/php-fpm && cd /var/run/ && chown -R nginx:nginx php-fpm
mkdir -p /var/lib/php/session
chown -R nginx:nginx /var/lib/php
6.设置开机启动
chmod +x /etc/init.d/php-fpm
chkconfig --add php-fpm
chkconfig php-fpm on
7.启动服务
service php-fpm start
netstat -tlunp看80和9000端口是否开开了。
=================================
整合PHP7和apache
在/usr/local/apache/conf/httpd.conf末尾加上两行:
AddType application/x-httpd-php .php
PHPIniDir "/usr/local/php7/"
在此处后加上index.php索引文件:
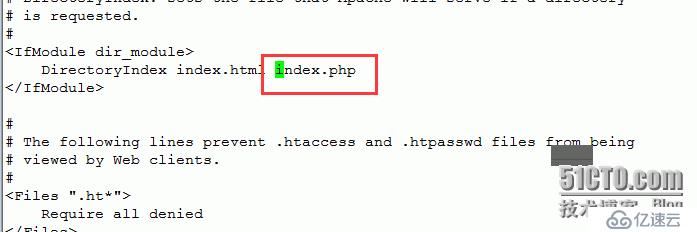
重启一下apache就OK了。
免责声明:本站发布的内容(图片、视频和文字)以原创、转载和分享为主,文章观点不代表本网站立场,如果涉及侵权请联系站长邮箱:is@yisu.com进行举报,并提供相关证据,一经查实,将立刻删除涉嫌侵权内容。


